2024 - Food
Last updated on December 01, 2024 by Fitness Goal 4U

“Confidence comes from discipline and training.” – Robert Kiyosaki
Leg workouts are crucial for overall fitness, strength, and mobility. They target the major muscle groups in the lower body, including the quadriceps, hamstrings, glutes, and calves. Incorporating leg exercises into your fitness routine not only helps in building muscle mass and strength but also enhances balance, coordination, and athletic performance. Strong legs support daily activities such as walking, running, and climbing stairs, and contribute to better posture and reduced risk of injuries.
A well-rounded leg workout routine should include a mix of compound movements and isolation exercises. Compound exercises like squats, deadlifts, and lunges engage multiple muscle groups and joints, promoting functional strength and stability. Isolation exercises like leg extensions, hamstring curls, and calf raises specifically target individual muscles, allowing for focused muscle growth and definition. Plyometric exercises like box jumps add an element of explosive power and agility training.
Integrating these diverse exercises ensures comprehensive lower body development, leading to improved overall fitness and performance.
Top 10 Leg Workouts
1. Squats

Squats are a fundamental lower body exercise that primarily targets the quadriceps, hamstrings, glutes, and core. They are essential for building strength, muscle mass, and improving overall lower body function. Squats can be performed with or without weights and have many variations to suit different fitness levels and goals.
How to Do
- Stand with feet shoulder-width apart.
- Lower hips back and down.
- Keep chest up and back straight.
- Push through heels to stand up.
Tips
- Keep heels on the ground.
- Engage your core.
2. Lunges

Lunges are a versatile lower body exercise that targets the quadriceps, glutes, hamstrings, and calves. They help improve balance, coordination, and overall leg strength. Lunges can be performed in various directions (forward, reverse, side) and can be modified with weights for added resistance.
How to Do
- Stand with feet together.
- Step forward with one leg.
- Lower hips until both knees are at 90 degrees.
- Push back to starting position.
Tips
- Keep your torso upright.
- Ensure front knee is above ankle.
3. Deadlifts
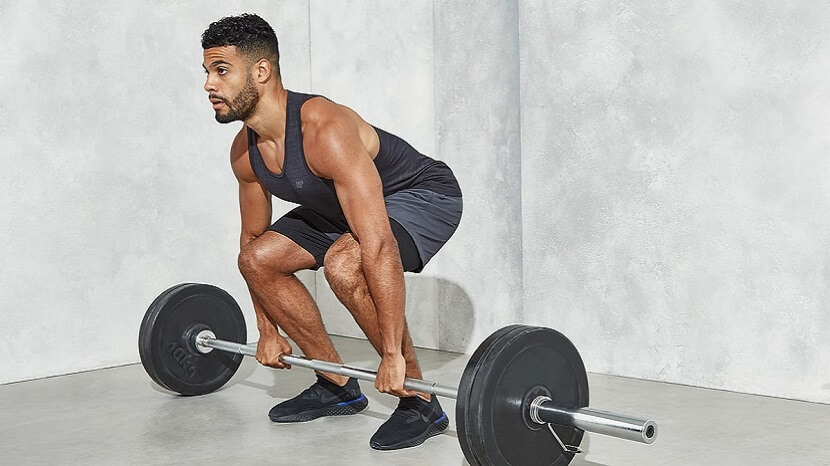
Deadlifts are a compound exercise that targets the posterior chain, including the hamstrings, glutes, lower back, and core. They are highly effective for building strength, improving posture, and enhancing overall athletic performance. Deadlifts can be performed with various equipment, such as barbells, dumbbells, or kettlebells, and have several variations to target different muscles.
How to Do
- Stand with feet hip-width apart.
- Bend at hips and knees to grasp barbell.
- Lift by extending hips and knees.
- Lower bar back down.
Tips
- Keep back straight.
- Engage your core.
4. Leg Press

The leg press is a machine-based exercise that primarily targets the quadriceps, glutes, and hamstrings. It is a great alternative to squats for those who may have lower back issues or want to isolate their leg muscles more effectively. The leg press allows for controlled movement and the ability to lift heavier weights with a lower risk of injury.
How to Do
- Sit on leg press machine.
- Place feet shoulder-width apart on platform.
- Push platform away by extending legs.
- Lower back to starting position.
Tips
- Keep feet flat.
- Avoid locking knees.
5. Step-Ups

Step-ups are a functional lower body exercise that primarily targets the quadriceps, glutes, and hamstrings. They mimic everyday activities such as climbing stairs and are excellent for building strength, improving balance, and enhancing coordination. Step-ups can be performed with bodyweight or added resistance such as dumbbells or barbells.
How to Do
- Stand facing a bench.
- Step onto bench with one foot.
- Push through heel to lift body.
- Step back down and repeat.
Tips
- Keep torso upright.
- Engage your core.
6. Calf Raises

Calf raises are an effective exercise for targeting the muscles in the lower legs, specifically the gastrocnemius and soleus muscles of the calves. They help build strength, endurance, and definition in the calves, which is important for activities such as running, jumping, and overall lower body stability. Calf raises can be performed using bodyweight, dumbbells, barbells, or on a calf raise machine.
How to Do
- Stand with balls of feet on a step.
- Raise heels as high as possible.
- Lower heels back down.
Tips
- Use full range of motion.
- Control the movement.
7. Glute Bridges

Glute bridges are a highly effective exercise targeting the glutes, hamstrings, and core. They help build strength and endurance in the lower body, improve hip mobility, and enhance overall stability. Glute bridges can be performed using bodyweight or with added resistance such as dumbbells, barbells, or resistance bands.
How to Do
- Lie on your back with knees bent.
- Lift hips until body forms a straight line.
- Lower back down.
Tips
- Squeeze glutes at the top.
- Keep core engaged.
8. Hamstring Curls

Hamstring curls are an isolation exercise that primarily targets the hamstring muscles at the back of the thighs. They help build strength, increase muscle mass, and improve overall leg function and stability. Hamstring curls can be performed using various equipment, such as machines, resistance bands, or stability balls.
How to Do
- Lie face down on hamstring curl machine.
- Curl legs up towards buttocks.
- Lower legs back down.
Tips
- Use controlled motion.
- Avoid using momentum.
9. Leg Extensions

Leg extensions are an isolation exercise that primarily targets the quadriceps muscles at the front of the thighs. They are performed using a leg extension machine and are excellent for building strength and muscle mass in the quadriceps. This exercise is particularly useful for defining the muscles of the front thighs and improving knee stability.
How to Do
- Sit on leg extension machine.
- Extend legs fully.
- Lower back to starting position.
Tips
- Avoid locking knees.
- Control the movement.
10. Box Jumps

Box jumps are a plyometric exercise that involves jumping from the ground onto a sturdy elevated surface, such as a box or platform. This exercise primarily targets the quadriceps, glutes, hamstrings, and calves, while also engaging the core. Box jumps are excellent for developing explosive power, improving agility, and enhancing overall athletic performance.
How to Do
- Stand facing a box.
- Jump onto the box, landing softly.
- Step or jump back down.
Tips
- Use arms for momentum.
- Land with knees slightly bent.
FAQs (Frequently Asked Questions)
1. Why are leg workouts important?
Answer : Leg workouts are essential for building lower body strength, muscle mass, and endurance. They improve overall athletic performance, enhance balance and coordination, and support daily functional movements like walking and climbing stairs.
2. How often should I do leg workouts?
Answer : It is recommended to do leg workouts 2-3 times per week, allowing at least 48 hours of rest between sessions to promote muscle recovery and growth.
3. Can I do leg workouts at home?
Answer : Yes, many leg exercises can be performed at home with minimal equipment. Bodyweight exercises like squats, lunges, and glute bridges are effective, and adding resistance bands or dumbbells can increase the intensity.
4. What are the best exercises for building leg strength?
Answer : Key exercises for building leg strength include squats, deadlifts, lunges, leg press, and step-ups. These compound movements engage multiple muscle groups for comprehensive strength development.
5. How can I prevent injuries during leg workouts?
Answer : To prevent injuries, ensure proper form and technique, warm up before exercising, start with lighter weights to master the movements, and gradually increase intensity. Also, incorporate stretching and mobility exercises to maintain flexibility.
6. Should I use weights for leg workouts?
Answer : Using weights can enhance muscle growth and strength. Start with bodyweight exercises to master the form, then gradually add weights such as dumbbells, barbells, or resistance bands to increase the challenge.
7. Can leg workouts help with weight loss?
Answer : Yes, leg workouts can help with weight loss by burning calories and building muscle mass, which increases metabolic rate. Compound exercises like squats and deadlifts are particularly effective for calorie burn.
8. How can I target different parts of my legs?
Answer : Varying your exercises can target different parts of your legs. Squats and leg presses primarily target the quadriceps, while deadlifts and hamstring curls focus on the hamstrings. Glute bridges and step-ups emphasize the glutes, and calf raises target the calf muscles.
9. Is it normal to feel sore after leg workouts?
Answer : Yes, it's common to feel sore after leg workouts, especially if you're new to exercise or have increased the intensity. This is known as delayed onset muscle soreness (DOMS) and typically subsides within a few days.
10. Can I do leg workouts if I have knee pain?
Answer : If you have knee pain, it's important to choose low-impact exercises and consult with a healthcare professional. Exercises like glute bridges, leg presses, and hamstring curls can often be performed with minimal knee stress.
Conclusion
Leg workouts are fundamental for achieving balanced fitness, strength, and mobility. Incorporating a variety of exercises such as squats, lunges, deadlifts, and calf raises ensures comprehensive development of the lower body muscles. Regular leg training enhances athletic performance, supports daily activities, and reduces the risk of injuries. Whether performed at home or in the gym, leg workouts can be tailored to all fitness levels with bodyweight or added resistance. Prioritizing proper form, gradual progression, and adequate recovery will lead to significant improvements in lower body strength, muscle mass, and overall physical health.
You might also like our weight loss articles.
“Motivation is what gets you started. Habit is what keeps you going.” – Jim Ryun
If you would like more information about the 2024, please send us an email.

Written by Fitness Goal 4U
Smart Fitness Goals - Achieve Health with Simple Steps
Smart fitness goals focus on being Specific, Measurable, Achievable, Relevant, and Time-bound. They help you create a clear path to success, stay motivated, and track progress. Whether its weight loss, strength building, or improved endurance, smart goals guide your fitness journey, ensuring steady growth and sustainable results tailored to your needs.
“Confidence comes from discipline and training.” – Robert Kiyosaki
A well-developed chest is often a focal point in building a strong and balanced upper body. The chest muscles, primarily the pectoralis major, contribute not only to aesthetics but also to essential functional movements in daily life and athletic activities. The best chest workouts incorporate a variety of exercises that target different parts of the chest, ensuring comprehensive muscle development. From foundational exercises like the barbell bench press and push-ups to more specialized movements like incline bench presses and cable crossovers, these workouts cater to all fitness levels. This collection of the top 10 chest exercises provides a balanced approach, combining compound movements for overall strength with isolation exercises for targeted muscle engagement. Whether you're aiming to increase muscle mass, improve definition, or enhance upper body strength, these exercises offer a versatile and effective routine to help you achieve your fitness goals.
Best 10 Chest Workouts
1. Barbell Bench Press

The barbell bench press is a staple exercise in strength training and bodybuilding routines, primarily targeting the chest muscles, but also engaging the shoulders and triceps. It's known for its effectiveness in building upper body strength and mass.
How to Do
- Lie on a flat bench with your feet flat on the floor.
- Grip the barbell slightly wider than shoulder-width apart.
- Lower the barbell to your chest, then press it back up until your arms are fully extended.
Tips and Tricks
- Keep your back flat on the bench.
- Avoid bouncing the bar off your chest.
- Use a spotter for heavy weights.
2. Dumbbell Bench Press

The dumbbell bench press is a versatile and effective exercise that targets the chest muscles while also engaging the shoulders and triceps. It allows for a greater range of motion compared to the barbell bench press and can help improve muscle symmetry and coordination.
How to Do
- Lie on a flat bench with a dumbbell in each hand.
- Position the dumbbells at shoulder level, palms facing forward.
- Press the dumbbells upward until your arms are fully extended, then lower them back down.
Tips and Tricks
- Control the weight throughout the movement.
- Maintain a neutral wrist position.
- Don't let your elbows flare out too much.
3. Incline Bench Press

The incline bench press is a variation of the bench press that targets the upper portion of the chest muscles (pectoralis major), while also engaging the shoulders and triceps. This exercise is performed on a bench set at an incline, typically between 30-45 degrees.
How to Do
- Set the bench at a 30-45 degree angle.
- Perform the exercise similarly to the barbell bench press.
Tips and Tricks
- Keep the movement controlled and steady.
- Focus on contracting your chest muscles.
4. Decline Bench Press

The decline bench press is a variation of the bench press that primarily targets the lower portion of the chest muscles (pectoralis major). It also engages the shoulders and triceps, but with a unique angle that emphasizes the lower chest.
How to Do
- Lie on a decline bench.
- Perform the exercise similarly to the barbell bench press.
Tips and Tricks
- Ensure the bench angle isn't too steep.
- Keep your feet secured.
5. Chest Dips

Chest dips are a bodyweight exercise that effectively targets the lower part of the chest, as well as the triceps and shoulders. They are performed using parallel bars and can be a powerful addition to any chest workout routine.
How to Do
- Use parallel bars, gripping them firmly.
- Lower your body by bending your elbows until your upper arms are parallel to the ground.
- Push back up to the starting position.
Tips and Tricks
- Lean slightly forward to target the chest more.
- Keep your elbows close to your body.
6. Push-Ups

Push-ups are a fundamental bodyweight exercise that primarily targets the chest muscles, while also engaging the shoulders, triceps, and core. They are versatile, requiring no equipment, and can be performed almost anywhere.
How to Do
- Start in a plank position with hands placed slightly wider than shoulder-width.
- Lower your body until your chest nearly touches the floor.
- Push back up to the starting position.
Tips and Tricks
- Keep your body in a straight line.
- Engage your core throughout the movement.
- Vary hand placement to target different areas of the chest.
7. Dumbbell Flyes

Dumbbell flyes are an isolation exercise that targets the chest muscles, focusing on stretching and contracting the pectorals. This exercise is great for increasing muscle definition and flexibility in the chest area.
How to Do
- Lie on a flat bench with a dumbbell in each hand.
- Extend your arms above your chest, palms facing each other.
- Lower the dumbbells in a wide arc until you feel a stretch in your chest.
- Bring them back up to the starting position.
Tips and Tricks
- Maintain a slight bend in your elbows.
- Keep the movement slow and controlled.
8. Cable Crossovers

Cable crossovers are an effective isolation exercise for the chest, focusing on the inner pectoral muscles. This exercise is performed using a cable machine, providing constant tension throughout the movement for optimal muscle engagement.
How to Do
- Stand between two cable machines with handles at shoulder height.
- Pull the handles down and together in front of your chest.
- Return to the starting position.
Tips and Tricks
- Keep your movements controlled.
- Focus on squeezing your chest muscles.
9. Pec Deck Machine

The pec deck machine is an isolation exercise that focuses on the pectoral muscles, specifically targeting the chest. It allows for a controlled and consistent movement, making it an excellent choice for both beginners and advanced lifters looking to improve chest muscle definition and strength.
How to Do
- Sit on the machine with your back flat against the pad.
- Grip the handles and bring them together in front of your chest.
- Slowly return to the starting position.
Tips and Tricks
- Adjust the seat height so your upper arms are parallel to the floor.
- Avoid letting the weights touch between reps.
10. Smith Machine Bench Press

The Smith machine bench press is a variation of the traditional bench press performed on a Smith machine, which provides a fixed bar path. This exercise targets the chest muscles, shoulders, and triceps, and is often used for its safety and stability features, making it suitable for both beginners and advanced lifters.
How to Do
- Perform the bench press using the Smith Machine for added stability.
Tips and Tricks
- Focus on form and control.
- Use the safety stops to prevent injury.
General Tips for Chest Workouts
1. Warm-up: Always warm up before starting your workout to prevent injuries.
2. Progressive Overload: Gradually increase the weight and intensity of your workouts to continue making gains.
3. Proper Form: Prioritize proper form over lifting heavier weights to avoid injury.
4. Rest and Recovery: Allow adequate rest between workouts for muscle recovery and growth.
5. Balanced Training: Ensure you’re also working other muscle groups to avoid imbalances.
FAQs
1. What are the benefits of chest workouts?
Answer : Chest workouts help build and strengthen the pectoral muscles, improve upper body strength, enhance overall aesthetics, and contribute to better posture and functional movements.
2. How often should I train my chest?
Answer : It's generally recommended to train your chest 1-2 times per week, allowing at least 48 hours of rest between sessions to ensure adequate recovery and muscle growth.
3. What exercises are best for building a bigger chest?
Answer : Compound exercises like the barbell bench press, incline bench press, and push-ups are great for building mass and strength. Isolation exercises like dumbbell flyes and cable crossovers help in defining and sculpting the chest muscles.
4. Should I use free weights or machines for chest workouts?
Answer : Both free weights and machines have their benefits. Free weights allow for a greater range of motion and engage stabilizer muscles, while machines provide stability and can help with controlled movements and targeting specific muscle groups.
5. How can I target the upper chest?
Answer : Incline bench press, incline dumbbell press, and incline cable flyes are effective exercises for targeting the upper chest.
6. Can I work out my chest at home without equipment?
Answer : Yes, bodyweight exercises like push-ups and variations (wide grip, diamond, incline, decline) are effective for working out the chest at home.
7. How many sets and reps should I do for chest exercises?
Answer : A typical range is 3-4 sets of 8-12 reps for muscle growth. For strength, 4-6 sets of 4-6 reps with heavier weights are recommended.
8. How can I prevent shoulder pain during chest workouts?
Answer : Focus on proper form, avoid overextending your elbows, and don't lift too heavy without proper warm-up. Strengthening the rotator cuff and shoulder muscles can also help prevent pain.
9. Do I need a spotter for chest workouts?
Answer : It's advisable to use a spotter when lifting heavy weights, especially during exercises like the bench press, to ensure safety and assist in case of muscle failure.
Conclusion
In conclusion, chest workouts are a crucial component of a balanced and effective fitness routine. They not only contribute to a well-defined and powerful upper body but also play a vital role in overall strength and functional performance. By incorporating a variety of exercises, such as compound movements like bench presses and push-ups, alongside isolation exercises like dumbbell flyes and cable crossovers, individuals can target all areas of the chest for comprehensive muscle development. Remember to prioritize proper form, progressively increase intensity, and allow adequate recovery time between workouts to maximize results. Whether you’re aiming to build muscle, improve strength, or enhance athletic performance, a well-structured chest workout regimen can help you achieve your fitness goals and maintain a healthy, strong physique.
You might also like our weight loss articles.
“Motivation is what gets you started. Habit is what keeps you going.” – Jim Ryun
If you would like more information about the 2024, please send us an email.
Written by Fitness Goal 4U
Smart Fitness Goals - Achieve Health with Simple Steps
Smart fitness goals focus on being Specific, Measurable, Achievable, Relevant, and Time-bound. They help you create a clear path to success, stay motivated, and track progress. Whether its weight loss, strength building, or improved endurance, smart goals guide your fitness journey, ensuring steady growth and sustainable results tailored to your needs.
“Confidence comes from discipline and training.” – Robert Kiyosaki
Achieving defined abs is not just about exercise; it's largely influenced by what you eat. The saying "abs are made in the kitchen" emphasizes the importance of diet in uncovering a toned midsection. To reveal those hard-earned abs, it's crucial to consume the right foods while avoiding those that hinder progress. Focus on whole, nutrient-dense foods like lean proteins, leafy greens, and healthy fats that promote fat loss and muscle definition. At the same time, cutting out processed foods, refined sugars, and excess carbs can prevent unwanted fat storage. A balanced diet not only helps shed fat but also fuels your workouts, supports recovery, and sustains energy levels throughout the day. This guide will help you make smart food choices to optimize your nutrition, ensuring your kitchen habits work hand in hand with your fitness routine for the best results.
Foods to eat for abs made in kitchen
To achieve visible abs through diet, focus on consuming foods that support muscle growth, fat loss, and overall health. Here are some key foods to include:
1. Lean Proteins:
- Chicken breast
- Turkey
- Fish (salmon, tuna)
- Eggs
- Greek yogurt
- Tofu and tempeh
2. Healthy Fats:
- Avocados
- Nuts (almonds, walnuts)
- Seeds (chia, flax, sunflower)
- Olive oil
- Fatty fish (sardines, mackerel)
3. Complex Carbohydrates:
- Whole grains (quinoa, brown rice, oats)
- Sweet potatoes
- Legumes (lentils, chickpeas, black beans)
- Vegetables (broccoli, spinach, kale)
4. Fiber-Rich Foods:
- Fruits (berries, apples, oranges)
- Vegetables (carrots, Brussels sprouts, bell peppers)
- Whole grains
5. Hydration:
- Water
- Green tea
- Herbal teas
Foods to avoid for abs made in kitchen
To achieve and maintain visible abs, it's important to avoid certain foods that can lead to weight gain and increase body fat. Here are some foods to avoid:
1. Sugary Foods and Drinks:
- Sodas
- Candy
- Pastries
- Ice cream
- Sweetened cereals
- Fruit juices with added sugar
2. Processed Foods:
- Fast food
- Frozen dinners
- Packaged snacks (chips, crackers)
- Processed meats (bacon, sausages)
- Instant noodles
3. Refined Carbohydrates:
- White bread
- White rice
- Pasta made from refined flour
- Sugary breakfast cereals
4. Unhealthy Fats:
- Trans fats (found in some margarines, baked goods, and fried foods)
- Saturated fats in excessive amounts (found in fatty cuts of meat, butter, and full-fat dairy products)
5. Alcohol:
- Beer
- Wine
- Spirits (especially when mixed with sugary drinks)
6. High-Calorie Snacks:
- Potato chips
- Cookies
- Doughnuts
FAQs ( Frequently Asked Questions )
1. Why is diet important for achieving visible abs?
Answer : Diet plays a crucial role in reducing overall body fat, which is necessary for revealing the abdominal muscles. Even with strong abs, a layer of fat can hide them.
2. What foods should I eat to help build abs?
Answer : Focus on lean proteins (like chicken, fish, and tofu), healthy fats (such as avocados, nuts, and olive oil), complex carbohydrates (such as whole grains and vegetables), and fiber-rich foods (like fruits and vegetables).
3. Which foods should I avoid to get visible abs?
Answer : Avoid sugary foods and drinks, processed foods, refined carbohydrates, unhealthy fats, and excessive alcohol. These can contribute to fat gain and hinder your progress.
4. Can I get abs just by eating right, without exercise?
Answer : While diet is crucial, combining it with regular exercise, especially core-strengthening exercises, is essential for developing and maintaining visible abs.
5. How often should I work out my abs?
Answer : Aim to work your abs 3-4 times a week. Allowing rest days in between helps in muscle recovery and growth.
6. What are some effective ab exercises?
Answer : Effective exercises include planks, bicycle crunches, leg raises, Russian twists, mountain climbers, flutter kicks, sit-ups, and toe touches.
7. How long will it take to see results?
Answer : The time it takes to see results varies depending on factors like your starting point, consistency, and overall body fat percentage. With a dedicated approach, noticeable changes can often be seen within a few months.
8. Is it necessary to count calories to get abs?
Answer : While counting calories can help manage weight, focusing on the quality of your food, portion sizes, and overall balanced diet is equally important. Listen to your body's hunger and fullness cues.
9. Can I still enjoy cheat meals?
Answer : Yes, occasional cheat meals are fine. The key is moderation and ensuring they don't derail your overall healthy eating habits.
10. Should I drink a lot of water for better abs?
Answer : Staying hydrated is important for overall health and can aid in digestion and metabolism, supporting your efforts to achieve visible abs.
Conclusion
Achieving visible abs is a combination of diet, exercise, and consistency. The saying "abs are made in the kitchen" highlights the importance of a nutritious, balanced diet in reducing overall body fat and revealing abdominal muscles. By focusing on lean proteins, healthy fats, complex carbohydrates, and fiber-rich foods while avoiding sugary, processed, and high-calorie items, you can create an optimal environment for fat loss and muscle definition. Coupled with regular core-strengthening exercises and a commitment to a healthy lifestyle, this approach will help you achieve and maintain defined abs. Remember, patience and persistence are key, as results come from sustained efforts over time.
You might also like our Food articles.
“Motivation is what gets you started. Habit is what keeps you going.” – Jim Ryun
If you would like more information about the 2024, please send us an email.
Written by Fitness Goal 4U
Smart Fitness Goals - Achieve Health with Simple Steps
Smart fitness goals focus on being Specific, Measurable, Achievable, Relevant, and Time-bound. They help you create a clear path to success, stay motivated, and track progress. Whether its weight loss, strength building, or improved endurance, smart goals guide your fitness journey, ensuring steady growth and sustainable results tailored to your needs.
“Confidence comes from discipline and training.” – Robert Kiyosaki
Building muscle requires a well-balanced diet rich in protein, healthy fats, and complex carbohydrates. Protein is essential for muscle repair and growth, making lean meats like chicken, turkey, and fish, along with plant-based options like lentils and tofu, excellent choices. Healthy fats from sources such as avocados, nuts, and olive oil support overall health and aid in recovery. Complex carbohydrates from foods like brown rice, sweet potatoes, and oats provide the energy needed for intense workouts and muscle repair. Incorporating dairy products like Greek yogurt and cottage cheese can also boost protein intake. Supplements like whey protein, creatine, and BCAAs can enhance muscle growth and recovery when used appropriately. A diet incorporating these nutrient-dense foods, along with consistent strength training, is key to effective muscle building.
Food for Muscle Building
Here are the best 20 foods for muscle building, along with descriptions of their benefits:
1. Chicken Breast: High in lean protein and low in fat, it supports muscle repair and growth.
2. Turkey: Another lean meat that is rich in protein and essential amino acids.
3. Lean Beef: Packed with protein, creatine, and iron, aiding muscle growth and strength.
4. Eggs: Contain high-quality protein and essential amino acids, plus vitamins and minerals.
5. Salmon: Rich in protein and omega-3 fatty acids, promoting muscle recovery and heart health.
6. Tuna: High in protein and low in fat, also provides omega-3 fatty acids.
7. Greek Yogurt: Offers double the protein of regular yogurt, great for muscle repair.
8. Cottage Cheese: High in casein protein, which is slow-digesting and ideal for overnight muscle repair.
9. Lentils: Packed with protein and fiber, perfect for plant-based diets.
10. Chickpeas: High in protein and versatile for various dishes.
11. Quinoa: A complete protein source with all nine essential amino acids, plus fiber and magnesium.
12. Tofu: Excellent plant-based protein, rich in amino acids.
13. Tempeh: Fermented soy product that provides protein, probiotics, and essential nutrients.
14. Almonds: Provide protein, healthy fats, and vitamin E, which aids muscle recovery.
15. Chia Seeds: High in protein, fiber, and omega-3 fatty acids, promoting muscle repair and reducing inflammation.
16. Flaxseeds: Rich in protein, omega-3s, and fiber, supporting muscle health and digestion.
17. Brown Rice: Provides complex carbohydrates for sustained energy and muscle recovery.
18. Sweet Potatoes: High in complex carbs and vitamins, aiding in energy supply and muscle repair.
19. Oats: Offer slow-releasing carbohydrates and protein, great for sustained energy.
20. Whole Grain Bread: Good source of carbohydrates and fiber, supporting energy levels and muscle growth.
Limit or Avoid Food for Muscle Building
To maximize muscle building and overall health, it's important to limit or avoid certain foods. Here are some to watch out for:
Foods to Limit
1. Processed Foods: High in unhealthy fats, sugars, and sodium, they can contribute to inflammation and poor muscle recovery.
2. Sugary Drinks: Provide empty calories and can lead to weight gain without offering any nutritional benefits.
3. Alcohol: Impairs muscle recovery and protein synthesis, and can also dehydrate the body.
4. Fried Foods: High in unhealthy fats and calories, they can negatively impact overall health and muscle recovery.
5. White Bread: Offers little nutritional value compared to whole grain options and can lead to blood sugar spikes.
6. Pastries and Sweets: High in sugar and unhealthy fats, they provide empty calories and can hinder muscle recovery.
7. High-Sodium Foods: Can lead to water retention and high blood pressure, which can affect workout performance.
8. Fast Food: Often high in unhealthy fats, sugars, and sodium, it can hinder muscle growth and overall health.
9. Ice Cream: High in sugar and unhealthy fats, offering little nutritional value.
10. Candy and Chocolate: High in sugar and empty calories, they can lead to weight gain and poor muscle recovery.
Foods to Avoid
1. Trans Fats: Found in some margarines, baked goods, and fried foods, they can cause inflammation and negatively impact heart health.
2. Sodas: Loaded with sugar and chemicals, they provide no nutritional benefit and can lead to weight gain.
3. Highly Processed Meats: Such as sausages, hot dogs, and deli meats, they contain high levels of sodium, preservatives, and unhealthy fats.
4. Artificial Sweeteners: While low in calories, they can negatively impact gut health and overall metabolism.
5. Refined Grains: Such as white rice and pasta, they lack fiber and essential nutrients compared to whole grain versions.
6. Snack Chips: High in unhealthy fats, sodium, and artificial additives, offering little nutritional value.
7. Energy Drinks: High in sugar and caffeine, they can lead to energy crashes and dehydration.
8. Store-Bought Baked Goods: Often contain trans fats, high sugar, and preservatives.
9. Flavored Yogurts: Many are high in added sugars, opt for plain yogurt instead.
10. Sugary Cereals: High in sugar and low in nutrients, leading to energy spikes and crashes.
Diet plan food for muscle building
Here's a comprehensive diet plan for muscle building, including breakfast, snacks, lunch, and dinner, to provide a balanced intake of proteins, carbohydrates, and healthy fats.
1. Breakfast
- Scrambled Eggs with Spinach: 3-4 eggs scrambled with fresh spinach, cooked in olive oil.
- Whole Grain Toast: 1-2 slices, optionally topped with avocado.
- Oatmeal: Made with milk, topped with a handful of berries and a spoonful of chia seeds.
2. Mid-Morning Snack
- Greek Yogurt: A bowl of Greek yogurt topped with a handful of nuts and honey.
- Apple Slices with Almond Butter: One apple sliced with 2 tablespoons of almond butter.
3. Lunch
- Grilled Chicken Breast: A serving of grilled chicken breast.
- Quinoa Salad: Quinoa mixed with black beans, cherry tomatoes, cucumber, and a drizzle of olive oil and lemon juice.
- Steamed Broccoli: A side of steamed broccoli or other green vegetables.
4. Afternoon Snack
- Protein Smoothie: Blend a scoop of whey protein with a banana, spinach, and almond milk.
- Carrot Sticks with Hummus: Fresh carrot sticks with a serving of hummus.
5. Dinner
- Baked Salmon: A portion of baked salmon seasoned with herbs and lemon.
- Sweet Potato: One medium sweet potato, baked or roasted.
- Mixed Green Salad: A salad of mixed greens, cherry tomatoes, cucumber, and a light vinaigrette.
6. Post-Workout Snack (if applicable)
- Protein Shake: A shake with whey protein and water or milk.
- Banana: One banana to replenish glycogen stores.
7. Evening Snack (optional)
- Cottage Cheese: A bowl of cottage cheese with a few slices of pineapple or other fruit.
- Mixed Nuts: A small handful of mixed nuts for a healthy fat and protein boost.
8. Hydration
- Water: Aim for at least 8-10 glasses of water per day.
- Electrolyte Drink: Optional post-workout to replenish lost minerals.
FAQs ( Frequently Asked Questions )
1. What are the best sources of protein for muscle building?
Answer : The best sources of protein include lean meats (chicken breast, turkey, lean beef), fish (salmon, tuna), eggs, dairy products (Greek yogurt, cottage cheese), and plant-based options (lentils, quinoa, tofu, tempeh).
2. How much protein should I consume daily to build muscle?
Answer : A common recommendation is 1.2 to 2.2 grams of protein per kilogram of body weight per day. For most people, this equates to 0.5 to 1 gram of protein per pound of body weight.
3. Are carbohydrates important for muscle building?
Answer : Yes, carbohydrates provide the necessary energy for workouts and aid in muscle recovery. Complex carbs like brown rice, sweet potatoes, oats, and whole grains are particularly beneficial.
4. What role do fats play in muscle building?
Answer : Healthy fats support hormone production, including testosterone, which is essential for muscle growth. Sources include avocados, nuts, seeds, and fatty fish.
5. Should I use protein supplements?
Answer : Protein supplements like whey protein can be convenient and effective, especially post-workout. However, it’s important to prioritize whole food sources of protein.
6. How often should I eat to build muscle?
Answer : Eating 4-6 smaller meals per day can help provide a steady supply of nutrients and energy, promoting muscle growth and recovery.
7. Can I build muscle on a plant-based diet?
Answer : Yes, plant-based diets can support muscle building. Focus on high-protein plant foods like lentils, chickpeas, quinoa, tofu, tempeh, nuts, and seeds.
8. Is it necessary to eat before and after workouts?
Answer : Consuming a balanced meal or snack before and after workouts can enhance performance and recovery. Pre-workout meals should include protein and carbs, while post-workout meals should focus on protein and carbs to replenish glycogen stores and repair muscle.
9. What foods should I avoid when trying to build muscle?
Answer : Avoid processed foods, sugary drinks, alcohol, fried foods, and foods high in trans fats and added sugars. These can hinder muscle recovery and overall health.
10. How important is hydration in muscle building?
Answer : Hydration is crucial for muscle function and recovery. Aim to drink at least 8-10 glasses of water daily, and more if you’re engaging in intense workouts.
11. Can cheat meals affect my muscle-building progress?
Answer : Occasional cheat meals can be part of a balanced diet, but frequent unhealthy eating can hinder muscle growth and recovery. Balance and moderation are key.
12. How do I balance calorie intake for muscle gain without excessive fat gain?
Answer : Focus on a slight caloric surplus (around 250-500 extra calories per day) with a balanced intake of macronutrients. Regularly monitor your progress and adjust as needed.
13. Is there a best time to consume protein for muscle growth?
Answer : Distributing protein intake evenly throughout the day and consuming protein-rich meals post-workout can optimize muscle protein synthesis.
14. Are there any specific micronutrients important for muscle building?
Answer : Yes, vitamins and minerals like vitamin D, calcium, magnesium, and zinc play important roles in muscle function and growth. A balanced diet with plenty of fruits and vegetables will help ensure adequate intake.
Conclusion
In conclusion, building muscle requires a strategic approach to nutrition, emphasizing a balanced intake of high-quality protein, complex carbohydrates, and healthy fats. Lean meats, fish, dairy products, and plant-based proteins provide the essential amino acids needed for muscle repair and growth. Complex carbohydrates from sources like brown rice, sweet potatoes, and whole grains supply sustained energy, while healthy fats from avocados, nuts, and seeds support hormone production and overall health.
Hydration is equally important, ensuring muscles function properly and recover efficiently. Supplements like whey protein and creatine can complement a well-rounded diet, especially post-workout.
Avoiding processed foods, sugary drinks, and unhealthy fats will prevent inflammation and poor muscle recovery. By adhering to a nutrient-dense diet plan, combined with consistent strength training, you can effectively support muscle growth, enhance performance, and achieve your fitness goals.
You might also like our Food articles.
“Motivation is what gets you started. Habit is what keeps you going.” – Jim Ryun
If you would like more information about the 2024, please send us an email.
Written by Fitness Goal 4U
Smart Fitness Goals - Achieve Health with Simple Steps
Smart fitness goals focus on being Specific, Measurable, Achievable, Relevant, and Time-bound. They help you create a clear path to success, stay motivated, and track progress. Whether its weight loss, strength building, or improved endurance, smart goals guide your fitness journey, ensuring steady growth and sustainable results tailored to your needs.
“Confidence comes from discipline and training.” – Robert Kiyosaki
Healthy food forms the foundation of a balanced diet, providing the essential nutrients required for our bodies to function optimally. These foods are rich in vitamins, minerals, antioxidants, and fiber, which support various bodily functions, boost the immune system, and prevent chronic diseases. Incorporating a variety of fruits, vegetables, whole grains, lean proteins, and healthy fats into daily meals ensures that we receive a comprehensive range of nutrients necessary for energy, growth, and overall well-being. Unlike processed foods that are often high in unhealthy fats, sugars, and sodium, healthy foods offer natural goodness that promotes long-term health. Embracing healthy eating habits is not just about maintaining a healthy weight; it’s about enhancing mental clarity, emotional stability, and physical vitality. By making informed food choices and prioritizing nutritional quality, we can lead healthier, more fulfilling lives.
Top 50 Healthy Food
Fruits and Vegetables
1. Blueberries: Packed with antioxidants, vitamins C and K, and fiber, blueberries help reduce the risk of heart disease and cancer.
2. Spinach: Rich in iron, calcium, vitamins A, C, and K, and antioxidants, spinach supports eye health, blood pressure, and bone health.
3. Broccoli: Contains vitamins C and K, fiber, and folate, and is known for its cancer-fighting properties and digestive benefits.
4. Carrots: High in beta-carotene, vitamins A and K, and fiber, carrots promote good vision and immune function.
5. Kale: Loaded with vitamins A, C, and K, calcium, and antioxidants, kale supports heart health, digestion, and bone health.
6. Avocado: Rich in healthy fats, fiber, potassium, and vitamins C, E, and K, avocados help with heart health and nutrient absorption.
7. Tomatoes: High in vitamins C and K, potassium, and lycopene, tomatoes support heart health and have anti-inflammatory properties.
8. Sweet Potatoes: Packed with beta-carotene, vitamins A and C, and fiber, sweet potatoes support eye health and immune function.
9. Oranges: High in vitamin C, fiber, and antioxidants, oranges boost the immune system and improve skin health.
10. Strawberries: Contain vitamins C and K, fiber, and antioxidants, strawberries support heart health and blood sugar control.
11. Bell Peppers: Rich in vitamins A, C, and E, fiber, and antioxidants, bell peppers boost immune function and improve skin health.
12. Brussels Sprouts: Packed with vitamins K and C, fiber, and antioxidants, Brussels sprouts support bone health and reduce inflammation.
13. Cauliflower: High in vitamins C and K, fiber, and antioxidants, cauliflower promotes digestion and reduces inflammation.
14. Mangoes: Contain vitamins A and C, fiber, and antioxidants, mangoes boost immunity and improve skin health.
15. Berries: Rich in vitamins, antioxidants, and fiber, berries support heart health and cognitive function.
16. Pineapple: High in vitamins C and B6, manganese, and antioxidants, pineapple aids digestion and boosts immunity.
17. Cabbage: Contains vitamins C and K, fiber, and antioxidants, cabbage supports digestion and reduces inflammation.
18. Apples: High in fiber, vitamin C, and antioxidants, apples improve digestion and support heart health.
19. Grapes: Contain vitamins C and K, fiber, and antioxidants, grapes support heart health and reduce inflammation.
20. Papaya: Rich in vitamins A and C, fiber, and antioxidants, papaya aids digestion and boosts immunity.
21. Watermelon: High in vitamins A and C, potassium, and antioxidants, watermelon hydrates and supports heart health.
22. Pomegranate: Contains vitamins C and K, fiber, and antioxidants, pomegranate supports heart health and reduces inflammation.
23. Beets: High in fiber, vitamins A and C, and antioxidants, beets improve blood pressure and digestive health.
24. Asparagus: Rich in vitamins A, C, and K, fiber, and antioxidants, asparagus supports digestive health and reduces inflammation.
25. Ginger: Contains vitamins B6 and C, magnesium, and antioxidants, ginger aids digestion and reduces nausea.
Proteins
1. Salmon: Rich in omega-3 fatty acids, protein, and vitamins D and B12, salmon promotes heart and brain health.
2. Eggs: High in protein, vitamins B2, B12, D, and selenium, eggs support muscle growth, brain function, and eye health.
3. Chickpeas: Contain protein, fiber, iron, and folate, chickpeas are great for digestion, muscle growth, and heart health.
4. Greek Yogurt: High in protein, calcium, probiotics, and vitamin B12, Greek yogurt supports gut health, bone health, and muscle recovery.
5. Quinoa: A complete protein with all nine essential amino acids, fiber, iron, and magnesium, quinoa supports muscle repair and digestion.
6. Lentils: Packed with protein, fiber, iron, and folate, lentils support heart health and digestion.
7. Tofu: High in protein, calcium, and iron, tofu is a versatile plant-based protein that supports muscle growth and bone health.
8. Chicken Breast: Lean and high in protein, vitamins B6 and B12, and selenium, chicken breast supports muscle growth and immune function.
9. Turkey: Rich in protein, vitamins B6 and B12, and selenium, turkey supports muscle growth and immune function.
10. Tempeh: High in protein, probiotics, and fiber, tempeh supports gut health and muscle growth.
Nuts and Seeds
1. Almonds: Rich in healthy fats, protein, fiber, vitamin E, and magnesium, almonds support heart health, brain function, and skin health.
2. Chia Seeds: High in omega-3 fatty acids, fiber, protein, and calcium, chia seeds aid in digestion, heart health, and energy levels.
3. Walnuts: Contain healthy fats, protein, omega-3 fatty acids, and antioxidants, walnuts promote brain and heart health.
4. Flaxseeds: High in omega-3 fatty acids, fiber, and lignans, flaxseeds support heart health and digestion.
5. Pumpkin Seeds: Rich in protein, healthy fats, magnesium, and zinc, pumpkin seeds support heart health and immune function.
6. Hemp Seeds: Contain protein, healthy fats, fiber, and magnesium, hemp seeds support muscle growth and heart health.
7. Cashews: High in healthy fats, protein, magnesium, and antioxidants, cashews support heart health and brain function.
8. Pistachios: Rich in healthy fats, protein, fiber, and antioxidants, pistachios support heart health and digestion.
Whole Grains
1. Oats: High in fiber, protein, vitamins B1 and B5, and minerals, oats support heart health, digestion, and energy levels.
2. Brown Rice: Contains fiber, vitamins B1 and B3, and magnesium, brown rice supports digestive health and energy production.
3. Barley: Rich in fiber, vitamins B1 and B3, and minerals, barley supports heart health and digestion.
4. Millet: High in fiber, protein, magnesium, and antioxidants, millet supports digestion and heart health.
Others
1. Garlic: Rich in vitamins C and B6, manganese, and antioxidants, garlic boosts the immune system and has anti-inflammatory properties.
2. Olive Oil: High in healthy monounsaturated fats and antioxidants, olive oil promotes heart health and reduces inflammation.
3. Green Tea: Contains antioxidants and bioactive compounds, green tea supports brain function, fat loss, and heart health.
FAQs (Frequently Asked Questions)
1. What is considered healthy food?
Answer : Healthy food typically refers to foods that are high in essential nutrients, low in unhealthy fats, sugars, and sodium, and are minimally processed. Examples include fruits, vegetables, whole grains, lean proteins, nuts, seeds, and healthy fats.
2. Why is it important to eat healthy foods?
Answer : Eating healthy foods is crucial for maintaining overall health, preventing chronic diseases such as heart disease, diabetes, and obesity, supporting mental health, boosting immunity, and promoting optimal growth and development.
3. How can I incorporate more vegetables into my diet?
Answer : You can incorporate more vegetables by adding them to soups, stews, and casseroles, snacking on raw veggies with hummus, blending them into smoothies, or using them as toppings for pizzas and sandwiches.
4. What are the benefits of eating whole grains?
Answer : Whole grains are rich in fiber, vitamins, and minerals. They help improve digestion, reduce the risk of heart disease, manage weight, and stabilize blood sugar levels.
5. Are all fats bad for you?
Answer : No, not all fats are bad. Healthy fats, such as those found in avocados, nuts, seeds, and olive oil, are essential for brain health, energy, and nutrient absorption. It's important to avoid trans fats and limit saturated fats.
6. How much protein do I need daily?
Answer : The daily protein requirement varies based on age, sex, and activity level. On average, adults need about 46-56 grams of protein per day. It's best to get protein from a variety of sources, including plant-based options.
7. What are the healthiest sources of protein?
Answer : Healthy protein sources include lean meats (chicken, turkey), fish, eggs, dairy products, legumes (beans, lentils), tofu, tempeh, nuts, and seeds.
8. How can I reduce my sugar intake?
Answer : To reduce sugar intake, avoid sugary beverages, choose whole fruits over fruit juices, read food labels for hidden sugars, and opt for natural sweeteners like honey or maple syrup in moderation.
9. Is it necessary to take dietary supplements?
Answer : For most people, a well-balanced diet provides all necessary nutrients. However, dietary supplements may be necessary for certain individuals, such as those with specific nutrient deficiencies or health conditions. Consult a healthcare provider before starting any supplements.
10. How can I make healthy eating more affordable?
Answer : Making healthy eating affordable involves planning meals, buying seasonal and local produce, purchasing in bulk, cooking at home, and minimizing food waste by using leftovers creatively.
11. What are the health benefits of eating nuts and seeds?
Answer : Nuts and seeds are rich in healthy fats, protein, fiber, vitamins, and minerals. They support heart health, brain function, and weight management.
12. Can I eat healthy food on a vegetarian or vegan diet?
Answer : Yes, a vegetarian or vegan diet can be very healthy. Ensure you get enough protein, iron, calcium, vitamin B12, and omega-3 fatty acids through a variety of plant-based foods and fortified products.
13. What are antioxidants and why are they important?
Answer : Antioxidants are compounds that protect the body from oxidative stress and free radical damage. They are important for reducing inflammation, preventing chronic diseases, and supporting overall health.
14. How much water should I drink daily?
Answer : It's generally recommended to drink 8-10 cups (2-2.5 liters) of water daily, but individual needs vary based on factors like activity level, climate, and health conditions.
15. What are the benefits of eating fiber-rich foods?
Answer : Fiber-rich foods aid in digestion, help maintain healthy cholesterol levels, control blood sugar levels, and promote a feeling of fullness, which can assist with weight management.
16. Are there any specific foods that boost immunity?
Answer : Foods that boost immunity include citrus fruits, garlic, ginger, spinach, yogurt, almonds, and green tea, all of which are rich in vitamins, minerals, and antioxidants.
17. How can I maintain a balanced diet while eating out?
Answer : To maintain a balanced diet while eating out, choose dishes with plenty of vegetables, opt for grilled or baked instead of fried foods, ask for dressings and sauces on the side, and control portion sizes.
18. What are some healthy snack options?
Answer : Healthy snacks include fresh fruits, vegetables with hummus, yogurt, nuts, seeds, whole-grain crackers, and homemade smoothies.
19. Is it okay to indulge in unhealthy foods occasionally?
Answer : Yes, it's okay to indulge occasionally. Moderation is key. Enjoy treats mindfully and balance them with healthy eating habits the rest of the time.
20. How can I ensure my kids eat healthy?
Answer : To ensure kids eat healthy, involve them in meal planning and preparation, offer a variety of foods, set a good example by eating healthy yourself, and make mealtimes enjoyable and stress-free.
Bottom Line
Eating a variety of nutrient-dense foods is crucial for maintaining overall health and preventing chronic diseases. Healthy foods, such as fruits, vegetables, whole grains, lean proteins, and healthy fats, provide essential vitamins, minerals, and antioxidants that support bodily functions, boost the immune system, and promote mental well-being.
Key points to remember:
- Variety is essential: Include a wide range of foods in your diet to ensure you get all necessary nutrients.
- Focus on whole foods: Opt for minimally processed foods over highly processed ones.
- Balance and moderation: Enjoy all foods in moderation, and maintain a balance between different food groups.
- Hydration matters: Drink plenty of water to support overall health.
- Mindful eating: Pay attention to portion sizes and listen to your body's hunger and fullness cues.
Incorporating these principles into your daily routine can help you achieve a healthier lifestyle and reduce the risk of various health issues. Remember, small, consistent changes in your eating habits can lead to significant improvements in your health over time.
You might also like our Food articles.
“Motivation is what gets you started. Habit is what keeps you going.” – Jim Ryun
If you would like more information about the 2024, please send us an email.
Written by Fitness Goal 4U
Smart Fitness Goals - Achieve Health with Simple Steps
Smart fitness goals focus on being Specific, Measurable, Achievable, Relevant, and Time-bound. They help you create a clear path to success, stay motivated, and track progress. Whether its weight loss, strength building, or improved endurance, smart goals guide your fitness journey, ensuring steady growth and sustainable results tailored to your needs.
“Confidence comes from discipline and training.” – Robert Kiyosaki
Eggs are a powerhouse of nutrition, offering numerous health benefits that make them a valuable addition to any diet. Packed with high-quality protein, essential vitamins, and minerals, eggs provide a balanced mix of nutrients crucial for overall health. They are an excellent source of vitamins A, B12, D, and E, along with minerals like selenium, iron, and zinc, which support immune function, bone health, and oxygen transport. Eggs are also rich in antioxidants such as lutein and zeaxanthin, promoting eye health and reducing the risk of macular degeneration and cataracts. The presence of choline aids brain development and cognitive function, making eggs particularly beneficial for pregnant women. Additionally, their high protein content supports muscle strength and weight management by promoting satiety. Versatile and affordable, eggs can be easily incorporated into various meals, making them an accessible and nutritious option for people of all ages.
Top 20 Health Benefits of Eggs
Here are the top 20 health benefits of eggs, each with a brief description:
1. High-Quality Protein : Eggs provide a complete source of protein, containing all nine essential amino acids needed for muscle growth and repair.
2. Rich in Vitamins: Eggs contain essential vitamins like A, B12, D, and E, supporting various bodily functions, including vision, immunity, and skin health.
3. Mineral-Rich: Eggs are rich in minerals such as selenium, iron, zinc, and phosphorus, which are vital for immune function, oxygen transport, and bone health.
4. Heart Health: Eggs contain healthy fats, including omega-3 fatty acids, which can help reduce inflammation and promote heart health.
5. Eye Health: Lutein and zeaxanthin in eggs help protect the eyes from damage due to blue light and reduce the risk of cataracts and macular degeneration.
6. Weight Management: Eggs are low in calories and high in protein, helping to promote satiety and reduce overall calorie intake.
7. Brain Health: Choline in eggs is essential for brain development and function, supporting memory and learning.
8. Bone Health: Vitamin D and phosphorus in eggs contribute to maintaining strong and healthy bones and teeth.
9. Boosts Immune System: Vitamins A and D, along with selenium in eggs, support a healthy immune system.
10. Skin and Hair Health: Protein, biotin, and other B vitamins in eggs help maintain healthy skin and hair.
11. Antioxidant Properties: Eggs contain antioxidants like lutein and zeaxanthin, which help neutralize harmful free radicals in the body.
12. Supports Pregnancy: Choline in eggs is crucial for fetal brain development, making eggs an important food for pregnant women.
13. Muscle Strength: High-quality protein in eggs aids in muscle maintenance and growth, particularly important for athletes and older adults.
14. Mental Health: B vitamins in eggs, particularly B12 and folate, support mental health by aiding in neurotransmitter function.
15. Energy Production: Eggs provide essential nutrients like riboflavin and pantothenic acid, which are involved in energy production.
16. Improves Cholesterol Profile: While eggs contain cholesterol, they also increase levels of HDL (good cholesterol), which is beneficial for heart health.
17. Enhanced Absorption of Nutrients: Eggs can enhance the absorption of fat-soluble vitamins like A, D, E, and K from other foods.
18. Promotes Healthy Aging: Antioxidants and other nutrients in eggs support cellular health, reducing the risk of age-related diseases.
19. Satiety and Appetite Control: Eggs are highly satiating, helping to control hunger and reduce snacking between meals.
20. Affordable and Versatile: Eggs are an inexpensive source of nutrition and can be prepared in numerous ways, making them accessible and versatile for any diet.
FAQs ( Frequently Asked Questions )
1. Are eggs good for heart health?
Answer : Yes, eggs contain healthy fats, including omega-3 fatty acids, which can help reduce inflammation and promote heart health. Moderate consumption does not increase heart disease risk in most people.
2. Do eggs help with weight management?
Answer : Yes, eggs are low in calories but high in protein, which helps increase feelings of fullness and reduces overall calorie intake, aiding in weight management.
3. Are eggs a good source of protein?
Answer : Absolutely, eggs are an excellent source of high-quality protein, containing all nine essential amino acids needed for muscle growth and repair.
4. Can eggs improve eye health?
Answer : Yes, eggs contain lutein and zeaxanthin, antioxidants that are beneficial for eye health, reducing the risk of cataracts and age-related macular degeneration.
5. Are eggs beneficial for brain health?
Answer : Yes, eggs are rich in choline, a nutrient that supports brain development and function, particularly important during pregnancy and early childhood.
6. Do eggs boost the immune system?
Answer : Eggs provide essential vitamins like A and D, as well as minerals like selenium, which support a healthy immune system.
7. How do eggs contribute to bone health?
Answer : Eggs contain vitamin D and phosphorus, both of which are important for maintaining strong and healthy bones and teeth.
8. Can eating eggs improve hair and skin health?
Answer : Yes, the protein, biotin, and other B vitamins in eggs promote healthy skin and hair.
9. Are eggs safe to eat daily?
Answer : For most people, eating eggs daily is safe and can be part of a balanced diet. However, those with specific health conditions should consult a healthcare provider.
10. Do eggs help in muscle building?
Answer : Yes, the high-quality protein in eggs is excellent for muscle maintenance and growth, making them a popular choice among athletes and bodybuilders.
11. Can eggs improve cholesterol levels?
Answer : Eggs can increase levels of HDL (good cholesterol), which is beneficial for heart health, although they do contain cholesterol. The overall impact varies among individuals.
12. Are eggs good for pregnant women?
Answer : Yes, eggs provide choline, which is crucial for fetal brain development, and other nutrients that support the health of both mother and baby.
13. How do eggs support mental health?
Answer : Eggs contain B vitamins, particularly B12 and folate, which are essential for brain function and mental health.
14. Can eggs enhance nutrient absorption?
Answer : Eggs can enhance the absorption of fat-soluble vitamins like A, D, E, and K from other foods when consumed together.
15. Are eggs good for ageing adults?
Answer : Yes, the antioxidants and other nutrients in eggs support cellular health and reduce the risk of age-related diseases.
16. Do eggs help with energy production?
Answer : Yes, eggs provide essential nutrients like riboflavin and pantothenic acid, which are involved in the body's energy production processes.
17. Are organic or free-range eggs healthier than regular eggs?
Answer : Organic and free-range eggs may have slightly higher levels of certain nutrients like omega-3 fatty acids and may be preferred for ethical reasons, but regular eggs are also highly nutritious.
18. Can eggs be part of a diabetic diet?
Answer : Yes, eggs can be included in a diabetic diet as they are low in carbohydrates and have a low glycemic index.
19. Are eggs versatile in cooking?
Answer : Eggs are incredibly versatile and can be cooked in many ways, such as boiling, poaching, scrambling, and baking, making them easy to include in various dishes.
20. How should eggs be stored for maximum freshness?
Answer : Eggs should be stored in the refrigerator to maintain their freshness and prevent the growth of harmful bacteria.
Bottom Line
The bottom line is that eggs are a nutrient-dense, versatile food that offers numerous health benefits. They are an excellent source of high-quality protein, essential vitamins, and minerals that support overall health, including heart, brain, eye, and bone health. Eggs can aid in weight management, enhance muscle strength, and promote healthy skin and hair. With their affordable cost and wide culinary versatility, incorporating eggs into a balanced diet can contribute to improved well-being for individuals of all ages.
“Motivation is what gets you started. Habit is what keeps you going.” – Jim Ryun
If you would like more information about the 2024, please send us an email.
Written by Fitness Goal 4U
Smart Fitness Goals - Achieve Health with Simple Steps
Smart fitness goals focus on being Specific, Measurable, Achievable, Relevant, and Time-bound. They help you create a clear path to success, stay motivated, and track progress. Whether its weight loss, strength building, or improved endurance, smart goals guide your fitness journey, ensuring steady growth and sustainable results tailored to your needs.
“Confidence comes from discipline and training.” – Robert Kiyosaki
Achieving bigger biceps is a common fitness goal that requires a strategic approach combining effective training, proper nutrition, and consistent recovery. The biceps, a prominent muscle group in the upper arms, can be developed through targeted exercises such as barbell curls, dumbbell curls, and chin-ups. Incorporating a variety of exercises ensures comprehensive muscle engagement and growth. Equally important is a diet rich in protein, healthy fats, and complex carbohydrates, providing the necessary nutrients for muscle repair and development. Progressive overload, which involves gradually increasing the weight or resistance, is crucial to continually challenge the muscles. Proper form and technique are essential to maximize effectiveness and prevent injuries. Adequate rest and recovery, including sufficient sleep and rest days between workouts, allow muscles to repair and grow. By following these guidelines, you can effectively work towards achieving impressive, well-defined biceps.
Food for Bigger Bicep Workout
Building bigger biceps requires not only consistent training but also proper nutrition to fuel muscle growth and recovery. Here are some key foods to include in your diet:
1. Protein-Rich Foods
- Chicken Breast : Lean and packed with protein, which is essential for muscle repair and growth.
- Eggs : High in quality protein and contain essential amino acids, vitamins, and minerals.
- Greek Yogurt : Rich in protein and contains probiotics that can aid digestion.
- Salmon : Provides high-quality protein and omega-3 fatty acids that reduce muscle inflammation.
- Lean Beef : Contains a good amount of protein, iron, and creatine, which supports muscle growth.
2. Complex Carbohydrates
- Brown Rice : A great source of complex carbohydrates for sustained energy during workouts.
- Sweet Potatoes : Packed with vitamins, minerals, and fiber, they provide long-lasting energy.
- Oats : Provide complex carbohydrates and are rich in fiber, keeping you full and energized.
3. Healthy Fats
- Avocados : Rich in healthy fats, vitamins, and potassium, they support overall health and muscle function.
- Nuts and Seeds : Provide healthy fats, protein, and essential minerals that support muscle growth.
4. Vegetables and Fruits
- Leafy Greens : Such as spinach and kale, these are rich in vitamins, minerals, and antioxidants.
- Berries : High in antioxidants and vitamins, which help in reducing muscle inflammation and boosting recovery.
5. Hydration
- Water : Essential for overall health and muscle function, staying hydrated is crucial for muscle recovery and performance.
- Coconut Water : Provides electrolytes that help in muscle function and recovery.
6. Supplements (if needed)
- Whey Protein : A convenient way to increase protein intake, especially post-workout.
- Creatine : Can enhance muscle mass and strength when combined with resistance training.
Food avoid for Bigger Bicep Workout
To maximize muscle growth and support your bicep workout, it's important to avoid certain foods that can hinder your progress. Here are some foods to avoid:
1. Processed and Junk Foods
- Sugary Snacks and Beverages : Sodas, candy, and sweets can lead to energy spikes and crashes, hindering workout performance and recovery.
- Fast Food : High in unhealthy fats, sodium, and calories, fast food can lead to weight gain and poor muscle definition.
- Processed Meats : Such as sausages, hot dogs, and deli meats, which are high in sodium and preservatives.
2. Refined Carbohydrates
- White Bread and Pastries : Lack essential nutrients and fiber, leading to rapid blood sugar spikes and reduced energy levels.
- Sugary Cereals : Often high in sugar and low in nutritional value, they can cause energy crashes and are not conducive to muscle building.
3. Unhealthy Fats
- Trans Fats : Found in many fried foods, baked goods, and margarine, trans fats can increase inflammation and negatively affect heart health.
- Highly Processed Vegetable Oils : Such as soybean oil and corn oil, which can contribute to inflammation when consumed in excess.
4. Alcohol
- Excessive Alcohol : Can interfere with muscle recovery, reduce protein synthesis, and dehydrate the body, negatively impacting workout performance.
5. Low-Quality Protein Sources
- Protein Bars with Added Sugars : Many protein bars contain added sugars and unhealthy ingredients that can offset their benefits.
6. Artificial Additives
- Foods with Artificial Sweeteners and Preservatives : Such as diet sodas and packaged snacks, which can affect metabolism and overall health.
Frequently Asked Questions
1. How often should I train my biceps?
Answer : It's recommended to train your biceps 2-3 times per week, allowing at least 48 hours of rest between sessions to ensure proper muscle recovery.
2. How many sets and reps should I do for bicep exercises?
Answer : Aim for 3-4 sets of 8-12 reps for each bicep exercise. This rep range is optimal for muscle hypertrophy (growth).
3. Can I train my biceps every day?
Answer : Training biceps every day is not recommended as it can lead to overtraining and inadequate recovery, hindering muscle growth. It's better to allow rest days between workouts.
4. What's the best way to warm up before a bicep workout?
Answer : Start with 5-10 minutes of light cardio (e.g., jogging, jumping jacks) followed by dynamic stretches and light sets of bicep exercises to prepare your muscles for the workout.
5. Should I use heavy weights or light weights for bicep training?
Answer : Both heavy and light weights have their benefits. Heavy weights with fewer reps can build strength, while lighter weights with higher reps can improve endurance and muscle definition. Incorporate a mix of both into your routine.
6. Is it necessary to use different exercises for bicep growth?
Answer : Yes, using a variety of exercises targets different parts of the biceps and helps promote balanced muscle development. Include exercises like barbell curls, dumbbell curls, hammer curls, and cable curls.
7. How important is diet for building bigger biceps?
Answer : Diet is crucial for muscle growth. Consuming adequate protein, healthy fats, and complex carbohydrates supports muscle repair and growth. Hydration and proper nutrient timing also play important roles.
8. Can I build bigger biceps with bodyweight exercises?
Answer : Yes, bodyweight exercises like chin-ups and variations of push-ups can effectively target the biceps. However, incorporating weights can provide more resistance and variety.
9. How long will it take to see results in my biceps?
Answer : Visible results depend on various factors, including genetics, diet, workout consistency, and intensity. Generally, you may start to see noticeable changes within 4-8 weeks of consistent training.
Conclusion
Building bigger biceps requires a strategic combination of targeted exercises, proper nutrition, and consistent recovery. By incorporating a variety of exercises such as barbell curls, dumbbell curls, and chin-ups, you can effectively engage different parts of the biceps for comprehensive muscle development. Proper form and progressive overload are essential to maximize gains and prevent injuries. Nutrition plays a crucial role, with a focus on high-protein foods, healthy fats, and complex carbohydrates to support muscle repair and growth. Equally important is allowing adequate rest and recovery, including rest days and sufficient sleep, to facilitate muscle recovery and growth. By following these guidelines, you can achieve well-defined, stronger biceps and enhance your overall fitness and appearance. Dedication and consistency in your training and diet will lead to impressive results, helping you reach your muscle-building goals.
You might also like our Food articles.
“Motivation is what gets you started. Habit is what keeps you going.” – Jim Ryun
If you would like more information about the 2024, please send us an email.
Written by Fitness Goal 4U
Smart Fitness Goals - Achieve Health with Simple Steps
Smart fitness goals focus on being Specific, Measurable, Achievable, Relevant, and Time-bound. They help you create a clear path to success, stay motivated, and track progress. Whether its weight loss, strength building, or improved endurance, smart goals guide your fitness journey, ensuring steady growth and sustainable results tailored to your needs.
“Confidence comes from discipline and training.” – Robert Kiyosaki
Keeping your brain young and active is crucial for maintaining cognitive function and overall well-being throughout life. Just as physical fitness requires regular exercise, brain health depends on a combination of mental stimulation, physical activity, a balanced diet, and social engagement. In today’s fast-paced world, our brains are constantly challenged by new information and tasks, making it essential to adopt habits that promote mental agility and resilience. From engaging in puzzles and learning new skills to maintaining strong social connections and managing stress effectively, there are numerous strategies to boost brain health. By integrating these practices into your daily routine, you can enhance memory, improve problem-solving skills, and protect against cognitive decline. This guide explores various methods to keep your brain sharp, ensuring you remain mentally fit and capable of navigating life’s complexities with confidence and clarity.
Keep Your Brain Young and Active
To keep your brain young and active, it's important to engage in a combination of mental, physical, and social activities, alongside maintaining a healthy lifestyle. Here are some strategies to achieve this:
1. Mental Stimulation
- Learning: Continuously challenge your brain by learning new skills or hobbies, such as playing a musical instrument, painting, or speaking a new language.
- Puzzles and Games: Engage in activities like puzzles, crosswords, Sudoku, chess, and other brain games that require critical thinking.
- Reading and Writing: Read books, articles, and journals regularly. Writing, whether it's journaling, creative writing, or blogging, can also stimulate your brain.
- Brain Training Apps: Use apps designed to enhance cognitive functions like memory, attention, and problem-solving.
2. Physical Activity
- Exercise Regularly: Activities such as walking, running, cycling, swimming, and yoga improve blood flow to the brain and promote overall brain health.
- Aerobic Exercise: Engage in aerobic exercises that increase heart rate, which can improve brain function and reduce the risk of cognitive decline.
3. Social Engagement
- Socialize: Maintain strong social connections and engage in regular social activities with friends, family, and community groups.
- Volunteer Work: Volunteering not only provides a sense of purpose but also stimulates mental activity and social interaction.
4. Healthy Diet
- Balanced Diet: Eat a diet rich in fruits, vegetables, whole grains, lean proteins, and healthy fats.
- Omega-3 Fatty Acids: Incorporate foods like fish, flaxseeds, and walnuts, which are high in omega-3 fatty acids.
- Antioxidants: Consume foods high in antioxidants, such as berries, dark chocolate, nuts, and green tea.
5. Mental and Emotional Health
- Stress Management: Practice mindfulness, meditation, and relaxation techniques to manage stress effectively.
- Adequate Sleep: Aim for 7-9 hours of quality sleep each night to allow your brain to rest and rejuvenate.
- Positive Attitude: Maintain a positive outlook on life, engage in activities that bring joy, and practice gratitude.
6. Cognitive Training
- Educational Courses: Take courses or attend workshops to keep learning and challenging your brain.
- Memory Techniques: Practice mnemonic devices, visualization, and other memory-enhancing techniques.
7. Routine Health Checks
- Regular Medical Check-ups: Keep up with health screenings and manage chronic conditions like diabetes, hypertension, and high cholesterol.
- Mental Health: Seek professional help if you experience symptoms of depression, anxiety, or other mental health issues.
FAQs (Frequently Asked Questions)
1. What are some simple daily activities to keep my brain active?
Answer : Engage in activities like reading, solving puzzles, learning new skills, and staying socially active. Even small changes, such as taking a different route to work or using your non-dominant hand for daily tasks, can stimulate your brain.
2. How does physical exercise benefit brain health?
Answer : Regular physical exercise improves blood flow to the brain, reduces inflammation, and stimulates the release of growth factors that support the survival of new brain cells and the connections between them.
3. Can diet affect brain health?
Answer : Yes, a balanced diet rich in antioxidants, healthy fats, vitamins, and minerals can protect your brain from oxidative stress and inflammation. Foods like berries, nuts, fish, and leafy greens are particularly beneficial.
4. How much sleep do I need to maintain good brain health?
Answer : Most adults need 7-9 hours of quality sleep per night. Sleep is essential for memory consolidation, clearing toxins from the brain, and overall cognitive function.
5. Are brain training games effective?
Answer : Brain training games can be beneficial, especially those that challenge memory, attention, and problem-solving skills. However, it's important to engage in a variety of activities to keep your brain challenged in different ways.
6. How does social interaction help keep the brain young?
Answer : Social interaction stimulates mental engagement and emotional support, which are crucial for cognitive health. It helps reduce stress, which can negatively impact brain function, and keeps your brain active through conversation and shared activities.
7. What role does stress management play in brain health?
Answer : Chronic stress can harm the brain by increasing inflammation and the risk of mental health disorders. Managing stress through mindfulness, meditation, exercise, and hobbies is vital for maintaining cognitive function.
8. Can learning new things really help my brain?
Answer : Absolutely. Learning new skills, whether it's a language, instrument, or hobby, creates new neural pathways and strengthens existing ones, which helps keep your brain flexible and resilient.
9. Is there a specific type of exercise that is best for brain health?
Answer : Aerobic exercises, such as running, swimming, and cycling, are particularly effective for brain health. These activities increase heart rate and blood flow to the brain, promoting the growth of new neurons and improving overall brain function.
10. How can I incorporate mental stimulation into my daily routine?
Answer : Simple ways to stimulate your brain include reading, writing, doing puzzles, playing strategy games, learning something new, and engaging in creative activities like painting or crafting.
11. Are supplements necessary for brain health?
Answer : While a balanced diet is the best way to get the nutrients your brain needs, some people may benefit from supplements, especially if they have dietary restrictions. Always consult with a healthcare provider before starting any new supplement regimen.
12. What are the early signs of cognitive decline?
Answer : Early signs of cognitive decline include memory loss that disrupts daily life, difficulty planning or solving problems, trouble completing familiar tasks, confusion with time or place, and changes in mood or personality. If you notice these signs, consult a healthcare professional.
Conclusion
Keeping your brain young and active is a multifaceted endeavor that requires a holistic approach to mental, physical, and emotional well-being. By incorporating regular mental stimulation, physical exercise, a healthy diet, social engagement, stress management, and adequate sleep into your daily routine, you can significantly enhance your cognitive health and overall quality of life.
Engaging in continuous learning, maintaining strong social connections, and practicing mindfulness are essential strategies to keep your brain agile and resilient. Furthermore, regular health check-ups and managing chronic conditions play a crucial role in preserving brain function.
By committing to these practices, you can not only reduce the risk of cognitive decline but also enjoy a vibrant, fulfilling life with a sharp and active mind. Prioritizing brain health is an investment in your future well-being, ensuring you remain mentally fit and capable of embracing life's challenges and opportunities.
“Motivation is what gets you started. Habit is what keeps you going.” – Jim Ryun
If you would like more information about the 2024, please send us an email.
Written by Fitness Goal 4U
Smart Fitness Goals - Achieve Health with Simple Steps
Smart fitness goals focus on being Specific, Measurable, Achievable, Relevant, and Time-bound. They help you create a clear path to success, stay motivated, and track progress. Whether its weight loss, strength building, or improved endurance, smart goals guide your fitness journey, ensuring steady growth and sustainable results tailored to your needs.
“Confidence comes from discipline and training.” – Robert Kiyosaki
Eye health is crucial for maintaining overall well-being and quality of life. Our eyes allow us to perceive the world, making vision one of our most important senses. Proper eye care involves regular check-ups, a balanced diet rich in vitamins A, C, and E, and protection from harmful UV rays. Conditions such as cataracts, glaucoma, and age-related macular degeneration can impair vision if not detected and treated early. Prolonged screen time, common in our digital age, can lead to eye strain and discomfort, emphasizing the need for regular breaks and proper lighting. Additionally, practicing good hygiene, such as not touching or rubbing the eyes and using clean contact lenses, can prevent infections. Educating oneself about the signs of vision problems and seeking prompt medical advice can preserve eye health. By taking proactive measures, we can ensure our eyes remain healthy and functional throughout our lives.
Food for Eye Health
Maintaining eye health can be significantly influenced by diet. Here are some key foods that support optimal eye health:
1. Carrots: Rich in beta-carotene, which the body converts to vitamin A, essential for good vision and preventing night blindness.
2. Leafy Greens: Spinach, kale, and collard greens are packed with lutein and zeaxanthin, antioxidants that protect against cataracts and age-related macular degeneration.
3. Fish: Fatty fish like salmon, tuna, and mackerel are high in omega-3 fatty acids, which are crucial for maintaining retinal health and preventing dry eyes.
5. Citrus Fruits: Oranges, lemons, and grapefruits are excellent sources of vitamin C, an antioxidant that helps maintain the health of blood vessels in the eyes.
6. Eggs: The yolks contain vitamin A, lutein, zeaxanthin, and zinc, which are all important for eye health and can help reduce the risk of macular degeneration.
7. Almonds: Rich in vitamin E, which helps protect the eyes from free radical damage and can slow the progression of cataracts and macular degeneration.
8. Sweet Potatoes: High in beta-carotene and vitamin E, these help maintain good vision and overall eye health.
9. Bell Peppers: Loaded with vitamins A and C, these can help reduce the risk of cataracts and age-related macular degeneration.
10. Berries: Blueberries, strawberries, and blackberries are rich in antioxidants and vitamin C, which can help prevent damage to the eye cells.
11. Broccoli: Contains a combination of nutrients, including vitamin C, beta-carotene, lutein, and zeaxanthin, all beneficial for eye health.
Food avoid for Eye Health
Maintaining eye health involves not only consuming beneficial foods but also avoiding those that can negatively impact vision. Here are some foods to avoid for optimal eye health:
1. Sugary Foods: Excessive sugar intake can lead to diabetes, which is a risk factor for diabetic retinopathy and other eye conditions.
2. Trans Fats: Found in processed and fried foods, trans fats can contribute to high cholesterol and heart disease, which are linked to macular degeneration.
3. High-Sodium Foods: Diets high in salt can lead to hypertension, which can cause damage to the blood vessels in the eyes and increase the risk of vision problems.
4. Refined Carbohydrates: White bread, pastries, and other refined carbs can cause blood sugar spikes, increasing the risk of diabetic retinopathy.
5. Processed Meats: High in sodium and preservatives, processed meats can contribute to hypertension and potentially damage the blood vessels in the eyes.
6. Alcohol: Excessive alcohol consumption can lead to nutrient deficiencies, particularly in vitamin A, and increase the risk of cataracts and optic nerve damage.
7. Fried Foods: High in unhealthy fats, fried foods can contribute to high cholesterol and heart disease, which are linked to eye health problems.
8. Margarine: Often containing trans fats, margarine can increase the risk of cardiovascular disease, which negatively impacts eye health.
9. Soda and Sugary Drinks: These can lead to obesity and diabetes, both of which are risk factors for various eye conditions.
10. Caffeine: Excessive caffeine consumption can lead to dry eyes and increased intraocular pressure, which can affect overall eye health.
FAQs ( Frequently Asked Questions )
1. How often should I have my eyes checked?
Answer : It is recommended to have a comprehensive eye exam every one to two years, depending on your age, risk factors, and whether you wear corrective lenses.
2. What are the common symptoms of eye problems?
Answer : Common symptoms include blurry vision, eye pain, redness, dry eyes, excessive tearing, floaters, and flashes of light. If you experience any of these, consult an eye care professional.
3. How can I protect my eyes from digital strain?
Answer : Follow the 20-20-20 rule: every 20 minutes, look at something 20 feet away for at least 20 seconds. Additionally, ensure proper lighting, reduce glare, and adjust screen brightness.
4. Can diet affect my eye health?
Answer : Yes, a diet rich in vitamins A, C, and E, omega-3 fatty acids, and antioxidants can support eye health. Foods like leafy greens, fish, nuts, and citrus fruits are particularly beneficial.
5. What are the risks of not wearing sunglasses?
Answer : Not wearing sunglasses can expose your eyes to harmful UV rays, increasing the risk of cataracts, macular degeneration, and photokeratitis (sunburn of the eye).
6. How can I prevent eye infections?
Answer : Maintain good hygiene by washing your hands before touching your eyes, avoiding touching or rubbing your eyes frequently, and properly cleaning contact lenses.
7. What causes dry eyes and how can I treat them?
Answer : Dry eyes can be caused by environmental factors, prolonged screen use, certain medications, and aging. Treatment includes using artificial tears, taking regular breaks from screens, and using a humidifier.
8. Are there exercises to improve eye health?
Answer : Yes, exercises like palming, blinking, near and far focusing, and the 20-20-20 rule can help reduce eye strain and maintain eye health.
9. What is the impact of smoking on eye health?
Answer : Smoking increases the risk of cataracts, age-related macular degeneration, and optic nerve damage, all of which can lead to vision loss.
10. How can I prevent age-related vision problems?
Answer : Maintain a healthy diet, avoid smoking, wear sunglasses, manage chronic conditions like diabetes, and have regular eye exams to detect and treat issues early.
Conclusion
Maintaining eye health is essential for preserving vision and overall quality of life. Regular eye exams, a balanced diet rich in essential nutrients, and protective measures against harmful UV rays and digital strain are crucial steps in safeguarding our eyes. Practicing good hygiene, managing underlying health conditions, and avoiding harmful habits such as smoking can further enhance eye health. By being proactive and informed about eye care, we can prevent many common vision problems and ensure that our eyes remain healthy and functional throughout our lives. Prioritizing eye health is an investment in our future well-being and clarity of sight.
You might also like our Food articles.
“Motivation is what gets you started. Habit is what keeps you going.” – Jim Ryun
If you would like more information about the 2024, please send us an email.
Written by Fitness Goal 4U
Smart Fitness Goals - Achieve Health with Simple Steps
Smart fitness goals focus on being Specific, Measurable, Achievable, Relevant, and Time-bound. They help you create a clear path to success, stay motivated, and track progress. Whether its weight loss, strength building, or improved endurance, smart goals guide your fitness journey, ensuring steady growth and sustainable results tailored to your needs.
“Confidence comes from discipline and training.” – Robert Kiyosaki
Maintaining healthy ears is crucial for overall well-being, as our ears play a vital role in communication, balance, and connection to the world around us. Our hearing can be easily damaged by various factors, including loud noises, infections, and poor hygiene practices. Despite their importance, ear health is often overlooked until problems arise. However, with a few simple habits and mindful practices, you can protect your hearing and ensure your ears remain healthy.
This guide provides practical tips for ear care, from proper cleaning techniques to dietary recommendations. It also addresses common issues and preventive measures, helping you maintain optimal ear health. By following these guidelines, you can reduce the risk of hearing loss, infections, and other ear-related problems, ensuring that your ears stay healthy and functional throughout your life. Prioritizing ear health today can lead to a better quality of life and long-lasting auditory health.
Foods for Healthy Ears
A healthy diet can significantly impact ear health and overall hearing. Here are some foods that promote healthy ears:
1. Fish: Rich in omega-3 fatty acids and vitamin D, fish like salmon, mackerel, and sardines can help reduce the risk of hearing loss by improving blood flow to the inner ear.
2. Leafy Greens: Spinach, kale, and other leafy greens are high in folate, which aids in maintaining healthy circulation, essential for ear health.
3. Nuts and Seeds: Almonds, walnuts, flaxseeds, and chia seeds are excellent sources of magnesium, which can help protect against noise-induced hearing loss.
4. Citrus Fruits: Oranges, lemons, and other citrus fruits are high in vitamin C and antioxidants, which support the immune system and help prevent ear infections.
5. Bananas: Bananas are rich in potassium, which is vital for maintaining proper fluid balance in the body, including the fluid in the inner ear.
6. Dark Chocolate: Contains zinc, an essential mineral for immune function and maintaining the health of the inner ear.
7. Whole Grains: Brown rice, oats, and whole wheat are packed with vitamins and minerals like vitamin E, which helps protect cells in the ear from damage.
8. Eggs: Eggs are a good source of vitamin D and other nutrients that support bone health, including the bones in the ear.
9. Berries: Blueberries, strawberries, and other berries are high in antioxidants, which protect the ears from free radical damage and improve blood flow.
10. Dairy Products: Milk, cheese, and yogurt provide calcium and vitamin D, crucial for maintaining the health of the tiny bones in the ear.
Frequently Asked Questions (FAQs)
1. How often should I clean my ears?
Answer : It is generally recommended to clean your ears gently once or twice a week. Focus on cleaning the outer ear with a damp cloth and avoid inserting objects into the ear canal.
2. Can loud noises really damage my hearing?
Answer : Yes, exposure to loud noises can cause permanent damage to the delicate structures of the inner ear, leading to hearing loss. Using ear protection in noisy environments is essential.
3. What are common signs of an ear infection?
Answer : Common signs of an ear infection include ear pain, fluid drainage, difficulty hearing, a feeling of fullness in the ear, and sometimes fever.
4. How can I prevent swimmer's ear?
Answer : To prevent swimmer’s ears, keep your ears dry. Use earplugs while swimming, dry your ears thoroughly after being in water, and avoid inserting objects into your ears.
5. Is it safe to use cotton swabs to clean my ears?
Answer : No, using cotton swabs can push earwax deeper into the ear canal, potentially causing blockages and damage. It’s best to use ear drops to soften earwax and let it naturally come out or visit a healthcare professional.
6. What should I do if I experience sudden hearing loss?
Answer : If you experience sudden hearing loss, it is crucial to seek medical attention immediately. Sudden hearing loss can be a medical emergency and early treatment can be vital.
7. Can diet affect my hearing health?
Answer : Yes, a balanced diet rich in vitamins and minerals can support ear health. Foods like fish, leafy greens, nuts, and fruits can improve blood flow and reduce the risk of hearing loss.
8. What volume level is safe when using headphones?
Answer : A safe volume level when using headphones is generally 60% of the maximum volume for no more than 60 minutes at a time. This is known as the 60/60 rule.
9. How can stress impact my hearing?
Answer : High levels of stress can contribute to conditions like tinnitus (ringing in the ears). Managing stress through relaxation techniques, exercise, and adequate sleep is beneficial for ear health.
10. When should I see a doctor about ear problems?
Answer : You should see a doctor if you experience persistent ear pain, hearing loss, discharge from the ear, or if you have symptoms of an ear infection that do not improve within a few days.
Conclusion
Caring for your ears is essential for preserving your hearing and preventing potential problems. By following simple practices such as avoiding loud noises, keeping your ears clean, and incorporating a healthy diet, you can support your ear health. Remember to dry your ears properly after water activities, use ear protection in noisy environments, and avoid inserting objects into the ear canal.
Regular check-ups with an audiologist or ear specialist can help identify any issues early on, ensuring that any necessary treatments can be administered promptly. Managing stress and maintaining overall health also play a significant role in keeping your ears functioning well.
By integrating these habits into your daily routine, you can enjoy good hearing health and reduce the risk of ear-related issues. Taking proactive steps today will contribute to maintaining healthy ears and good hearing throughout your life.
You might also like our Food articles.
“Motivation is what gets you started. Habit is what keeps you going.” – Jim Ryun
If you would like more information about the 2024, please send us an email.
Written by Fitness Goal 4U
Smart Fitness Goals - Achieve Health with Simple Steps
Smart fitness goals focus on being Specific, Measurable, Achievable, Relevant, and Time-bound. They help you create a clear path to success, stay motivated, and track progress. Whether its weight loss, strength building, or improved endurance, smart goals guide your fitness journey, ensuring steady growth and sustainable results tailored to your needs.
“Confidence comes from discipline and training.” – Robert Kiyosaki
Spine back pain is a prevalent health issue that affects millions of individuals worldwide, impacting their daily activities and overall quality of life. It can stem from various causes, including muscle strain, herniated discs, poor posture, injuries, and chronic conditions such as arthritis. While back pain can be acute or chronic, its effects can range from mild discomfort to debilitating pain. Understanding the root causes, symptoms, and effective management strategies is essential for addressing this common problem. Preventative measures, including maintaining a healthy weight, practicing good posture, and engaging in regular physical activity, can significantly reduce the risk of developing back pain. Additionally, incorporating a balanced diet rich in anti-inflammatory foods can support spine health. Early intervention and appropriate treatment, ranging from physical therapy to medical interventions, are crucial for alleviating pain and preventing long-term complications, enabling individuals to lead active and fulfilling lives.
Food for Spine Back Pain
Diet plays a crucial role in managing spine back pain by reducing inflammation and providing essential nutrients for bone and joint health. Incorporating the following foods into your diet can help alleviate back pain and promote overall spine health:
1. Anti-Inflammatory Foods
- Fatty Fish: Salmon, mackerel, and sardines are rich in omega-3 fatty acids, which help reduce inflammation and support spine health.
- Berries: Blueberries, strawberries, and raspberries contain antioxidants and anti-inflammatory compounds that can help reduce pain.
- Leafy Greens: Spinach, kale, and Swiss chard are packed with vitamins, minerals, and anti-inflammatory properties beneficial for spine health.
- Nuts and Seeds: Walnuts, flaxseeds, and chia seeds provide omega-3 fatty acids and other nutrients that combat inflammation.
2. Foods for Bone and Joint Health
- Dairy or Fortified Alternatives: Milk, yogurt, cheese, and fortified plant-based milks are high in calcium and vitamin D, essential for maintaining strong bones.
- Lean Protein: Chicken, turkey, tofu, and beans provide necessary protein for muscle repair and support spine stability.
- Orange and Yellow Fruits and Vegetables: Carrots, sweet potatoes, oranges, and bell peppers are rich in vitamins A and C, which support collagen production and joint health.
3. Overall Wellness Foods
- Whole Grains: Brown rice, quinoa, and whole wheat bread offer fiber and essential nutrients for overall health and inflammation reduction.
- Olive Oil: Contains healthy fats and anti-inflammatory properties, making it a great addition to your diet.
- Green Tea: Rich in antioxidants and anti-inflammatory compounds, green tea can help reduce inflammation and support spine health.
4. Additional Tips
- Hydration: Drinking plenty of water helps keep spinal discs hydrated and supports overall health.
- Balanced Diet: Ensuring a well-rounded diet that includes a variety of nutrients is crucial for maintaining spine health and preventing back pain.
- Avoid Processed Foods: Limiting intake of sugary, high-fat, and highly processed foods can reduce inflammation and support overall well-being.
Foods to Avoid for Spine Back Pain
Managing spine back pain involves not only incorporating beneficial foods but also avoiding those that can exacerbate inflammation and contribute to pain. Here are some foods to minimize or eliminate from your diet to help reduce spine back pain:
1. Sugary Foods and Beverages
- Examples: Sodas, candies, pastries, sweetened cereals.
- Why: High sugar intake can lead to increased inflammation and weight gain, which can strain the spine.
2. Refined Carbohydrates
- Examples: White bread, white rice, pasta, pastries.
- Why: These can cause spikes in blood sugar levels and contribute to inflammation.
3. Processed Foods
- Examples: Fast food, packaged snacks, processed meats.
- Why: Often high in unhealthy fats, sugars, and additives that can increase inflammation and contribute to poor health.
4. Fried Foods
- Examples: French fries, fried chicken, doughnuts.
- Why: High in trans fats and unhealthy oils, which can promote inflammation and lead to weight gain.
5. Red and Processed Meats
- Examples: Beef, pork, bacon, sausages.
- Why: High in saturated fats and can increase inflammation and contribute to conditions that cause back pain.
6. Dairy Products (for some people)
- Examples: Whole milk, cheese, ice cream.
- Why: Some individuals may experience increased inflammation or digestive issues from dairy products.
7. High-Sodium Foods
- Examples: Canned soups, salted snacks, processed foods.
- Why: Excess sodium can cause water retention and increase pressure on the spine and joints.
8. Alcohol
- Why: Can increase inflammation, interfere with pain management, and contribute to poor sleep quality, which can exacerbate back pain.
9. Excessive Caffeine
- Examples: Coffee, energy drinks, certain teas.
- Why: Excessive caffeine can lead to dehydration and increased muscle tension, which can worsen back pain.
10. Artificial Additives
- Examples: Artificial sweeteners, preservatives, food colorings.
- Why: These can contribute to inflammation and other health issues that may affect spine health.
FAQs ( Frequently Asked Questions )
1. What are the common causes of spine back pain?
Answer : Common causes include muscle or ligament strain, herniated discs, degenerative disc disease, spinal stenosis, poor posture, injuries, arthritis, and scoliosis.
2. When should I see a doctor for back pain?
Answer : Seek medical attention if the pain is severe, lasts more than a few weeks, radiates down the legs, causes weakness or numbness, or is accompanied by unexplained weight loss or fever.
3. What are the symptoms of a herniated disc?
Answer : Symptoms include sharp or burning pain in the back, numbness or tingling in the limbs, muscle weakness, and pain that worsens with certain movements.
4. Can poor posture cause back pain?
Answer : Yes, poor posture can lead to muscle strain and imbalances, which can cause or exacerbate back pain.
5. What are some effective treatments for spine back pain?
Answer : Treatments include physical therapy, exercise, stretching, pain medication, hot/cold therapy, chiropractic care, and in severe cases, surgery.
6. How can I prevent back pain?
Answer : Maintain a healthy weight, exercise regularly, practice good posture, avoid lifting heavy objects improperly, and use ergonomic furniture.
7. Is it safe to exercise with back pain?
Answer : Yes, gentle exercises and stretches can help relieve back pain, but it's important to avoid activities that cause pain or discomfort. Consult with a healthcare provider before starting any exercise routine.
8. Can stress cause back pain?
Answer : Yes, stress can lead to muscle tension and spasms, which can contribute to back pain.
9. What role does diet play in managing back pain?
Answer : A diet rich in anti-inflammatory foods can help reduce inflammation and support overall spine health. Avoiding processed foods, sugary foods, and excessive alcohol can also be beneficial.
10. Are there any home remedies for back pain relief?
Answer : Home remedies include applying heat or ice packs, gentle stretching, staying active, using over-the-counter pain relievers, and practicing relaxation techniques like yoga or meditation.
11. Can sleeping positions affect back pain?
Answer : Yes, sleeping on your back or side with proper support can help reduce back pain. Avoid sleeping on your stomach as it can strain the spine.
12. How long does it take for back pain to improve?
Answer : The duration varies depending on the cause and severity of the pain. Acute back pain often improves within a few days to weeks with proper care, while chronic pain may require longer-term management.
13. What are the signs that back pain might be serious?
Answer : Serious signs include severe and unrelenting pain, pain accompanied by fever, unexplained weight loss, numbness or weakness in the legs, and loss of bladder or bowel control.
Conclusion
Spine back pain is a common issue that can significantly impact daily life. Understanding its causes and symptoms is crucial for effective management. Adopting a healthy lifestyle, including a balanced diet rich in anti-inflammatory foods, regular exercise, and proper posture, can help prevent and alleviate pain. Avoiding foods that exacerbate inflammation and seeking appropriate medical care when necessary are essential steps in managing spine back pain. Early intervention and consistent management can lead to better outcomes, allowing individuals to maintain an active and fulfilling life despite the challenges of back pain.
You might also like our Food articles.
“Motivation is what gets you started. Habit is what keeps you going.” – Jim Ryun
If you would like more information about the 2024, please send us an email.
Written by Fitness Goal 4U
Smart Fitness Goals - Achieve Health with Simple Steps
Smart fitness goals focus on being Specific, Measurable, Achievable, Relevant, and Time-bound. They help you create a clear path to success, stay motivated, and track progress. Whether its weight loss, strength building, or improved endurance, smart goals guide your fitness journey, ensuring steady growth and sustainable results tailored to your needs.
“Confidence comes from discipline and training.” – Robert Kiyosaki
Healthy Bones are fundamental to a vibrant and active lifestyle, providing structure, protecting organs, anchoring muscles, and storing calcium. From childhood through adulthood, maintaining bone health is crucial as it directly impacts mobility and overall well-being. Bones constantly undergo a process of remodeling, where old bone tissue is replaced by new, necessitating a steady supply of essential nutrients and regular physical activity. Calcium and vitamin D are pivotal for bone strength, while weight-bearing and resistance exercises help build and maintain bone density. Factors such as age, diet, lifestyle, and genetics influence bone health, making it essential to adopt proactive measures early on. As we age, bone density naturally decreases, increasing the risk of fractures and osteoporosis. Understanding the importance of bone health and implementing effective strategies can prevent bone-related issues, ensuring a robust skeletal system that supports an active, healthy life throughout all stages of life.
Food for Healthy Bones
A well-balanced diet rich in specific nutrients is essential for maintaining healthy bones. Here are some of the best foods for bone health:
1. Dairy Products: Milk, cheese, and yogurt are excellent sources of calcium, which is crucial for bone strength.
2. Leafy Greens: Vegetables like kale, spinach, and collard greens are high in calcium and vitamin K, both important for bone health.
3. Fish: Fatty fish like salmon, sardines, and mackerel are rich in vitamin D and omega-3 fatty acids, which help the body absorb calcium and maintain bone density.
4. Nuts and Seeds: Almonds, chia seeds, and sesame seeds provide calcium, magnesium, and phosphorus, essential minerals for bone health.
5. Fortified Foods: Some cereals, orange juice, and plant-based milk alternatives are fortified with calcium and vitamin D.
6. Eggs: Egg yolks contain vitamin D, which is necessary for calcium absorption.
7. Fruits: Oranges, figs, and prunes are good sources of calcium and other nutrients that support bone health.
8. Legumes: Beans, lentils, and chickpeas are rich in calcium, magnesium, and fiber, all beneficial for bones.
9. Whole Grains: Foods like oats, quinoa, and brown rice provide magnesium, which plays a role in bone density.
10. Lean Protein: Chicken, turkey, and tofu provide protein, which is essential for bone repair and strength.
Food avoid for Healthy Bones
While certain foods and beverages promote bone health, others can negatively impact it. Here are some foods and drinks to avoid or limit for maintaining healthy bones:
1. High-Sodium Foods: Excessive salt intake can lead to calcium loss through urine. Avoid processed foods, canned soups, and salty snacks.
2. Sugary Drinks: Beverages high in sugar, like soda and certain fruit juices, can interfere with calcium absorption and contribute to bone loss.
3. Caffeine: High caffeine intake can decrease calcium absorption. Limit coffee, tea, and energy drinks.
4. Alcohol: Excessive alcohol consumption can interfere with the body's ability to absorb calcium and other nutrients essential for bone health.
5. Soft Drinks: Colas and other sodas contain phosphoric acid, which can lead to an imbalance in bone calcium levels.
6. Red and Processed Meats: High consumption of red and processed meats can lead to increased calcium excretion in urine.
7. Oxalate-Rich Foods: Foods high in oxalates, such as spinach and rhubarb, can hinder calcium absorption if consumed in large amounts.
8. Trans Fats: Found in fried foods, baked goods, and margarine, trans fats can negatively affect bone density.
9. Refined Grains: Foods like white bread, white rice, and pasta lack the nutrients found in whole grains that support bone health.
10. Certain Vegetable Oils: High levels of omega-6 fatty acids in oils like corn and soybean oil can interfere with bone health if not balanced with omega-3 fatty acids.
FAQs (Frequently Asked Questions)
1. Why is bone health important?
Answer : Bone health is crucial for maintaining mobility, protecting internal organs, and providing structure and support to the body. Healthy bones reduce the risk of fractures and osteoporosis.
2. How can I improve my bone health?
Answer : Improving bone health involves a combination of a balanced diet rich in calcium and vitamin D, regular weight-bearing and resistance exercises, and avoiding harmful habits like smoking and excessive alcohol consumption.
3. What are the best sources of calcium?
Answer : Good sources of calcium include dairy products (milk, cheese, yogurt), leafy green vegetables (kale, broccoli), nuts and seeds (almonds, sesame seeds), and fortified foods (orange juice, cereals).
4. Why is vitamin D important for bones?
Answer : Vitamin D helps the body absorb calcium, which is essential for building and maintaining strong bones. Without sufficient vitamin D, bones can become thin, brittle, or misshapen.
5. What are the signs of poor bone health?
Answer : Signs of poor bone health include frequent fractures, back pain, a decrease in height over time, and a stooped posture. Osteoporosis is a common condition associated with weak bones.
6. Can exercise help improve bone health?
Answer : Yes, weight-bearing exercises (like walking, running, and dancing) and resistance training (like lifting weights) are effective in improving bone density and strength.
7. Are there foods I should avoid for better bone health?
Answer : Yes, foods high in sodium, sugar, caffeine, and alcohol can negatively impact bone health. It's also advisable to limit intake of soft drinks, red and processed meats, and foods high in oxalates and trans fats.
8. Can I take supplements for bone health?
Answer : If you cannot get enough calcium and vitamin D from your diet, supplements can help. It's important to consult with a healthcare provider before starting any supplement regimen.
9. How does aging affect bone health?
Answer : As we age, bone density naturally decreases, leading to a higher risk of fractures and osteoporosis. It's important to maintain a healthy diet, stay active, and monitor bone health as we age.
10. What is osteoporosis?
Answer : Osteoporosis is a condition characterized by weak and brittle bones, increasing the risk of fractures. It is more common in older adults, especially postmenopausal women.
11. How can I prevent osteoporosis?
Answer : Preventing osteoporosis involves a combination of a calcium-rich diet, adequate vitamin D intake, regular exercise, avoiding smoking and excessive alcohol, and undergoing bone density tests as recommended by a healthcare provider.
12. Can children develop bone health issues?
Answer : Yes, children can develop bone health issues, especially if they do not get enough calcium and vitamin D or if they lead a sedentary lifestyle. Encouraging a balanced diet and physical activity is important for children's bone health.
13. Is it ever too late to improve bone health?
Answer : No, it's never too late to improve bone health. While bone density decreases with age, adopting healthy lifestyle habits can help strengthen bones and reduce the risk of fractures.
Conclusion
Maintaining healthy bones is essential for overall well-being and mobility. A balanced diet rich in calcium and vitamin D, combined with regular weight-bearing and resistance exercises, plays a crucial role in promoting bone health. Avoiding harmful habits like excessive alcohol consumption, smoking, and high-sodium or sugary foods further supports bone strength. Monitoring bone density, especially as we age, and making lifestyle adjustments as needed can prevent conditions like osteoporosis. By prioritizing bone health through proper nutrition, exercise, and lifestyle choices, we can ensure a strong skeletal foundation for a healthier, more active life.
You might also like our Food articles.
“Motivation is what gets you started. Habit is what keeps you going.” – Jim Ryun
If you would like more information about the 2024, please send us an email.
Written by Fitness Goal 4U
Smart Fitness Goals - Achieve Health with Simple Steps
Smart fitness goals focus on being Specific, Measurable, Achievable, Relevant, and Time-bound. They help you create a clear path to success, stay motivated, and track progress. Whether its weight loss, strength building, or improved endurance, smart goals guide your fitness journey, ensuring steady growth and sustainable results tailored to your needs.
“Confidence comes from discipline and training.” – Robert Kiyosaki
Biceps workouts are a crucial component of any comprehensive strength training routine, targeting the biceps brachii, brachialis, and brachioradialis muscles to enhance arm size, strength, and definition. Whether you're a beginner or an experienced lifter, focusing on the biceps not only improves the aesthetics of your arms but also supports functional strength for everyday activities and other compound movements. A well-rounded biceps workout involves a combination of compound exercises, like chin-ups and rows, which engage multiple muscle groups, and isolation exercises, such as barbell curls, dumbbell curls, and hammer curls, to specifically target the biceps. Proper form, controlled movements, and a full range of motion are essential to maximize muscle engagement and prevent injury. Additionally, varying your exercises, grips, and angles can help target different parts of the biceps for balanced development. Consistency, along with proper nutrition and recovery, is key to achieving noticeable results in biceps strength and definition.
Best 10 Biceps Workout
1. Standing Barbell Curl

The standing barbell curl is a fundamental exercise that primarily targets the biceps brachii. It is a staple in many strength training routines due to its simplicity and effectiveness in building biceps size and strength.
How to Do It
1. Setup:
- Stand with your feet shoulder-width apart.
- Hold a barbell with an underhand grip (palms facing up), hands positioned shoulder-width apart.
- Let your arms hang down fully extended in front of you, with the barbell at thigh level.
2. Execution:
- Start the movement by contracting your biceps to curl the barbell upward.
- Keep your elbows stationary and close to your torso throughout the entire movement.
- Continue curling the barbell until it reaches shoulder level, fully contracting your biceps at the top.
- Pause briefly at the top of the movement.
- Slowly lower the barbell back to the starting position in a controlled manner.
3. Breathing:
- Exhale as you curl the barbell upwards.
- Inhale as you lower the barbell back down.
Tips and Tricks
- Elbow Position: Ensure your elbows remain fixed and close to your sides to prevent them from drifting forward or backward. This helps isolate the biceps.
- Controlled Movement: Focus on a slow and controlled movement to maximize muscle engagement and avoid using momentum. This will enhance the effectiveness of the exercise.
- Grip Width: Adjust your grip width to what feels comfortable for your wrists and shoulders. A shoulder-width grip is standard, but you can experiment with a slightly narrower or wider grip to target different parts of the biceps.
- Avoid Swinging: Do not use your back or shoulders to help lift the barbell. Keep the movement isolated to your biceps for better muscle activation.
- Full Range of Motion: Ensure you use a full range of motion, fully extending your arms at the bottom and fully contracting your biceps at the top.
- Weight Selection: Choose a weight that allows you to perform the exercise with proper form. As you progress, gradually increase the weight to continue challenging your muscles.
- Consistent Practice: Incorporate this exercise into your regular biceps routine to build strength and muscle over time.
2. Dumbbell Curl

The dumbbell curl is a fundamental exercise that isolates each bicep, promoting balanced muscle development and strength. It is versatile and can be performed in various positions, including standing or seated.
How to Do It
1. Setup
- Stand or sit with a dumbbell in each hand.
- Allow your arms to hang at your sides with your palms facing forward.
- Keep your feet shoulder-width apart if standing.
2. Execution
- Begin by contracting your biceps to curl the dumbbells upwards.
- Keep your elbows stationary and close to your torso.
- Curl the dumbbells simultaneously or alternately towards your shoulders.
- Continue curling until the dumbbells are at shoulder level, fully contracting your biceps at the top.
- Pause briefly at the top of the movement.
- Slowly lower the dumbbells back to the starting position in a controlled manner.
3. Breathing
- Exhale as you curl the dumbbells upwards.
- Inhale as you lower the dumbbells back down.
Tips and Tricks
- Elbow Position: Ensure your elbows remain fixed and close to your sides. This helps focus the work on your biceps and reduces the involvement of other muscles.
- Controlled Movement: Use a slow, controlled motion to maximize muscle engagement and avoid using momentum. This enhances the effectiveness of the exercise.
- Full Range of Motion: Use a full range of motion, fully extending your arms at the bottom and fully contracting your biceps at the top.
- Avoid Swinging: Do not use your back or shoulders to help lift the dumbbells. Keep the movement isolated to your biceps for better muscle activation.
- Grip Variation: You can vary your grip (neutral, supinated, or pronated) to target different parts of the biceps and forearms.
- Weight Selection: Choose a weight that allows you to perform the exercise with proper form. As you progress, gradually increase the weight to continue challenging your muscles.
- Consistent Practice: Incorporate this exercise into your regular biceps routine to build strength and muscle over time.
3. Hammer Curl

The hammer curl is an effective biceps exercise that targets the brachialis and brachioradialis muscles in addition to the biceps brachii. It uses a neutral grip (palms facing each other), which can be easier on the wrists and helps in building arm strength and size.
How to Do It
1. Setup
- Stand with your feet shoulder-width apart.
- Hold a dumbbell in each hand with a neutral grip (palms facing your body).
- Allow your arms to hang at your sides.
2. Execution
- Begin by curling the dumbbells upwards while keeping your palms facing each other.
- Keep your elbows stationary and close to your torso throughout the movement.
- Continue curling until the dumbbells are at shoulder level, fully contracting your biceps at the top.
- Pause briefly at the top of the movement.
- Slowly lower the dumbbells back to the starting position in a controlled manner.
3. Breathing
- Exhale as you curl the dumbbells upwards.
- Inhale as you lower the dumbbells back down.
Tips and Tricks
- Elbow Position: Ensure your elbows remain fixed and close to your sides to keep the focus on your biceps and brachialis muscles.
- Controlled Movement: Use a slow and controlled motion to maximize muscle engagement and avoid using momentum. This enhances the effectiveness of the exercise.
- Full Range of Motion: Use a full range of motion, fully extending your arms at the bottom and fully contracting your biceps at the top.
- Avoid Swinging: Do not use your back or shoulders to help lift the dumbbells. Keep the movement isolated to your biceps for better muscle activation.
- Grip Consistency: Maintain a neutral grip throughout the exercise to target the intended muscles effectively.
- Weight Selection: Choose a weight that allows you to perform the exercise with proper form. As you progress, gradually increase the weight to continue challenging your muscles.
- Consistent Practice: Incorporate this exercise into your regular biceps routine to build strength and muscle over time.
4. Preacher Curl

The preacher curl is an isolation exercise that targets the biceps brachii. It is performed on a preacher bench, which helps eliminate the involvement of other muscle groups, providing a more focused and intense bicep workout.
How to Do It
1. Setup
- Adjust the seat of the preacher bench so that when seated, your upper arms lie flat on the bench pad, and your chest is firmly against the bench.
- Hold a barbell or EZ curl bar with an underhand grip (palms facing up), hands positioned shoulder-width apart.
- Rest your upper arms on the preacher bench pad, allowing your arms to hang down fully extended.
2. Execution
- Begin by curling the bar towards your shoulders, contracting your biceps.
- Keep your upper arms firmly against the bench and your elbows stationary.
- Continue curling until the bar reaches shoulder level or just above the pad, fully contracting your biceps at the top.
- Pause briefly at the top of the movement.
- Slowly lower the bar back to the starting position in a controlled manner, fully extending your arms.
3. Breathing
- Exhale as you curl the bar upwards.
- Inhale as you lower the bar back down.
Tips and Tricks
- Elbow Position: Ensure your elbows remain fixed and close to your body, keeping them stationary against the bench pad. This helps focus the work on your biceps and reduces the involvement of other muscles.
- Controlled Movement: Use a slow and controlled motion to maximize muscle engagement and avoid using momentum. This enhances the effectiveness of the exercise.
- Full Range of Motion: Use a full range of motion, fully extending your arms at the bottom and fully contracting your biceps at the top.
- Avoid Overextending: Do not overextend your elbows at the bottom of the movement to prevent strain and potential injury.
- Grip Variation: You can use a narrow or wide grip on the bar to target different parts of the biceps. Experiment to find what feels best for you.
- Weight Selection: Choose a weight that allows you to perform the exercise with proper form. As you progress, gradually increase the weight to continue challenging your muscles.
- Consistent Practice: Incorporate this exercise into your regular biceps routine to build strength and muscle over time.
5. Concentration Curl

The concentration curl is a highly effective isolation exercise that targets the biceps brachii. It emphasizes the peak contraction of the biceps, helping to build size and definition. This exercise is performed one arm at a time, allowing for focused attention on each bicep.
How to Do It
1. Setup
- Sit on a bench with your legs spread, your feet flat on the floor.
- Hold a dumbbell in one hand, with your palm facing up.
- Lean forward slightly and rest the back of your upper arm against the inside of your thigh on the same side.
- Your arm should be fully extended with the dumbbell just above the floor.
2. Execution
- Begin by curling the dumbbell upwards towards your shoulder, keeping the back of your upper arm against your thigh.
- Focus on squeezing your bicep as you lift the weight.
- Continue curling until the dumbbell reaches shoulder level, fully contracting your bicep at the top.
- Pause briefly at the top of the movement.
- Slowly lower the dumbbell back to the starting position in a controlled manner, fully extending your arm.
3. Breathing
- Exhale as you curl the dumbbell upwards.
- Inhale as you lower the dumbbell back down.
Tips and Tricks
- Elbow Position: Ensure your elbow remains fixed against your thigh throughout the exercise to maintain isolation of the bicep.
- Controlled Movement: Use a slow and controlled motion to maximize muscle engagement and avoid using momentum. This enhances the effectiveness of the exercise.
- Full Range of Motion: Use a full range of motion, fully extending your arm at the bottom and fully contracting your bicep at the top.
- Avoid Swinging: Do not use your body to help lift the dumbbell. Keep the movement isolated to your bicep for better muscle activation.
- Focus on Contraction: Concentrate on squeezing your bicep at the top of the movement for maximum muscle engagement.
- Weight Selection: Choose a weight that allows you to perform the exercise with proper form. As you progress, gradually increase the weight to continue challenging your muscles.
- Consistent Practice: Incorporate this exercise into your regular biceps routine to build strength and muscle over time.
- Alternate Arms: Perform the exercise for one arm, then switch to the other arm to ensure balanced development.
6. Cable Curl

The cable curl is an isolation exercise that targets the biceps brachii using a cable machine. The constant tension provided by the cable offers a unique challenge compared to free weights, ensuring continuous muscle engagement throughout the entire range of motion.
How to Do It
1. Setup
- Attach a straight bar or an EZ-curl bar to a low pulley on a cable machine.
- Stand facing the machine, with feet shoulder-width apart.
- Grasp the bar with an underhand grip (palms facing up), hands positioned shoulder-width apart.
- Stand close enough to the machine so the cable remains taut when your arms are fully extended.
2. Execution
- Begin by curling the bar upwards towards your shoulders, keeping your elbows stationary and close to your torso.
- Focus on contracting your biceps as you lift the weight.
- Continue curling until the bar is at shoulder level, fully contracting your biceps at the top.
- Pause briefly at the top of the movement.
- Slowly lower the bar back to the starting position in a controlled manner, fully extending your arms.
3. Breathing
- Exhale as you curl the bar upwards.
- Inhale as you lower the bar back down.
Tips and Tricks
- Elbow Position: Keep your elbows fixed and close to your sides throughout the exercise to maintain isolation of the biceps.
- Controlled Movement: Use a slow and controlled motion to maximize muscle engagement and avoid using momentum. This enhances the effectiveness of the exercise.
- Full Range of Motion: Use a full range of motion, fully extending your arms at the bottom and fully contracting your biceps at the top.
- Avoid Leaning: Do not lean back or use your body to help lift the weight. Keep the movement isolated to your biceps for better muscle activation.
- Grip Variation: Experiment with different attachments and grips (e.g., rope attachment, narrow or wide grip) to target different parts of the biceps and forearms.
- Cable Height: Adjust the height of the pulley to target different angles of resistance. A lower pulley position is standard, but you can try different heights to vary the exercise.
- Weight Selection: Choose a weight that allows you to perform the exercise with proper form. As you progress, gradually increase the weight to continue challenging your muscles.
- Consistent Practice: Incorporate this exercise into your regular biceps routine to build strength and muscle over time.
7. Incline Dumbbell Curl
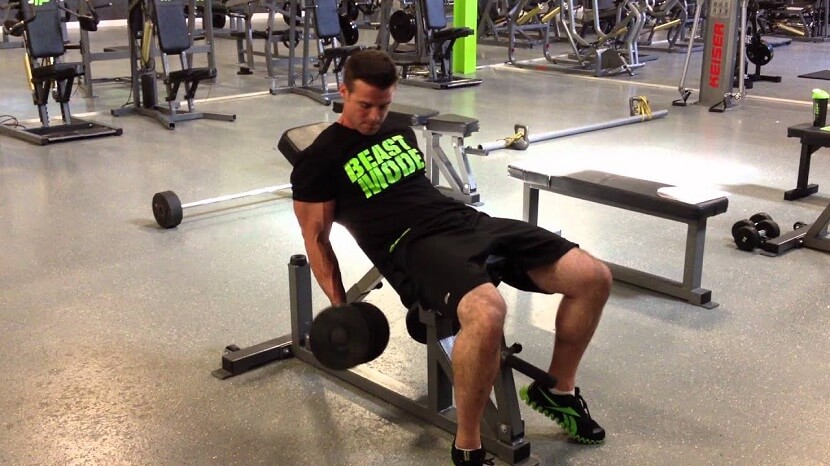
The incline dumbbell curl is an isolation exercise that targets the biceps brachii, particularly emphasizing the long head of the biceps. By performing this exercise on an incline bench, you increase the stretch on the biceps, which can lead to greater muscle activation and growth.
How to Do It
1. Setup
- Set an adjustable bench to an incline angle of about 45 degrees.
- Sit on the bench with your back firmly against the pad.
- Hold a dumbbell in each hand with an underhand grip (palms facing up).
- Let your arms hang straight down, fully extended.
2. Execution
- Begin by curling the dumbbells upwards towards your shoulders, keeping your elbows stationary and close to your torso.
- Focus on contracting your biceps as you lift the weights.
- Continue curling until the dumbbells are at shoulder level, fully contracting your biceps at the top.
- Pause briefly at the top of the movement.
- Slowly lower the dumbbells back to the starting position in a controlled manner, fully extending your arms.
3. Breathing
- Exhale as you curl the dumbbells upwards.
- Inhale as you lower the dumbbells back down.
Tips and Tricks:
- Elbow Position: Keep your elbows fixed and close to your sides throughout the exercise to maintain isolation of the biceps.
- Controlled Movement: Use a slow and controlled motion to maximize muscle engagement and avoid using momentum. This enhances the effectiveness of the exercise.
- Full Range of Motion: Use a full range of motion, fully extending your arms at the bottom and fully contracting your biceps at the top.
- Avoid Swinging: Do not use your back or shoulders to help lift the dumbbells. Keep the movement isolated to your biceps for better muscle activation.
- Bench Angle: Adjust the incline angle to vary the stretch and challenge on the biceps. A lower angle increases the stretch, while a higher angle reduces it.
- Grip Variation: You can vary your grip (e.g., neutral grip) to target different parts of the biceps and forearms.
- Weight Selection: Choose a weight that allows you to perform the exercise with proper form. As you progress, gradually increase the weight to continue challenging your muscles.
- Consistent Practice: Incorporate this exercise into your regular biceps routine to build strength and muscle over time.
8. Spider Curl

The spider curl is an isolation exercise that targets the biceps brachii, particularly emphasizing the peak contraction of the biceps. Performed on an incline bench, it eliminates the use of momentum and other muscle groups, providing a highly focused biceps workout.
How to Do It
1. Setup
- Adjust an incline bench to a 45-degree angle.
- Lie face down on the bench with your chest and stomach against the pad, and your feet firmly planted on the floor.
- Hold a dumbbell in each hand with an underhand grip (palms facing up), letting your arms hang straight down towards the floor.
2. Execution
- Begin by curling the dumbbells upwards towards your shoulders, keeping your elbows stationary and close to your torso.
- Focus on contracting your biceps as you lift the weights.
- Continue curling until the dumbbells are at shoulder level, fully contracting your biceps at the top.
- Pause briefly at the top of the movement.
- Slowly lower the dumbbells back to the starting position in a controlled manner, fully extending your arms.
3. Breathing
- Exhale as you curl the dumbbells upwards.
- Inhale as you lower the dumbbells back down.
Tips and Tricks
- Elbow Position: Keep your elbows fixed and stationary throughout the exercise to maintain isolation of the biceps.
- Controlled Movement: Use a slow and controlled motion to maximize muscle engagement and avoid using momentum. This enhances the effectiveness of the exercise.
- Full Range of Motion: Use a full range of motion, fully extending your arms at the bottom and fully contracting your biceps at the top.
- Avoid Swinging: Do not use your back or shoulders to help lift the dumbbells. Keep the movement isolated to your biceps for better muscle activation.
- Grip Variation: You can vary your grip (e.g., neutral grip) to target different parts of the biceps and forearms.
- Weight Selection: Choose a weight that allows you to perform the exercise with proper form. As you progress, gradually increase the weight to continue challenging your muscles.
- Bench Angle: Ensure the bench is set at an appropriate angle to prevent discomfort and to keep the focus on the biceps.
- Consistent Practice: Incorporate this exercise into your regular biceps routine to build strength and muscle over time.
9. Zottman Curl

The Zottman curl is a unique and effective exercise that targets both the biceps and the forearms. By combining a regular curl with a reverse curl, it maximizes muscle engagement in the biceps brachii, brachialis, and brachioradialis, promoting balanced arm development.
How to Do It
1. Setup
- Stand with your feet shoulder-width apart.
- Hold a dumbbell in each hand with an underhand grip (palms facing up), hands positioned shoulder-width apart.
- Let your arms hang straight down at your sides.
2. Execution
- Begin by curling the dumbbells upwards towards your shoulders, keeping your elbows stationary and close to your torso.
- Focus on contracting your biceps as you lift the weights.
- Once the dumbbells are at shoulder level, pause briefly and rotate your wrists so your palms are facing down (overhand grip).
- Slowly lower the dumbbells back to the starting position with the overhand grip, fully extending your arms.
- Rotate your wrists back to the underhand grip at the bottom to start the next repetition.
3. Breathing
- Exhale as you curl the dumbbells upwards.
- Inhale as you lower the dumbbells back down.
Tips and Tricks
- Elbow Position: Keep your elbows fixed and close to your sides throughout the exercise to maintain isolation of the biceps and forearms.
- Controlled Movement: Use a slow and controlled motion to maximize muscle engagement and avoid using momentum. This enhances the effectiveness of the exercise, particularly during the lowering phase with the overhand grip.
- Full Range of Motion: Use a full range of motion, fully extending your arms at the bottom and fully contracting your biceps at the top.
- Wrist Rotation: Ensure smooth wrist rotation at the top of the movement to transition from the underhand to overhand grip. This helps target the forearms effectively.
- Avoid Swinging: Do not use your back or shoulders to help lift the dumbbells. Keep the movement isolated to your arms for better muscle activation.
- Weight Selection: Choose a weight that allows you to perform the exercise with proper form. As you progress, gradually increase the weight to continue challenging your muscles.
- Balanced Development: Incorporate the Zottman curl into your regular arm routine to ensure balanced development of the biceps and forearms.
- Consistent Practice: Regularly include this exercise in your workouts to build strength and muscle over time.
10. Chin-Up

The chin-up is a powerful bodyweight exercise that primarily targets the biceps brachii and the latissimus dorsi (lats). It also engages the shoulders, forearms, and core, making it an excellent compound movement for overall upper body strength and development.
How to Do It
1. Setup
- Find a pull-up bar and stand directly below it.
- Grip the bar with an underhand grip (palms facing you), hands positioned shoulder-width apart.
- Hang from the bar with your arms fully extended and your legs slightly bent at the knees or crossed at the ankles.
2. Execution
- Begin by pulling your body upwards towards the bar by bending your elbows and engaging your biceps and lats.
- Keep your elbows close to your body as you lift.
- Continue pulling until your chin is above the bar, fully contracting your biceps at the top.
- Pause briefly at the top of the movement.
- Slowly lower your body back to the starting position in a controlled manner, fully extending your arms.
3. Breathing
- Exhale as you pull your body upwards.
- Inhale as you lower your body back down.
Tips and Tricks
- Grip: Ensure a firm grip on the bar to prevent slipping and to maximize control throughout the movement.
- Elbow Position: Keep your elbows close to your body to maintain focus on the biceps and lats.
- Controlled Movement: Use a slow and controlled motion, particularly on the way down, to maximize muscle engagement and avoid using momentum. This enhances the effectiveness of the exercise and reduces the risk of injury.
- Core Engagement: Engage your core throughout the movement to maintain stability and prevent swinging.
- Range of Motion: Use a full range of motion, fully extending your arms at the bottom and ensuring your chin is above the bar at the top.
- Avoid Kipping: Do not use your legs or momentum to help lift your body. Keep the movement strict to isolate the target muscles.
- Progression: If you are unable to perform a full chin-up, use resistance bands for assistance or perform negative chin-ups (focusing on the lowering phase) to build strength.
- Consistent Practice: Incorporate chin-ups into your regular workout routine to build strength and muscle over time.
FAQs (Frequently Asked Questions)
1. How often should I train my biceps?
Answer : It's generally recommended to train your biceps 2-3 times per week, allowing at least 48 hours of rest between sessions to ensure proper recovery and muscle growth.
2. What is the best exercise for biceps growth?
Answer : There isn't a single "best" exercise, as effective biceps growth comes from a combination of exercises. Key exercises include standing barbell curls, dumbbell curls, hammer curls, and chin-ups.
3. How many sets and reps should I do for biceps?
Answer : For hypertrophy (muscle growth), aim for 3-4 sets of 8-12 reps. For strength, you might do 4-6 sets of 4-6 reps. Adjust based on your goals and experience level.
4. Should I use heavy weights or lighter weights for biceps training?
Answer : Both heavy and light weights can be effective. Heavy weights with lower reps build strength, while lighter weights with higher reps build endurance and muscle definition. Incorporate a mix of both in your routine.
5. How can I avoid plateauing in my biceps training?
Answer : Vary your exercises, rep ranges, and weights regularly. Incorporate different angles, grips, and equipment to continuously challenge your muscles and promote growth.
6. Can I train my biceps every day?
Answer : Training biceps every day is not recommended as it can lead to overtraining, which hinders recovery and growth. Ensure adequate rest between workouts.
7. Is it necessary to use supplements for biceps growth?
Answer : Supplements can support your training but are not necessary for growth. Focus on a balanced diet rich in protein, carbs, and healthy fats. Supplements like protein powder or BCAAs can be beneficial if you have difficulty meeting your nutritional needs through food alone.
8. How long does it take to see results in biceps growth?
Answer : Visible results can vary based on genetics, diet, and consistency. Generally, you may start to see noticeable changes in 4-8 weeks with consistent training and proper nutrition.
9. Do I need to do different exercises for the short and long head of the biceps?
Answer : Yes, incorporating a variety of exercises that target different angles can help develop both the short and long head of the biceps. For example, incline curls emphasize the long head, while preacher curls target the short head.
10. Can I get big biceps just from compound exercises like pull-ups and rows?
Answer : Compound exercises like pull-ups and rows do work the biceps, but for maximum growth, it's beneficial to include isolation exercises that specifically target the biceps.
11. Should I train biceps on the same day as back or on a different day?
Answer : Training biceps on the same day as back can be efficient since many back exercises also work the biceps. However, if you prefer, you can train them on a separate day to focus more intensely on each muscle group.
12. How important is the mind-muscle connection in biceps training?
Answer : The mind-muscle connection is very important. Focusing on squeezing and contracting your biceps during each rep can significantly enhance muscle activation and growth.
13. Can women train biceps the same way as men?
Answer : Yes, women can and should train biceps in the same way as men. The principles of muscle growth and strength training apply equally to both genders.
14. Is it normal to experience soreness after biceps workouts?
Answer : Some soreness, known as delayed onset muscle soreness (DOMS), is normal, especially if you're new to training or have increased intensity. However, severe or persistent pain may indicate an injury.
15. How can I avoid wrist pain during biceps exercises?
Answer : Ensure proper form and grip during exercises. Using an EZ curl bar can reduce wrist strain compared to a straight bar. Additionally, incorporating wrist strengthening exercises and stretching can help.
16. Do I need to change my biceps workout routine regularly?
Answer : Yes, regularly changing your routine can prevent plateaus and continuously challenge your muscles. Consider changing exercises, rep ranges, and weights every 4-6 weeks.
17. Are machines or free weights better for biceps growth?
Answer : Both have their advantages. Free weights allow for a natural range of motion and require more stabilizer muscle activation, while machines provide consistent tension and can be safer for beginners. A mix of both can be beneficial.
18. How important is nutrition for biceps growth?
Answer : Nutrition is crucial. Consuming adequate protein, carbohydrates, and healthy fats supports muscle repair and growth. Hydration and sufficient calorie intake are also essential.
19. Can I use resistance bands for biceps training?
Answer : Yes, resistance bands can be an effective tool for biceps training, providing constant tension and a different type of resistance compared to free weights.
20. How can I ensure I’m using the correct form during biceps exercises?
Answer : Watching instructional videos, consulting with a trainer, or using a mirror to monitor your form can help ensure proper technique. Proper form minimizes the risk of injury and maximizes the effectiveness of your workouts.
Conclusion
Achieving well-defined and strong biceps requires consistency, proper technique, and variety. Incorporate a mix of compound and isolation exercises like barbell curls, dumbbell curls, hammer curls, preacher curls, and chin-ups. Focus on maintaining proper form, using controlled movements, and employing a full range of motion. Gradually increase weights to continue challenging your muscles. Ensure a balanced diet rich in protein, carbohydrates, and healthy fats to support muscle growth. Rest and recovery are equally important for optimal results. By following these principles, you'll see significant improvements in biceps size, strength, and definition. Stay consistent and dedicated to your training.
You might also like our weight loss articles.
“Motivation is what gets you started. Habit is what keeps you going.” – Jim Ryun
If you would like more information about the 2024, please send us an email.
Written by Fitness Goal 4U
Smart Fitness Goals - Achieve Health with Simple Steps
Smart fitness goals focus on being Specific, Measurable, Achievable, Relevant, and Time-bound. They help you create a clear path to success, stay motivated, and track progress. Whether its weight loss, strength building, or improved endurance, smart goals guide your fitness journey, ensuring steady growth and sustainable results tailored to your needs.
“Confidence comes from discipline and training.” – Robert Kiyosaki
Stretching exercises are a fundamental component of any fitness routine, offering numerous benefits for individuals of all activity levels. They help improve flexibility, enhance range of motion, and reduce the risk of injuries, making them essential for both athletes and those leading sedentary lifestyles. Stretching can alleviate muscle tension, promote relaxation, and improve circulation, contributing to overall physical and mental well-being. Incorporating a variety of stretching techniques, such as dynamic stretching for warming up and static stretching for cooling down, ensures comprehensive muscle conditioning. Whether you’re looking to enhance your athletic performance, recover from a workout, or simply improve your daily movement, regular stretching is key. This guide provides essential information and practical tips on different stretching exercises, ensuring you can safely and effectively integrate them into your fitness regimen. By making stretching a daily habit, you can enjoy greater flexibility, improved posture, and a healthier, more active lifestyle.
Best 10 Stretching Exercises
1. Standing Hamstring Stretch
The standing hamstring stretch is a fundamental exercise designed to improve flexibility in the hamstrings, which are the muscles located at the back of your thighs. This stretch helps to alleviate tightness and can prevent injuries, especially for individuals who engage in physical activities that involve the legs.
How to Do It
1. Starting Position
- Stand up straight with your feet hip-width apart.
- Keep your knees slightly bent to avoid locking them.
2. Bend Forward
- Slowly bend forward at the hips, keeping your back straight.
- Reach down towards your toes, keeping your hands parallel to the ground.
- If you can’t reach your toes, reach as far down your legs as you comfortably can.
3. Hold the Stretch
- Once you feel a gentle stretch in your hamstrings, hold the position.
- Keep your head relaxed and your neck in a neutral position.
4. Return to Starting Position
- Slowly rise back up to the starting position, rolling up through your spine.
- Take a deep breath as you come up to avoid dizziness.
5. Repeat
- Perform the stretch 2-3 times, holding each stretch for 20-30 seconds.
Tips and Tricks
- Warm-Up First: Always do a light warm-up (e.g., jogging in place) before stretching to prepare your muscles and reduce the risk of injury.
- Engage Your Core: Keep your abdominal muscles engaged to support your lower back during the stretch.
- Avoid Bouncing: Stretching should be smooth and steady. Avoid bouncing or jerking movements, as this can cause muscle strain.
- Listen to Your Body: Stretch to the point of mild discomfort but never pain. If you feel pain, ease back until you find a comfortable stretch.
- Breath Deeply: Focus on deep, steady breaths to help relax your muscles and enhance the stretch.
- Progress Gradually: If you’re new to stretching, you may not reach very far at first. That’s okay—consistency and gradual progress are key.
- Maintain Good Posture: Keep your back straight and avoid rounding your shoulders as you bend forward.
- Use Support if Needed: If you find it difficult to reach the floor, use a chair or yoga blocks for support.
2. Quadriceps Stretch
The quadriceps stretch targets the quadriceps muscles, which are located at the front of your thighs. This stretch is beneficial for improving flexibility, reducing muscle tightness, and preventing injuries, especially in activities that involve running, jumping, or cycling.
How to Do It
1. Starting Position
- Stand tall with your feet hip-width apart.
- You can hold onto a wall, chair, or another stable object for balance.
2. Grab Your Ankle
- Bend your right knee and bring your right heel up towards your buttocks.
- Reach back with your right hand and grasp your right ankle.
3. Align Your Knees
- Keep your knees close together, with your bent knee pointing straight down.
- Ensure that your standing leg is straight but not locked.
4. Hold the Stretch
- Gently pull your right ankle towards your buttocks until you feel a stretch in your right quadriceps.
- Hold the position for 20-30 seconds.
5. Switch Sides
- Slowly release your right ankle and return to the starting position.
- Repeat the stretch on your left leg.
6. Repeat
- Perform the stretch 2-3 times on each leg.
Tips and Tricks
- Warm-Up First: Perform a light warm-up (e.g., brisk walking or jogging) before stretching to prepare your muscles.
- Maintain Good Posture: Stand tall and keep your back straight throughout the stretch.
- Engage Your Core: Activate your core muscles to help maintain balance and support your lower back.
- Avoid Overstretching: Stretch to the point of mild discomfort but never pain. Overstretching can lead to injury.
- Breath Deeply: Breathe deeply and steadily to help relax your muscles and enhance the stretch.
- Use Both Hands: If you have difficulty balancing, you can use both hands to hold onto a stable object for better stability.
- Gradual Progress: If you’re new to stretching, you may not be able to bring your heel very close to your buttocks. That’s okay—gradual improvement is more important than forcing the stretch.
- Stretch Both Sides Equally: Ensure you spend equal time stretching both legs to maintain balanced flexibility.
- Stay Relaxed: Avoid tensing other parts of your body, such as your shoulders or neck, while performing the stretch.
3. Butterfly Stretch
The butterfly stretch is an effective exercise for improving flexibility in the inner thighs, hips, and groin area. It helps to alleviate tension and tightness, promoting better mobility and preventing injuries. This stretch is commonly used in yoga and various fitness routines.
How to Do It
1. Starting Position
- Sit on the floor with your back straight and your legs extended in front of you.
2. Form the Butterfly Position
- Bend your knees and bring the soles of your feet together.
- Pull your heels towards your pelvis as close as comfortably possible.
3. Hold Your Feet
- Grasp your feet or ankles with both hands.
- Keep your back straight and your shoulders relaxed.
4. Press Your Knees Down
- Gently press your knees towards the floor using your leg muscles. Avoid forcing them down with your hands.
- You should feel a stretch in your inner thighs and groin.
5. Lean Forward (Optional)
- To deepen the stretch, you can lean your torso slightly forward from your hips while keeping your back straight.
- Be gentle and avoid rounding your back.
6. Hold the Stretch
- Maintain the position for 20-30 seconds.
- Breathe deeply and steadily throughout the stretch.
7. Release
- Slowly release the stretch and return to the starting position.
- Repeat 2-3 times.
Tips and Tricks
- Warm-Up First: Perform a light warm-up (e.g., walking or light jogging) before stretching to prepare your muscles.
- Maintain Good Posture: Keep your back straight and avoid slouching or rounding your shoulders during the stretch.
- Avoid Forcing: Stretch to the point of mild discomfort but never pain. Forcing your knees down can cause injury.
- Breath Deeply: Deep, steady breathing helps relax your muscles and enhance the stretch.
- Use Props: If you have difficulty reaching your feet, you can hold onto your ankles or use a towel around your feet for assistance.
- Stay Relaxed: Keep your upper body relaxed, and avoid tensing your shoulders or neck.
- Consistent Practice: Regularly incorporating the butterfly stretch into your routine will gradually improve your flexibility.
- Progress Gradually: If you’re new to stretching, start with a comfortable range of motion and gradually increase the depth of the stretch over time.
- Modify If Needed: If you experience discomfort in your hips, you can place a cushion or yoga block under each knee for support.
4. Triceps Stretch
The triceps stretch is a simple yet effective exercise that targets the triceps muscles located at the back of your upper arm. This stretch helps to improve flexibility, reduce muscle tightness, and enhance the range of motion in your shoulders and arms. It is commonly included in warm-up and cool-down routines.
How to Do It
1. Starting Position
- Stand or sit up straight with your feet hip-width apart.
2. Raise Your Arm
- Lift your right arm overhead and bend your elbow, reaching your right hand down towards the middle of your back.
3. Support the Stretch
- Use your left hand to gently push your right elbow further down and back.
- You should feel a stretch along the back of your upper arm (triceps).
4. Hold the Stretch
- Maintain the position for 20-30 seconds, breathing deeply and steadily.
5. Switch Sides
- Release the stretch and return to the starting position.
- Repeat the stretch with your left arm.
6. Repeat
- Perform the stretch 2-3 times on each arm.
Tips and Tricks
- Warm-Up First: Lightly warm up your muscles with activities like jogging or arm circles before stretching to reduce the risk of injury.
- Keep Your Back Straight: Maintain good posture by keeping your back straight and your core engaged throughout the stretch.
- Avoid Overstretching: Stretch to the point of mild discomfort but never pain. Overstretching can lead to injury.
- Breathe Deeply: Focus on deep, steady breaths to help relax your muscles and improve the effectiveness of the stretch.
- Relax Your Shoulders: Keep your shoulders relaxed and avoid hunching them up towards your ears.
- Support Your Neck: Make sure your neck stays in a neutral position and avoid straining it during the stretch.
- Consistent Practice: Incorporate the triceps stretch into your regular stretching routine to maintain and improve flexibility.
- Use Both Hands: If you have difficulty reaching your elbow, use a towel or strap to assist in pulling your arm down gently.
- Stretch Both Sides Equally: Ensure you give equal attention to both arms to maintain balanced flexibility.
5. Cat-Cow Stretch
The Cat-Cow stretch is a gentle, flowing movement between two poses that warms up the spine, increases flexibility, and stretches the back, neck, and torso. It is commonly used in yoga practice and is excellent for improving spinal mobility and relieving tension.
How to Do It
1. Starting Position
- Begin on your hands and knees in a tabletop position.
- Place your wrists directly under your shoulders and your knees under your hips.
- Keep your head in a neutral position and gaze down at the floor.
2. Cat Pose
- Exhale and round your spine towards the ceiling.
- Tuck your tailbone and draw your belly button towards your spine.
- Drop your head and tuck your chin towards your chest, stretching the back of your neck.
3. Cow Pose
- Inhale and arch your back, letting your belly sink towards the floor.
- Lift your head and tailbone towards the ceiling, creating an opposite curve in your spine.
- Gaze forward or slightly upward without straining your neck.
4. Flow Between Poses
- Continue to flow between Cat Pose and Cow Pose, coordinating your breath with the movements.
- Exhale into Cat Pose and inhale into Cow Pose.
- Repeat the sequence for 5-10 breaths, or as long as it feels good.
Tips and Tricks
- Warm-Up: Although Cat-Cow is a gentle stretch, it's still beneficial to warm up slightly, especially if you’re stiff or tight.
- Alignment: Ensure your wrists are under your shoulders and your knees are under your hips to maintain proper alignment.
- Breath Coordination: Focus on your breath, allowing the exhalation to guide you into Cat Pose and the inhalation to guide you into Cow Pose.
- Smooth Movements: Transition smoothly between the two poses, allowing your spine to move fluidly.
- Avoid Overextending: Move within your comfortable range of motion. Avoid forcing your spine into extreme positions.
- Engage Core Muscles: Keep your core slightly engaged to support your lower back throughout the movement.
- Listen to Your Body: If you experience any pain or discomfort, modify the movement or stop and rest.
- Consistent Practice: Regularly incorporating Cat-Cow into your routine can improve your spinal flexibility and relieve tension in your back and neck.
- Props and Modifications: If you have wrist discomfort, you can perform the stretch on your forearms instead of your hands.
6. Child’s Pose (Balasana)
Child’s Pose, or Balasana, is a restful and gentle yoga pose that stretches the back, hips, thighs, and ankles while promoting relaxation. It is often used as a resting position in yoga practices to help relieve stress and tension.
How to Do It
1. Starting Position
- Begin on your hands and knees in a tabletop position.
- Bring your big toes together and sit back on your heels.
- Spread your knees apart to a comfortable width.
2. Lower Your Torso
- Exhale and lower your torso between your knees.
- Extend your arms forward with your palms facing down, or you can place your arms alongside your body with palms facing up.
3. Rest Your Forehead
- Rest your forehead on the mat.
- Allow your neck and shoulders to relax completely.
4. Hold the Pose:
- Close your eyes and take slow, deep breaths.
- Hold the position for 30 seconds to a few minutes, depending on your comfort level.
5. Return to Starting Position
- To come out of the pose, gently use your hands to lift your torso and return to the tabletop position.
Tips and Tricks
- Comfort and Support: If your forehead does not comfortably reach the floor, place a folded towel or a yoga block under your forehead for support.
- Knee Modifications: If you experience discomfort in your knees, you can place a rolled-up blanket or towel between your calves and thighs for added cushioning.
- Arm Positions: Experiment with different arm positions. You can extend your arms forward, place them alongside your body, or bend them with your hands resting under your head for more comfort.
- Hip Flexibility: If sitting back on your heels is uncomfortable, place a folded blanket or cushion between your thighs and calves to reduce the strain.
- Breath Focus: Focus on deep, steady breaths to enhance relaxation. Inhale deeply through your nose and exhale slowly, allowing your body to relax further with each breath.
- Listen to Your Body: If you feel any pain or discomfort, ease out of the pose and adjust your position. Child’s Pose should feel relaxing and restorative.
- Use Props: Props like blankets, cushions, or blocks can be used to make the pose more comfortable and accessible.
- Stay Relaxed: Keep your entire body relaxed, especially your shoulders, neck, and back. Let gravity do the work.
7. Shoulder Stretch
The shoulder stretch is an effective exercise for increasing flexibility and relieving tension in the shoulders and upper back. It is particularly useful for people who spend long hours sitting at a desk or engaging in activities that cause shoulder strain.
How to Do It
1. Starting Position
- Stand or sit up straight with your feet shoulder-width apart.
2. Raise Your Arm
- Lift your right arm across your chest, keeping it straight but not locked.
3. Support the Stretch
- Use your left hand to grasp your right arm just above the elbow.
- Gently pull your right arm towards your chest, feeling a stretch in your shoulder and upper back.
4. Hold the Stretch
- Hold this position for 20-30 seconds, keeping your shoulders relaxed and your back straight.
- Breathe deeply and steadily.
5. Switch Sides
- Release the stretch and return to the starting position.
- Repeat the stretch with your left arm.
6. Repeat
- Perform the stretch 2-3 times on each arm.
Tips and Tricks
- Warm-Up First: Lightly warm up your muscles with activities like arm circles or light jogging before stretching to reduce the risk of injury.
- Maintain Good Posture: Stand or sit tall with your back straight and your core engaged throughout the stretch.
- Avoid Overstretching: Stretch to the point of mild discomfort but never pain. Overstretching can lead to injury.
- Breathe Deeply: Focus on deep, steady breaths to help relax your muscles and improve the effectiveness of the stretch.
- Relax Your Shoulders: Keep your shoulders down and away from your ears to avoid unnecessary tension.
- Consistent Practice: Incorporate the shoulder stretch into your regular stretching routine to maintain and improve flexibility.
- Stay Relaxed: Avoid tensing other parts of your body, such as your neck or back, while performing the stretch.
- Use Both Hands: If you have difficulty reaching your arm, you can use a towel or strap to assist in pulling your arm gently.
8. Hip Flexor Stretch
The hip flexor stretch targets the muscles located at the front of your hips, which are crucial for various movements such as walking, running, and sitting. Stretching these muscles can help alleviate tightness, improve flexibility, and prevent lower back pain.
How to Do It
1. Starting Position
- Begin in a kneeling position on the floor.
- Step your right foot forward so that your right knee is bent at a 90-degree angle and your left knee is on the ground.
2. Align Your Hips
- Keep your hips square and facing forward.
- Engage your core to support your lower back.
3. Stretch the Hip Flexor
- Slowly push your hips forward while keeping your upper body upright.
- You should feel a stretch in the front of your left hip and thigh.
- Ensure your right knee does not go beyond your toes to avoid knee strain.
4. Hold the Stretch
- Hold this position for 20-30 seconds, breathing deeply and steadily.
5. Switch Sides
- Return to the starting position and switch legs.
- Repeat the stretch with your left foot forward and right knee on the ground.
6. Repeat
- Perform the stretch 2-3 times on each side.
Tips and Tricks
- Warm-Up First: Lightly warm up your muscles with activities like walking or light jogging before stretching to reduce the risk of injury.
- Maintain Good Posture: Keep your back straight and your shoulders relaxed throughout the stretch.
- Avoid Overstretching: Stretch to the point of mild discomfort but never pain. Overstretching can lead to injury.
- Breathe Deeply: Focus on deep, steady breaths to help relax your muscles and improve the effectiveness of the stretch.
- Engage Your Core: Activate your core muscles to support your lower back and maintain balance.
- Use a Cushion: Place a folded towel or cushion under your knee for added comfort, especially if you are on a hard surface.
- Gentle Movements: Move into and out of the stretch slowly and gently to avoid straining your muscles.
- Consistent Practice: Incorporate the hip flexor stretch into your regular stretching routine to maintain and improve flexibility.
- Modify if Needed: If you experience discomfort in your back, you can perform the stretch with your back knee slightly bent and avoid pushing your hips too far forward.
9. Calf Stretch
The calf stretch targets the muscles at the back of your lower leg, primarily the gastrocnemius and soleus muscles. Stretching your calves can help improve flexibility, reduce muscle tightness, and prevent injuries, especially if you engage in activities like running, walking, or cycling.
How to Do It
1. Starting Position
- Stand facing a wall, about an arm's length away.
- Place your hands on the wall at shoulder height for support.
2. Position Your Feet
- Step your right foot back, keeping it straight, and bend your left knee slightly.
- Ensure both feet are flat on the ground and pointing straight ahead.
3. Stretch the Calf
- Lean into the wall, bending your front knee more while keeping your back leg straight.
- Push your back heel into the ground until you feel a stretch in your right calf.
- Keep your back straight and hips facing forward.
4. Hold the Stretch
- Maintain this position for 20-30 seconds, breathing deeply and steadily.
5. Switch Sides
- Return to the starting position and switch legs.
- Repeat the stretch with your left foot back and right knee slightly bent.
6. Repeat
- Perform the stretch 2-3 times on each leg.
Tips and Tricks
- Warm-Up First: Lightly warm up your muscles with activities like walking or light jogging before stretching to reduce the risk of injury.
- Maintain Good Posture: Keep your back straight and your shoulders relaxed throughout the stretch.
- Avoid Overstretching: Stretch to the point of mild discomfort but never pain. Overstretching can lead to injury.
- Breathe Deeply: Focus on deep, steady breaths to help relax your muscles and improve the effectiveness of the stretch.
- Keep Both Feet Flat: Ensure both heels remain flat on the ground to maximize the stretch in your calves.
- Adjust Foot Position: You can slightly adjust the distance between your front and back foot to find a comfortable and effective stretch.
- Stay Relaxed: Avoid tensing other parts of your body, such as your shoulders or neck, while performing the stretch.
- Use a Step or Curb: You can also perform a calf stretch on a step or curb by placing the ball of one foot on the edge and dropping your heel down.
- Consistent Practice: Incorporate the calf stretch into your regular stretching routine to maintain and improve flexibility.
10. Seated Forward Bend (Paschimottanasana)
The seated forward bend, or Paschimottanasana in yoga, is a calming and deeply effective stretch for the entire back of your body, especially the spine, hamstrings, and lower back. This stretch is beneficial for improving flexibility, relieving stress, and promoting relaxation.
How to Do It
1. Starting Position
- Sit on the floor with your legs extended straight in front of you.
- Flex your feet and press your heels away from your body.
- Sit up tall with your spine straight.
2. Reach Forward
- Inhale and raise your arms overhead, lengthening your spine.
- Exhale and hinge at your hips, reaching your hands towards your feet.
- Try to keep your spine as straight as possible while you reach forward.
3. Grasp Your Feet
- If possible, grasp your feet with your hands. If you cannot reach your feet, hold your shins, ankles, or use a yoga strap around your feet to help you stretch.
- Keep your head and neck relaxed.
4. Deepen the Stretch
- With each exhale, try to deepen the stretch by gently pulling yourself a little closer to your legs.
- Maintain a straight spine as much as possible to avoid rounding your back excessively.
5. Hold the Stretch
- Hold the position for 20-30 seconds, breathing deeply and steadily.
- Focus on relaxing into the stretch with each breath.
6. Return to Starting Position
- To come out of the pose, inhale and lift your torso back up to the starting position.
- Lower your arms and sit up tall.
7. Repeat
- Perform the stretch 2-3 times if desired.
Tips and Tricks
- Warm-Up First: Lightly warm up your muscles with activities like walking or gentle yoga poses before stretching to reduce the risk of injury.
- Use a Strap: If you can't reach your feet, use a yoga strap or towel around your feet to help you achieve the stretch.
- Bend Your Knees: If you have tight hamstrings, you can slightly bend your knees to make the stretch more accessible.
- Maintain Alignment: Focus on hinging at the hips rather than rounding the lower back to maintain proper alignment.
- Avoid Overstretching: Stretch to the point of mild discomfort but never pain. Overstretching can lead to injury.
- Breathe Deeply: Deep, steady breaths help relax your muscles and improve the effectiveness of the stretch.
- Stay Relaxed: Keep your shoulders, neck, and face relaxed to avoid unnecessary tension.
- Consistent Practice: Incorporate the seated forward bend into your regular stretching or yoga routine to gradually improve flexibility.
- Modify If Needed: If you experience discomfort in your lower back, sit on a folded blanket or cushion to elevate your hips and ease the stretch.
FAQs
1. Why is stretching important?
Answer : Stretching helps improve flexibility, range of motion, and overall mobility. It can reduce muscle tension, prevent injuries, improve posture, and enhance circulation.
2. When should I stretch?
Answer : It is best to stretch after warming up your muscles with light activity, such as walking or jogging. Stretching is also beneficial after workouts as part of a cool-down routine to relax muscles and improve flexibility.
3. How long should I hold each stretch?
Answer : Hold each stretch for 20-30 seconds, ensuring you breathe deeply and steadily. Repeat each stretch 2-3 times for optimal results.
4. Should I stretch every day?
Answer : Yes, incorporating daily stretching into your routine can help maintain flexibility and prevent stiffness. Even a few minutes each day can be beneficial.
5. Can stretching help reduce muscle soreness?
Answer : Yes, stretching can help alleviate muscle soreness by increasing blood flow and oxygen to the muscles, promoting faster recovery.
6. Is it normal to feel pain while stretching?
Answer : No, stretching should not be painful. You should feel a mild discomfort or gentle pull, but not pain. If you experience pain, ease back from the stretch and avoid overstretching.
7. What is the difference between dynamic and static stretching?
Answer : Dynamic Stretching Involves moving parts of your body through a full range of motion to warm up muscles before activity (e.g., leg swings, arm circles) and Static Stretching Involves holding a stretch in a comfortable position for a period, usually after exercise to improve flexibility (e.g., hamstring stretch, quadriceps stretch).
8. Can stretching improve my athletic performance?
Answer : Yes, regular stretching can enhance flexibility, which can improve your overall athletic performance, reduce the risk of injuries, and help you move more efficiently.
9. Can stretching help with back pain?
Answer : Yes, stretching can help alleviate back pain by improving flexibility and reducing tension in the muscles supporting the spine. Focus on stretches that target the lower back, hamstrings, and hip flexors.
10. Is it safe to stretch during pregnancy?
Answer : Yes, stretching can be beneficial during pregnancy to relieve muscle tension and improve flexibility. However, it's important to avoid overstretching and consult with a healthcare provider for safe stretching guidelines.
Conclusion
Stretching exercises are essential for maintaining flexibility, improving range of motion, and preventing injuries. By incorporating a mix of dynamic and static stretches into your daily routine, you can alleviate muscle tension, enhance circulation, and promote overall physical well-being. Consistency is key to seeing improvements, so make stretching a regular part of your fitness regimen. Always remember to warm up before stretching, avoid overstretching, and listen to your body to ensure safe and effective practice. With regular stretching, you can enjoy a more flexible, balanced, and healthier body.
You might also like our weight loss articles.
“Motivation is what gets you started. Habit is what keeps you going.” – Jim Ryun
If you would like more information about the 2024, please send us an email.
Written by Fitness Goal 4U
Smart Fitness Goals - Achieve Health with Simple Steps
Smart fitness goals focus on being Specific, Measurable, Achievable, Relevant, and Time-bound. They help you create a clear path to success, stay motivated, and track progress. Whether its weight loss, strength building, or improved endurance, smart goals guide your fitness journey, ensuring steady growth and sustainable results tailored to your needs.
“Confidence comes from discipline and training.” – Robert Kiyosaki
Triceps exercises are crucial for building strong, defined arms and enhancing overall upper body strength. The triceps muscle, located on the back of the upper arm, is responsible for arm extension and plays a significant role in daily movements and various sports. Incorporating a variety of exercises targeting the triceps can help improve muscle tone, increase arm size, and enhance functional performance. From bodyweight movements like dips and push-ups to weighted exercises such as tricep extensions and pushdowns, there are numerous ways to effectively work this muscle group. Proper form and consistency are key to maximizing results and preventing injuries. Whether you're aiming to build muscle, improve endurance, or simply tone your arms, including dedicated triceps exercises in your workout routine is essential for balanced arm development and overall fitness.
Best 10 Triceps Exercises
1. Tricep Dips
Tricep dips are a versatile and accessible bodyweight exercise that primarily targets the triceps, along with the shoulders and chest. This exercise can be performed almost anywhere, making it a convenient choice for building upper body strength. By using a bench, chair, or parallel bars, tricep dips engage the triceps through a controlled lowering and lifting motion, effectively working the muscles. They are suitable for all fitness levels, with variations available to increase or decrease difficulty. Incorporating tricep dips into your workout routine can enhance arm definition, improve functional strength, and contribute to overall upper body conditioning.
How to Do
- Sit on the edge of a bench or chair, hands next to your hips.
- Slide your buttocks off the edge, supporting your weight with your hands.
- Lower your body by bending your elbows until they form a 90-degree angle.
- Push back up to the starting position.
Tips and Tricks
- Keep your back close to the bench.
- Avoid using your legs to push up.
- Keep shoulders away from ears.
2. Tricep Pushdown
The tricep pushdown is a popular cable machine exercise that targets the triceps, helping to build strength and definition in the back of the upper arm. This exercise involves using a high pulley machine with a straight bar or rope attachment. By gripping the attachment and pushing it down towards the thighs, the triceps are engaged through the extension of the elbows. Tricep pushdowns are effective for isolating the triceps and can be adjusted for varying resistance levels, making them suitable for all fitness levels. They are an excellent addition to any upper body or arm-focused workout routine.
How to Do
- Attach a straight bar to a high pulley.
- Stand facing the machine with feet shoulder-width apart.
- Grip the bar with an overhand grip, elbows close to your body.
- Push the bar down until your arms are fully extended.
- Slowly return to the starting position.
Tips and Tricks
- Keep elbows stationary and close to your sides.
- Use controlled movements; avoid using momentum.
3. Overhead Tricep Extension
The overhead tricep extension is a fundamental exercise for strengthening and toning the triceps, focusing on the muscle's long head. This exercise involves holding a weight, such as a dumbbell or barbell, above the head with both hands. The movement consists of lowering the weight behind the head by bending the elbows, then extending the arms back to the starting position. This exercise is highly effective for isolating the triceps and can be performed in both seated and standing positions. It's a valuable addition to any upper body workout routine, aiding in building muscle mass and enhancing arm definition.
How to Do
- Hold a dumbbell with both hands and lift it above your head.
- Keep your upper arms close to your ears and elbows pointing forward.
- Lower the dumbbell behind your head by bending your elbows.
- Extend your arms to return to the starting position.
Tips and Tricks
- Keep your core engaged to avoid arching your back.
- Perform the movement slowly for better muscle engagement.
4. Close-Grip Bench Press
The close-grip bench press is a compound exercise that targets the triceps while also engaging the chest and shoulders. This variation of the traditional bench press involves a narrower hand placement on the barbell, typically shoulder-width apart. The closer grip shifts the emphasis towards the triceps, making it an effective exercise for building upper arm strength and muscle definition. To perform the close-grip bench press, lower the barbell to your chest with elbows tucked close to your body, then press it back up. This exercise is excellent for those looking to enhance upper body strength and develop well-defined triceps.
How to Do
- Lie on a bench, holding a barbell with a close grip (hands shoulder-width apart).
- Lower the barbell to your chest, keeping your elbows close to your body.
- Push the barbell back up to the starting position.
Tips and Tricks
- Focus on keeping your elbows close to your sides.
- Maintain a tight grip on the bar.
5. Skull Crushers
Skull crushers, also known as lying tricep extensions, are an isolation exercise that effectively targets the triceps. Performed with an EZ curl bar or dumbbells, this exercise involves lying flat on a bench and lowering the weight towards the forehead by bending the elbows. The movement isolates the triceps, particularly the long head, promoting muscle growth and strength. Skull crushers are ideal for building upper arm definition and can be adjusted in intensity by varying the weight. Proper form is crucial to avoid strain on the elbows and ensure maximum tricep engagement, making this exercise a staple in arm-focused routines.
How to Do
- Lie on a bench, holding an EZ curl bar above your chest.
- Keep your upper arms stationary and lower the bar towards your forehead by bending your elbows.
- Extend your arms to return to the starting position.
Tips and Tricks
- Control the bar's descent to avoid hitting your forehead.
- Keep your elbows from flaring out.
6. Tricep Kickbacks
Tricep kickbacks are a popular isolation exercise designed to strengthen and tone the triceps. This exercise involves extending the arm behind the body while holding a dumbbell, with the torso bent forward at a slight angle. The movement focuses on fully extending the elbow to engage the tricep muscle, particularly targeting the lateral head. Tricep kickbacks are highly effective for sculpting the back of the upper arm and are suitable for all fitness levels. They can be performed one arm at a time or simultaneously, offering versatility in a workout routine. Proper form is essential to maximize muscle engagement and prevent strain.
How to Do
- Stand with a dumbbell in each hand, bend forward at the hips with knees slightly bent.
- Keep your upper arms close to your body and extend your arms straight back.
- Slowly return to the starting position.
Tips and Tricks
- Keep your upper arms stationary throughout the movement.
- Avoid swinging the dumbbells.
7. Diamond Push-Ups
Diamond push-ups are a challenging bodyweight exercise that specifically targets the triceps, while also engaging the chest and shoulders. Named for the diamond shape formed by placing the hands close together under the chest, this variation of the traditional push-up emphasizes the triceps more intensely. The exercise involves lowering the body towards the ground while maintaining a straight line from head to heels, then pushing back up. Diamond push-ups are excellent for building upper body strength and muscle definition. They can be modified to suit different fitness levels and are a great addition to any upper body or arm-focused workout routine.
How to Do
- Get into a push-up position with your hands close together, forming a diamond shape with your thumbs and index fingers.
- Lower your body towards the ground, keeping elbows close to your sides.
- Push back up to the starting position.
Tips and Tricks
- Keep your body in a straight line from head to heels.
- Engage your core and avoid flaring your elbows.
8. Rope Tricep Pushdown
The rope tricep pushdown is a versatile cable machine exercise that targets the triceps, particularly the lateral head. Utilizing a rope attachment on a high pulley, this exercise involves extending the arms downward while keeping the elbows close to the body. The unique grip allows for a more extensive range of motion and engages the triceps effectively. By splitting the rope apart at the bottom of the movement, additional focus is placed on the muscle contraction. The rope tricep pushdown is suitable for all fitness levels and is excellent for building arm strength and definition, making it a staple in many strength training routines.
How to Do
- Attach a rope to a high pulley.
- Stand facing the machine and grip the rope with both hands.
- Pull the rope down, splitting it apart at the bottom.
- Slowly return to the starting position.
Tips and Tricks
- Keep your elbows close to your sides.
- Fully extend your arms at the bottom of the movement.
9. Bench Dips
Bench dips are an effective bodyweight exercise that targets the triceps, along with the chest and shoulders. This exercise involves using a bench, chair, or any sturdy elevated surface to support the hands, while the legs extend out in front. The movement consists of lowering the body by bending the elbows, then pushing back up to the starting position. Bench dips are a versatile exercise that can be performed almost anywhere and are easily modified to increase or decrease difficulty. They are excellent for building upper body strength and muscle definition, making them a valuable addition to any fitness routine.
How to Do
- Sit on the edge of a bench, hands next to your hips.
- Extend your legs out in front of you.
- Lower your body by bending your elbows until they form a 90-degree angle.
- Push back up to the starting position.
Tips and Tricks
- Keep your back close to the bench.
- Avoid using momentum to push up.
10. Dumbbell Floor Press
The dumbbell floor press is a strength training exercise that targets the chest, triceps, and shoulders. Unlike the traditional bench press, this exercise is performed lying on the floor, limiting the range of motion and placing emphasis on the triceps and upper chest. The floor press involves pressing dumbbells upward from a lying position, with elbows bent at a 90-degree angle at the bottom. This exercise is ideal for those looking to build upper body strength, particularly in the triceps, while minimizing strain on the shoulders. It's a great alternative for those who may not have access to a bench or prefer a safer movement with reduced shoulder involvement.
How to Do
- Lie on the floor with dumbbells in each hand, elbows bent at a 90-degree angle.
- Press the dumbbells up until your arms are fully extended.
- Slowly lower the dumbbells back to the starting position.
Tips and Tricks
- Keep your elbows at a 45-degree angle to your body.
- Focus on pressing with your triceps.
FAQs
1. How often should I train my triceps?
Answer : It's generally recommended to train your triceps 2-3 times per week. However, this can vary depending on your overall workout routine, goals, and fitness level. Ensure you allow at least 48 hours of rest between triceps workouts to allow for adequate recovery.
2. Can I train triceps and biceps on the same day?
Answer : Yes, training both triceps and biceps on the same day is common and effective. This is often referred to as an "arm day." You can alternate between exercises for each muscle group or focus on one group at a time.
3. Should I use heavy weights for triceps exercises?
Answer : Using heavy weights can be beneficial for building strength and mass in the triceps. However, it's crucial to maintain proper form and avoid using weights that are too heavy, which can lead to poor technique and potential injury. Start with lighter weights to master the movement, then gradually increase the weight as you become more comfortable.
4. Can I work out my triceps if they are sore?
Answer : It's generally advisable to avoid training sore muscles intensely. If your triceps are sore, it may be better to rest them or engage in light, low-intensity exercises to promote recovery.
5. What’s the best way to warm up before triceps exercises?
Answer : A proper warm-up should include dynamic movements that increase blood flow and prepare the muscles for exercise. Light cardio, arm circles, and light sets of triceps exercises with low weights can help warm up the muscles.
6. How many sets and reps should I do for triceps exercises?
Answer : The number of sets and reps depends on your goals. For muscle endurance, aim for 12-15 reps per set. For muscle hypertrophy (growth), aim for 8-12 reps per set. For strength, aim for 4-6 reps per set. Typically, 3-4 sets per exercise are recommended.
7. Are bodyweight exercises effective for building triceps?
Answer : Yes, bodyweight exercises like dips and diamond push-ups can be very effective for building triceps strength and definition. They can be done anywhere and can be modified to increase or decrease difficulty.
8. How important is form when doing triceps exercises?
Answer : Proper form is crucial for preventing injuries and ensuring that the targeted muscles are effectively worked. Poor form can lead to joint strain and reduce the effectiveness of the exercise. Focus on controlled movements and avoid using momentum.
9. Can I train triceps if I have elbow pain?
Answer : If you have elbow pain, it's important to be cautious with triceps exercises, as they can put stress on the elbow joint. It’s best to consult with a healthcare professional or physical therapist to determine the cause of the pain and find safe alternatives or modifications.
10. Do I need to use supplements to build triceps?
Answer : Supplements are not necessary for building triceps or any other muscle. A balanced diet with adequate protein, carbohydrates, and fats, along with consistent training and proper recovery, is sufficient for most people. However, some may choose to use supplements like protein powders to support their nutritional intake. Always consult a healthcare professional before starting any supplement regimen.
Conclusion
Triceps exercises are an essential component of a well-rounded fitness routine, offering numerous benefits such as increased upper body strength, improved arm aesthetics, and enhanced functional movement. Whether you're using bodyweight exercises, free weights, or resistance machines, a variety of triceps exercises can help target different parts of the muscle for comprehensive development.
Consistency, proper form, and a balanced approach to training are key to achieving the best results. Remember to allow adequate recovery time between workouts and listen to your body to prevent overtraining and injury. By incorporating triceps exercises into your routine, you can build strong, toned arms and improve your overall fitness. Whether you're a beginner or an experienced athlete, there's always room to challenge yourself and progress. Keep experimenting with different exercises and techniques to find what works best for you, and enjoy the journey toward stronger, healthier arms.
You might also like our weight loss articles.
“Motivation is what gets you started. Habit is what keeps you going.” – Jim Ryun
If you would like more information about the 2024, please send us an email.
Written by Fitness Goal 4U
Smart Fitness Goals - Achieve Health with Simple Steps
Smart fitness goals focus on being Specific, Measurable, Achievable, Relevant, and Time-bound. They help you create a clear path to success, stay motivated, and track progress. Whether its weight loss, strength building, or improved endurance, smart goals guide your fitness journey, ensuring steady growth and sustainable results tailored to your needs.
“Confidence comes from discipline and training.” – Robert Kiyosaki
Belly fat is a common concern for many, as it not only affects physical appearance but also poses health risks. Effective exercises for burning belly fat combine cardiovascular activities, strength training, and core-focused movements. These exercises target the abdominal muscles, enhance metabolism, and promote overall fat loss. Incorporating a variety of movements, such as crunches, planks, and high-intensity interval training (HIIT), can help sculpt the midsection and improve core strength. However, exercise alone is not enough; a balanced diet, adequate hydration, sufficient sleep, and stress management are also crucial for achieving optimal results. Consistency and dedication to a holistic approach are key to losing belly fat and maintaining a healthy lifestyle. Whether you are a beginner or an experienced fitness enthusiast, these exercises can be tailored to suit your fitness level and help you reach your goals.
Best 10 Exercises to Burn Belly Fat
1. Crunches
Crunches are a classic and effective exercise for targeting the abdominal muscles, particularly the rectus abdominis, which forms the "six-pack" appearance. This simple yet powerful move helps strengthen and tone the core, making it a popular choice for those looking to burn belly fat. Crunches can be performed anywhere without equipment, making them accessible for all fitness levels. By isolating the abs, crunches help improve muscle endurance and stability, contributing to a flatter stomach and better posture. Incorporating crunches into your workout routine can be an essential step toward achieving a stronger, more defined midsection.
How to do it
- Lie on your back with knees bent and feet flat on the floor.
- Place your hands behind your head, elbows out.
- Lift your shoulders off the ground towards your knees while exhaling.
- Lower back down without resting your head completely on the ground.
Tips and Tricks
- Keep your chin off your chest to avoid neck strain.
- Focus on using your core muscles rather than pulling with your neck or arms.
2. Plank
The plank is a fundamental exercise that effectively targets the core muscles, helping to burn belly fat and build overall strength. Unlike traditional crunches, the plank engages multiple muscle groups, including the abdominals, back, shoulders, and legs, making it a comprehensive full-body workout. By holding a stable position, the plank challenges your core stability and endurance, promoting better posture and balance. This versatile exercise requires no equipment and can be easily modified to suit various fitness levels. Incorporating planks into your routine is an excellent way to enhance core strength and support your journey toward a toned, lean midsection.
How to do it
- Start on all fours, then extend your legs behind you, balancing on toes and forearms.
- Keep your body in a straight line from head to heels.
- Hold this position, engaging your core and glutes.
Tips and Tricks
- Keep your hips level and avoid letting them sag.
- Breathe steadily and deeply to maintain stability.
3. Bicycle Crunches
Bicycle crunches are an excellent exercise for burning belly fat and strengthening the core, particularly targeting the obliques and rectus abdominis. This dynamic movement involves a combination of crunching and twisting, simulating a pedaling motion that engages the entire abdominal area. By incorporating both upper and lower body movements, bicycle crunches help improve coordination, enhance muscle endurance, and increase calorie burn. This exercise can be performed without equipment, making it accessible for all fitness levels. Adding bicycle crunches to your workout routine can effectively contribute to achieving a leaner, more toned midsection and improved core stability.
How to do it
- Lie on your back with your hands behind your head and legs lifted.
- Bring one knee towards your chest while twisting your torso to bring the opposite elbow to meet the knee.
- Alternate sides in a pedaling motion.
Tips and Tricks
- Keep the movement controlled and steady.
- Focus on fully extending each leg and twisting your torso.
4. Mountain Climbers
Mountain climbers are a high-intensity, full-body exercise that effectively burns belly fat and boosts cardiovascular endurance. This dynamic movement engages multiple muscle groups, including the core, legs, and arms, while also raising your heart rate for a powerful calorie-burning effect. By simulating a running motion in a plank position, mountain climbers challenge your stability and coordination, making them a great addition to any workout routine. This exercise requires no equipment and can be easily modified for various fitness levels. Incorporating mountain climbers into your regimen can help improve agility, strengthen your core, and promote overall fat loss.
How to do it
- Start in a push-up position.
- Quickly bring one knee towards your chest, then switch legs as if running in place.
- Continue alternating legs at a rapid pace.
Tips and Tricks
- Keep your core tight and maintain a straight body line.
- Move at a pace that challenges you without compromising form.
5. Leg Raises
Leg raises are an effective exercise targeting the lower abdominal muscles, helping to burn belly fat and strengthen the core. This exercise involves lifting and lowering the legs while lying flat, engaging the lower abs to control the movement. Leg raises are particularly beneficial for isolating the lower region of the rectus abdominis, which can be challenging to engage with other exercises. They require no equipment and can be performed anywhere, making them accessible for all fitness levels. Incorporating leg raises into your workout routine can help enhance core strength, improve muscle tone, and contribute to a more defined midsection.
How to do it
- Lie on your back with your legs straight and hands by your sides or under your hips.
- Lift your legs towards the ceiling, keeping them straight.
- Lower them back down slowly without letting them touch the floor.
Tips and Tricks
- Keep your lower back pressed into the ground.
- Control the movement, especially when lowering your legs.
6. Russian Twists
Russian twists are an effective core exercise that specifically targets the oblique muscles, helping to burn belly fat and improve rotational strength. This exercise involves sitting with your knees bent and feet off the ground, twisting your torso from side to side while holding a weight or medicine ball. The rotational movement engages the entire core, enhancing stability and balance. Russian twists are versatile and can be performed with or without added resistance, making them suitable for various fitness levels. Including Russian twists in your workout routine can help tone the waistline, increase core endurance, and promote a stronger, more sculpted midsection.
How to do it
- Sit on the floor with your knees bent and feet lifted.
- Lean back slightly and hold a weight or medicine ball.
- Twist your torso to the right, then to the left, while keeping your core engaged.
Tips and Tricks
- Keep your feet off the ground for added difficulty.
- Move slowly and deliberately to engage the obliques fully.
7. Burpees
Burpees are a high-intensity, full-body exercise that effectively burns belly fat and enhances cardiovascular fitness. This dynamic movement combines a squat, jump, and push-up, engaging multiple muscle groups including the core, legs, chest, and arms. Burpees are known for their calorie-torching potential, making them an excellent choice for those looking to shed fat and improve endurance. This exercise requires no equipment and can be performed anywhere, making it accessible and convenient. Incorporating burpees into your workout routine can help boost metabolism, build strength, and contribute to overall body fat reduction, including the abdominal area.
How to do it
- Start standing, then drop into a squat position.
- Kick your feet back into a push-up position and perform a push-up.
- Jump your feet back to the squat position and leap up.
Tips and Tricks
- Focus on maintaining proper form, especially during the push-up.
- Use your core to stabilize the movement.
8. High Knees
High knees are a simple yet effective cardio exercise that helps burn belly fat and improve overall fitness. This exercise involves running in place while lifting your knees as high as possible, engaging the core, legs, and hip flexors. High knees elevate your heart rate quickly, making them a great option for boosting cardiovascular endurance and burning calories. They can be performed anywhere and require no equipment, making them accessible for all fitness levels. Including high knees in your workout routine can help enhance agility, coordination, and lower body strength, while also contributing to overall fat loss and a toned physique.
How to do it
- Stand with feet hip-width apart.
- Lift one knee towards your chest, then quickly switch legs.
- Continue alternating legs, running in place.
Tips and Tricks
- Keep a brisk pace and pump your arms to increase intensity.
- Engage your core to maintain balance.
9. Flutter Kicks
Flutter kicks are a core-strengthening exercise that effectively targets the lower abdominal muscles, helping to burn belly fat and improve muscle definition. This exercise involves lying on your back and alternately kicking your legs up and down in a controlled manner, keeping them straight. Flutter kicks engage the entire core, particularly focusing on the lower abs, hip flexors, and even the lower back. They are excellent for enhancing endurance and stability in the abdominal region. This exercise requires no equipment and can be easily incorporated into any workout routine. Including flutter kicks can aid in achieving a flatter, more toned midsection.
How to do it
- Lie on your back with legs straight and hands under your hips.
- Lift your legs slightly off the ground and alternately kick them up and down.
- Keep the movement small and controlled.
Tips and Tricks
- Keep your lower back pressed into the ground.
- Move in a controlled manner to fully engage the core.
10. Side Plank
The side plank is an excellent core exercise that specifically targets the obliques, helping to burn belly fat and improve lateral core strength. This exercise involves supporting your body on one arm and the side of your foot, forming a straight line from head to heels. By holding this position, the side plank engages the abdominal muscles, particularly the obliques, while also strengthening the shoulders and legs. It enhances stability, balance, and posture. The side plank can be easily modified for different fitness levels and requires no equipment. Incorporating side planks into your routine can help sculpt the waistline and build a stronger, more stable core.
How to do it
- Lie on your side with legs straight and one arm directly under your shoulder.
- Lift your hips off the ground, creating a straight line from head to feet.
- Hold the position, then switch sides.
Tips and Tricks
- Keep your body straight and avoid letting your hips drop.
- Engage your core and glutes for stability.
FAQs
1. Can you target belly fat specifically with exercise?
Answer : While you can't target fat loss in a specific area, exercises that engage the core can strengthen and tone the abdominal muscles. Overall fat loss, which includes belly fat, occurs through a combination of cardio, strength training, and a healthy diet.
2. How often should I do exercises to burn belly fat?
Answer : For optimal results, aim for at least 3-4 sessions of core-focused exercises per week, combined with regular cardio workouts. Consistency is key, so it's important to stay active most days of the week.
3. What are the best exercises to burn belly fat?
Answer : Effective exercises include crunches, planks, bicycle crunches, mountain climbers, burpees, high knees, leg raises, Russian twists, flutter kicks, and side planks. These exercises engage the core and boost metabolism.
4. How long will it take to see results?
Answer : The time to see visible results varies depending on factors like diet, exercise consistency, and individual metabolism. Generally, noticeable changes can occur within 4-6 weeks with a consistent workout routine and healthy eating.
5. Is diet important for losing belly fat?
Answer : Yes, diet plays a crucial role in losing belly fat. A balanced diet with whole foods, lean proteins, healthy fats, and limited processed sugars is essential. Creating a calorie deficit by consuming fewer calories than you burn is key to fat loss.
6. Can I do belly fat-burning exercises at home?
Answer : Yes, many effective belly fat-burning exercises, such as crunches, planks, and burpees, can be done at home with minimal or no equipment. This makes it convenient to incorporate them into your routine.
7. Should I do cardio or strength training to burn belly fat?
Answer : A combination of both cardio and strength training is most effective for burning belly fat. Cardio exercises help burn calories, while strength training builds muscle, which can increase metabolism.
8. Are there any specific tips for beginners?
Answer : Beginners should start with basic exercises and gradually increase intensity as they build strength. It's important to focus on proper form to prevent injury and to listen to your body. Consistency and patience are crucial.
9. Can stress affect belly fat loss?
Answer : Yes, chronic stress can lead to the release of cortisol, a hormone that can increase fat storage, particularly in the abdominal area. Managing stress through activities like meditation, yoga, or deep breathing can be beneficial.
10. Is it possible to have a flat stomach without losing weight?
Answer : Yes, you can tone and strengthen your abdominal muscles to create a flatter appearance without significant weight loss. However, reducing overall body fat through a combination of diet and exercise is typically necessary for a noticeably flatter stomach.
Conclusion
In conclusion, exercises to burn belly fat are an essential component of a comprehensive fitness regimen that promotes overall health and well-being. While spot reduction is not possible, incorporating a variety of core-strengthening exercises, cardiovascular activities, and strength training can help reduce body fat and tone the abdominal area. Consistency in these exercises, combined with a balanced diet, adequate hydration, sufficient sleep, and stress management, is key to achieving and maintaining a leaner, healthier body. It's important to approach this journey with patience and perseverance, as sustainable changes take time. By integrating these practices into your lifestyle, you can not only work towards a flatter stomach but also enhance your overall fitness and quality of life.
You might also like our weight loss articles.
“Motivation is what gets you started. Habit is what keeps you going.” – Jim Ryun
If you would like more information about the 2024, please send us an email.
Written by Fitness Goal 4U
Smart Fitness Goals - Achieve Health with Simple Steps
Smart fitness goals focus on being Specific, Measurable, Achievable, Relevant, and Time-bound. They help you create a clear path to success, stay motivated, and track progress. Whether its weight loss, strength building, or improved endurance, smart goals guide your fitness journey, ensuring steady growth and sustainable results tailored to your needs.
“Confidence comes from discipline and training.” – Robert Kiyosaki
Pimples are an unwelcome guest for most people. They often appear at the most inconvenient times, such as before an important event or meeting. While various over-the-counter treatments are available, many people prefer natural remedies to deal with pimples due to their gentler effect on the skin and fewer side effects. In this article, we will explore the natural methods that can help you get rid of pimplesas quickly as possible.
Understanding Pimples: Causes and Types
Before diving into the remedies, it’s essential to understand what causes pimples. Pimples occur when hair follicles become clogged with oil, dead skin cells, and bacteria. The body reacts to this blockage by producing inflammation, leading to red, swollen, and sometimes painful bumps on the skin.
Causes of Pimples:
- Excess Sebum Production: The sebaceous glands produce oil (sebum) to keep the skin hydrated. However, when these glands produce too much oil, it can mix with dead skin cells and clog pores, leading to pimples.
- Bacteria: The bacterium Propionibacterium acnes (P. acnes) naturally lives on the skin. When a pore becomes clogged, this bacterium can multiply, leading to inflammation and pimples.
- Hormonal Changes: Hormonal fluctuations, especially during puberty, menstruation, pregnancy, and stress, can increase oil production and contribute to pimple formation.
- Diet: Some studies suggest that certain foods, particularly those high in sugar and dairy, can trigger or worsen acne.
- Stress: Stress doesn’t directly cause pimples, but it can exacerbate them by triggering the release of hormones that increase oil production.
Types of Pimples:
- Whiteheads: These are small, closed bumps that form when a pore is clogged and covered with a thin layer of skin.
- Blackheads: Open bumps on the skin filled with excess oil and dead skin cells. They appear black due to the oxidation of melanin (a skin pigment) when exposed to air.
- Papules: Small red, inflamed bumps caused by clogged pores.
- Pustules: These are similar to papules but contain pus at their tips, making them look like white or yellowish bumps.
- Nodules: Large, painful lumps beneath the skin caused by deep blockages in the pores.
- Cysts: The most severe type of pimple, these are painful, pus-filled lumps under the skin that can lead to scarring if not treated properly.
Natural Remedies to Get Rid of Pimples
Now that we understand the causes and types of pimples, let’s explore some natural remedies that can help clear them up quickly.
1. Tea Tree Oil
Benefits:
Tea tree oil is a powerful natural antiseptic with anti-inflammatory properties. It can kill bacteria on the skin, reducing the number of pimples and preventing new ones from forming. Its anti-inflammatory effect also helps reduce the swelling and redness associated with pimples.
How to Use:
- Dilute a few drops of tea tree oil with a carrier oil like coconut or jojoba oil.
- Apply the mixture directly to the pimples using a cotton swab.
- Leave it on for a few hours or overnight, then rinse with lukewarm water.
Precautions:
- Always dilute tea tree oil before applying it to your skin to prevent irritation.
- Conduct a patch test on a small area of your skin before using it extensively.
2. Aloe Vera
Benefits:
Aloe vera is known for its soothing and healing properties. It contains salicylic acid and sulfur, both of which are used in the treatment of acne. Aloe vera can reduce inflammation, promote healing, and prevent scarring, making it an excellent remedy for pimples.
How to Use:
- Extract the gel from an aloe vera leaf.
- Apply the gel directly to your pimples and leave it on overnight.
- Rinse your face with water the next morning.
Precautions:
- Use pure aloe vera gel for the best results.
- Some people may be allergic to aloe vera, so it's advisable to perform a patch test before full application.
3. Honey and Cinnamon Mask
Benefits:
Honey is a natural antibacterial agent that can prevent the growth of acne-causing bacteria. It also has anti-inflammatory properties that can reduce the redness and swelling of pimples. Cinnamon has antimicrobial properties that can help fight bacteria and promote faster healing of pimples.
How to Use:
- Mix two tablespoons of honey with one teaspoon of cinnamon to form a paste.
- Apply the mixture to your face and leave it on for 10-15 minutes.
- Rinse with lukewarm water and pat your face dry.
Precautions:
- Be careful if you have sensitive skin, as cinnamon can cause irritation in some people.
4. Green Tea
Benefits:
Green tea is rich in antioxidants, particularly epigallocatechin gallate (EGCG), which has been shown to reduce sebum production, fight inflammation, and inhibit the growth of acne-causing bacteria. Applying green tea to the skin can help reduce the appearance of pimples and promote clearer skin.
How to Use:
- Steep a green tea bag in boiling water for 3-4 minutes.
- Let the tea cool, then apply it to your face using a cotton ball.
- Leave it on for 10 minutes or overnight, then rinse with water.
Precautions:
- Always use cooled green tea to avoid burns.
5. Apple Cider Vinegar
Benefits:
Apple cider vinegar has antibacterial and antifungal properties that can help reduce the bacteria that cause pimples. It also contains acetic acid, which can exfoliate the skin, remove dead skin cells, and unclog pores.
How to Use:
- Mix one part apple cider vinegar with three parts water.
- Apply the mixture to your pimples using a cotton ball.
- Leave it on for 5-20 seconds, then rinse with water and pat your skin dry.
Precautions:
- Apple cider vinegar is highly acidic and can cause irritation if used undiluted or left on the skin for too long. Always dilute it and use it with caution.
6. Witch Hazel
Benefits:
Witch hazel is a natural astringent that can reduce inflammation and soothe the skin. It’s often used to treat various skin conditions, including acne. Witch hazel helps tighten pores, control oil production, and reduce the size of pimples.
How to Use:
- Apply witch hazel to your face using a cotton ball after cleansing.
- Leave it on your skin; there’s no need to rinse it off.
Precautions:
- Choose alcohol-free witch hazel to avoid drying out your skin.
7. Lemon Juice
Benefits:
Lemon juice is a natural source of vitamin C, which has antibacterial and exfoliating properties. Applying lemon juice can help reduce the bacteria on the skin and promote the drying out of pimples.
How to Use:
- Squeeze the juice from a fresh lemon.
- Apply the juice directly to the pimples using a cotton swab.
- Leave it on for 10-15 minutes, then rinse with water.
Precautions:
- Lemon juice can make your skin more sensitive to sunlight, so avoid sun exposure or wear sunscreen after using it.
- It can also cause irritation in people with sensitive skin, so a patch test is recommended.
8. Garlic
Benefits:
Garlic has strong antibacterial properties due to its high content of sulfur compounds, particularly allicin. Applying garlic to the skin can help kill the bacteria that cause pimples and reduce inflammation.
How to Use:
- Crush a garlic clove to extract its juice.
- Apply the juice directly to the pimples using a cotton swab.
- Leave it on for a few minutes, then rinse with water.
Precautions:
- Garlic can cause a burning sensation and irritation on the skin, so use it sparingly and perform a patch test first.
9. Turmeric
Benefits:
Turmeric is known for its anti-inflammatory, antibacterial, and antioxidant properties. It can help reduce the redness and swelling associated with pimples, promote healing, and prevent further breakouts.
How to Use:
- Mix turmeric powder with water or honey to form a paste.
- Apply the paste to the pimples and leave it on for 10-15 minutes.
- Rinse with lukewarm water.
Precautions:
- Turmeric can stain the skin temporarily, so be prepared for a slight yellow tint.
10. Ice
Benefits:
Ice is an excellent remedy for reducing the swelling and redness of pimples. It can constrict blood vessels and reduce the size of inflamed pimples, making them less noticeable.
How to Use:
- Wrap an ice cube in a clean cloth or paper towel.
- Apply the ice to the pimple for 1-2 minutes.
- Repeat several times a day as needed.
Precautions:
- Do not apply ice directly to the skin, as it can cause frostbite or damage the skin.
Lifestyle Changes to Prevent Pimples
While these natural remedies can help get rid of pimples quickly, making certain lifestyle changes can prevent them from recurring.
1. Maintain a Consistent Skincare Routine
A consistent skincare routine is essential for keeping your skin clear and preventing pimples. This routine should include:
- Cleansing: Use a gentle cleanser to remove dirt, oil, and makeup from your skin twice a day.
- Exfoliating: Exfoliate your skin 1-2 times a week to remove dead skin cells and prevent clogged pores.
- Moisturizing: Even if you have oily skin, it’s essential to moisturize to keep your skin balanced and hydrated. Choose a lightweight, non-comedogenic moisturizer.
- Sun Protection: Apply sunscreen daily to protect your skin from UV damage, which can worsen acne.
2. Watch Your Diet
Your diet can have a significant impact on your skin’s health. To prevent pimples, consider the following dietary tips:
- Reduce Sugar Intake: High-glycemic foods, like sugary snacks and beverages, can cause blood sugar spikes, leading to increased oil production and pimples.
- Limit Dairy Products: Some studies suggest a link between dairy consumption and acne. Consider reducing your intake of milk, cheese, and other dairy products.
- Eat More Fruits and Vegetables: Fruits and vegetables are rich in antioxidants, which can help protect your skin from damage and inflammation.
- Stay Hydrated: Drinking plenty of water helps flush toxins from your body and keeps your skin hydrated.
3. Manage Stress
Stress can trigger hormonal changes that lead to increased oil production and pimples. To manage stress:
- Practice Relaxation Techniques: Techniques such as deep breathing, meditation, and yoga can help reduce stress levels.
- Get Enough Sleep: Aim for 7-9 hours of sleep each night to allow your body to repair and regenerate.
- Exercise Regularly: Physical activity can reduce stress and improve circulation, promoting healthier skin.
4. Avoid Touching Your Face
Touching your face with dirty hands can transfer bacteria and oil to your skin, leading to clogged pores and pimples. Try to avoid:
- Popping Pimples: Popping pimples can push bacteria deeper into the skin, leading to more significant inflammation and potential scarring.
- Resting Your Face on Your Hands: This habit can transfer oil and dirt from your hands to your face.
5. Keep Your Hair Clean
Oily hair can contribute to pimples, especially along the hairline and forehead. To prevent this:
- Wash Your Hair Regularly: Keep your hair clean and avoid letting it come into contact with your face.
- Use Oil-Free Hair Products: Choose hair products that are oil-free and non-comedogenic to prevent clogged pores.
Conclusion
Pimples can be frustrating, but with the right natural remedies and lifestyle changes, you can get rid of them quickly and prevent future breakouts. Tea tree oil, aloe vera, honey, green tea, and other natural ingredients offer effective ways to treat pimples without the harsh chemicals found in many commercial products.
Remember that consistency is key. While these natural remedies can provide quick results, maintaining a healthy skincare routine, watching your diet, and managing stress are essential for long-term clear skin. If your pimples persist or worsen, consider consulting a dermatologist for professional advice and treatment options.
You might also like our beauty articles.
“Motivation is what gets you started. Habit is what keeps you going.” – Jim Ryun
If you would like more information about the 2024, please send us an email.
Written by Fitness Goal 4U
Smart Fitness Goals - Achieve Health with Simple Steps
Smart fitness goals focus on being Specific, Measurable, Achievable, Relevant, and Time-bound. They help you create a clear path to success, stay motivated, and track progress. Whether its weight loss, strength building, or improved endurance, smart goals guide your fitness journey, ensuring steady growth and sustainable results tailored to your needs.
“Confidence comes from discipline and training.” – Robert Kiyosaki
Scars are a natural part of the body’s healing process, but they can often be a source of discomfort, both physically and emotionally. Whether from surgery, injury, acne, or other causes, scars can be stubborn and challenging to treat. Fortunately, there are numerous methods available to help reduce the appearance of scars and assist in the healing process. This guide will delve into various hacks and treatments that can help remove all types of scars and promote faster, healthier healing.
Understanding Scars and Their Formation
Before diving into the hacks for scar removal, it's essential to understand how scars form. When the skin is injured, the body initiates a healing process that involves the production of collagen, a protein that helps repair the wound. The type, size, and location of the injury, along with your age, ethnicity, and even genetics, all influence how the scar will form. Scars can vary in appearance, ranging from flat and pale to raised and discolored.
Types of Scars
- Atrophic Scars: These scars are indented and are often the result of acne, chickenpox, or injuries. They form when the skin loses its collagen, leading to a sunken appearance.
- Hypertrophic Scars: These are raised scars that occur when the body produces too much collagen during the healing process. They remain within the boundaries of the original wound.
- Keloid Scars: Similar to hypertrophic scars, keloid scars are raised but extend beyond the original injury site. Keloids are more common in people with darker skin tones and can be challenging to treat.
- Contracture Scars: These scars result from burns and cause the skin to tighten, which can restrict movement.
- Stretch Marks: While technically not scars, stretch marks are a type of scar that forms when the skin stretches or shrinks rapidly, such as during pregnancy or rapid weight gain.
Topical Treatments for Scar Removal
1. Silicone Gel Sheets and Gels
Silicone is one of the most effective ingredients for treating scars. Silicone gel sheets and gels are widely used to reduce the appearance of scars, particularly hypertrophic and keloid scars. They work by hydrating the scar tissue, which helps to flatten and soften the scar over time. Additionally, silicone creates a protective barrier over the scar, preventing bacteria and other contaminants from entering, which can further improve healing.
How to Use:
- Apply the silicone gel or sheet directly to the scar.
- Leave it on for at least 12 hours a day for optimal results.
- Consistent use over several weeks or months is necessary to see significant improvement.
2. Vitamin E Oil
Vitamin E is a popular home remedy for scars. It’s believed to help improve the texture and appearance of scars by promoting skin regeneration and hydration. While scientific evidence on its effectiveness is mixed, many people find that vitamin E can help with the healing process.
How to Use:
- Break open a vitamin E capsule and apply the oil directly to the scar.
- Massage the oil gently into the skin for a few minutes.
- Repeat this process twice daily.
3. Onion Extract Gel
Onion extract is another widely used ingredient in scar treatment products. It contains anti-inflammatory properties that can help reduce the redness and size of scars, particularly in hypertrophic and keloid scars.
How to Use:
- Apply a gel containing onion extract to the scar.
- Use the gel at least once a day.
- Regular use for several months is often needed to see results.
4. Aloe Vera
Aloe vera is well-known for its soothing and healing properties. It can be particularly effective in treating scars caused by burns and other minor injuries. Aloe vera helps to keep the skin hydrated, reduces inflammation, and can help improve the appearance of scars over time.
How to Use:
- Extract fresh aloe vera gel from the plant and apply it directly to the scar.
- Massage gently and leave it on for at least 30 minutes.
- Rinse with lukewarm water and repeat the process twice a day.
5. Honey
Honey is a natural humectant, which means it helps retain moisture, making it beneficial for healing scars. It also has antibacterial properties, which can help prevent infections that may worsen scars.
How to Use:
- Apply a small amount of honey directly to the scar.
- Cover the area with a bandage and leave it on overnight.
- Wash it off with warm water the next morning.
- Repeat daily until you see improvement.
6. Coconut Oil
Coconut oil is rich in fatty acids and antioxidants, which can help improve the texture of scars and reduce redness. It’s especially useful for treating atrophic scars and stretch marks.
How to Use:
- Warm a small amount of coconut oil in your hands.
- Massage the oil into the scar for a few minutes.
- Leave it on for a few hours or overnight.
- Repeat daily for the best results.
7. Lemon Juice
Lemon juice is known for its skin-lightening properties, which can help reduce the appearance of dark scars. It’s particularly effective for hyperpigmented scars, but it should be used with caution, as it can make the skin more sensitive to sunlight.
How to Use:
- Squeeze fresh lemon juice and apply it to the scar with a cotton ball.
- Leave it on for 10-15 minutes.
- Rinse off with warm water and apply sunscreen if you plan to go outside.
- Use it once daily, but avoid using it on open wounds or fresh scars.
Natural Remedies for Scar Healing
1. Essential Oils
Essential oils, such as lavender, tea tree, and frankincense, are known for their healing properties. They can help reduce inflammation, promote skin regeneration, and improve the overall appearance of scars.
How to Use:
- Dilute a few drops of essential oil with a carrier oil, like coconut or jojoba oil.
- Massage the mixture into the scar daily.
- Be consistent with application for several weeks to see results.
2. Baking Soda
Baking soda is a natural exfoliant that can help remove dead skin cells and promote new skin growth, which may reduce the appearance of scars over time.
How to Use:
- Mix a tablespoon of baking soda with water to form a paste.
- Apply the paste to the scar and leave it on for 10-15 minutes.
- Rinse off with warm water and moisturize the area.
- Use this remedy two to three times a week.
3. Apple Cider Vinegar
Apple cider vinegar (ACV) is known for its astringent and antibacterial properties. It can help exfoliate the skin, reduce redness, and improve the texture of scars.
How to Use:
- Dilute ACV with water (1:2 ratio) to avoid irritation.
- Apply the mixture to the scar using a cotton ball.
- Leave it on for 10-15 minutes before rinsing off.
- Use it daily for the best results.
4. Cucumber
Cucumber is a natural skin soother and hydrator, making it effective in reducing inflammation and lightening scars.
How to Use:
- Blend cucumber to create a paste.
- Apply the paste directly to the scar.
- Leave it on for 30 minutes before rinsing off with cold water.
- Repeat daily.
5. Potato Juice
Potato juice is another natural remedy believed to help lighten scars and improve skin tone. It contains enzymes that promote skin regeneration.
How to Use:
- Grate a potato and extract the juice.
- Apply the juice to the scar and leave it on for 20-30 minutes.
- Rinse off with warm water.
- Use this remedy daily for best results.
Medical Treatments for Scar Removal
While home remedies can be effective, some scars require medical intervention. There are various treatments available that can significantly reduce the appearance of scars.
1. Laser Therapy
Laser therapy is one of the most effective treatments for reducing scars, especially for hypertrophic and keloid scars. It works by targeting the blood vessels in the scar tissue, which reduces redness and promotes collagen remodeling.
Types of Laser Treatments:
- Ablative Lasers: Remove the top layer of skin, which can help with more severe scars.
- Non-Ablative Lasers: Target the underlying skin tissue to stimulate collagen production without removing the skin.
Considerations:
- Multiple sessions are often required.
- It’s important to follow post-treatment care to prevent complications.
2. Microneedling
Microneedling involves using a device with tiny needles to create micro-injuries in the skin. This process stimulates collagen production and can help improve the texture and appearance of scars.
How It Works:
- The treatment is typically performed by a dermatologist or trained professional.
- It’s effective for atrophic scars, such as acne scars.
Considerations:
- Redness and swelling may occur after treatment.
- Several sessions are needed for optimal results.
3. Chemical Peels
Chemical peels involve applying a solution to the skin that causes the top layer to peel off. This process encourages new skin growth and can reduce the appearance of scars.
Types of Chemical Peels:
- Superficial Peels: Use mild acids like glycolic acid and are effective for mild scarring.
- Medium Peels: Use stronger acids like trichloroacetic acid (TCA) and can treat more severe scars.
- Deep Peels: Penetrate deeper layers of the skin and are used for more severe scarring but have a longer recovery time.
Considerations:
- Peels should be done by a professional to avoid complications.
- Post-peel care is crucial for healing and avoiding hyperpigmentation.
4. Corticosteroid Injections
Corticosteroid injections are commonly used to treat hypertrophic and keloid scars. They work by reducing inflammation and flattening the scar tissue.
How It Works:
- The injections are typically administered by a dermatologist.
- Multiple sessions may be needed to achieve desired results.
Considerations:
- There may be some pain or discomfort during the injection.
- Results vary, and some scars may not respond well to this treatment.
5. Dermal Fillers
Dermal fillers can be used to treat atrophic scars by filling in the depressed areas, making the skin look smoother.
How It Works:
- Fillers are injected into the scar by a professional.
- The results are immediate but not permanent, so repeat treatments are necessary.
Considerations:
- There may be some bruising or swelling after the treatment.
- The cost of fillers can be high, and they need to be repeated every few months.
6. Surgery
In some cases, surgery may be the best option for removing or improving the appearance of scars. This is especially true for large, deep scars that cannot be treated effectively with other methods.
Types of Scar Revision Surgery:
- Excision: The scar is surgically removed, and the skin is stitched together to create a smaller, less noticeable scar.
- Skin Grafting: In cases of large scars, such as burns, skin grafts may be used to cover the area with healthy skin.
Considerations:
- Surgery is invasive and comes with risks, such as infection and scarring.
- Recovery time varies depending on the type of surgery performed.
Preventing Scars During the Healing Process
While the above treatments can help reduce the appearance of existing scars, it's also crucial to take steps to prevent scars from forming in the first place. Proper wound care and early intervention can make a significant difference in how a scar forms.
1. Keep the Wound Clean and Moist
Keeping the wound clean is essential to prevent infection, which can worsen scarring. Using an antibiotic ointment and covering the wound with a sterile bandage can help keep it moist and promote faster healing.
2. Avoid Picking at Scabs
Picking at scabs can reopen the wound and lead to a larger scar. It’s essential to let the scab fall off naturally as the skin underneath heals.
3. Use Sunscreen
Exposure to the sun can cause scars to darken and become more noticeable. Applying sunscreen with at least SPF 30 to the scarred area can help protect it from UV damage and reduce pigmentation.
4. Massage the Scar
Once the wound has healed, gently massaging the scar can help break down the collagen fibers and improve the scar’s appearance. Use a moisturizing lotion or oil during the massage to keep the skin hydrated.
5. Stay Hydrated and Maintain a Healthy Diet
Drinking plenty of water and eating a diet rich in vitamins and minerals can support skin health and aid in the healing process. Foods high in vitamin C, zinc, and protein are particularly beneficial for skin repair.
Conclusion
While scars are a natural part of the body’s healing process, there are many effective methods to reduce their appearance and promote faster healing. From topical treatments and natural remedies to medical interventions, the options are vast and can be tailored to the specific type of scar. Consistency is key when it comes to scar treatment, and combining multiple methods often yields the best results. By understanding the different types of scars and the treatments available, you can take proactive steps to minimize scars and achieve healthier, smoother skin.
You might also like our beauty articles.
“Motivation is what gets you started. Habit is what keeps you going.” – Jim Ryun
If you would like more information about the 2024, please send us an email.
Written by Fitness Goal 4U
Smart Fitness Goals - Achieve Health with Simple Steps
Smart fitness goals focus on being Specific, Measurable, Achievable, Relevant, and Time-bound. They help you create a clear path to success, stay motivated, and track progress. Whether its weight loss, strength building, or improved endurance, smart goals guide your fitness journey, ensuring steady growth and sustainable results tailored to your needs.
“Confidence comes from discipline and training.” – Robert Kiyosaki
In a world where the beauty industry constantly pushes products and procedures, the idea of enhancing your natural glow can feel refreshing and empowering. Embracing your natural beauty doesn’t mean rejecting makeup or skincare; instead, it’s about understanding your skin, nourishing it, and using products and techniques that enhance what you already have. This comprehensive guide explores various beauty tips and tricks to help you achieve that coveted natural glow.
1. Understand Your Skin Type
Before diving into beauty routines and products, it’s essential to understand your skin type. Skin types generally fall into four categories:
- Normal: Balanced skin with no significant issues.
- Dry: Skin that feels tight, flaky, or rough.
- Oily: Skin that appears shiny and may have larger pores and acne.
- Combination: Skin that is oily in some areas (like the T-zone) and dry in others.
Knowing your skin type allows you to choose the right products and routines tailored to your needs, helping you maintain healthy, glowing skin.
2. Hydration is Key
Water is the foundation of healthy skin. Drinking enough water daily helps maintain the skin’s elasticity, reduces the appearance of wrinkles, and flushes out toxins that can cause blemishes. Aim for at least eight glasses of water a day, but adjust based on your activity level and environment.
In addition to drinking water, incorporate hydrating skincare products like serums containing hyaluronic acid, glycerin, and aloe vera. These ingredients help retain moisture, keeping your skin plump and radiant.
3. Nourish Your Skin from Within
What you eat significantly impacts your skin’s health. A diet rich in antioxidants, vitamins, and minerals promotes a natural glow from the inside out. Here’s what to focus on:
- Antioxidants: Foods like berries, nuts, and leafy greens are packed with antioxidants that fight free radicals and protect the skin from damage.
- Omega-3 Fatty Acids: Found in fish like salmon, flaxseeds, and walnuts, omega-3s help maintain the skin’s lipid barrier, keeping it hydrated and smooth.
- Vitamin C: Essential for collagen production, vitamin C-rich foods like oranges, strawberries, and broccoli help maintain the skin’s firmness and elasticity.
- Zinc: This mineral, found in pumpkin seeds, beans, and lentils, helps with skin repair and reduces inflammation, making it great for acne-prone skin.
Consider supplements if your diet lacks certain nutrients, but always consult a healthcare provider before adding them to your routine.
4. Establish a Skincare Routine
A consistent skincare routine tailored to your skin type is crucial for maintaining a natural glow. Here’s a basic routine that you can adjust based on your skin’s needs:
- Cleansing: Use a gentle cleanser twice a day to remove dirt, oil, and makeup without stripping your skin of its natural oils.
- Exfoliation: Exfoliate 2-3 times a week to remove dead skin cells and promote cell turnover. Choose a chemical exfoliant like AHA or BHA for a gentler, more effective option.
- Toning: A good toner balances your skin’s pH, tightens pores, and prepares it for the next steps. Look for toners with soothing ingredients like rose water or witch hazel.
- Serum: Serums are packed with active ingredients like vitamin C, niacinamide, or hyaluronic acid. Choose one that targets your specific skin concerns.
- Moisturizing: Moisturize daily to keep your skin hydrated. If you have oily skin, opt for a lightweight, non-comedogenic moisturizer.
- Sun Protection: Never skip sunscreen. Apply broad-spectrum SPF 30 or higher every day to protect your skin from UV damage, which can cause premature aging and hyperpigmentation.
5. The Magic of Face Masks
Face masks are a fantastic way to give your skin a boost. Depending on your skin’s needs, you can choose from various masks:
- Clay Masks: Great for oily and acne-prone skin, clay masks help absorb excess oil and unclog pores.
- Sheet Masks: Packed with serums, sheet masks are ideal for hydration and soothing. They’re also a great way to relax.
- Gel Masks: Perfect for calming irritated or sensitive skin, gel masks often contain ingredients like aloe vera and cucumber.
- Exfoliating Masks: These masks contain AHAs or BHAs and are excellent for brightening and smoothing the skin.
Use a face mask once or twice a week to give your skin that extra TLC.
6. Prioritize Sleep
Beauty sleep is not just a phrase; it’s a necessity. During sleep, your body repairs and regenerates cells, including skin cells. Lack of sleep can lead to dull skin, dark circles, and premature aging. Aim for 7-9 hours of sleep each night to wake up with refreshed, glowing skin.
Enhance your nighttime routine by using a silk pillowcase, which reduces friction and helps prevent wrinkles and frizz. Also, consider applying a nourishing night cream or a sleeping mask to help your skin repair overnight.
7. Incorporate Facial Massage
Facial massage is a simple yet effective way to improve blood circulation, reduce puffiness, and promote lymphatic drainage, all of which contribute to a natural glow. You can use your fingers, a jade roller, or a gua sha tool for a few minutes each day to reap the benefits.
Start from the center of your face and move outwards, using gentle, upward strokes. Don’t forget to massage your neck and décolletage, as these areas also show signs of aging.
8. Choose Makeup That Enhances, Not Hides
When it comes to makeup, less is often more when aiming for a natural glow. Here’s how to enhance your features without masking them:
- Light Coverage Foundation or Tinted Moisturizer: Instead of heavy foundation, opt for a light coverage foundation, BB cream, or tinted moisturizer that evens out your skin tone while allowing your natural skin to shine through.
- Cream Products: Cream-based blushes, bronzers, and highlighters blend seamlessly into the skin, giving you a more natural, dewy finish.
- Highlight Strategically: Apply a subtle highlighter to the high points of your face, such as the cheekbones, brow bones, and the bridge of your nose, to add a natural-looking radiance.
- Enhance Brows: Well-groomed brows frame the face and enhance your natural beauty. Use a brow pencil or powder to fill in sparse areas, but keep it light for a natural look.
- Luminous Lips: Choose a lip color that enhances your natural lip tone. A tinted lip balm or a sheer lipstick can provide a hint of color and hydration.
9. Exercise for Healthy Skin
Regular exercise is not only good for your body but also for your skin. When you work out, your heart pumps more blood, delivering oxygen and nutrients to your skin, which promotes cell regeneration and gives your complexion a healthy glow.
Exercise also helps reduce stress, which can be a major factor in skin issues like acne and eczema. Aim for at least 30 minutes of moderate exercise most days of the week. Activities like yoga, running, or even brisk walking can make a difference.
10. Manage Stress
Stress can wreak havoc on your skin, leading to breakouts, dullness, and even premature aging. Finding ways to manage stress is crucial for maintaining a natural glow. Here are some effective strategies:
- Mindfulness and Meditation: Practice mindfulness or meditation to calm your mind and reduce stress. Even just a few minutes a day can make a big difference.
- Breathing Exercises: Simple breathing exercises can help lower your stress levels and improve your skin’s appearance. Try deep breathing or the 4-7-8 technique.
- Journaling: Writing down your thoughts and feelings can be a therapeutic way to manage stress and improve your overall well-being.
11. Protect Your Skin from Environmental Damage
Environmental factors like pollution, UV rays, and harsh weather can damage your skin, leading to premature aging and dullness. Here’s how to protect your skin:
- Sunscreen: As mentioned earlier, always wear sunscreen. Reapply every two hours when outdoors, especially if you’re sweating or swimming.
- Antioxidant Serums: Antioxidants like vitamin C and E help protect your skin from free radical damage caused by environmental factors.
- Protective Clothing: Wear hats, sunglasses, and protective clothing to shield your skin from the sun’s harmful rays.
- Humidifiers: Use a humidifier in your home, especially during winter, to maintain moisture in the air and prevent your skin from drying out.
12. Embrace Natural Ingredients
Natural and organic skincare products are becoming increasingly popular for their gentle, effective properties. Ingredients like aloe vera, coconut oil, honey, and rosehip oil are known for their nourishing and healing properties. Here are some ways to incorporate natural ingredients into your routine:
- Aloe Vera: Use pure aloe vera gel as a moisturizer, mask, or soothing treatment for irritated skin.
- Coconut Oil: Apply coconut oil as a natural moisturizer or makeup remover. It’s especially beneficial for dry skin.
- Honey: Honey is a natural humectant, meaning it draws moisture into the skin. Use it as a face mask or spot treatment for acne.
- Rosehip Oil: Rich in vitamins A and C, rosehip oil is excellent for brightening skin and reducing the appearance of scars and fine lines.
13. Exfoliate Regularly but Gently
Exfoliation is crucial for maintaining a natural glow as it removes dead skin cells, allowing fresh, healthy skin to surface. However, it’s important to exfoliate gently to avoid damaging your skin’s barrier. Depending on your skin type, choose an exfoliator that suits you:
- Physical Exfoliators: Scrubs with small, smooth particles are suitable for most skin types. However, avoid harsh scrubs that can cause microtears in the skin.
- Chemical Exfoliators: AHAs (like glycolic acid) and BHAs (like salicylic acid) are great for a deeper exfoliation without the physical abrasion.
Limit exfoliation to 2-3 times a week to avoid over-exfoliating, which can lead to irritation and sensitivity.
14. Pay Attention to Your Eyes
The skin around your eyes is delicate and prone to showing signs of aging. To keep this area looking fresh and radiant, incorporate the following tips:
- Use an Eye Cream: Look for an eye cream that targets your specific concerns, whether it’s dark circles, puffiness, or fine lines. Ingredients like caffeine, peptides, and hyaluronic acid are particularly effective.
- Be Gentle: When applying eye cream or makeup, use your ring finger to tap the product in gently. Avoid rubbing or tugging at the skin.
- Protect from UV Rays: Wear sunglasses and apply sunscreen around your eyes to protect this sensitive area from sun damage.
15. Don’t Forget Your Hands and Neck
Your hands and neck are often overlooked but can show signs of aging just as much as your face. Here’s how to keep them looking youthful:
- Moisturize: Apply moisturizer to your hands and neck daily, especially after washing your hands or showering.
- Sun Protection: Just like your face, your hands and neck need protection from the sun. Apply sunscreen to these areas to prevent sunspots and wrinkles.
- Exfoliate: Gently exfoliate your hands and neck once a week to keep the skin smooth and even.
16. Get Regular Facials
Regular facials can do wonders for your skin by deeply cleansing, exfoliating, and nourishing your complexion. While it’s great to pamper yourself with a professional facial, you can also achieve similar results at home. Here’s how to give yourself a DIY facial:
- Cleanse: Start by thoroughly cleansing your face to remove any dirt, oil, and makeup.
- Exfoliate: Use a gentle exfoliant to slough off dead skin cells.
- Steam: Fill a bowl with hot water and hold your face over the steam for a few minutes. This opens up your pores, making it easier for treatments to penetrate.
- Mask: Apply a mask suited to your skin type. Leave it on for 10-15 minutes, then rinse off.
- Tone: Apply a toner to balance your skin’s pH.
- Serum: Apply a serum packed with active ingredients.
- Moisturize: Finish with a moisturizer to lock in hydration.
17. Practice Good Hygiene
Good hygiene is fundamental to maintaining clear, glowing skin. Here are some tips:
- Clean Makeup Brushes: Dirty brushes can harbor bacteria, leading to breakouts. Clean your makeup brushes regularly with a gentle cleanser or brush cleaner.
- Change Pillowcases: Pillowcases can accumulate oil, dirt, and bacteria from your skin and hair. Change them at least once a week to prevent skin issues.
- Avoid Touching Your Face: Your hands carry bacteria and oils that can transfer to your face, causing breakouts. Try to avoid touching your face as much as possible.
18. Smile Often
A genuine smile can enhance your natural beauty more than any product or procedure. Smiling not only makes you look more approachable and friendly, but it also releases endorphins, which reduce stress and make you feel happier. A happy, relaxed face naturally glows.
19. Be Consistent
Consistency is key in any beauty routine. Whether it’s skincare, diet, exercise, or stress management, sticking to your routine will yield the best results. Remember that achieving a natural glow takes time, so be patient and persistent.
20. Confidence is Your Best Asset
Lastly, remember that confidence is the most attractive quality. When you feel good about yourself, it radiates from within, enhancing your natural beauty. Embrace your unique features, focus on what makes you feel beautiful, and let your inner glow shine.
Conclusion
Enhancing your natural glow is about nurturing your skin, embracing healthy habits, and choosing products and techniques that highlight your best features. By understanding your skin type, staying hydrated, nourishing your skin from within, and following a consistent skincare routine, you can achieve a radiant complexion that reflects your overall health and well-being.
Incorporate these tips into your daily life, and you’ll find that your natural beauty shines through effortlessly. Remember, the goal is not to mask your appearance but to enhance what you already have, allowing your inner beauty to reflect on the outside.
You might also like our beauty articles.
“Motivation is what gets you started. Habit is what keeps you going.” – Jim Ryun
If you would like more information about the 2024, please send us an email.
Written by Fitness Goal 4U
Smart Fitness Goals - Achieve Health with Simple Steps
Smart fitness goals focus on being Specific, Measurable, Achievable, Relevant, and Time-bound. They help you create a clear path to success, stay motivated, and track progress. Whether its weight loss, strength building, or improved endurance, smart goals guide your fitness journey, ensuring steady growth and sustainable results tailored to your needs.
“Confidence comes from discipline and training.” – Robert Kiyosaki
Getting glowing skin overnight is a common goal for many people, whether for a special event, an important meeting, or just to boost self-confidence. While achieving a truly radiant complexion typically requires consistent skincare, there are effective strategies you can employ to enhance your skin's appearance in just one night. This comprehensive guide will explore various methods to help you wake up with a luminous, refreshed glow.
Understanding Your Skin
Before diving into overnight remedies, it’s essential to understand your skin type and its needs. Skin can be categorized into several types: oily, dry, combination, sensitive, and normal. Each type has specific requirements and reacts differently to various products and treatments. Knowing your skin type helps tailor your nighttime routine to achieve the best results.
Prepping Your Skin for Nighttime Care
- Cleansing: The first step to glowing skin is thorough cleansing. Remove all makeup, dirt, and impurities from your face. Use a gentle, hydrating cleanser suited for your skin type. For oily skin, a foaming or gel cleanser works well, while a cream-based cleanser is ideal for dry skin. Cleansing properly ensures that your skin can absorb the nutrients from your nighttime products effectively.
- Exfoliation: Exfoliating your skin removes dead skin cells, revealing a fresher layer underneath. However, avoid over-exfoliating, as this can irritate your skin. For a one-night glow, opt for a mild exfoliant or a product with gentle exfoliating acids like glycolic acid or lactic acid. Exfoliate 2-3 times a week, ideally in the evening, to maintain smooth and radiant skin.
Overnight Skincare Routine for Glowing Skin
1. Hydrating Toner: After cleansing and exfoliating, apply a hydrating toner. Toners help balance your skin’s pH levels and prepare it for better absorption of subsequent products. Look for a toner with soothing ingredients like rose water or chamomile extract. Avoid toners with alcohol, as they can dry out your skin.
2. Serums: Serums are concentrated treatments that target specific skin concerns. For glowing skin, focus on serums with ingredients such as vitamin C, hyaluronic acid, or niacinamide. Vitamin C brightens and evens out skin tone, hyaluronic acid deeply hydrates, and niacinamide reduces redness and improves texture.
- Vitamin C Serum: Apply a vitamin C serum to brighten your complexion and diminish dark spots. This powerful antioxidant helps reduce hyperpigmentation and promotes an even skin tone.
- Hyaluronic Acid Serum: Hyaluronic acid attracts moisture to your skin, making it look plump and hydrated. It’s an excellent choice for all skin types, especially if you’re looking for instant hydration.
- Niacinamide Serum: Niacinamide (vitamin B3) helps strengthen the skin barrier, reduce redness, and even out skin tone. It also has anti-inflammatory properties, which can soothe irritated skin.
3. Moisturizer: A good moisturizer locks in hydration and creates a barrier to prevent moisture loss. Choose a moisturizer based on your skin type:
- For Dry Skin: Opt for a rich, creamy moisturizer with ingredients like shea butter, ceramides, or squalane.
- For Oily Skin: Go for a lightweight, non-comedogenic moisturizer with a gel-like consistency.
4. Apply your moisturizer evenly across your face and neck. For an added boost, you can use a night cream or an overnight mask to deeply nourish your skin while you sleep.
5. Face Oil : Face oils can enhance your skin’s glow by providing additional hydration and nourishment. Look for oils rich in essential fatty acids and antioxidants, such as rosehip oil, argan oil, or jojoba oil. Apply a few drops to your face after moisturizing to lock in moisture and add a dewy finish.
- Rosehip Oil: Rich in vitamins A and C, rosehip oil helps brighten the skin and reduce the appearance of scars and fine lines.
- Argan Oil: Known for its moisturizing properties, argan oil is packed with antioxidants and fatty acids that nourish and protect the skin.
- Jojoba Oil: Jojoba oil closely resembles the skin’s natural sebum, making it an excellent choice for balancing oil production and providing hydration.
Additional Tips for Achieving Glowing Skin Overnight
1. Face Masks: Incorporating a face mask into your routine can provide an extra boost of hydration and radiance. Choose a mask suited to your skin’s needs:
- Hydrating Masks: Look for masks with ingredients like aloe vera, honey, or hyaluronic acid.
- Brightening Masks: Masks with vitamin C, licorice extract, or turmeric can help brighten and even out your skin tone.
2. Apply the mask according to the instructions and rinse it off before bed, following up with your regular nighttime routine.
3. Eye Cream : Don’t forget your eyes! The delicate skin around your eyes can benefit from an eye cream that targets dark circles, puffiness, and fine lines. Look for ingredients like caffeine, peptides, or hyaluronic acid.
4. Stay Hydrated: Drinking plenty of water throughout the day helps keep your skin hydrated from the inside out. Aim for at least 8 glasses of water daily. This simple habit can make a significant difference in your skin’s appearance and overall health.
5. Good Sleep: Quality sleep is crucial for skin repair and regeneration. Aim for 7-9 hours of restful sleep each night. Establish a calming bedtime routine and create a sleep-friendly environment to enhance the benefits of your skincare routine.
Natural Remedies for Glowing Skin
In addition to store-bought products, there are natural remedies that can help you achieve glowing skin overnight:
- Honey: Honey is a natural humectant that attracts moisture to the skin. It also has antibacterial and soothing properties. Apply a thin layer of raw honey to your face and leave it on for 20 minutes before rinsing off.
- Aloe Vera: Aloe vera gel is known for its soothing and hydrating properties. Apply fresh aloe vera gel to your face before bed and leave it on overnight. It can help calm irritated skin and provide a healthy glow.
- Green Tea: Green tea is rich in antioxidants that can help reduce inflammation and brighten the skin. Brew a cup of green tea, let it cool, and use a cotton pad to apply it to your face as a toner before applying your serum and moisturizer.
- Cucumber: Cucumber has hydrating and soothing properties that can help refresh your skin. Grate a cucumber, squeeze out the juice, and apply it to your face with a cotton pad. Leave it on for 10-15 minutes before rinsing.
Avoiding Common Mistakes
To ensure the best results from your nighttime skincare routine, avoid these common mistakes:
- Overusing Products: Using too many products or layering too many active ingredients can irritate your skin. Stick to a few key products and avoid combining multiple strong actives in one routine.
- Skipping Sunscreen: While this guide focuses on nighttime care, don’t forget the importance of sunscreen during the day. Sun protection is crucial for maintaining healthy, glowing skin and preventing damage.
- Ignoring Skin Sensitivities: If you have sensitive skin or are prone to reactions, perform a patch test before using new products or ingredients. Choose products specifically formulated for sensitive skin if needed.
Conclusion
Achieving glowing skin overnight is possible with the right combination of skincare products, natural remedies, and healthy habits. By understanding your skin type, following a tailored nighttime routine, and incorporating additional tips and natural remedies, you can wake up with a refreshed, radiant complexion. Remember that consistent skincare, along with proper hydration and quality sleep, plays a vital role in maintaining long-term skin health and glow.
With these strategies, you’re well on your way to achieving that coveted overnight glow.
You might also like our beauty articles.
“Motivation is what gets you started. Habit is what keeps you going.” – Jim Ryun
If you would like more information about the 2024, please send us an email.
Written by Fitness Goal 4U
Smart Fitness Goals - Achieve Health with Simple Steps
Smart fitness goals focus on being Specific, Measurable, Achievable, Relevant, and Time-bound. They help you create a clear path to success, stay motivated, and track progress. Whether its weight loss, strength building, or improved endurance, smart goals guide your fitness journey, ensuring steady growth and sustainable results tailored to your needs.
“Confidence comes from discipline and training.” – Robert Kiyosaki
Oily skin can present unique challenges, especially when it comes to choosing skincare products like fairness creams. People with oily skin often struggle with excess sebum production, which can lead to clogged pores and a shiny appearance. Therefore, selecting a fairness cream that not only addresses skin tone but also manages oiliness is crucial. In this comprehensive guide, we'll explore the best fairness creams for oily skin, focusing on their ingredients, benefits, and how they can help achieve a more even skin tone without exacerbating oiliness.
1. Neutrogena Hydro Boost Water Gel
Key Ingredients:
- Hyaluronic Acid
- Glycerin
- Dimethicone
Why It’s Suitable for Oily Skin: Neutrogena Hydro Boost Water Gel is renowned for its lightweight, gel-based formula that hydrates without adding extra oil. Hyaluronic acid provides deep hydration while maintaining a non-greasy texture. This cream helps in brightening the skin while managing oiliness, making it an excellent choice for those with oily skin who also want to improve skin tone.
Benefits:
- Hydrates skin without clogging pores.
- Lightweight and non-greasy.
- Helps improve skin texture and brightness.
2. Olay Luminous Tone Perfecting Cream
Key Ingredients:
- Niacinamide (Vitamin B3)
- Vitamin C
- Mica
Why It’s Suitable for Oily Skin: Olay Luminous Tone Perfecting Cream is specifically designed to even out skin tone and reduce dark spots. Niacinamide, a key ingredient, is known for its ability to reduce inflammation and control oil production. The formula is non-comedogenic, meaning it won’t clog pores, making it ideal for oily skin.
Benefits:
- Reduces dark spots and evens out skin tone.
- Controls oil production.
- Non-comedogenic formula.
3. La Roche-Posay Effaclar Brightening Foaming Cream
Key Ingredients:
- LHA (Lipo-Hydroxy Acid)
- Glycolic Acid
- Salicylic Acid
Why It’s Suitable for Oily Skin: La Roche-Posay Effaclar Brightening Foaming Cream combines exfoliating acids with brightening agents. The LHA and glycolic acid help in removing dead skin cells and promoting a brighter complexion, while salicylic acid helps in managing excess oil and preventing acne. This cream effectively targets uneven skin tone and excessive oil production.
Benefits:
- Exfoliates and brightens skin.
- Controls oil and prevents acne.
- Suitable for sensitive skin.
4. Kiehl's Clearly Corrective Dark Spot Solution
Key Ingredients:
- Activated C (Vitamin C)
- White Birch Extract
- Peony Extract
Why It’s Suitable for Oily Skin: Kiehl's Clearly Corrective Dark Spot Solution is designed to reduce dark spots and hyperpigmentation. The formula includes activated C, which is a potent form of Vitamin C that brightens the skin without being heavy or greasy. The addition of white birch and peony extracts helps in soothing and clarifying the skin.
Benefits:
- Reduces dark spots and uneven skin tone.
- Lightweight and fast-absorbing.
- Soothes and clarifies the skin.
5. Pond’s White Beauty Spot-less Fairness Cream
Key Ingredients:
- Pro-Vitamin B3
- Vitamin C
- SPF 15
Why It’s Suitable for Oily Skin: Pond’s White Beauty Spot-less Fairness Cream is formulated with Pro-Vitamin B3 and Vitamin C, which are effective in brightening the skin and reducing dark spots. The cream has a non-oily texture, making it suitable for those with oily skin. Additionally, it includes SPF 15 for sun protection.
Benefits:
- Brightens and evens out skin tone.
- Non-oily and absorbs quickly.
- Includes sun protection.
6. The Body Shop Vitamin C Glow-Protect Lotion
Key Ingredients:
- Vitamin C
- Community Trade Aloe Vera
- SPF 30
Why It’s Suitable for Oily Skin: The Body Shop Vitamin C Glow-Protect Lotion is enriched with Vitamin C to brighten the complexion and reduce the appearance of dark spots. The lotion has a lightweight, non-greasy formula that helps to control oil while providing essential hydration. The addition of SPF 30 offers protection against harmful UV rays.
Benefits:
- Brightens and protects the skin.
- Lightweight and non-greasy.
- Offers high sun protection.
7. Garnier SkinActive Brightening Gel Cream
Key Ingredients:
- Vitamin C
- Hyaluronic Acid
- Antioxidants
Why It’s Suitable for Oily Skin: Garnier SkinActive Brightening Gel Cream features a gel-based texture that hydrates without adding extra oil. Vitamin C helps in brightening the skin tone and reducing dark spots, while hyaluronic acid ensures hydration without heaviness. The antioxidants in the formula protect the skin from environmental damage.
Benefits:
- Provides brightening and hydration.
- Gel texture absorbs quickly.
- Protects against environmental damage.
8. Clinique Even Better Clinical Dark Spot Corrector
Key Ingredients:
- Vitamin C
- Salicylic Acid
- Molecular Science Complex
Why It’s Suitable for Oily Skin: Clinique Even Better Clinical Dark Spot Corrector is known for its advanced formula that targets dark spots and uneven skin tone. The inclusion of Vitamin C and salicylic acid helps in brightening the skin while managing excess oil. The lightweight formula ensures it won’t add to oiliness or clog pores.
Benefits:
- Reduces dark spots and uneven skin tone.
- Lightweight and oil-free.
- Helps control excess oil.
9. L'Oréal Paris White Perfect Laser Day Cream
- Key Ingredients:
- Pro-Vitamin B3
- Melanin-Block
- SPF 19
Why It’s Suitable for Oily Skin: L'Oréal Paris White Perfect Laser Day Cream is formulated with Pro-Vitamin B3 and Melanin-Block to target dark spots and uneven skin tone. The cream has a light texture that absorbs quickly, making it suitable for oily skin. SPF 19 provides added protection against UV damage.
Benefits:
- Targets dark spots and brightens skin.
- Light and non-greasy.
- Provides sun protection.
10. Bioderma White Objective Lightening Serum
Key Ingredients:
- Vitamin C
- Resveratrol
- Yarrow Extract
Why It’s Suitable for Oily Skin: Bioderma White Objective Lightening Serum is designed to reduce pigmentation and brighten the skin. The serum has a lightweight texture that is ideal for oily skin. Vitamin C and resveratrol help in evening out skin tone and protecting against oxidative stress.
Benefits:
- Brightens and evens out skin tone.
- Lightweight and fast-absorbing.
- Provides antioxidant protection.
Tips for Using Fairness Creams on Oily Skin
- Choose Oil-Free Formulas: Always opt for products labeled as oil-free or non-comedogenic to avoid exacerbating oiliness and preventing clogged pores.
- Look for Light Textures: Gel-based or water-based formulas are generally better for oily skin as they provide hydration without adding extra grease.
- Incorporate Exfoliation: Regular exfoliation can help in removing dead skin cells and preventing clogged pores, which can complement the effectiveness of fairness creams.
- Apply Sunscreen: Even if your fairness cream includes SPF, consider using a separate sunscreen for better protection against UV rays, which can contribute to hyperpigmentation.
- Patch Test New Products: Before fully incorporating a new fairness cream into your routine, perform a patch test to ensure it doesn’t cause any adverse reactions.
Conclusion
Finding the right fairness cream for oily skin involves balancing skin brightening with oil control. The creams listed in this guide offer a range of solutions from hydrating gels to lightweight serums, each formulated to address oily skin concerns while working towards a more even skin tone. By choosing products specifically designed for oily skin and following the application tips, you can achieve a brighter complexion without compromising your skin's balance.
You might also like our beauty articles.
“Motivation is what gets you started. Habit is what keeps you going.” – Jim Ryun
If you would like more information about the 2024, please send us an email.
Written by Fitness Goal 4U
Smart Fitness Goals - Achieve Health with Simple Steps
Smart fitness goals focus on being Specific, Measurable, Achievable, Relevant, and Time-bound. They help you create a clear path to success, stay motivated, and track progress. Whether its weight loss, strength building, or improved endurance, smart goals guide your fitness journey, ensuring steady growth and sustainable results tailored to your needs.
“Confidence comes from discipline and training.” – Robert Kiyosaki
Marriage is one of the most significant and intimate relationships two people can share. It's built on a foundation of love, trust, respect, and commitment. However, even the strongest marriages can face challenges, misunderstandings, or periods where the connection feels strained. Loving your spouse better isn't about grand gestures or constantly trying to "fix" things; it’s about nurturing a relationship over time with consistent effort, thoughtfulness, and care. This article explores actionable ways to love your spouse better, whether you're in a long-term marriage or just beginning your journey.
1. Communicate Effectively
Good communication is the cornerstone of a healthy marriage. But communicating effectively goes beyond talking about the day's events or family logistics. It's about sharing feelings, fears, and dreams openly and honestly.
- Active Listening: When your spouse speaks, truly listen. This means setting aside distractions, making eye contact, and showing empathy. Instead of formulating a response while they talk, absorb what they're saying. Ask questions to clarify and confirm that you've understood them.
- Open Dialogue: Encourage open conversations about both good and challenging topics. If something is bothering you, approach it in a non-confrontational way. By creating a safe space where both partners can share without fear of judgment, you strengthen the emotional bond.
- Non-Verbal Communication: Sometimes, love isn't expressed through words. Pay attention to non-verbal cues like body language, touch, and even the tone of voice. A gentle touch or a hug can sometimes speak volumes.
2. Express Appreciation and Gratitude
It’s easy to take your spouse for granted, especially when life gets busy. However, consistently showing appreciation can deepen your love for one another.
- Daily Affirmations: Small acts of kindness or words of affirmation can go a long way. Simple phrases like “I appreciate you,” “Thank you for doing that,” or “I love you” can make your partner feel valued.
- Celebrate Achievements: Whether it’s a promotion at work or a personal accomplishment, celebrate each other's successes. Acknowledging milestones shows that you're invested in your spouse's growth and happiness.
- Gratitude Journal: Consider starting a gratitude journal where both of you can note things you're thankful for in your marriage. This simple act can help remind you of the positive aspects of your relationship.
3. Prioritize Quality Time Together
In the hustle and bustle of daily life, spending quality time together can often fall by the wayside. However, carving out moments to connect is essential for maintaining a healthy marriage.
- Date Nights: Regular date nights give you the chance to reconnect outside of your daily routines. It doesn't have to be an expensive outing—something as simple as a walk in the park, cooking dinner together, or watching a movie can reignite the spark.
- Unplugged Time: Disconnect from your phones, work, and other distractions. This allows you to be fully present with each other, giving your partner your undivided attention.
- Shared Hobbies: Find activities that you both enjoy and can engage in together. Whether it’s cooking, hiking, painting, or traveling, shared experiences build stronger emotional bonds.
4. Embrace Physical Affection
Physical touch is one of the most powerful ways to show love and affection. It can convey emotions when words fall short and plays a critical role in maintaining intimacy.
- Small Gestures: Holding hands, hugging, or simply sitting close to each other can increase feelings of closeness. Small gestures of affection can be as meaningful as grand romantic gestures.
- Regular Intimacy: A fulfilling sexual relationship is essential for most couples. Prioritize intimacy by making time for it and communicating openly about your needs and desires. It’s not always about frequency, but about making the experience meaningful and satisfying for both partners.
- Non-Sexual Touch: Touch doesn't always have to lead to sex. Simple acts like a back rub, a kiss on the forehead, or brushing against each other while passing by can build a stronger physical connection.
5. Support Each Other’s Individual Growth
Marriage is a partnership, but it’s also made up of two individuals with their own goals, dreams, and interests. Loving your spouse better means supporting them in their personal journey, not just as part of the couple but also as an individual.
- Encourage Personal Goals: Be your spouse's biggest cheerleader. Whether they want to pursue a new hobby, change careers, or further their education, offer your support and encouragement. This shows that you’re invested in their personal happiness and development.
- Space for Individuality: While it’s important to do things together, it's equally vital to give each other space for individuality. Allowing your spouse time to pursue their interests or spend time with friends helps maintain a healthy balance between "we" and "me."
- Emotional Support: During challenging times, be there to listen and offer support. Sometimes, just knowing that you’re there, ready to provide a listening ear or a comforting hug, can make all the difference.
6. Resolve Conflicts Constructively
Disagreements are inevitable in any marriage. However, how you handle conflict can either strengthen or weaken your relationship.
- Stay Calm: When disagreements arise, try to stay calm and avoid reacting impulsively. Take a moment to collect your thoughts before responding. This helps prevent hurtful words or actions that you might regret later.
- Focus on Solutions: Instead of dwelling on the problem or assigning blame, focus on finding solutions together. Approach the issue as a team, where both of you are working toward a common goal: the health of your marriage.
- Agree to Disagree: Not all conflicts need to be resolved with full agreement. Sometimes, it’s okay to have differing opinions. The key is mutual respect and understanding that your partner has their own perspectives.
7. Cultivate Forgiveness and Patience
No one is perfect, and that includes both you and your spouse. To love your spouse better, you need to embrace forgiveness and patience.
- Forgive Quickly: Holding onto grudges can breed resentment. When conflicts arise, work toward forgiveness. This doesn’t mean ignoring or excusing harmful behavior, but it does mean letting go of anger and bitterness after an issue has been resolved.
- Be Patient: Everyone makes mistakes, and it's important to be patient with your spouse when they fall short. Understand that growth takes time, and your spouse is likely trying their best to meet your expectations.
- Self-Forgiveness: Just as you forgive your partner, be kind to yourself when you make mistakes in the relationship. Self-compassion allows you to love more fully and prevents guilt from overshadowing your actions.
8. Show Respect in Words and Actions
Respect is the foundation of any strong relationship. Without it, love can falter. To love your spouse better, prioritize showing respect both in your words and actions.
- Respect Boundaries: Every person has their own boundaries, and respecting those boundaries is crucial in maintaining a healthy relationship. Be mindful of your spouse's comfort zones—whether emotional, physical, or psychological.
- Avoid Criticism and Contempt: Criticism and contempt are two of the most damaging behaviors in a relationship. Instead of tearing your partner down or ridiculing them, communicate any issues respectfully. Frame discussions as opportunities to grow together rather than as opportunities to point out flaws.
- Appreciate Differences: You and your spouse might have different ways of doing things, different habits, or even different values in some areas. Learning to appreciate these differences, rather than trying to change them, helps foster mutual respect.
9. Keep the Romance Alive
Keeping the romance alive is key to maintaining a strong emotional and physical connection. Romance isn't just about grand gestures; it's about the small, thoughtful actions that remind your spouse they’re cherished.
- Surprise Gestures: Surprises can bring a refreshing excitement into your relationship. Whether it's planning a spontaneous weekend getaway, writing a love note, or preparing their favorite meal, these small acts show your partner that you're thinking of them.
- Flirt with Each Other: Flirting isn't just for the dating stage. Continue to flirt with your spouse, whether through playful teasing, affectionate texts during the day, or romantic glances. It keeps the spark alive and reminds your partner of the attraction you have for them.
- Celebrate Your Love: Mark special occasions like your anniversary, the day you met, or other meaningful milestones. Take time to reflect on your journey together and celebrate how far you've come as a couple.
10. Work Together on Common Goals
A shared vision for the future is one of the best ways to strengthen your marriage. Working together on common goals, whether they’re short-term or long-term, gives your relationship a sense of purpose and direction.
- Set Financial Goals: Finances can often be a point of stress in marriage. Work together to set financial goals, whether saving for a home, paying off debt, or planning for retirement. Being on the same page financially strengthens your partnership.
- Plan for the Future: Discuss your long-term goals as a couple. Where do you see yourselves in five, ten, or twenty years? Whether it's raising a family, traveling the world, or starting a business together, having shared aspirations deepens your connection.
- Tackle Challenges Together: Life will inevitably throw challenges your way, whether it’s a career change, health issues, or family problems. Approach these challenges as a team, supporting each other and working together to overcome them.
Conclusion
Loving your spouse better is an ongoing, dynamic process that requires consistent effort, patience, and a genuine desire to nurture your relationship. By communicating openly, showing appreciation, prioritizing time together, and continually working on both personal and shared goals, you can build a marriage that thrives on mutual respect, affection, and support. Each of the strategies mentioned in this article is a tool that can help strengthen your marriage and deepen your connection. With intentional effort, your love for your spouse can continue to grow, creating a fulfilling and lasting partnership.
You might also like our Love articles.
“Motivation is what gets you started. Habit is what keeps you going.” – Jim Ryun
If you would like more information about the 2024, please send us an email.
Written by Fitness Goal 4U
Smart Fitness Goals - Achieve Health with Simple Steps
Smart fitness goals focus on being Specific, Measurable, Achievable, Relevant, and Time-bound. They help you create a clear path to success, stay motivated, and track progress. Whether its weight loss, strength building, or improved endurance, smart goals guide your fitness journey, ensuring steady growth and sustainable results tailored to your needs.
“Confidence comes from discipline and training.” – Robert Kiyosaki
Loving your girlfriend is about more than just romantic gestures and sweet words. True love is built on respect, understanding, commitment, and emotional support. It’s a conscious effort that both partners contribute to in order to create a meaningful, lasting relationship. Whether you’re at the beginning of your relationship or looking to deepen your connection, this guide will help you understand how to truly love your girlfriend and make your relationship flourish.
1. Understanding Love: What It Means to Truly Love Someone
Before diving into practical ways to love your girlfriend, it's crucial to understand what love truly means in a relationship. Love is not just about the intense feelings you have in the early stages of your relationship, also known as the "honeymoon phase." True love is built over time, as you grow to care for and support your partner in every aspect of life.
Love is about:
- Respect: Appreciating your partner for who she is, not trying to change her to fit an ideal.
- Trust: Believing in her integrity and having confidence in the relationship.
- Commitment: Choosing to be with her through both the highs and lows.
- Affection: Showing her care through both words and actions.
- Communication: Listening to her needs, desires, and concerns and being open about your own.
- Growth: Encouraging each other to become better versions of yourselves.
By understanding these pillars of love, you can begin to approach your relationship with a deeper appreciation and purpose.
2. Respecting Her Individuality
One of the most important aspects of a healthy relationship is respecting your girlfriend's individuality. You love her for who she is, so it’s important to allow her to express herself without feeling constrained. Here’s how to show respect for her uniqueness:
- Give Her Space: Every person needs time for themselves, even in a committed relationship. Respect her need for personal space and time to pursue her interests, hobbies, and friendships outside of the relationship. Understand that time apart can help both of you grow as individuals and bring more to the relationship.
- Encourage Her Dreams and Ambitions: Support her goals and encourage her to pursue her passions, whether it's a career, a hobby, or something else entirely. Love means cheering for her success, even if it takes her in a different direction than you expected. Help her feel confident in pursuing her ambitions by being her biggest fan.
- Listen to Her Thoughts and Opinions: Genuine love involves truly listening to your girlfriend when she speaks. Show interest in her opinions, even if they differ from your own. Engaging in meaningful conversations can strengthen your emotional connection and help you understand her on a deeper level.
3. Effective Communication: The Backbone of a Healthy Relationship
Open and honest communication is the foundation of any strong relationship. To love your girlfriend fully, you must communicate in a way that fosters trust, emotional intimacy, and mutual understanding.
- Be a Good Listener: Active listening means focusing on what she is saying without interrupting or planning your response. Give her your full attention during conversations, whether they are serious discussions or light-hearted chats. Make eye contact, ask follow-up questions, and show empathy.
- Share Your Feelings Openly: Don’t be afraid to express your emotions and thoughts with your girlfriend. Vulnerability creates intimacy, and by sharing your own experiences, worries, and joys, you invite her to do the same. Let her know that you trust her enough to open up, which in turn strengthens the bond you share.
- Resolve Conflicts Calmly and Respectfully: Disagreements are a natural part of any relationship, but the way you handle them makes all the difference. Instead of getting defensive or blaming each other, focus on finding solutions together. Use "I" statements to express your feelings (e.g., "I feel upset when...") rather than accusing or criticizing. Show that you value the relationship enough to work through issues calmly.
4. Show Appreciation: The Power of Gratitude
One of the simplest and most effective ways to love your girlfriend is to show her that you appreciate her. Expressing gratitude regularly reminds her that she is valued and cherished.
- Acknowledge the Little Things: Whether she makes you a cup of coffee, gives you advice, or simply makes you laugh, acknowledge and appreciate the little things she does for you. A simple "thank you" or a compliment can go a long way in making her feel loved.
- Celebrate Her Qualities: Tell her what you love about her. Is it her kindness? Her intelligence? Her sense of humor? Take time to express the things that make her unique and special to you. Everyone loves to feel appreciated, and reminding her of the qualities you admire helps deepen your connection.
- Make Time for Thoughtful Gestures: It doesn’t always take grand gestures to show love. Small acts of kindness, like leaving her a sweet note, planning a surprise date, or helping her with something she’s stressed about, can have a powerful impact. These thoughtful actions show that you care about her happiness and well-being.
5. Be Supportive: Emotional and Practical Support in a Relationship
Being a supportive partner means being there for your girlfriend, both emotionally and practically. Life is full of challenges, and by supporting her, you strengthen the foundation of your relationship.
- Be Her Emotional Anchor: When she’s going through tough times, offer a listening ear and emotional support. Instead of trying to fix every problem, sometimes all she needs is for you to listen and understand. Offer words of encouragement, comfort, and validation to help her feel safe and supported.
- Help Her Through Stressful Situations: Whether it's a work-related issue, a personal challenge, or a difficult decision, show that you’re willing to stand by her side and help her through it. Offer your advice or help her think through solutions, but most importantly, let her know that she doesn’t have to face challenges alone.
- Celebrate Her Successes: When she achieves something, whether big or small, celebrate her accomplishments. Showing genuine pride in her success helps build her confidence and reinforces that you’re in her corner. Celebrate her wins, and share in her joy.
6. Cultivate Intimacy: Physical and Emotional Closeness
Intimacy goes beyond physical affection—it’s about building a deep emotional connection. To love your girlfriend fully, you need to cultivate both emotional and physical intimacy in your relationship.
- Emotional Intimacy: Building emotional intimacy involves creating a space where both of you feel comfortable sharing your deepest thoughts and feelings. Encourage vulnerability by opening up to each other about your hopes, dreams, fears, and experiences. Share your personal stories and create an environment where both of you feel accepted for who you are.
- Physical Intimacy: Physical affection is an important part of any romantic relationship, but it should always be based on mutual comfort and consent. Be attentive to her boundaries and preferences, and find ways to show affection that makes her feel loved and respected. This could include anything from holding hands, hugging, cuddling, or kissing, to more intimate acts, depending on the level of your relationship.
- Surprise Her with Romantic Gestures: Every relationship can benefit from a little romance. Plan a surprise date night, write her a love letter, or cook her favorite meal. These thoughtful acts show that you’re invested in making her feel special and cherished.
7. Build Trust: The Core of Every Lasting Relationship
Trust is the cornerstone of any healthy relationship. To love your girlfriend fully, you must prioritize building and maintaining trust between you.
- Be Honest and Transparent: Honesty is key to building trust. Share the truth with your girlfriend, even when it’s difficult. Transparency about your feelings, your plans, and your actions creates a sense of security in the relationship. Secrets, on the other hand, can erode trust and damage the connection between you.
- Keep Your Promises: When you make a commitment or promise, follow through. Whether it’s something small like showing up on time or something big like planning a future together, keeping your word shows her that she can rely on you.
- Show Consistency in Your Actions: Consistency builds trust over time. Show her through your actions that you are dependable, reliable, and loyal. Being there for her when she needs you, making time for her, and staying true to your values are all ways to demonstrate your trustworthiness.
8. Grow Together: Strengthening Your Relationship Over Time
Love is a journey that evolves as you grow together. A long-term relationship requires both partners to be open to change and personal growth. Here’s how you can continue to grow together over time:
- Set Goals Together: Whether it’s planning a future trip, saving for a shared goal, or working on personal development, setting goals together helps strengthen your bond. It gives you something to work toward as a team and helps create a sense of unity in your relationship.
- Learn from Each Other: Your girlfriend has her own strengths, experiences, and perspectives, and so do you. Take time to learn from each other, whether it’s a new skill, a new way of thinking, or a different perspective on life. Being open to learning from each other fosters growth and mutual respect.
- Adapt to Changes: Life will bring changes, whether it’s a new job, a move, or a shift in your relationship dynamics. The key to a strong relationship is adapting to those changes together. Be patient and flexible, and remember that growth often comes from challenges.
9. Be Her Best Friend: The Power of Friendship in Love
A strong relationship is built on a foundation of friendship. Loving your girlfriend means being her partner in life as well as her best friend.
- Share Fun Experiences Together: Take time to do fun things together that you both enjoy. Whether it’s trying out new activities, going on adventures, or simply enjoying a movie night at home, creating happy memories strengthens your bond and keeps the relationship exciting.
- Be There in Good Times and Bad: True love means standing by your girlfriend’s side not only during the fun times but also during the difficult moments. Whether she’s celebrating a win or going through a tough period, being there for her emotionally and practically shows that you’re a dependable partner.
Conclusion
Loving your girlfriend is an ongoing process that requires effort, care, and attention. By respecting her individuality, communicating openly, supporting her emotionally, and building trust, you create a relationship that can stand the test of time. True love is not just about grand gestures but about the small, meaningful acts that show her she is valued and cherished.
As you continue to grow together, remember that love is a journey. Be her best friend, her confidant, her biggest supporter, and her partner in life, and your relationship will thrive in the long run.
“Motivation is what gets you started. Habit is what keeps you going.” – Jim Ryun
If you would like more information about the 2024, please send us an email.
Written by Fitness Goal 4U
Smart Fitness Goals - Achieve Health with Simple Steps
Smart fitness goals focus on being Specific, Measurable, Achievable, Relevant, and Time-bound. They help you create a clear path to success, stay motivated, and track progress. Whether its weight loss, strength building, or improved endurance, smart goals guide your fitness journey, ensuring steady growth and sustainable results tailored to your needs.
“Confidence comes from discipline and training.” – Robert Kiyosaki
In the pursuit of love, many couples start their journey with passion, excitement, and an overwhelming sense of connection. However, maintaining that bond over the long haul often becomes a challenge. While the initial spark of romance is crucial, it’s the everyday actions, emotional habits, and shared experiences that determine the longevity and quality of a relationship. So, how do couples stay in love over the years? Recent studies in psychology and relationship science have shed light on the behaviors, attitudes, and practices that contribute to long-lasting love. This article dives deep into these findings and provides a comprehensive understanding of the elements that help couples maintain their emotional connection.
1. Communication: The Foundation of Love
Communication is often referred to as the bedrock of successful relationships. According to research by Dr. John Gottman, a leading expert in marital stability, couples who communicate effectively are more likely to stay in love over time. Gottman’s studies reveal that it’s not just the frequency of communication but the quality that matters.
- Active Listening: One of the most significant aspects of effective communication is active listening. Couples who listen to each other without interrupting, criticizing, or offering unsolicited advice tend to resolve conflicts more easily. Listening with empathy allows partners to feel understood and valued, fostering deeper emotional intimacy.
- Positive Language: In addition to active listening, the words couples use with one another also play a vital role. Dr. Gottman’s research emphasizes the importance of maintaining a high ratio of positive interactions to negative ones. He suggests a “magic ratio” of 5:1—meaning for every negative interaction, there should be five positive ones. Compliments, appreciation, and loving gestures can help maintain this balance.
- Open and Honest Expression: Couples who feel safe to express their emotions, even when discussing difficult subjects, are more likely to stay in love. Being vulnerable and honest with one’s partner promotes trust and reduces the likelihood of resentment building up over time.
2. Emotional Responsiveness: Meeting Each Other’s Emotional Needs
Emotional responsiveness is another critical component of a lasting relationship. Studies conducted by psychologist Sue Johnson, the founder of Emotionally Focused Therapy (EFT), reveal that couples who remain emotionally attuned to each other’s needs have stronger and more secure attachments.
- Attachment Theory and Love: Johnson’s work is based on attachment theory, which posits that humans are wired to seek emotional security and connection. In a romantic relationship, emotional responsiveness means being available for your partner during times of need and showing that you care about their emotional well-being.
- Validating Emotions: A critical aspect of emotional responsiveness is the ability to validate each other’s feelings. When a partner feels upset or anxious, validating their emotions instead of dismissing them allows both partners to feel heard and supported. Studies show that when couples validate each other’s emotional experiences, they report greater satisfaction and closeness in their relationship.
- Emotional Bonding Activities: Simple, shared activities that allow couples to bond emotionally can also enhance feelings of love. These include spending quality time together, engaging in meaningful conversations, or sharing experiences that bring joy and excitement.
3. Commitment: A Conscious Choice
While love is often seen as a feeling, maintaining love in the long term requires a conscious commitment. In a study published in the Journal of Personality and Social Psychology, researchers found that commitment is one of the strongest predictors of relationship satisfaction and longevity.
- The Importance of Choosing Each Other: Love, at its core, is a choice. Couples who stay in love continually choose each other despite challenges, conflicts, and external stressors. This means prioritizing the relationship over other competing demands, such as work or social obligations.
- Sacrifices and Compromise: Staying in love often involves making sacrifices and compromises for the well-being of the relationship. Couples who are willing to meet each other halfway and who view their relationship as a team effort report higher levels of satisfaction.
- Shared Goals and Values: Commitment is also reinforced when couples share long-term goals and values. Studies show that couples who align on core values, such as family, religion, or career aspirations, tend to experience more stability in their relationship. These shared values provide a roadmap for navigating life’s challenges together.
4. Physical Intimacy: Maintaining a Strong Connection
Physical intimacy plays a crucial role in keeping the love alive in romantic relationships. Numerous studies have shown that couples who maintain a healthy level of physical affection, including hugging, kissing, and sexual activity, report higher levels of relationship satisfaction.
- The Role of Oxytocin: Physical touch, particularly during intimate moments, releases oxytocin—a hormone that promotes bonding and emotional closeness. This “love hormone” helps couples feel more connected, safe, and secure in their relationship.
- Regular Intimacy: Research conducted by the Kinsey Institute for Research in Sex, Gender, and Reproduction suggests that regular physical intimacy, whether it’s through sex or other forms of affectionate touch, helps couples maintain their emotional connection. Couples who engage in regular physical touch are more likely to stay emotionally close and report higher levels of happiness.
- Understanding Each Other’s Needs: Importantly, couples need to understand and respect each other’s physical needs and boundaries. Open conversations about sexual preferences, desires, and boundaries are essential for a healthy and fulfilling physical relationship. When couples feel safe and understood in this domain, it often spills over into other areas of the relationship, reinforcing emotional intimacy.
5. Managing Conflict: Turning Disagreements into Opportunities for Growth
No relationship is without conflict. However, how couples handle disagreements can make or break a relationship. Research from the Gottman Institute reveals that it’s not conflict itself that harms relationships but the way couples deal with it.
- Avoiding the “Four Horsemen”: Dr. John Gottman identifies four key behaviors—criticism, contempt, defensiveness, and stonewalling—that are particularly damaging to relationships. Couples who stay in love are able to manage conflict by avoiding these toxic behaviors and focusing instead on productive, respectful communication.
- Using Soft Startups: One effective strategy for managing conflict is using a “soft startup,” which involves starting a difficult conversation gently and respectfully. Instead of blaming or accusing, couples who stay in love use “I” statements to express how they feel and what they need from their partner. This approach reduces defensiveness and keeps the conversation focused on finding solutions.
- Repair Attempts: Couples who remain in love are skilled at making “repair attempts” during conflict. These are small gestures, such as a smile, a touch, or an apology, that signal a desire to reconnect and resolve the issue. Research shows that couples who successfully make and accept repair attempts are more likely to resolve conflicts and maintain a positive emotional connection.
6. Gratitude and Appreciation: The Power of Positive Reinforcement
Gratitude and appreciation are powerful tools for keeping love alive. Studies conducted by Dr. Sara Algoe, a leading researcher in the field of relationship science, show that couples who regularly express gratitude toward each other experience stronger emotional bonds and greater relationship satisfaction.
- The Gratitude Effect: When individuals feel appreciated by their partners, they are more likely to engage in positive behaviors that benefit the relationship. This creates a positive feedback loop where both partners feel valued and motivated to invest in the relationship.
- Small Acts of Kindness: Expressing gratitude doesn’t have to involve grand gestures. Small acts of kindness, such as thanking your partner for making dinner or acknowledging their support during a stressful time, can have a profound impact on the relationship. These small moments of appreciation build a reservoir of positive feelings that help couples weather difficult times.
- Keeping the Spark Alive: In long-term relationships, it’s easy to take each other for granted. However, couples who make an effort to regularly express appreciation and admiration for their partner tend to keep the romance alive. This can be as simple as complimenting your partner, leaving them a sweet note, or planning a surprise date night.
7. Shared Experiences and Novelty: Growing Together
One of the keys to staying in love is continuing to grow and evolve together. Research by psychologist Arthur Aron reveals that couples who engage in novel and exciting activities together experience higher levels of relationship satisfaction.
- The Role of Novelty: Engaging in new and exciting experiences as a couple helps recreate the initial feelings of excitement and attraction that often fade over time. Whether it’s traveling to new places, trying a new hobby, or learning a new skill together, these shared experiences help couples bond and create lasting memories.
- Quality Time vs. Quantity Time: It’s not just about spending time together, but the quality of that time. Couples who prioritize meaningful interactions, such as deep conversations or shared activities, report stronger emotional connections. Even something as simple as cooking a meal together or taking a walk can help maintain intimacy.
8. Supportive Social Networks: The Role of Friends and Family
Social support plays an essential role in maintaining long-term relationships. Couples who have strong, supportive social networks are more likely to stay in love and experience greater relationship satisfaction.
- The Buffering Effect of Social Support: Research shows that when couples face external stressors, such as financial difficulties or health problems, having a supportive social network can buffer against the negative impact of these stressors. Friends and family who provide emotional support can help couples navigate challenges and reduce the strain on the relationship.
- Balancing Independence and Togetherness: While having a supportive social network is important, couples also need to strike a balance between maintaining their individual friendships and spending quality time together. Studies show that couples who allow each other the freedom to maintain their own social lives while also prioritizing the relationship are more likely to experience long-term satisfaction.
9. Shared Values and Vision for the Future
A shared vision for the future helps couples stay focused on their relationship goals and remain committed to each other. Having aligned values and beliefs about key life areas such as family, career, finances, and personal growth creates a strong foundation for long-lasting love.
- Goal Setting: Research shows that couples who set shared goals and work towards them together are more likely to remain committed. Whether it’s planning for a family, saving for a home, or pursuing career aspirations, having a united approach helps couples maintain a sense of teamwork and partnership.
- Adapting to Change: Life is full of unexpected twists and turns, and couples who stay in love are those who can adapt to change together. Whether it’s a career shift, a health issue, or a change in family dynamics, couples who approach these challenges as a team and support each other through transitions are more likely to stay connected and in love.
Conclusion
Staying in love requires more than just romantic gestures or fleeting passion. It involves a conscious effort to communicate effectively, remain emotionally responsive, show appreciation, and maintain physical and emotional intimacy. Couples who navigate conflict with respect, prioritize shared experiences, and build a strong foundation of trust and commitment are more likely to experience long-lasting love. By embracing these scientifically-backed strategies, couples can continue to grow together, deepening their connection and maintaining the bond that keeps love alive.
“Motivation is what gets you started. Habit is what keeps you going.” – Jim Ryun
If you would like more information about the 2024, please send us an email.
Written by Fitness Goal 4U
Smart Fitness Goals - Achieve Health with Simple Steps
Smart fitness goals focus on being Specific, Measurable, Achievable, Relevant, and Time-bound. They help you create a clear path to success, stay motivated, and track progress. Whether its weight loss, strength building, or improved endurance, smart goals guide your fitness journey, ensuring steady growth and sustainable results tailored to your needs.
“Confidence comes from discipline and training.” – Robert Kiyosaki
Marriage is a beautiful journey filled with love, companionship, and shared experiences. But as time passes, the initial excitement and butterflies of a new relationship can fade. Flirting is one way to keep that spark alive, even after years of marriage. Flirting with your husband is not only fun but also a powerful way to reconnect emotionally, maintain intimacy, and keep the romance thriving in your relationship.
In this comprehensive guide, we will explore various tips and techniques on how to flirt with your husband to bring back that exciting, playful energy. Whether you’ve been married for a few years or several decades, it's never too late to engage in some lighthearted, affectionate teasing and flirting to rekindle your connection.
1. Understand the Importance of Flirting
Flirting isn’t just something you do when you’re dating; it’s a vital part of maintaining a healthy and loving relationship. Flirting helps create and nurture emotional and physical intimacy. It keeps things fun, keeps you both on your toes, and reminds you that you’re more than just partners in the business of life – you’re also lovers.
Benefits of Flirting in a Marriage:
- Maintains emotional closeness: Flirting is a way of keeping that emotional connection intact, helping both partners feel valued and attractive.
- Fosters physical intimacy: Light touches, playful winks, and teasing words can lead to more physical closeness.
- Rekindles romance: Even small gestures of affection can reignite that feeling of being “in love” with each other.
- Improves communication: Flirting encourages light-hearted banter, which can improve communication in other areas of your marriage as well.
2. Subtle Physical Touch
Physical touch is one of the most powerful ways to convey affection. It doesn’t always have to be sexual, either. Gentle, non-sexual touches throughout the day can build emotional and physical intimacy over time.
Ideas for Physical Flirting:
- Light caresses: When walking past your husband, lightly brush your hand against his arm or back. This small gesture can convey a world of meaning.
- Surprise hugs: Wrap your arms around him from behind when he’s busy with something, like cooking or working. A hug out of nowhere is an unexpected but welcome gesture of affection.
- Touch his face: When you're talking, softly touch his cheek or run your fingers through his hair. This intimate gesture shows your affection.
- Play footsie: While sitting across from each other during dinner or while watching TV, lightly touch his leg with your foot. It’s playful, fun, and can be a subtle way to spark desire.
- Hold hands: Never underestimate the power of holding hands. Whether you’re watching a movie or taking a walk together, this simple act of connection can work wonders.
3. Compliment Him More Often
Everyone loves to feel appreciated, and your husband is no different. Compliments make people feel good about themselves and strengthen their confidence. But be specific in your compliments rather than vague; it’ll make him feel like you really notice and appreciate him.
Flirty Compliments to Try:
- Appearance-based compliments: “You look so handsome in that shirt,” or “Your smile drives me crazy.”
- Action-based compliments: “You’re so good at fixing things around the house,” or “I love how you handled that situation with the kids.”
- Sexy compliments: “You have such sexy arms,” or “You know exactly how to make me feel special.”
4. Use Playful Language and Teasing
Words have a huge impact, and playful, flirty language can reignite that spark between you two. Teasing each other gently, in a loving way, can create a fun dynamic that keeps your relationship fresh and exciting.
Ideas for Playful Flirting:
- Send flirty texts: When you’re apart, send him cheeky, suggestive texts like, “Can’t stop thinking about how good you looked this morning,” or “Just wait till you get home tonight…”
- Joking around: Playfully tease him about something lighthearted, like how he always leaves his socks around or how he has a "secret" fan club because of his good looks.
- Create inside jokes: Having a shared sense of humor and inside jokes is a great way to bond. It can be as simple as making fun of a silly moment you both experienced or a phrase only you two understand.
- Nicknames: Use cute or cheeky pet names when addressing him. Whether it’s something sweet like "babe" or a teasing nickname like "Mr. Perfect," it adds an extra layer of intimacy.
5. Send Flirty Notes and Surprises
Flirting doesn’t always have to happen in person. Sometimes, little surprises or notes left around the house can do wonders for creating excitement. Plus, they show that you’re thinking of him throughout the day.
Ideas for Flirty Surprises:
- Love notes: Write a small note and stick it in his wallet, car, or on his pillow. It could be something simple like, “Thinking about you!” or a sexy hint for later.
- Surprise gifts: Leave a little treat or gift with a fun note. For example, if he loves a specific snack, leave it out with a message that says, “A sweet treat for my sweet guy.”
- Coupon book: Make a homemade "coupon" book of fun activities he can redeem, like "One Back Massage," or "Movie Night of Your Choice."
6. Dress Up for Him
While your husband loves you for who you are, sometimes putting in that extra effort to look your best can reignite the passion. Dressing up shows him that you care about maintaining the physical attraction in your relationship and can make ordinary moments feel a little more special.
Ways to Dress Up:
- Wear something he loves: If your husband has mentioned that he loves a particular outfit or style, wear it for him now and then.
- Lingerie: Don’t underestimate the power of sexy lingerie. Surprise him by wearing something special under your clothes, and let him know subtly.
- Get ready for date nights: If you’re going out together, make an extra effort to look your best. A little makeup, a flattering dress, or a pair of heels can do wonders for setting the mood.
7. Plan Spontaneous Date Nights
One of the best ways to flirt with your husband is to carve out time to reconnect away from the usual routine. Planning a spontaneous date night or an exciting adventure together can rekindle the romance in your relationship.
Ideas for Fun Date Nights:
- Dinner out: Surprise him with a reservation at his favorite restaurant or a new place you’ve both wanted to try.
- At-home date night: Plan a cozy date night at home, complete with his favorite meal, a bottle of wine, and maybe a movie.
- Outdoor activities: If you both enjoy being active, plan a day out hiking, biking, or taking a scenic walk together.
8. Be Playful in Public
Flirting doesn’t just have to happen in private. You can have fun flirting with your husband when you’re out in public, which can add a sense of excitement and build anticipation for later. These small public displays of affection can be thrilling for both of you.
Public Flirting Ideas:
- Secret touches: When you’re out with friends or at a social event, give him a discreet touch on the leg or lower back, or whisper something flirty in his ear.
- Flirty eye contact: Catch his eye across the room and give him a playful, knowing look. He’ll get the message without you having to say a word.
- Light PDA: Holding hands, putting your arm around him, or giving him a quick kiss can show him that you’re proud to be with him and that the connection between you is still strong.
9. Be Confident and Assertive
Confidence is incredibly attractive, and one of the best ways to flirt with your husband is to show him that you’re still confident in yourself and in your relationship. Take charge sometimes, initiate affection or intimate moments, and let him see how much you enjoy being with him.
How to Show Confidence:
- Initiate physical touch: Don’t always wait for him to make the first move. Give him a kiss when you feel like it, or initiate intimacy in a way that feels right for you.
- Make the first move: Surprise him by being the one to plan a romantic evening or initiate physical affection.
10. Keep the Playfulness Alive
In the hustle and bustle of daily life, it's easy to forget the importance of fun and playfulness in a marriage. Keeping a sense of humor and playfulness alive can help your relationship thrive and keep that sense of flirtation going strong.
Ways to Stay Playful:
- Play games: Whether it's board games, video games, or even flirty games like “truth or dare,” playing together can create a sense of fun and lightheartedness.
- Laugh together: Share funny stories or watch a comedy together. Laughter is one of the best ways to bond and keep things light between you.
- Be spontaneous: Do something out of the blue, whether it's dancing in the kitchen, having a pillow fight, or suggesting an impromptu trip.
Conclusion
Flirting with your husband is a wonderful way to keep the love, passion, and excitement alive in your marriage. By incorporating physical touch, playful language, compliments, and spontaneity into your relationship, you can maintain the romantic spark for years to come.
Whether it’s through flirty texts, surprise notes, or dressing up for date night, the key is to be intentional about connecting with your partner. Flirting isn’t just for new relationships – it’s a vital part of keeping a long-term marriage strong, fun, and full of love.
Embrace these flirty behaviors, have fun with them, and watch as your connection with your husband deepens and strengthens over time.
“Motivation is what gets you started. Habit is what keeps you going.” – Jim Ryun
If you would like more information about the 2024, please send us an email.
Written by Fitness Goal 4U
Smart Fitness Goals - Achieve Health with Simple Steps
Smart fitness goals focus on being Specific, Measurable, Achievable, Relevant, and Time-bound. They help you create a clear path to success, stay motivated, and track progress. Whether its weight loss, strength building, or improved endurance, smart goals guide your fitness journey, ensuring steady growth and sustainable results tailored to your needs.
“Confidence comes from discipline and training.” – Robert Kiyosaki
Date nights are essential for nurturing relationships, but they don’t always have to come with a hefty price tag. Whether you’re on a tight budget, saving for a big purchase, or simply want to be more financially conscious, there are plenty of ways to enjoy a romantic and memorable night out without overspending. The key is creativity, planning, and a little resourcefulness. In this article, we’ll explore 9 ways to save on your date night, ensuring you can focus on enjoying each other’s company rather than worrying about your bank balance.
1. Plan a Picnic in the Park
One of the most romantic yet affordable ways to enjoy each other’s company is by planning a picnic in the park. You can create a cozy, intimate atmosphere for little to no cost. Instead of heading to an expensive restaurant, pack your favorite home-cooked meal or grab some snacks from the store. Throw in a bottle of wine or sparkling water, a cozy blanket, and some good tunes on a portable speaker, and you’ve got yourself the perfect evening.
Not only do you avoid pricey restaurant bills, but you also get the added bonus of being outdoors, which can be a refreshing change of pace. Parks often offer free entertainment, such as live music or cultural festivals, depending on where you live. You can time your date to coincide with these events for an extra layer of fun.
Budget Breakdown:
- Food: $10–$20 (homemade or store-bought)
- Blanket: Free (something from home)
- Park Admission: Free (in most cases)
2. Take Advantage of Happy Hour
Dining out doesn’t have to be expensive if you take advantage of happy hour deals. Many restaurants, bars, and lounges offer special discounts on drinks and appetizers during certain times of the day, typically in the late afternoon or early evening. By timing your date during happy hour, you can enjoy discounted drinks and share appetizers for a fraction of the regular cost.
Look for spots that have “2-for-1” deals or significant markdowns on your favorite items. Pair a few appetizers together, and you may even be able to skip the more expensive main course. It’s a great way to enjoy dining out without breaking the bank.
Budget Breakdown:
- Drinks: $5–$10 (during happy hour)
- Appetizers: $8–$15
3. Cook a Meal Together at Home
There’s something intimate and bonding about cooking a meal together, and it’s significantly cheaper than going to a restaurant. Plan a date night where you and your partner choose a recipe you’ve both been wanting to try. Head to the grocery store together and pick out the ingredients. The preparation process becomes part of the date, giving you time to connect and collaborate in the kitchen.
You can even turn it into a themed night – for example, an Italian pasta-making night, a sushi-rolling evening, or a taco bar fiesta. Set the ambiance by lighting candles, playing music, and dressing up as if you were going out. You get a gourmet experience at a fraction of the cost.
Budget Breakdown:
- Ingredients: $20–$30
- Wine (optional): $10–$15
4. Opt for a Matinee or Discount Movie Night
If you and your partner love going to the movies, consider going to a matinee showing instead of the more expensive evening screenings. Many theaters offer discounted ticket prices for earlier showings, typically before 5 p.m. You’ll still get the full movie experience but at a reduced price.
Alternatively, keep an eye out for local discount movie nights. Many theaters have special promotions on certain days of the week where tickets are sold at a lower rate. Some places even have rewards programs that allow you to earn points toward free tickets or snacks, further reducing costs on future date nights.
Budget Breakdown:
- Matinee Tickets: $8–$10 per person
- Discount Movie Tickets: $5–$7 per person
- Snacks (optional): $10–$15
5. Explore Free or Low-Cost Local Events
Local events can be a treasure trove of affordable entertainment. From outdoor concerts and art walks to food festivals and farmers’ markets, there’s often something happening in most cities that won’t cost much, if anything at all. Check your city’s event calendar or social media pages to find free or low-cost activities.
This can also be a great opportunity to explore new parts of your city or discover new hobbies. You might find free entry days at museums, free yoga in the park, or cultural festivals offering complimentary performances. The key is to stay in the loop about local happenings and take advantage of these opportunities.
Budget Breakdown:
- Event Admission: Free or minimal cost
- Food/Drink (optional): $10–$20
6. Have a Game Night at Home
If you’re looking for a fun and low-cost way to spend time together, consider having a game night at home. Whether you enjoy board games, card games, or video games, this can be an incredibly affordable and enjoyable way to bond.
If you don’t already have games at home, check out local thrift stores or online marketplaces for secondhand options. Alternatively, you could play free online multiplayer games if you both enjoy video games. To make the evening even more special, you can prepare some snacks or make your favorite cocktails at home, adding a festive touch to your game night.
Budget Breakdown:
- Games: Free or secondhand for $5–$10
- Snacks/Drinks: $10–$15
7. Enjoy the Great Outdoors
There’s no need to spend money on expensive activities when nature offers plenty of free entertainment. Going for a hike, walking by the beach, or exploring a local nature trail are all cost-free ways to enjoy each other’s company.
Depending on where you live, you may also be able to take part in other outdoor activities such as cycling, kayaking, or even stargazing. If you want to make the experience even more memorable, pack a thermos of hot cocoa or coffee and enjoy a post-activity drink while watching the sunset.
Nature-based dates provide the perfect opportunity for uninterrupted conversation and allow you to reconnect away from the distractions of everyday life.
Budget Breakdown:
- Outdoor Activity: Free
- Snacks/Drinks (optional): $5–$10
8. Opt for DIY Entertainment
Instead of buying concert or theater tickets, consider making your own entertainment at home. You can set up a DIY movie theater by streaming a movie or show you’ve both been excited to watch. All you need is a comfortable space, blankets, pillows, and some homemade popcorn to recreate the theater experience without the cost.
Another option is to create a home spa experience. Grab some bath bombs, essential oils, and candles, and give each other massages or facials. The experience can be just as relaxing and rejuvenating as a professional spa, but for a fraction of the cost.
Budget Breakdown:
- Movie Streaming: Free (if you have subscriptions)
- Spa Supplies: $10–$20
9. Use Coupons, Gift Cards, or Loyalty Points
One of the simplest ways to save money on a date night is by using coupons, gift cards, or loyalty points that you’ve accumulated. Whether it’s a discount at your favorite restaurant, a buy-one-get-one-free offer on movie tickets, or a gift card from a previous occasion, these little savings can add up.
Check websites or apps like Groupon, RetailMeNot, or Honey for deals on activities or meals. If you frequently dine at certain restaurants or shop at certain stores, consider signing up for their rewards programs. Over time, you can accumulate points or perks that can be redeemed for discounts, making future date nights even more affordable.
Budget Breakdown:
- Coupons/Deals: $10–$30 in savings
- Loyalty Points: Varies depending on the program
Conclusion
Saving money on date nights doesn’t mean sacrificing fun or romance. With a little planning and creativity, you can still enjoy meaningful experiences without the financial stress. Whether you’re cooking a meal together, exploring the outdoors, or finding local free events, there are plenty of affordable options that can make your date night just as special as a high-priced outing. The key is focusing on connection and shared experiences, which are truly priceless.
“Motivation is what gets you started. Habit is what keeps you going.” – Jim Ryun
If you would like more information about the 2024, please send us an email.
Written by Fitness Goal 4U
Smart Fitness Goals - Achieve Health with Simple Steps
Smart fitness goals focus on being Specific, Measurable, Achievable, Relevant, and Time-bound. They help you create a clear path to success, stay motivated, and track progress. Whether its weight loss, strength building, or improved endurance, smart goals guide your fitness journey, ensuring steady growth and sustainable results tailored to your needs.
“Confidence comes from discipline and training.” – Robert Kiyosaki
Romance is often seen as the foundation of a happy and fulfilling relationship. It isn’t something that stops after you say, “I do.” Whether you've been married for a few months or several years, keeping the romance alive is crucial for nurturing a lasting connection. Husbands, like wives, crave love, affection, and attention, but how you show romance to your husband may differ slightly. It’s all about understanding his love language, personal preferences, and creating moments of intimacy that resonate with him.
In this article, we will explore various ways to romance your husband, focusing on the emotional, physical, and mental aspects of love. Whether your husband prefers grand gestures or simple acts of affection, you’ll find numerous ideas to help you reignite the spark in your marriage.
1. Understand His Love Language
Before diving into romantic gestures, take the time to understand your husband’s love language. According to Dr. Gary Chapman, author of The 5 Love Languages, individuals express and experience love in five distinct ways:
- Words of Affirmation: Compliments, kind words, and expressions of gratitude.
- Acts of Service: Helping out with tasks or doing something special for them.
- Receiving Gifts: Thoughtful presents that show you’re thinking about them.
- Quality Time: Undivided attention and spending meaningful time together.
- Physical Touch: Hugs, kisses, hand-holding, and other forms of physical affection.
Everyone has a primary love language that makes them feel most loved. Find out what your husband’s love language is and focus on expressing your affection in that way. For example, if his love language is physical touch, holding his hand or giving him a surprise massage will have a greater impact than verbal compliments. Alternatively, if he values acts of service, cooking his favorite meal or helping him with chores may touch his heart more than a spontaneous gift.
2. Surprise Him with Small Gestures
Big romantic gestures are great, but small, consistent acts of love often have a longer-lasting effect. These thoughtful gestures show that you’re thinking of him, even during the busiest times of your day.
- Leave love notes: Write him a note, even if it’s a short one, telling him how much he means to you. You can tuck these into his wallet, car, or work bag, where he’ll find them throughout the day.
- Make his favorite snack: Prepare his favorite snack or drink and bring it to him when he’s relaxing. This small gesture can brighten his day, showing that you’re attentive to his likes.
- Offer unexpected hugs or kisses: Surprise him with a spontaneous hug, kiss, or touch. Physical affection can immediately uplift his mood, making him feel loved and appreciated.
- Compliment him: Everyone loves to hear kind words, especially when they come from a partner. Compliment your husband’s looks, his character, or something he’s done well. Let him know how much you appreciate him.
These small gestures don’t take much effort but can leave a lasting impression. Over time, they create an atmosphere of love and appreciation, helping both of you feel more connected.
3. Plan a Surprise Date Night
When life gets busy, date nights may be the first thing to go, but they are essential for keeping the romance alive. Planning a surprise date night shows that you value your relationship and want to spend meaningful time together.
Some ideas for a romantic date night include:
- Candlelit dinner at home: If you’re on a budget or prefer a more intimate setting, create a restaurant-like atmosphere at home. Cook his favorite meal, set the table with candles and soft music, and enjoy a quiet evening together.
- Outdoor adventure: If your husband loves the outdoors, surprise him with an adventure like hiking, fishing, or going for a scenic bike ride. The fresh air and nature will create a relaxed environment for you to bond.
- Movie night with a twist: Instead of watching the usual TV shows, pick a movie he’s been wanting to see. Add some fun with homemade popcorn, blankets, and dimmed lights to create a cozy ambiance.
- Staycation getaway: If you have the time, book a weekend staycation at a nearby hotel or resort. Sometimes, a change of scenery can do wonders for your relationship, giving you both time to relax and reconnect.
A well-thought-out date night, even if it’s simple, can reignite the spark in your marriage and allow you to focus solely on each other without distractions.
4. Express Gratitude Regularly
Gratitude is a powerful emotion that strengthens relationships. When we appreciate our partner’s efforts, it creates a positive feedback loop, encouraging more loving behavior. Let your husband know how much you appreciate him by expressing gratitude daily.
You can start by saying:
- “Thank you for working so hard for our family.”
- “I appreciate everything you do for me.”
- “You make me feel so loved, and I’m grateful for that.”
- “You’re an amazing partner, and I’m lucky to have you.”
By acknowledging the little things your husband does, you’re reinforcing the bond between you. Gratitude also helps to shift your mindset toward positivity, which naturally strengthens your connection and deepens the romance in your relationship.
5. Flirt with Him
Just because you’re married doesn’t mean the flirting has to stop! Flirting is a fun and playful way to keep the romance alive, and it helps bring back the excitement you experienced when you were first dating.
- Send playful texts: Text him during the day with a flirty message or compliment. It could be something as simple as, “Can’t wait to see you tonight,” or “You looked so handsome this morning.”
- Playfully tease him: Teasing can add humor to your relationship. Joke with him about something funny or a shared inside joke that brings back good memories.
- Initiate playful touch: Whether it’s brushing against him as you pass by or giving him a playful nudge, physical touch communicates affection and attraction.
- Dress up for him: Every now and then, dress up in something you know he loves. Whether it’s a special outfit or his favorite scent, it’s a fun way to remind him of the attraction between you two.
Flirting keeps the relationship lively and makes your husband feel desired and loved. It also breaks the monotony of everyday life, adding a spark of excitement.
6. Encourage His Passions and Interests
A romantic partner is one who not only loves but also supports their spouse’s individual interests and passions. Show your husband that you respect and encourage his hobbies by taking an interest in what he loves.
- Join him in his hobbies: Whether it’s watching his favorite sports team, playing video games, or working on a DIY project, joining him in his hobbies shows that you value his interests.
- Surprise him with something related to his passion: If he’s a music lover, get him tickets to a concert or buy him a new set of headphones. If he loves fitness, surprise him with workout gear or a gym membership.
- Respect his need for personal time: Sometimes, showing love means giving your husband the space he needs to pursue his interests. Encourage him to spend time doing what he enjoys, whether it’s golfing, fishing, or simply relaxing with a good book.
Supporting his passions fosters a deeper connection, showing that you care about his happiness and want him to thrive both in and out of the relationship.
7. Write Him a Love Letter
In today’s digital world, there’s something incredibly romantic about writing a handwritten love letter. Take the time to express your feelings on paper and remind your husband of all the reasons you fell in love with him.
- Recall special moments: Mention some of the milestones you’ve shared together—your first date, the day you got married, or the birth of your children. These memories can evoke powerful emotions and remind him of the journey you’ve been on together.
- Express your admiration: Write about the qualities you admire most in him, whether it’s his strength, sense of humor, or kindness. Let him know how much you value him as a partner and as a person.
- Share your hopes for the future: Talk about your dreams and goals as a couple. Whether it’s traveling together, starting a family, or simply growing old side by side, sharing your hopes will make him feel secure and loved.
A love letter is a timeless gesture that can strengthen emotional intimacy and serve as a keepsake that your husband will treasure.
8. Plan Intimate Moments
Physical intimacy is a vital part of any romantic relationship. Plan intimate moments with your husband to nurture the physical connection between you two.
- Create a romantic atmosphere: Set the mood with soft lighting, scented candles, and relaxing music. This creates an intimate setting where you can enjoy each other’s company.
- Be attentive to his needs: Everyone has different preferences when it comes to physical affection. Listen to his needs and communicate openly about what makes both of you feel close and connected.
- Surprise him with spontaneous affection: Whether it’s a surprise kiss, hug, or holding his hand while you’re out, spontaneous affection can reignite passion and romance.
- Prioritize intimacy: Life can get busy, but make it a point to prioritize intimacy in your relationship. Whether it’s setting aside time for a romantic night together or simply being more physically affectionate throughout the day, nurturing physical intimacy keeps the relationship strong.
9. Celebrate His Achievements
Celebrate your husband’s successes, both big and small. Whether it’s a promotion at work, reaching a personal goal, or simply getting through a tough week, acknowledge his achievements and let him know how proud you are.
- Plan a surprise celebration: If your husband has accomplished something significant, plan a surprise celebration, such as a dinner or small gathering with close friends or family.
- Gift him something meaningful: Choose a thoughtful gift that symbolizes his accomplishment, whether it’s something related to his career, hobbies, or personal interests.
- Offer words of encouragement: Even if it’s a small achievement, like completing a project or reaching a fitness goal, words of encouragement can make your husband feel valued and supported.
Supporting your husband’s successes strengthens the bond between you and creates a positive, nurturing environment within the relationship.
10. Continue Growing Together
Romancing your husband isn’t just about grand gestures or fleeting moments of affection—it’s about growing together as a couple. Take the time to continually work on your relationship, ensuring that both of you are evolving together.
- Communicate openly: Regularly check in with each other about your relationship. Open communication helps prevent misunderstandings and strengthens emotional intimacy.
- Set goals as a couple: Whether it’s financial goals, travel plans, or personal growth aspirations, setting goals together gives you both something to look forward to and work toward.
- Continue learning about each other: Even after years of marriage, there’s always something new to discover about your partner. Keep asking questions, sharing experiences, and exploring each other’s thoughts and dreams.
By continually investing in your relationship, you’ll create a deeper connection that grows stronger over time.
Conclusion
Romancing your husband isn’t a one-time event; it’s an ongoing effort to show love, affection, and appreciation throughout your relationship. By understanding his love language, planning thoughtful gestures, and creating intimate moments, you’ll keep the flame of romance alive for years to come. The most important thing is to be present, show genuine affection, and continually nurture the bond you share. With these tips, you’ll find that romancing your husband becomes a joyful part of your everyday life, deepening your connection and making your marriage stronger.
“Motivation is what gets you started. Habit is what keeps you going.” – Jim Ryun
If you would like more information about the 2024, please send us an email.
Written by Fitness Goal 4U
Smart Fitness Goals - Achieve Health with Simple Steps
Smart fitness goals focus on being Specific, Measurable, Achievable, Relevant, and Time-bound. They help you create a clear path to success, stay motivated, and track progress. Whether its weight loss, strength building, or improved endurance, smart goals guide your fitness journey, ensuring steady growth and sustainable results tailored to your needs.
“Confidence comes from discipline and training.” – Robert Kiyosaki
Fashion is a powerful form of self-expression, and for men, mastering the art of style can significantly boost confidence and make lasting impressions. Yet, developing a personal style that resonates with your personality while keeping up with trends can be a challenge. Whether you’re aiming to enhance your day-to-day wardrobe or preparing for a special occasion, this comprehensive guide will offer practical styling tips for men across various contexts and settings.
1. Understanding Fit: The Foundation of Style
Regardless of the clothing style you prefer, the fit is non-negotiable. Wearing ill-fitted clothes can detract from your appearance, no matter how expensive or trendy they are. Here are some fit-related tips:
- Shirts: The shoulder seams should align perfectly with your shoulders, the sleeves should stop at your wrist bone, and the body of the shirt should not be too tight or too loose.
- Trousers: Pants should not bunch excessively at the ankle but should also not be too short. A slight break (where the hem hits the shoe) is ideal for formal wear, while no break (just touching the shoe) works for casual or slim-fit styles.
- Blazers and Jackets: These should frame your torso without pinching or sagging. The sleeves should also stop at the wrist bone, allowing about a quarter-inch of your shirt cuff to show.
In essence, always try on clothes before buying them, or get them tailored. A well-fitted outfit can make a world of difference in how you present yourself.
2. Build a Versatile Wardrobe
One of the keys to developing good style is to have a solid foundation of clothing items that can be mixed and matched for various occasions. A versatile wardrobe should contain:
- White and Black T-Shirts: Simple, classic, and functional, these can be worn under blazers or on their own for casual outings.
- Dark Jeans: A pair of well-fitting dark jeans is a timeless piece that works in both casual and semi-formal settings.
- Blazer: Whether for the office or a casual dinner, a fitted blazer can instantly elevate your look.
- Chinos: A great alternative to jeans, chinos can be dressed up with a button-down shirt or dressed down with a t-shirt.
- White Sneakers: Clean, minimalist sneakers can complement casual outfits while offering comfort.
- Brown and Black Leather Shoes: These are necessary for formal occasions or business settings. Make sure they're polished and well-kept.
- Neutral Outerwear: A trench coat, peacoat, or leather jacket in neutral colors will give you warmth and style during colder months.
By building a wardrobe of versatile essentials, you won’t need to buy a completely new outfit for every event, and you'll always have options that can be mixed and matched.
3. Master Layering
Layering can add depth and interest to your outfit. When done right, it can also be functional, allowing you to dress according to the temperature or activity. Here’s how you can master the art of layering:
- Base Layer: Start with a simple and fitted base, such as a t-shirt or henley.
- Mid Layer: Add a sweater, denim shirt, or light jacket. This layer should complement but not overpower the base.
- Top Layer: A coat or heavier jacket is the final layer, ideal for colder weather.
Keep in mind that each layer should be visible, and colors should work harmoniously. Avoid wearing multiple layers that are all of the same thickness—your outfit should taper to your body.
4. Be Color Conscious
Understanding how to use colors is an important aspect of styling. For men who may be less confident in experimenting with color, starting with neutral tones is safe and effective. Colors like black, white, gray, navy, beige, and olive are versatile and easy to pair. Once comfortable, you can start adding more bold colors to your wardrobe:
- Neutral Colors: These serve as the foundation of your outfit. Think of black, white, gray, navy, and brown.
- Accent Colors: These add personality to your look. Experiment with colors like maroon, mustard, or even light pastel shades like pink or blue.
- Complementary Colors: Learning about color theory helps when you're putting together outfits. For instance, navy and brown complement each other well, as do olive and tan.
Avoid clashing bold colors together unless you're confident about pulling it off.
5. Accessorize Wisely
Accessories are the finishing touches to an outfit that can take it from good to great. However, they should be used sparingly and thoughtfully.
- Watches: A classic watch can elevate both formal and casual outfits. Leather straps are ideal for a more classic or formal look, while metal straps or sports watches work well with casual attire.
- Sunglasses: Sunglasses are functional and stylish. Stick to classic shapes like aviators or wayfarers that suit your face shape.
- Belts: Match your belt to your shoes—black with black and brown with brown. A well-made leather belt is a must-have.
- Hats and Caps: For a more casual look, a baseball cap or beanie can work, but for more formal occasions, consider a fedora or flat cap.
- Jewelry: Keep jewelry minimal unless it’s a core part of your style. A simple bracelet, necklace, or ring can be tasteful without being overwhelming.
Avoid over-accessorizing, as this can detract from the overall impact of your look.
6. Pay Attention to Footwear
Footwear can make or break an outfit. Investing in quality shoes that suit your lifestyle and complement your wardrobe is essential.
- Casual Footwear: White sneakers or loafers are versatile and work well with jeans or chinos. Opt for clean designs and avoid flashy branding.
- Formal Footwear: Black and brown Oxford or Derby shoes are must-haves for formal occasions or professional settings. Polished leather shoes always give a refined look.
- Boots: Chelsea boots or Chukka boots are versatile and stylish options for the colder months or casual settings.
Always keep your shoes clean and well-maintained, as worn-out footwear can ruin the sharpest outfit.
7. Grooming: A Key Part of Style
Your grooming habits are just as important as the clothes you wear. An unkempt beard, messy hair, or poor hygiene can undermine even the most well-put-together outfit.
- Hair: Find a hairstyle that suits your face shape and is easy to maintain. Regular trips to the barber will keep your hair looking fresh.
- Beard and Facial Hair: Whether you’re clean-shaven or sporting a beard, keeping it groomed and neat is essential. Use beard oils or creams to maintain a healthy look.
- Skincare: Men’s skincare is often overlooked, but it’s crucial. Cleanse, moisturize, and use sunscreen daily to maintain healthy skin.
- Fragrance: A subtle, well-chosen fragrance can leave a lasting impression. Don't overdo it—one or two sprays are usually sufficient.
Well-groomed hair, skin, and facial hair demonstrate that you take care of yourself, adding to your overall appeal.
8. Dress for the Occasion
Your outfit should always be appropriate for the setting you're in. Understanding how to dress for different occasions ensures that you look well-prepared and confident:
- Casual: For a casual day out, think of basics like jeans, t-shirts, sneakers, or a casual jacket. You can experiment more with bolder colors and prints here.
- Business Casual: Business casual is often misunderstood, but it generally includes chinos, button-down shirts, and loafers or brogues. A blazer can be added for a more formal touch.
- Formal: For formal events, suits are a must. Invest in a tailored suit that fits you perfectly. Darker shades like navy, black, or charcoal are safe bets, while a classic white or light blue shirt complements the suit.
- Semi-Formal: If you're unsure, a blazer with dress pants and a button-down shirt will work for most semi-formal events.
Being overdressed is better than being underdressed, so when in doubt, aim for a slightly more formal look.
9. Confidence is Key
No matter how well you dress, confidence is the most important accessory you can wear. If you feel good in your clothes, it will naturally reflect in your posture, attitude, and the way you carry yourself. Here are some tips to boost your confidence:
- Know Your Style: Take time to experiment and figure out what works for you. Don’t feel the need to follow every trend. Instead, find a personal style that makes you feel comfortable and authentic.
- Practice Good Posture: Standing tall with your shoulders back not only makes you look more confident but also improves the overall appearance of your outfit.
- Take Risks: Don’t be afraid to try something new. Whether it's a bold color, an accessory you've never worn before, or a different type of jacket, experimenting with your style can be rewarding.
10. Stay True to Yourself
Fashion is ultimately about self-expression, and the most important styling tip is to stay true to your unique identity. Don't feel pressured to conform to trends that don’t suit your personality or lifestyle. Authenticity in style will always resonate more powerfully than simply following the latest fads.
Conclusion
Building a great sense of style doesn’t have to be complicated or expensive. By focusing on the right fit, investing in versatile wardrobe staples, mastering the art of layering, and understanding color and accessories, you can elevate your fashion game effortlessly. Grooming, footwear, and confidence also play critical roles in creating a stylish look. Ultimately, the key to great style is knowing yourself, dressing for the occasion, and wearing your clothes with confidence.
“Motivation is what gets you started. Habit is what keeps you going.” – Jim Ryun
If you would like more information about the 2024, please send us an email.
Written by Fitness Goal 4U
Smart Fitness Goals - Achieve Health with Simple Steps
Smart fitness goals focus on being Specific, Measurable, Achievable, Relevant, and Time-bound. They help you create a clear path to success, stay motivated, and track progress. Whether its weight loss, strength building, or improved endurance, smart goals guide your fitness journey, ensuring steady growth and sustainable results tailored to your needs.
“Confidence comes from discipline and training.” – Robert Kiyosaki
In today’s modern world, male grooming is no longer considered an optional luxury. It’s an essential part of personal care, appearance, and confidence. The days when grooming was merely about shaving and getting a haircut are long gone. Male grooming now encompasses a range of practices from skincare, hair care, facial hair styling, and body care to more specialized routines like nail care and fragrance choices. If you're looking to elevate your grooming game, this ultimate guide will cover everything you need to know to look and feel your best.
Why Male Grooming Matters
Grooming isn’t just about vanity—it’s about taking care of yourself. Looking good helps you feel good. It boosts your self-confidence, enhances your personal and professional interactions, and demonstrates that you value hygiene and attention to detail. Well-groomed men are also perceived as more trustworthy, professional, and approachable. Investing in grooming can enhance your quality of life in ways you might not have imagined.
Skincare Basics for Men
One of the most critical aspects of grooming is skincare. Healthy skin is the foundation of looking good, and the right routine can make a massive difference. Many men have been reluctant to invest in skincare, but more are realizing its importance.
1. Know Your Skin Type
Before you embark on a skincare routine, it’s crucial to understand your skin type, which will determine the kinds of products you should use:
- Oily Skin: If you have a shiny face and are prone to acne, your skin produces excess sebum. Look for products that are oil-free and mattifying.
- Dry Skin: If your skin feels tight, flaky, or itchy, you need deeply hydrating products.
- Combination Skin: A mix of oily and dry areas, often with an oily T-zone (forehead, nose, chin) and dry cheeks.
- Sensitive Skin: Easily irritated by certain products, sensitive skin needs hypoallergenic, fragrance-free formulas.
2. Essential Skincare Products
Here’s a basic skincare routine that will suit most men:
- Cleanser: Start and end your day with a good face wash to remove dirt, oil, and sweat. Avoid soap, which can strip your skin’s natural oils, and opt for a facial cleanser suited to your skin type.
- Exfoliator: Exfoliate once or twice a week to remove dead skin cells, unclog pores, and prevent ingrown hairs. This will leave your skin smoother and brighter.
- Moisturizer: Hydrate your skin daily with a moisturizer. Even if you have oily skin, hydration is crucial to maintain a balanced, healthy complexion.
- Sunscreen: Sunscreen is essential to prevent premature aging, sunburn, and skin cancer. Opt for a broad-spectrum SPF 30 or higher and apply it every day, regardless of the weather.
3. Specialized Treatments
- Anti-Aging: Incorporating an anti-aging serum that contains retinol or vitamin C can help reduce wrinkles, fine lines, and improve skin texture.
- Eye Cream: If you have dark circles or puffiness around your eyes, using an eye cream with caffeine, peptides, or hyaluronic acid can make a big difference.
Hair Care for Men
Hair is often the first thing people notice about you, so maintaining healthy, stylish hair is a crucial aspect of grooming. Different hair types and styles require different care, but there are general guidelines every man should follow.
1. Washing Your Hair
How often you should wash your hair depends on your hair type:
- Oily Hair: Wash daily to remove excess oil.
- Dry Hair: Limit washing to two or three times a week to prevent stripping the scalp of its natural oils.
- Normal Hair: You can wash your hair every other day or as needed.
Use a shampoo that suits your hair type, and follow up with a conditioner to keep your hair soft and manageable.
2. Styling Products
Whether you prefer a messy, textured look or a sleek, polished style, there are plenty of styling products available:
- Pomade: Best for sleek styles and high shine. Ideal for pompadours or slicked-back hair.
- Clay: Gives a matte finish and is perfect for shorter, textured styles.
- Wax: Provides hold and a slight shine. Great for structured styles with flexibility.
- Gel: Offers a strong hold and wet look but can make hair stiff and flaky.
3. Regular Trims
Getting a haircut every 4-6 weeks helps maintain your hairstyle and remove split ends. Regular trims keep your hair looking fresh and well-groomed. It’s also important to find a hairstylist or barber you trust to shape your hair to suit your face shape and personal style.
Beard Grooming and Facial Hair Maintenance
Facial hair has become a significant trend over the past decade, and whether you prefer a full beard, a goatee, or a clean shave, facial hair grooming is key to looking polished.
1. Shaving Essentials
For men who prefer a clean-shaven look, the right technique and tools can make all the difference:
- Shave after a shower: Warm water softens facial hair and opens pores, making it easier to get a closer shave.
- Use a sharp razor: Dull blades can cause irritation and razor bumps. Change your razor frequently for a smooth shave.
- Shaving cream/gel: Always apply shaving cream or gel to protect your skin and reduce friction.
- Post-shave care: After shaving, apply an alcohol-free aftershave or moisturizer to soothe the skin and prevent irritation.
2. Beard Care Routine
If you have facial hair, keeping it well-groomed is essential:
- Wash and condition your beard: Treat your beard like the hair on your head. Use a beard shampoo and conditioner to keep it clean, soft, and manageable.
- Trim regularly: Even if you’re growing your beard, it’s crucial to keep it trimmed and shaped. Use a beard trimmer to maintain your desired length and a pair of scissors for precision trimming.
- Beard oil or balm: To keep your beard soft, shiny, and hydrated, use a beard oil or balm. This will also help prevent itchiness and flakiness.
Body Grooming
Taking care of your body is equally important as looking after your face and hair. Body grooming covers everything from maintaining body hair to smelling great.
1. Body Hair Management
Body hair is a personal preference, and there’s no right or wrong amount of grooming—it’s all about what makes you feel confident. Common areas to manage include:
- Chest and Stomach: Many men trim or shave their chest and stomach hair. You can use a body trimmer or razor, depending on your preference.
- Back Hair: If you have back hair and prefer a smooth look, consider laser hair removal, waxing, or getting a friend or professional to help trim or shave it.
- Pubic Hair: Grooming below the belt is a personal choice. Trimming, shaving, or waxing your pubic area is common for hygiene and aesthetic reasons.
2. Deodorant and Fragrance
Smelling good is essential for making a positive impression. Deodorant is a non-negotiable, especially if you sweat a lot. Choose a deodorant or antiperspirant that provides long-lasting protection.
Fragrance is a more personal choice. Whether you prefer woody, citrus, or spicy scents, find a signature cologne that complements your personality. Apply it to pulse points (neck, wrists, behind the ears) for long-lasting effect.
Nail Care
Men often overlook nail care, but well-groomed nails are a sign of attention to detail and cleanliness.
- Trim your nails regularly: Use a nail clipper to keep nails short and neat. Avoid biting your nails, as this can lead to infections and unsightly nails.
- Clean under your nails: Dirt can accumulate under your nails, so make sure you regularly clean them with a nail brush.
- Moisturize your hands and nails: Keeping your hands and nails hydrated helps prevent dryness and cracking. You can use a hand cream to maintain smooth, healthy skin.
Fitness and Grooming
Staying fit is not only about health but also contributes to your grooming. A well-maintained physique is a key aspect of grooming, as it reflects self-discipline and care. Exercise regularly to keep your body toned and healthy. It will not only improve your physical appearance but also your posture and overall energy levels.
Nutrition and Hydration for Healthy Skin and Hair
What you eat plays a huge role in the health of your skin, hair, and overall appearance. A balanced diet rich in vitamins, minerals, and hydration is essential for glowing skin, strong hair, and good health.
- Vitamins A, C, and E: These antioxidants help protect the skin and promote healthy hair growth.
- Biotin: This B vitamin is essential for hair health. It helps in the prevention of hair thinning and loss.
- Omega-3 Fatty Acids: Found in fish and flaxseeds, omega-3s support hair shine and skin hydration.
- Stay Hydrated: Drink at least eight glasses of water a day. Proper hydration keeps your skin looking plump and your hair shiny.
Mental Grooming
It’s also worth mentioning the importance of mental grooming. Feeling good starts from within, and your mental health affects your appearance. Take time to relax, manage stress, and engage in activities that make you happy and relaxed. Grooming is not just about looking good—it’s about feeling good inside and out.
Conclusion
Male grooming is an integral part of modern self-care. It’s about more than just looking presentable; it’s about feeling
Confident and well-maintained in every aspect of your life. From skincare and hair care to body grooming and mental wellness, each element plays a crucial role in your overall appearance and self-esteem.
By following this ultimate guide to male grooming, you’ll be well on your way to achieving a polished, well-groomed look that enhances your confidence and leaves a lasting impression. Whether you’re just starting out or looking to refine your existing routine, investing time and effort in grooming is a worthy endeavor that will benefit you in countless ways.
“Motivation is what gets you started. Habit is what keeps you going.” – Jim Ryun
If you would like more information about the 2024, please send us an email.
Written by Fitness Goal 4U
Smart Fitness Goals - Achieve Health with Simple Steps
Smart fitness goals focus on being Specific, Measurable, Achievable, Relevant, and Time-bound. They help you create a clear path to success, stay motivated, and track progress. Whether its weight loss, strength building, or improved endurance, smart goals guide your fitness journey, ensuring steady growth and sustainable results tailored to your needs.
“Confidence comes from discipline and training.” – Robert Kiyosaki
Self-care is the practice of taking an active role in protecting one's own well-being and happiness, particularly during periods of stress. In today’s fast-paced world, self-care is no longer a luxury but a necessity. It’s about understanding your personal needs, recognizing what helps you thrive, and deliberately setting aside time to rejuvenate physically, mentally, and emotionally. This article dives into the best self-care practices, emphasizing their importance, and offering practical tips on how to integrate them into your life.
1. Mental Health Care
Mental health is at the core of self-care. If your mind isn’t well, it’s hard to feel good physically, emotionally, or spiritually. The following practices are essential for nurturing mental well-being:
a) Mindfulness and Meditation : Mindfulness involves being fully present in the moment without judgment. Regular meditation practices have been shown to reduce stress, improve focus, and enhance emotional health. Whether it's through sitting meditation, guided imagery, or deep breathing exercises, these practices allow you to observe your thoughts and feelings from a distance rather than being overwhelmed by them.
- How to integrate: Start with 5-10 minutes of meditation each morning or before bed. Use apps like Headspace or Calm to guide your practice. Over time, try extending your sessions as you become more comfortable with mindfulness.
b) Journaling : Writing down thoughts, worries, or experiences can help in processing emotions and identifying triggers. Journaling can also be a space to express gratitude, which has been linked to increased happiness and lower stress levels.
- How to integrate: Set aside 10 minutes a day to write in a journal. You can use prompts like “What made me smile today?” or “What challenges did I face and how did I overcome them?”
c) Therapy and Counseling : Mental health professionals can provide insights, coping mechanisms, and unbiased support. Therapy isn’t just for those with mental health disorders; it’s a tool for anyone wanting to better understand themselves and improve their emotional well-being.
- How to integrate: Schedule regular appointments with a therapist or counselor, even if it’s once a month, to process your thoughts and emotions.
2. Physical Health Care
Physical self-care is fundamental to overall well-being. A healthy body promotes a healthy mind and emotions. Here are some ways to prioritize physical health:
a) Exercise and Movement : Regular physical activity is essential for maintaining a healthy body and reducing the risk of various diseases. Exercise releases endorphins, which help in elevating your mood and reducing feelings of anxiety and depression. Movement doesn’t always have to be rigorous. Walking, stretching, yoga, or dancing can be beneficial forms of exercise.
- How to integrate: Aim for at least 30 minutes of physical activity most days of the week. Find an activity you enjoy, whether it’s a group class, solo running, or dance.
b) Healthy Eating : Nourishing your body with the right foods can make a huge difference in your physical and emotional energy levels. Eating a balanced diet rich in fruits, vegetables, lean proteins, and whole grains supports cognitive function, boosts immunity, and enhances your mood.
- How to integrate: Try meal prepping to avoid reaching for unhealthy snacks when you’re hungry. Pay attention to how certain foods make you feel, and consider keeping a food journal.
c) Rest and Sleep : Sleep is often underestimated in today’s busy society. However, getting adequate rest is crucial for cognitive function, emotional stability, and physical health. Chronic sleep deprivation has been linked to an increased risk of mental health issues, obesity, and heart disease.
- How to integrate: Create a bedtime routine to help your body wind down. Avoid screens at least 30 minutes before sleep, as the blue light from devices can interfere with melatonin production.
d) Hydration : Staying hydrated is key to maintaining energy levels, supporting digestion, and keeping your skin healthy. Dehydration can lead to fatigue, headaches, and mood swings.
- How to integrate: Carry a water bottle with you throughout the day and set reminders to drink water. You can also consume foods with high water content, such as cucumbers, watermelon, and oranges.
3. Emotional Care
Our emotions can deeply influence how we experience the world. Emotional self-care involves recognizing and understanding your emotions and finding healthy ways to express and cope with them.
a) Self-Compassion : Many people are their own harshest critics. Self-compassion involves treating yourself with the same kindness and understanding that you would offer to a friend. It means forgiving yourself for mistakes and acknowledging that imperfection is a part of being human.
- How to integrate: Practice positive affirmations. If you catch yourself thinking negative thoughts, counter them with statements like “I am doing my best” or “I am worthy of love and respect.”
b) Emotional Release : Bottling up emotions can lead to mental and physical tension. Finding healthy outlets for your emotions is crucial. This could be through crying, talking to a friend, or engaging in creative activities like painting or music.
- How to integrate: Set aside time each week to engage in activities that allow you to express your emotions, whether that’s through creative arts or open conversations.
c) Setting Boundaries : Emotional health often depends on the relationships you maintain. Setting boundaries is essential for preserving your emotional energy and preventing burnout. It’s okay to say no, prioritize your needs, and distance yourself from toxic relationships.
- How to integrate: Practice saying no without feeling guilty. Identify situations where you tend to overextend yourself and begin setting firm but kind boundaries.
4. Spiritual Care
Spiritual self-care doesn’t necessarily mean religious practice. It can involve any activity that helps you connect with your inner self, your values, or a sense of purpose in life.
a) Meditation and Prayer: For many, prayer is a way to connect with a higher power, while meditation is a way to connect with the inner self. Both practices can bring a sense of peace, clarity, and purpose. Even if you’re not religious, moments of silence and reflection can be profoundly grounding.
- How to integrate: Create a daily habit of quiet reflection. This can be as simple as sitting in silence for a few minutes or participating in a longer meditation session.
b) Nature Connection : Spending time in nature can nurture the spirit. Walking in a park, hiking in the mountains, or simply observing the sky can provide a sense of perspective and calm. Nature has been shown to reduce stress, anxiety, and depression while promoting a sense of peace.
- How to integrate: Schedule regular outings in nature. Whether it’s a short walk in a park or a weekend trip to a forest, make time to be outside and disconnect from the busyness of life.
c) Practicing Gratitude : Gratitude is a powerful spiritual practice. By focusing on what you have rather than what you lack, you shift your perspective and invite more positivity into your life. People who practice gratitude regularly report feeling happier, more fulfilled, and less stressed.
- How to integrate: Keep a gratitude journal, writing down 3-5 things you’re grateful for each day. You can also express gratitude to others by verbally acknowledging their impact on your life.
5. Social Self-Care
Human beings are social creatures, and healthy relationships play a significant role in our well-being. Social self-care involves fostering relationships that uplift, nourish, and support you.
a) Nurturing Friendships : Quality friendships offer emotional support, companionship, and a sense of belonging. In times of stress, talking with a trusted friend can provide relief, perspective, and understanding.
- How to integrate: Schedule regular catch-ups with friends, whether through phone calls, video chats, or in-person meetings. Be present during these interactions and genuinely invest in maintaining these relationships.
b) Seeking Community: Being part of a community, whether through hobbies, clubs, or religious groups, can give you a sense of belonging and purpose. A community provides support in tough times and offers opportunities to give back.
- How to integrate: Join a group or club that aligns with your interests, whether it’s a sports team, a book club, or a volunteer organization. Actively engage in these communities to foster connections.
c) Balanced Social Media Use: While social media can offer connections, it can also become overwhelming and contribute to feelings of inadequacy. A balanced approach to social media is important to ensure it supports your social well-being without leading to comparison or isolation.
- How to integrate: Set time limits for social media use. Be mindful of the content you consume and unfollow accounts that make you feel negative. Focus on using social media to connect with others, rather than as a tool for comparison.
6. Professional Self-Care
Since we spend a significant portion of our lives working, professional self-care is key to maintaining overall well-being. It’s about creating a balance between work and personal life, setting career goals, and avoiding burnout.
a) Work-Life Balance : An imbalance between work and life can lead to stress, fatigue, and mental health problems. It’s essential to establish boundaries between professional obligations and personal time. This might involve setting specific work hours, not checking emails after a certain time, or making time for hobbies and relaxation outside of work.
- How to integrate: Set firm working hours and stick to them. Avoid overcommitting at work, and take breaks throughout the day to recharge. Delegate tasks when necessary and use your vacation time to fully unplug.
b) Continuous Learning : Personal development in the professional realm can bring a sense of fulfillment. Whether it’s attending workshops, reading, or seeking mentorship, continuous learning helps keep you engaged and motivated in your career.
- How to integrate: Set aside time to invest in professional growth. This could be taking an online course, reading industry-related books, or networking with colleagues in your field.
c) Creating a Comfortable Workspace : Your workspace can influence your mood, productivity, and overall well-being. A cluttered or uninspiring workspace can add to stress, while a clean, organized, and aesthetically pleasing environment can help you feel calm and focused.
- How to integrate: Regularly clean and declutter your workspace. Add elements that inspire you, such as plants, art, or personal mementos. Ensure your desk setup supports good posture and comfort.
Conclusion
Incorporating self-care practices into your daily routine is essential for achieving balance, reducing stress, and maintaining overall well-being. Self-care is not about being selfish; it's about recognizing your needs and taking steps to meet them. By nurturing your mental, physical, emotional, social, and spiritual health, you create a foundation for a more fulfilling and resilient life.
Remember, self-care is personal. What works for one person might not work for another. The key is to explore different practices, listen to your body and mind, and find what nourishes you the most. Start small, be consistent, and gradually, self-care will become an integral part of your life, leading to lasting happiness and fulfillment.
“Motivation is what gets you started. Habit is what keeps you going.” – Jim Ryun
If you would like more information about the 2024, please send us an email.
Written by Fitness Goal 4U
Smart Fitness Goals - Achieve Health with Simple Steps
Smart fitness goals focus on being Specific, Measurable, Achievable, Relevant, and Time-bound. They help you create a clear path to success, stay motivated, and track progress. Whether its weight loss, strength building, or improved endurance, smart goals guide your fitness journey, ensuring steady growth and sustainable results tailored to your needs.
“Confidence comes from discipline and training.” – Robert Kiyosaki
Self-trust is a fundamental aspect of personal growth, emotional well-being, and success. It is the foundation upon which we build confidence, make decisions, take action, and form relationships. When you trust yourself, you cultivate resilience, reduce anxiety, and navigate life’s challenges with greater ease. However, self-trust doesn’t always come naturally, and many people struggle with doubting their abilities, second-guessing their decisions, or feeling unsure about their path in life.
If you’ve ever felt hesitant about making a decision or unsure about whether you’re on the right track, you’re not alone. But the good news is that self-trust, like any other skill, can be cultivated through intentional practice. This article will delve deep into specific practices that can help you build and maintain a strong sense of self-trust.
1. Understand the Concept of Self-Trust
Before diving into specific practices, it’s crucial to understand what self-trust means. Self-trust is the ability to rely on your own judgments, make confident decisions, and trust that you have the capacity to handle life’s uncertainties. It’s the inner assurance that, no matter what happens, you will act in alignment with your values, make the best possible choices for yourself, and recover from setbacks.
Self-trust is not about always being right or never making mistakes. It’s about believing that even when you make mistakes, you can learn, grow, and bounce back stronger.
2. Develop Self-Awareness
Self-awareness is the foundation of self-trust. It involves understanding your thoughts, emotions, behaviors, and motivations. When you know yourself well, you’re better equipped to make decisions that align with your values and goals. Self-awareness also helps you recognize patterns in your thinking or behavior that may undermine your self-trust.
How to Cultivate Self-Awareness:
- Journaling: Writing down your thoughts and emotions regularly can help you gain insight into your inner world. Reflect on your experiences, decisions, and reactions to understand yourself better.
- Mindfulness Meditation: Practicing mindfulness allows you to observe your thoughts and feelings without judgment. This can help you develop a deeper understanding of your inner dialogue and how it affects your self-trust.
- Seek Feedback: Ask trusted friends, family, or colleagues for feedback on how they perceive your strengths and weaknesses. This external perspective can provide valuable insights into areas where you may need to work on trusting yourself more.
3. Honor Your Commitments to Yourself
One of the most effective ways to build self-trust is by consistently honoring the commitments you make to yourself. When you set goals or intentions and follow through with them, you send a powerful message to your subconscious that you are reliable and capable.
Tips for Honoring Self-Commitments:
- Start Small: Begin by setting small, manageable goals that you know you can achieve. As you build momentum and demonstrate consistency, you’ll gradually increase your self-trust.
- Set Clear Intentions: Be specific about what you want to achieve and why it’s important to you. This clarity will make it easier to stay committed.
- Track Your Progress: Keep a journal or use an app to track your progress toward your goals. Celebrate your successes, no matter how small, to reinforce your sense of accomplishment.
- Forgive Yourself for Setbacks: If you break a commitment to yourself, don’t be too hard on yourself. Acknowledge the setback, learn from it, and recommit to your goals.
4. Make Decisions and Stand By Them
Decision-making is a critical aspect of self-trust. When you consistently second-guess yourself or avoid making decisions out of fear of making the wrong choice, you weaken your self-trust. The ability to make decisions confidently, even in uncertain situations, is a hallmark of strong self-trust.
Practices to Strengthen Decision-Making:
- Gather Information: Before making a decision, gather as much information as you need to feel informed. However, avoid getting stuck in analysis paralysis, where you overthink and delay action.
- Listen to Your Intuition: Trusting your gut feeling is an important part of self-trust. While it’s important to consider facts and logic, your intuition can often guide you in the right direction, especially when faced with complex or uncertain decisions.
- Practice Decisiveness: Start with small decisions—what to eat, what to wear, or how to spend your free time. Over time, practice making bigger decisions with the same level of confidence.
- Embrace Mistakes: No one is perfect, and even the best decision-makers sometimes make mistakes. When you make a decision that doesn’t turn out as expected, treat it as a learning opportunity rather than a failure.
5. Cultivate Self-Compassion
Self-trust and self-compassion go hand in hand. When you trust yourself, you give yourself permission to make mistakes, experience setbacks, and learn from them. Without self-compassion, it’s easy to fall into the trap of harsh self-criticism, which can erode self-trust.
How to Practice Self-Compassion:
- Treat Yourself Like a Friend: When you make a mistake or face a difficult situation, imagine how you would support a close friend in the same circumstance. Extend that same kindness and understanding to yourself.
- Reframe Negative Self-Talk: Pay attention to how you speak to yourself, especially when things go wrong. Replace negative self-talk with more compassionate, constructive language.
- Acknowledge Your Humanity: Everyone makes mistakes and experiences setbacks. Remind yourself that you are not alone in your struggles and that failure is a natural part of the human experience.
6. Build Confidence Through Action
Confidence and self-trust are closely intertwined. Confidence comes from taking action, even when you feel uncertain or afraid. Each time you take action, you prove to yourself that you are capable, and this reinforces your self-trust.
Ways to Build Confidence:
- Step Outside Your Comfort Zone: Regularly challenge yourself to take on new experiences or tasks that push you out of your comfort zone. Start small and gradually take on bigger challenges as your confidence grows.
- Celebrate Your Wins: Recognize and celebrate your accomplishments, no matter how small. Each success builds a sense of confidence and reinforces your ability to trust yourself.
- Practice Self-Affirmation: Use positive affirmations to remind yourself of your strengths and capabilities. Statements like “I am capable of handling whatever comes my way” can help boost your confidence and self-trust.
7. Establish Healthy Boundaries
Setting and maintaining healthy boundaries is a critical practice in building self-trust. When you establish clear boundaries, you demonstrate to yourself and others that you respect your needs, values, and limits. This reinforces your sense of self-worth and strengthens your self-trust
Steps to Set Healthy Boundaries:
- Identify Your Values and Needs: Clarify what is most important to you and what you need to feel safe, respected, and fulfilled in your relationships and daily life.
- Communicate Clearly: When setting boundaries, be direct and clear in your communication. Let others know what you need and expect in a respectful manner.
- Enforce Your Boundaries: Setting boundaries is only the first step; you also need to enforce them consistently. If someone violates your boundaries, calmly and assertively remind them of your limits.
- Practice Saying No: Learning to say no is an essential part of setting boundaries. When you say no to something that doesn’t serve you, you reinforce your self-trust by prioritizing your well-being.
8. Trust Your Emotions
Many people struggle with trusting their emotions, especially if they’ve been taught to suppress or ignore them. However, your emotions are valuable signals that can guide you in making decisions and understanding your inner world. Trusting your emotions is a key component of self-trust.
How to Trust Your Emotions:
- Acknowledge Your Feelings: Rather than suppressing or dismissing your emotions, acknowledge them as valid and important. Allow yourself to feel your emotions without judgment.
- Understand the Message Behind Your Emotions: Emotions often carry valuable information about what is happening in your life. For example, feelings of anxiety may indicate that you need to address an unresolved issue, while feelings of excitement may point to an opportunity for growth.
- Use Emotions as a Guide: When making decisions, consider how you feel about the options in front of you. While emotions shouldn’t be the sole factor in decision-making, they can provide important insights that complement logic and reason.
9. Practice Gratitude and Self-Appreciation
Gratitude is a powerful practice for building self-trust. When you focus on what you appreciate about yourself and your life, you shift your attention away from self-doubt and negativity. This helps reinforce a positive self-image and strengthens your belief in your abilities.
How to Practice Gratitude:
- Keep a Gratitude Journal: Each day, write down at least three things you are grateful for, including qualities you appreciate about yourself. This practice helps you focus on your strengths and accomplishments.
- Celebrate Small Wins: Don’t wait for major milestones to celebrate your successes. Acknowledge and celebrate the small wins that contribute to your overall progress.
- Express Gratitude to Yourself: Take a moment to thank yourself for the effort, resilience, and dedication you show in your daily life. Self-appreciation is a powerful way to reinforce self-trust.
10. Seek Professional Support When Needed
Building self-trust is a personal journey, but you don’t have to do it alone. If you’re struggling with deep-seated self-doubt, anxiety, or a lack of confidence, seeking support from a therapist, coach, or counselor can be incredibly helpful. These professionals can provide guidance, tools, and strategies to help you build self-trust in a supportive and non-judgmental environment.
When to Seek Support:
- Chronic Self-Doubt: If you find that self-doubt is a constant presence in your life, preventing you from making decisions or taking action, professional support can help you work through these challenges.
- Fear of Failure: If fear of failure is holding you back from pursuing your goals or taking risks, a therapist or coach can help you build the confidence to move forward.
- Difficulty Trusting Your Emotions: If you struggle with understanding or trusting your emotions, a therapist can help you develop emotional awareness and regulation skills.
Conclusion
Self-trust is a vital component of personal well-being and success. It empowers you to make decisions confidently, navigate challenges with resilience, and build fulfilling relationships. By developing self-awareness, honoring your commitments, practicing self-compassion, and taking consistent action, you can strengthen your self-trust and lead a more empowered life.
Building self-trust is an ongoing journey, but with dedication and practice, you can cultivate a deep sense of trust in yourself that will support you in all areas of life.
“Motivation is what gets you started. Habit is what keeps you going.” – Jim Ryun
If you would like more information about the 2024, please send us an email.
Written by Fitness Goal 4U
Smart Fitness Goals - Achieve Health with Simple Steps
Smart fitness goals focus on being Specific, Measurable, Achievable, Relevant, and Time-bound. They help you create a clear path to success, stay motivated, and track progress. Whether its weight loss, strength building, or improved endurance, smart goals guide your fitness journey, ensuring steady growth and sustainable results tailored to your needs.
“Confidence comes from discipline and training.” – Robert Kiyosaki
Attractiveness is a multifaceted concept. While physical appearance plays a significant role, it’s only one piece of the puzzle. Confidence, grooming, lifestyle, emotional intelligence, and even how you interact with others are just as important. In this article, we will explore various ways to enhance your attractiveness as a man, focusing not only on physical changes but also on personal growth, habits, and character development.
1. Grooming: Presenting Your Best Self
Grooming is one of the most straightforward and immediately noticeable ways to become more attractive. Here are some essential grooming tips to elevate your appearance:
- Hair Care: Your hairstyle says a lot about you. A haircut that suits your face shape can dramatically improve your looks. Regularly maintain your hair, trim it when necessary, and use products that complement your hair type. Experiment with styles until you find one that enhances your natural features.
- Skin Care: Healthy, clear skin is a universal sign of attractiveness. Establish a skincare routine that includes cleansing, moisturizing, and using sunscreen. If you struggle with acne or other skin conditions, consider consulting a dermatologist for tailored advice.
- Facial Hair: Facial hair can define your face and create a more mature, rugged appearance if maintained well. Whether you're clean-shaven, have a beard, or prefer stubble, it’s essential to keep it well-trimmed and groomed. Experiment with different styles to see which complements your face shape.
- Dental Hygiene: A bright, healthy smile is one of the most appealing features a man can have. Brush and floss regularly, visit the dentist for routine cleanings, and consider teeth whitening treatments if necessary. Your smile not only affects how others perceive you but also boosts your confidence.
- Fragrance: Smelling good can significantly enhance your attractiveness. Invest in a high-quality cologne, but be cautious not to overdo it. A subtle, pleasing scent is often more alluring than an overpowering one. Rose water (Gulab Jal) is a natural alternative, and using it on your skin can add a light, refreshing fragrance while offering skin benefits.
2. Fitness and Health: Build a Strong, Confident Physique
Being physically fit is not just about looking good; it’s about feeling good too. Regular exercise and a healthy diet can transform both your appearance and your confidence.
- Exercise Routine: Strength training, cardio, and flexibility exercises all contribute to a balanced, attractive physique. Aim for at least 150 minutes of moderate aerobic activity or 75 minutes of vigorous activity each week, combined with strength training on two or more days a week.
- Posture: Good posture communicates confidence and self-assurance. Stand tall, with your shoulders back and your chest out. If you have poor posture, practicing yoga, pilates, or even targeted stretching exercises can help you correct it.
- Diet and Nutrition: Your diet plays a crucial role in your physical appearance. Eating a balanced diet rich in fruits, vegetables, lean proteins, and healthy fats will not only help you maintain a healthy weight but also improve your skin, hair, and overall energy levels. Hydration is key, so make sure you drink plenty of water throughout the day.
- Sleep: Getting enough sleep is essential for your appearance and your overall well-being. Aim for 7-9 hours of quality sleep each night. Sleep deprivation can lead to dark circles, dull skin, and a lack of energy, all of which detract from your attractiveness.
3. Style and Fashion: Dress to Impress
Your clothing choices can dramatically affect how attractive you appear to others. Dressing well shows that you care about yourself and helps boost your confidence.
- Find Your Personal Style: Experiment with different styles until you find one that suits your personality, body type, and lifestyle. Whether it’s classic, casual, or edgy, find a style that makes you feel confident and comfortable.
- Fit is King: No matter how stylish the clothing, if it doesn’t fit well, it won’t look good. Tailored clothes that fit your body type will always make you appear more polished and attractive.
- Attention to Details: Small details like polished shoes, a well-chosen watch, or the right accessories can elevate your look. Avoid over-accessorizing; instead, choose a few key pieces that complement your overall style.
- Groomed and Neat: Your clothes should always be clean, pressed, and free from any stains or wrinkles. Neatness is a sign of self-respect and attention to detail, which others find attractive.
4. Confidence: The Ultimate Attractiveness Booster
Confidence is often cited as one of the most attractive traits a man can have. Confidence doesn’t mean arrogance; it’s about believing in yourself and being comfortable in your skin.
- Self-Assurance: Work on building your self-esteem by focusing on your strengths and accepting your flaws. A man who knows who he is and is secure in himself naturally exudes confidence.
- Body Language: Your body language plays a big role in how others perceive you. Stand tall, make eye contact, and offer a firm handshake. Avoid crossing your arms or slouching, as these can make you appear defensive or insecure.
- Positive Mindset: Confidence starts in the mind. Work on cultivating a positive attitude and practice gratitude for the things you have. This mindset not only makes you more resilient but also makes you more attractive to others.
- Overcome Insecurities: Everyone has insecurities, but how you handle them matters. Rather than letting them define you, work on improving the areas you can control and accept the ones you can’t. Seeking professional help, like therapy, can also provide tools for building emotional resilience and self-acceptance.
5. Emotional Intelligence: Be In Tune with Your Feelings
Emotional intelligence (EQ) is about being aware of and managing your emotions, as well as understanding the emotions of others. High EQ is an attractive trait because it shows you can handle interpersonal relationships thoughtfully and empathetically.
- Self-Awareness: The first step to emotional intelligence is self-awareness. Reflect on your thoughts and emotions, and understand how they impact your actions. Meditation, journaling, and mindfulness practices can help enhance self-awareness.
- Empathy: Being able to put yourself in others' shoes and understand their feelings is key to forming strong connections. Empathy makes you more approachable, likable, and attractive to others.
- Communication Skills: Effective communication is crucial in all relationships. Learn how to express your thoughts clearly, listen actively, and respond empathetically. Good communication shows that you value others and can handle tough conversations with respect and care.
- Emotional Resilience: Emotionally resilient men can navigate life’s challenges without letting stress or adversity break them down. Building emotional resilience involves practicing mindfulness, maintaining a strong support network, and learning from setbacks rather than being defeated by them.
6. Cultivate a Positive Lifestyle
Your lifestyle choices reflect who you are. Being proactive about your health, interests, and goals can make you more attractive.
- Stay Active and Adventurous: An active lifestyle signals energy and vitality. Whether it's hiking, biking, or trying new sports, staying physically active shows that you’re engaged with life. It also gives you more opportunities to meet people and develop new interests.
- Hobbies and Interests: Cultivating diverse hobbies makes you a more interesting person. Whether it’s learning a new language, playing an instrument, or mastering a craft, your passions and interests reflect depth and curiosity, which are attractive traits.
- Personal Development: Always seek to improve yourself. This can mean setting new goals, learning new skills, or expanding your knowledge. A man who is constantly evolving is more appealing than someone who is stagnant.
- Financial Responsibility: Being financially responsible shows maturity and stability. This doesn’t mean you need to be rich, but managing your money wisely and planning for the future demonstrates that you are responsible and can handle life’s demands.
7. Social Skills: Be Charismatic and Approachable
Charisma isn’t something you’re born with; it can be developed. Enhancing your social skills makes you more likable and magnetic in social situations.
- Be a Good Listener: Active listening is one of the most underrated social skills. When you truly listen to someone, they feel valued, and this connection naturally enhances your attractiveness. Focus on what the other person is saying, ask meaningful questions, and engage in the conversation.
- Develop a Sense of Humor: A good sense of humor is incredibly attractive. It shows that you don’t take life too seriously and can handle challenges with grace. Practice finding humor in everyday situations and learn to laugh at yourself when appropriate.
- Be Kind and Respectful: Kindness is universally attractive. Treat others with respect, show compassion, and help when you can. Acts of kindness make you approachable and show that you’re a caring, considerate person.
- Build a Strong Social Circle: Surround yourself with positive, supportive people. Your social circle reflects your character, and having strong friendships can also boost your confidence and give you a solid support system.
8. Mindset and Mental Health: Inner Well-Being Reflects Outer Attractiveness
Your mental health and mindset greatly influence how others perceive you. A healthy, balanced mindset makes you more grounded, calm, and attractive.
- Manage Stress: Chronic stress not only impacts your mental health but can also take a toll on your physical appearance. Practice stress management techniques like meditation, exercise, and deep breathing to keep yourself calm and collected.
- Stay Optimistic: A positive attitude is contagious. People are naturally drawn to individuals who maintain an optimistic outlook on life, even in challenging situations. Optimism helps you navigate life’s ups and downs with grace and resilience.
- Self-Reflection and Growth: Take time to reflect on your life, your goals, and your relationships. Regular self-reflection allows you to make improvements and stay aligned with your values. This self-awareness makes you more grounded, confident, and attractive.
- Mental Health Support: If you’re struggling with mental health issues, don’t hesitate to seek help. Therapy, counseling, and other mental health resources are available to help you navigate tough times. Taking care of your mental health is an important part of becoming the best version of yourself.
Conclusion
Becoming a more attractive man is not just about changing your physical appearance; it’s about embracing a holistic approach to self-improvement. From grooming and fitness to confidence, emotional intelligence, and social skills, attractiveness is built on a foundation of self-care, self-awareness, and self-respect. When you focus on becoming the best version of yourself, you naturally become more attractive to others.
Remember, attractiveness is subjective, and what matters most is that you feel good about yourself. Confidence, kindness, and authenticity will always be your most attractive qualities. By working on these areas, you’ll not only enhance your outward appearance but also radiate an inner attractiveness that will draw people toward you.
“Motivation is what gets you started. Habit is what keeps you going.” – Jim Ryun
If you would like more information about the 2024, please send us an email.
Written by Fitness Goal 4U
Smart Fitness Goals - Achieve Health with Simple Steps
Smart fitness goals focus on being Specific, Measurable, Achievable, Relevant, and Time-bound. They help you create a clear path to success, stay motivated, and track progress. Whether its weight loss, strength building, or improved endurance, smart goals guide your fitness journey, ensuring steady growth and sustainable results tailored to your needs.
“Confidence comes from discipline and training.” – Robert Kiyosaki
Attractiveness isn’t just about physical appearance; it’s a combination of various factors including personality, behavior, and habits. Whether you want to enhance your attractiveness for professional, social, or personal reasons, there are simple, effective strategies anyone can adopt. Here's how you can instantly boost your attractiveness, no matter where you are or who you are.
1. Embrace Confidence
Confidence is magnetic. People are naturally drawn to those who are sure of themselves and carry a positive attitude. To build and project confidence:
- Maintain Eye Contact: When you speak with someone, maintain eye contact. It shows you’re engaged, interested, and self-assured.
- Stand Tall: Your posture says a lot about your confidence level. Stand with your shoulders back and your head held high.
- Practice Self-Affirmations: Tell yourself that you are capable and valuable. Self-affirmations can shift your mindset and help you present yourself more confidently.
2. Smile More Often
Smiling is one of the simplest ways to become instantly more attractive. A genuine smile not only enhances your facial features but also makes you appear approachable and friendly. When you smile:
- Activate Positivity: Smiling releases endorphins, making you feel happier and more relaxed.
- Build Connections: People are more likely to engage with someone who appears warm and welcoming.
- Improve Your Mood: Even when you don’t feel like smiling, practicing it can actually elevate your mood and positively influence those around you.
3. Improve Personal Hygiene and Grooming
Good hygiene and grooming are essential for making a lasting impression. It’s not about being flashy; it’s about maintaining a clean and fresh appearance.
- Dress Neatly: Wear clothes that are clean, fit well, and complement your body type.
- Practice Good Oral Hygiene: A bright smile with fresh breath is a major boost to your attractiveness.
- Maintain a Skincare Routine: Clear, healthy skin can enhance your confidence and appearance, so invest in a basic skincare routine that suits your skin type.
4. Develop a Sense of Humor
A sense of humor is an incredibly attractive trait. It shows that you are fun, approachable, and able to handle life’s challenges with a positive attitude. To develop your sense of humor:
- Be Playful: Don’t take life too seriously; learn to laugh at yourself and find joy in small moments.
- Engage in Lighthearted Conversations: Use humor to break the ice or ease tense situations. This not only makes you more attractive but also helps others feel comfortable around you.
- Watch and Learn: If you’re not naturally funny, watch comedians or read humorous books to understand the art of humor.
5. Be a Good Listener
Listening is a powerful way to connect with others and become more attractive in social settings. When you listen actively:
- Show Genuine Interest: People love to talk about themselves, and when you show that you’re interested in their stories, they feel valued and appreciated.
- Practice Empathy: Understand and validate the emotions and thoughts of others. This shows that you’re caring and supportive, qualities that are universally attractive.
- Engage with Open Body Language: Nod, maintain eye contact, and lean slightly forward to show that you are fully present in the conversation.
6. Cultivate a Positive Attitude
A positive outlook on life is infectious. When you radiate positivity, people are naturally drawn to you. To develop a positive attitude:
- Focus on Gratitude: Start your day by listing things you are grateful for. This simple practice can shift your mindset and set a positive tone.
- Surround Yourself with Positivity: Engage with people and activities that uplift you and eliminate negative influences that drain your energy.
- Practice Kindness: A simple act of kindness, such as complimenting someone or helping them out, makes you more attractive. It shows that you are compassionate and genuine.
7. Maintain a Healthy Lifestyle
Taking care of your body not only improves your physical appearance but also boosts your overall confidence and energy levels.
- Exercise Regularly: Regular physical activity improves your physique, releases endorphins, and enhances your mood, all of which contribute to a more attractive presence.
- Eat a Balanced Diet: Proper nutrition improves your skin, hair, and overall health, giving you a more vibrant appearance.
- Stay Hydrated: Drinking enough water keeps your skin glowing and helps maintain your energy levels throughout the day.
8. Dress to Impress
Your style plays a significant role in how you are perceived. Dressing well doesn’t mean following the latest trends but rather wearing clothes that suit your personality and body type.
- Wear Clothes That Fit: Ill-fitting clothes can make you look unkempt. Invest in clothes that highlight your best features.
- Choose Colors Wisely: Some colors can enhance your skin tone, eye color, and overall appearance. Experiment with different shades to find the ones that suit you best.
- Accessorize Thoughtfully: Accessories can add a touch of elegance to your look. Whether it's a watch, a necklace, or a scarf, choose items that complement your outfit without being too flashy.
9. Work on Your Body Language
Body language is a non-verbal cue that significantly influences how others perceive you. Positive body language can make you appear more attractive instantly.
- Keep an Open Posture: Avoid crossing your arms or slouching. Open gestures, such as keeping your arms relaxed by your side, make you look approachable.
- Use Subtle Gestures: Nodding when someone speaks shows that you’re engaged. Mirroring the other person’s body language can also create a sense of connection and trust.
- Be Mindful of Your Space: Respecting personal space is crucial. Stand at an appropriate distance, and lean in only when it feels comfortable for both parties.
10. Enhance Your Communication Skills
Being a good communicator makes you instantly attractive. The ability to express your thoughts clearly and engage in meaningful conversations shows intelligence and charisma.
- Practice Active Listening: Focus on understanding rather than just responding. Reflect on what the other person says before giving your opinion.
- Be Articulate: Work on expanding your vocabulary and speaking with clarity. Avoid using filler words like “um” and “like” frequently.
- Use Compliments Effectively: Complimenting someone sincerely can make you stand out. People appreciate genuine, specific compliments that show you notice their efforts or traits.
11. Stay True to Yourself
Authenticity is incredibly attractive. People are drawn to those who are comfortable in their own skin and don’t feel the need to pretend or impress others.
- Embrace Your Uniqueness: Instead of hiding your quirks, embrace them. They make you who you are, and authenticity builds genuine connections.
- Be Honest About Your Opinions: While it’s important to be respectful, sharing your honest thoughts shows confidence and integrity.
- Avoid People-Pleasing: You don’t need to agree with everyone to be liked. Being true to your beliefs and values will attract people who appreciate the real you.
12. Stay Curious and Educate Yourself
Intellectual curiosity is another attractive quality. People who are knowledgeable and passionate about learning tend to engage others effortlessly.
- Read Widely: Explore topics outside of your field to become well-rounded and engage in diverse conversations.
- Ask Thought-Provoking Questions: Instead of engaging in small talk, ask questions that reveal someone’s interests, passions, and thoughts.
- Stay Informed: Keeping up with current events, trends, or cultural shifts shows that you are aware and capable of engaging in meaningful discussions.
13. Take Care of Your Mental Health
Mental well-being is just as important as physical health when it comes to attractiveness. When you feel good on the inside, it reflects on the outside.
- Practice Mindfulness and Meditation: These practices can reduce stress, improve mood, and make you more present and engaged in conversations.
- Seek Support When Needed: If you’re struggling, don’t hesitate to seek professional help or talk to someone you trust. Taking care of your mental health shows strength and responsibility.
- Set Boundaries: Protect your energy and mental space by setting healthy boundaries. This not only boosts your self-respect but also shows others that you value yourself.
14. Stay Active on Social Media Wisely
Social media can be a powerful tool for enhancing your attractiveness, but only when used mindfully.
- Share Positively: Focus on sharing positive, inspiring content that reflects your interests and values.
- Engage Authentically: Instead of trying to portray a perfect image, be genuine in your interactions. Respond thoughtfully and show appreciation for others.
- Limit Overuse: Spending too much time on social media can negatively affect your mental health and self-image. Balance your online presence with real-world interactions.
15. Be Ambitious and Passionate
Ambition and passion are incredibly attractive traits. People are drawn to those who have goals and are passionate about their pursuits.
- Set Personal Goals: Whether it’s a career milestone, fitness achievement, or creative endeavor, setting goals keeps you motivated and attractive.
- Share Your Passions: When you talk about things you love, your enthusiasm becomes contagious and draws people in.
- Support Others’ Ambitions: Being supportive of others’ goals shows that you are confident in your own abilities and genuinely care about others’ success.
Conclusion
Attractiveness isn’t about fitting a specific mold; it’s about highlighting the best version of yourself. By embracing confidence, maintaining good hygiene, cultivating a positive attitude, and staying true to yourself, you can become instantly more attractive. Remember, the most attractive people are those who are comfortable in their own skin, radiate positivity, and connect with others genuinely. Implement these tips, and watch how your attractiveness transforms not only your life but also the lives of those around you.
“Motivation is what gets you started. Habit is what keeps you going.” – Jim Ryun
If you would like more information about the 2024, please send us an email.
Written by Fitness Goal 4U
Smart Fitness Goals - Achieve Health with Simple Steps
Smart fitness goals focus on being Specific, Measurable, Achievable, Relevant, and Time-bound. They help you create a clear path to success, stay motivated, and track progress. Whether its weight loss, strength building, or improved endurance, smart goals guide your fitness journey, ensuring steady growth and sustainable results tailored to your needs.
“Confidence comes from discipline and training.” – Robert Kiyosaki
Aging is an inevitable part of life, but the way our brains age can vary significantly based on lifestyle choices and habits. Maintaining a youthful brain is not just about preventing cognitive decline; it's about fostering mental agility, enhancing memory, and ensuring overall neurological health. This comprehensive guide explores various strategies to keep your brain young, focusing on diet, physical exercise, mental activities, social engagement, sleep, stress management, and more.
Understanding Brain Aging
Before delving into strategies to keep the brain young, it's essential to understand how the brain ages. Brain aging involves both structural and functional changes, including:
- Neuronal Loss: A gradual loss of neurons can lead to reduced cognitive functions.
- Synaptic Decline: Connections between neurons weaken, affecting communication within the brain.
- Reduced Neuroplasticity: The brain's ability to form new connections diminishes, impacting learning and memory.
- Decreased Blood Flow: Reduced circulation can affect brain metabolism and function.
- Accumulation of Waste Products: Toxins and metabolic byproducts can accumulate, potentially leading to neurodegenerative diseases.
While some of these changes are natural, various factors can accelerate or slow down brain aging. Genetics play a role, but lifestyle choices significantly influence the brain's longevity and health.
Balanced Diet for Brain Health
Nutrition is foundational to brain health. A balanced diet provides essential nutrients that support brain structure, function, and repair mechanisms.
Nutrient-Rich Foods
1. Omega-3 Fatty Acids: Found in fatty fish (like salmon, mackerel, and sardines), flaxseeds, and walnuts, omega-3s are crucial for maintaining neuronal membranes and promoting anti-inflammatory processes.
2. Antioxidant-Rich Foods: Berries, dark chocolate, and green leafy vegetables like spinach and kale are rich in antioxidants, which combat oxidative stress—a significant factor in brain aging.
3. Whole Grains: Foods like oats, quinoa, and brown rice provide glucose, the brain's primary energy source, ensuring sustained cognitive function.
4. Vitamins and Minerals:
- Vitamin E: Protects brain cells from oxidative damage. Sources include nuts, seeds, and vegetable oils.
- B Vitamins: Important for energy production and neurotransmitter synthesis. Found in whole grains, meat, eggs, and dairy products.
- Magnesium and Zinc: Support neurotransmission and neuronal health. Sources include nuts, seeds, legumes, and whole grains.
5. Polyphenols: Present in tea, coffee, red wine (in moderation), and various fruits, polyphenols have neuroprotective properties and support cognitive function.
Hydration
Dehydration can impair cognitive functions such as memory, attention, and processing speed. Ensuring adequate water intake is vital for maintaining optimal brain function. Aim for at least eight glasses of water daily, adjusting based on activity level and climate.
Physical Exercise and Brain Function
Regular physical activity is one of the most effective ways to keep the brain young. Exercise promotes neurogenesis (the formation of new neurons), enhances blood flow, and reduces inflammation.
Benefits of Physical Exercise:
- Increased Blood Flow: Enhances the delivery of oxygen and nutrients to the brain.
- Neurogenesis: Particularly in the hippocampus, which is crucial for memory formation.
- Release of Neurotrophic Factors: Such as BDNF (Brain-Derived Neurotrophic Factor), which supports neuron growth and survival.
- Improved Mood and Reduced Stress: Exercise stimulates the release of endorphins, reducing stress and anxiety levels.
Types of Beneficial Exercises:
- Aerobic Exercises: Activities like walking, jogging, swimming, and cycling improve cardiovascular health and promote overall brain health.
- Strength Training: Helps in maintaining muscle mass and has been linked to improved cognitive functions.
- Flexibility and Balance Exercises: Yoga and tai chi enhance coordination and reduce the risk of falls, indirectly supporting brain health by promoting a healthy lifestyle.
- High-Intensity Interval Training (HIIT): Short bursts of intense activity can boost cognitive functions and brain plasticity.
Mental Stimulation and Cognitive Training
Engaging in mentally stimulating activities keeps the brain active and promotes cognitive resilience.
Strategies for Mental Stimulation:
- Learning New Skills: Taking up a new language, musical instrument, or hobby challenges the brain and fosters neuroplasticity.
- Puzzles and Games: Activities like crossword puzzles, Sudoku, and strategy games stimulate problem-solving and memory.
- Reading and Writing: Regular reading and creative writing exercises enhance comprehension, vocabulary, and critical thinking.
- Educational Courses: Enrolling in courses or attending workshops can provide structured mental challenges and continuous learning.
- Mindfulness and Meditation: Practices that enhance focus and attention can improve cognitive flexibility and executive functions.
Cognitive Training Programs:
There are numerous brain-training programs and apps designed to enhance specific cognitive skills. While their effectiveness can vary, incorporating structured cognitive exercises into your routine can complement other brain-healthy strategies.
Social Engagement and Emotional Well-being
Human beings are inherently social creatures. Maintaining social connections and emotional well-being plays a critical role in brain health.
Importance of Social Engagement:
- Cognitive Stimulation: Conversations and social interactions require quick thinking, active listening, and emotional intelligence, all of which stimulate cognitive functions.
- Emotional Support: Strong social networks provide emotional support, reducing stress and its negative impact on the brain.
- Reduced Risk of Depression and Anxiety: Social engagement is linked to lower rates of mental health issues, which can otherwise contribute to cognitive decline.
Ways to Enhance Social Engagement:
- Join Clubs or Groups: Participating in community groups, hobby clubs, or volunteer organizations fosters social connections.
- Maintain Relationships: Regularly connecting with family and friends through meetings, calls, or digital communication.
- Participate in Group Activities: Engaging in team sports, group exercises, or collaborative projects.
- Attend Social Events: Going to gatherings, workshops, or cultural events to meet new people and engage in diverse interactions.
Emotional Well-being Practices:
- Mindfulness Meditation: Enhances emotional regulation and reduces stress.
- Therapy or Counseling: Professional support can help manage emotional challenges and promote mental health.
- Expressive Activities: Art, music, or journaling can help process emotions and maintain psychological well-being.
Quality Sleep for Brain Restoration
Sleep is a critical period for brain restoration, memory consolidation, and toxin clearance.
Importance of Sleep:
- Memory Consolidation: During sleep, the brain processes and consolidates memories and learning from the day.
- Toxin Clearance: The glymphatic system becomes more active during sleep, removing waste products and toxins that accumulate during waking hours.
- Emotional Regulation: Adequate sleep supports emotional stability and reduces susceptibility to stress.
Tips for Better Sleep:
- Establish a Routine: Going to bed and waking up at the same time daily regulates the body's internal clock.
- Create a Restful Environment: A dark, quiet, and cool bedroom promotes better sleep quality.
- Limit Screen Time Before Bed: Reducing exposure to blue light from devices helps in melatonin production and better sleep.
- Avoid Stimulants: Limiting caffeine and nicotine intake, especially in the hours leading up to bedtime.
- Relaxation Techniques: Practices like deep breathing, meditation, or reading can ease the transition to sleep.
Stress Management Techniques
Chronic stress can have detrimental effects on the brain, including impaired memory, reduced neurogenesis, and increased risk of neurodegenerative diseases.
Effects of Stress on the Brain:
- Elevated Cortisol Levels: Prolonged stress leads to high cortisol, which can damage the hippocampus and prefrontal cortex.
- Neuroinflammation: Stress triggers inflammatory responses that can harm brain cells.
- Impaired Cognitive Function: Chronic stress affects attention, decision-making, and memory.
Effective Stress Management Strategies:
- Mindfulness and Meditation: Regular practice can reduce stress levels and enhance cognitive functions.
- Physical Activity: Exercise is a natural stress reliever, releasing endorphins that improve mood.
- Time Management: Organizing tasks and setting priorities can reduce feelings of overwhelm.
- Social Support: Sharing concerns with friends or family can alleviate stress.
- Hobbies and Leisure Activities: Engaging in enjoyable activities provides a break from stressors.
- Professional Help: Seeking therapy or counseling can provide strategies to cope with chronic stress.
Avoiding Toxins and Protecting Your Brain
Exposure to certain toxins can accelerate brain aging and increase the risk of neurological disorders.
Common Brain Toxins:
- Heavy Metals: Lead, mercury, and aluminum can impair cognitive functions and contribute to neurodegeneration.
- Air Pollutants: Fine particulate matter and other pollutants can affect brain health.
- Substance Abuse: Excessive alcohol, recreational drugs, and certain medications can damage brain cells.
- Environmental Toxins: Pesticides and industrial chemicals can have neurotoxic effects.
Protective Measures:
- Healthy Environment: Ensuring clean air and minimizing exposure to pollutants.
- Safe Practices: Using protective gear when handling chemicals and avoiding contaminated water or food.
- Limiting Substance Intake: Moderating alcohol consumption and avoiding recreational drug use.
- Regular Detoxification: Supporting the body's natural detox processes through a healthy diet and hydration.
Lifelong Learning and Neuroplasticity
The brain's ability to adapt and reorganize itself, known as neuroplasticity, is crucial for maintaining cognitive functions.
Enhancing Neuroplasticity:
- Continuous Learning: Engaging in educational activities stimulates neural connections.
- Variety of Experiences: Exposing the brain to new environments and challenges fosters adaptability.
- Physical Exercise: Promotes the release of neurotrophic factors that support neuroplasticity.
- Adequate Nutrition: Essential nutrients support the brain's structural and functional integrity.
- Mental Challenges: Regularly challenging the brain with puzzles, games, or new skills enhances plasticity.
Benefits of Neuroplasticity:
- Recovery from Brain Injuries: Facilitates compensation for damaged areas.
- Adaptation to New Situations: Enhances problem-solving and adaptability.
- Maintenance of Cognitive Functions: Helps in preserving memory, attention, and other cognitive abilities.
Regular Health Check-ups
Maintaining overall health is intrinsically linked to brain health. Regular health check-ups can identify and manage conditions that may affect cognitive functions.
Important Health Aspects to Monitor:
- Cardiovascular Health: Hypertension, cholesterol levels, and heart health directly impact brain blood flow.
- Diabetes Management: Poorly managed diabetes can lead to cognitive decline.
- Thyroid Function: Imbalances can affect mood, memory, and cognitive functions.
- Mental Health: Regular screenings for depression, anxiety, and other mental health issues.
- Neurological Assessments: Monitoring for signs of neurodegenerative diseases or other neurological conditions.
Preventative Measures:
- Vaccinations: Protect against infections that can affect the brain.
- Healthy Lifestyle Choices: Diet, exercise, and avoiding toxins support overall health.
- Medication Management: Proper use of medications to prevent adverse effects on the brain.
Conclusion
Keeping your brain young is a multifaceted endeavor that involves nurturing your body, mind, and social connections. By adopting a balanced diet rich in essential nutrients, engaging in regular physical and mental exercises, maintaining strong social ties, ensuring quality sleep, managing stress effectively, avoiding harmful toxins, embracing lifelong learning, and staying on top of your overall health, you can significantly enhance your brain's longevity and functionality.
Remember, it's never too late to start implementing these strategies. Small, consistent changes can lead to substantial improvements in your brain health, ensuring that you remain mentally sharp, resilient, and vibrant throughout your life.
“Motivation is what gets you started. Habit is what keeps you going.” – Jim Ryun
If you would like more information about the 2024, please send us an email.
Written by Fitness Goal 4U
Smart Fitness Goals - Achieve Health with Simple Steps
Smart fitness goals focus on being Specific, Measurable, Achievable, Relevant, and Time-bound. They help you create a clear path to success, stay motivated, and track progress. Whether its weight loss, strength building, or improved endurance, smart goals guide your fitness journey, ensuring steady growth and sustainable results tailored to your needs.
“Confidence comes from discipline and training.” – Robert Kiyosaki
Maintaining a healthy heart is crucial for overall well-being and longevity. Heart disease remains one of the leading causes of death worldwide, but the good news is that many heart conditions are preventable through lifestyle changes and proactive health management. This comprehensive guide explores various strategies to keep your heart healthy, including diet, exercise, stress management, and regular medical checkups.
Understanding Heart Health
Before diving into the ways to maintain a healthy heart, it's essential to understand what heart health entails. The heart is a muscular organ responsible for pumping blood throughout the body, delivering oxygen and nutrients to tissues, and removing waste products. A healthy heart beats efficiently without undue strain, maintaining optimal blood flow and pressure.
Importance of Heart Health
- Longevity: A healthy heart reduces the risk of life-threatening conditions like heart attacks and strokes.
- Quality of Life: Good heart health enhances energy levels, physical fitness, and mental well-being.
- Preventive Care: Proactive heart health management can prevent the onset of chronic diseases such as hypertension, diabetes, and obesity.
1. Adopt a Heart-Healthy Diet
Your diet plays a pivotal role in maintaining heart health. Consuming the right types of food can help manage weight, lower cholesterol levels, and reduce blood pressure.
Key Components of a Heart-Healthy Diet
a. Fruits and Vegetables
- Benefits: Rich in vitamins, minerals, antioxidants, and fiber.
- Recommendations: Aim for at least five servings of fruits and vegetables daily. Incorporate a variety of colors to ensure a range of nutrients.
b. Whole Grains
- Benefits: High in fiber, which helps lower cholesterol and regulate blood sugar levels.
- Recommendations: Choose whole wheat, brown rice, oats, quinoa, and barley over refined grains.
c. Lean Proteins
- Benefits: Provide essential amino acids without excessive saturated fats.
- Recommendations: Opt for poultry, fish, legumes, nuts, and seeds. Incorporate fatty fish like salmon and merring rich in omega-3 fatty acids.
d. Healthy Fats
- Benefits: Support cell function and reduce inflammation.
- Recommendations: Use olive oil, avocado, and nuts instead of saturated and trans fats found in fried foods and processed snacks.
e. Low-Fat Dairy
- Benefits: Source of calcium and vitamin D without high saturated fat content.
- Recommendations: Choose skim milk, low-fat yogurt, and reduced-fat cheese.
Foods to Limit or Avoid
- Saturated and Trans Fats: Found in red meat, butter, cheese, and processed foods. They raise LDL cholesterol levels.
- Salt (Sodium): Excessive intake can lead to high blood pressure. Limit processed and packaged foods.
- Added Sugars: Contribute to weight gain and increased risk of heart disease. Avoid sugary beverages and snacks.
- Refined Carbohydrates: White bread, pastries, and other refined grains can spike blood sugar levels and contribute to obesity.
Sample Heart-Healthy Meal Plan
Breakfast:
- Oatmeal topped with fresh berries and a sprinkle of nuts.
- A glass of low-fat milk or a fortified plant-based alternative.
Lunch:
- Grilled chicken salad with a variety of vegetables, dressed with olive oil and lemon juice.
- A whole-grain roll on the side.
Snack:
- Sliced apple with almond butter.
Dinner:
- Baked salmon with quinoa and steamed broccoli.
- A side of mixed greens with a vinaigrette dressing.
Dessert:
- Fresh fruit salad or a small portion of dark chocolate.
2. Engage in Regular Physical Activity
Exercise is a cornerstone of heart health. It strengthens the heart muscle, improves blood circulation, helps maintain a healthy weight, and reduces stress.
Benefits of Regular Exercise
- Strengthens the Heart: Enhances the heart's ability to pump blood efficiently.
- Lowers Blood Pressure: Regular activity helps reduce hypertension.
- Improves Cholesterol Levels: Increases HDL (good) cholesterol and decreases LDL (bad) cholesterol.
- Weight Management: Helps burn calories and maintain a healthy body weight.
- Reduces Stress: Physical activity releases endorphins that improve mood and reduce anxiety.
Recommended Types of Exercise
a. Aerobic Exercises
- Examples: Walking, jogging, cycling, swimming, dancing.
- Frequency: At least 150 minutes of moderate-intensity or 75 minutes of vigorous-intensity aerobic activity per week.
- Tips: Incorporate activities you enjoy to stay motivated. Break workouts into manageable sessions if needed.
b. Strength Training
- Benefits: Builds muscle mass, which supports metabolism and bone health.
- Frequency: At least two days per week, targeting all major muscle groups.
- Examples: Weightlifting, resistance band exercises, bodyweight exercises like push-ups and squats.
c. Flexibility and Balance Exercises
- Benefits: Improve range of motion, prevent injuries, and enhance overall mobility.
- Examples: Yoga, Pilates, tai chi.
- Frequency: Incorporate flexibility exercises into your routine several times a week.
Creating an Exercise Routine
- Set Realistic Goals: Start with achievable targets and gradually increase intensity and duration.
- Stay Consistent: Consistency is key to reaping long-term benefits.
- Listen to Your Body: Avoid overexertion and allow time for recovery.
- Mix It Up: Combine different types of exercises to keep the routine interesting and well-rounded.
3. Maintain a Healthy Weight
Being overweight or obese increases the risk of heart disease, hypertension, diabetes, and other health issues. Achieving and maintaining a healthy weight is vital for heart health.
Strategies for Weight Management
a. Balanced Diet
- Caloric Intake: Ensure you consume the right number of calories to maintain or lose weight.
- Portion Control: Be mindful of portion sizes to avoid overeating.
- Nutrient-Dense Foods: Focus on foods that provide essential nutrients without excessive calories.
b. Regular Physical Activity
- Calorie Burn: Exercise helps burn calories and supports weight loss efforts.
- Muscle Building: Strength training increases muscle mass, which boosts metabolism.
c. Behavioral Changes
- Mindful Eating: Pay attention to hunger and fullness cues.
- Avoid Emotional Eating: Find alternative ways to cope with stress and emotions.
- Sleep and Stress Management: Poor sleep and high stress can contribute to weight gain.
Setting Realistic Goals
- Gradual Weight Loss: Aim for a steady loss of 1-2 pounds per week.
- Sustainable Habits: Focus on long-term lifestyle changes rather than quick fixes.
- Professional Guidance: Consult a healthcare provider or nutritionist for personalized advice.
4. Quit Smoking and Limit Alcohol Consumption
Tobacco and excessive alcohol intake are significant risk factors for heart disease. Quitting smoking and moderating alcohol consumption can dramatically improve heart health.
Smoking and Heart Health
- Impact: Smoking damages blood vessels, increases blood pressure, and reduces oxygen supply to the heart.
- Risks: Increases the likelihood of coronary artery disease, heart attacks, and strokes.
- Benefits of Quitting: Improved circulation, lower heart rate, and reduced risk of heart disease.
Tips to Quit Smoking
- Set a Quit Date: Choose a specific day to stop smoking.
- Seek Support: Join a support group or seek professional counseling.
- Use Nicotine Replacement: Consider patches, gums, or medications to manage withdrawal symptoms.
- Avoid Triggers: Identify and steer clear of situations that tempt you to smoke.
Alcohol Consumption and Heart Health
- Moderation is Key: Excessive alcohol can lead to high blood pressure, heart failure, and stroke.
- Recommended Limits: Up to one drink per day for women and up to two drinks per day for men.
- Healthier Choices: Opt for beverages with lower alcohol content and avoid binge drinking.
5. Manage Stress Effectively
Chronic stress can negatively impact heart health by increasing blood pressure and causing unhealthy behaviors like overeating or smoking.
Techniques for Stress Management
a. Mindfulness and Meditation
- Benefits: Reduce stress, improve mental clarity, and lower blood pressure.
- Practices: Daily meditation, deep-breathing exercises, mindfulness-based stress reduction (MBSR).
b. Physical Activity
- Benefits: Releases endorphins that improve mood and reduce stress.
- Activities: Engage in regular exercise, yoga, or tai chi.
c. Time Management
- Benefits: Reduces feelings of being overwhelmed and enhances productivity.
- Strategies: Prioritize tasks, set realistic goals, and take regular breaks.
d. Social Support
- Benefits: Sharing feelings with friends and family can alleviate stress.
- Actions: Maintain strong relationships, join support groups, and seek professional counseling if needed.
6. Get Regular Health Screenings
- Regular medical checkups are essential for early detection and management of risk factors associated with heart disease.
- Important Screenings for Heart Health
a. Blood Pressure Monitoring
- Importance: High blood pressure can damage arteries and the heart.
- Frequency: At least once every two years if normal, more often if elevated or high.
b. Cholesterol Levels
- Importance: High LDL cholesterol can lead to plaque buildup in arteries.
- Frequency: Every four to six years for adults over 20, more frequently if at risk.
c. Blood Sugar Levels
- Importance: Diabetes increases the risk of heart disease.
- Frequency: At least once every three years starting at age 45, or earlier if at risk.
d. Body Mass Index (BMI) and Waist Circumference
- Importance: Helps assess obesity and related health risks.
- Frequency: During regular health checkups.
e. Electrocardiogram (ECG)
- Importance: Detects irregular heart rhythms and other heart conditions.
- Frequency: As recommended by a healthcare provider based on risk factors.
Understanding Your Risk Factors
- Non-Modifiable: Age, gender, family history, and genetics.
- Modifiable: Lifestyle choices such as diet, exercise, smoking, and alcohol consumption.
7. Ensure Adequate Sleep
Quality sleep is vital for heart health. Poor sleep patterns can contribute to high blood pressure, obesity, and stress, all of which increase the risk of heart disease.
Benefits of Good Sleep
- Blood Pressure Regulation: Helps maintain healthy blood pressure levels.
- Stress Reduction: Enhances emotional well-being and reduces stress hormones.
- Weight Management: Prevents overeating and supports metabolism.
Tips for Better Sleep
- Maintain a Regular Sleep Schedule: Go to bed and wake up at the same time every day.
- Create a Comfortable Sleep Environment: Keep the bedroom cool, dark, and quiet.
- Limit Screen Time Before Bed: Reduce exposure to blue light from devices at least an hour before bedtime.
- Avoid Stimulants: Limit caffeine and nicotine intake in the hours leading up to sleep.
- Establish a Relaxing Routine: Engage in calming activities such as reading or taking a warm bath before bed.
8. Limit Exposure to Environmental Toxins
Exposure to certain environmental toxins can negatively impact heart health. Reducing exposure to these substances can help protect your cardiovascular system.
Common Environmental Toxins
- Air Pollution: Particulate matter and pollutants can increase the risk of heart disease.
- Heavy Metals: Exposure to lead, mercury, and arsenic can harm the heart.
- Chemicals: Pesticides, solvents, and other industrial chemicals may contribute to heart problems.
Tips to Reduce Exposure
- Improve Indoor Air Quality: Use air purifiers, ventilate rooms regularly, and reduce the use of indoor pollutants.
- Use Protective Gear: When handling chemicals or in polluted environments, use appropriate protective equipment.
- Choose Natural Products: Opt for natural cleaning and personal care products to minimize exposure to harmful chemicals.
- Stay Informed: Be aware of local pollution levels and avoid outdoor activities during high pollution periods.
9. Foster a Positive Mindset and Emotional Well-being
Emotional health is closely linked to heart health. Positive emotions and mental resilience can reduce stress and promote healthy behaviors.
Strategies for Emotional Well-being
a. Cultivate Gratitude
- Benefits: Enhances mood and reduces stress.
- Practices: Keep a gratitude journal, regularly acknowledge what you're thankful for.
b. Engage in Hobbies
- Benefits: Provides relaxation and a sense of accomplishment.
- Suggestions: Pursue activities you enjoy, such as reading, gardening, painting, or playing a musical instrument.
c. Seek Professional Help
- Benefits: Address mental health issues like depression and anxiety that can impact heart health.
- Actions: Consult a therapist or counselor if you're experiencing persistent emotional challenges.
d. Build Strong Relationships
- Benefits: Provides support, reduces stress, and enhances overall happiness.
- Actions: Spend quality time with family and friends, join community groups or clubs.
10. Stay Informed and Educated
Keeping yourself informed about heart health can empower you to make better lifestyle choices and recognize early signs of potential issues.
Ways to Stay Informed
- Read Reputable Sources: Follow guidelines from organizations like the American Heart Association and the World Health Organization.
- Attend Health Workshops: Participate in seminars or workshops focused on heart health and wellness.
- Consult Healthcare Professionals: Regularly discuss your heart health with your doctor or a cardiologist.
11. Incorporate Antioxidant-Rich Foods
Antioxidants help protect the body from oxidative stress, which can damage heart tissues and lead to inflammation.
Foods High in Antioxidants
- Berries: Blueberries, strawberries, raspberries, and blackberries.
- Dark Chocolate: Contains flavonoids that improve heart health.
- Nuts: Almonds, walnuts, and pecans are rich in antioxidants and healthy fats.
- Green Tea: Packed with catechins that support cardiovascular health.
- Leafy Greens: Spinach, kale, and broccoli are excellent sources of antioxidants and other heart-healthy nutrients.
How to Incorporate Them
- Snacks: Choose berries or a handful of nuts as healthy snacks.
- Meals: Add spinach or kale to smoothies, salads, and soups.
- Beverages: Replace sugary drinks with green tea or herbal teas.
12. Limit Intake of Processed and Red Meats
Processed and red meats are associated with an increased risk of heart disease due to high levels of saturated fats, cholesterol, and preservatives.
Healthier Alternatives
- Fish and Seafood: Rich in omega-3 fatty acids that support heart health.
- Poultry: Opt for skinless chicken or turkey.
- Plant-Based Proteins: Incorporate beans, lentils, tofu, and tempeh into your diet.
Tips for Reducing Consumption
- Plan Meals Ahead: Include more plant-based and lean protein sources in your meal planning.
- Experiment with Recipes: Try new recipes that feature healthier protein alternatives.
- Read Labels: Be mindful of processed meat products and limit their intake.
13. Monitor Your Heart Rate
Keeping track of your heart rate can help you understand how well your heart is functioning and detect potential issues early.
How to Measure Your Heart Rate
- Resting Heart Rate: Measure your pulse first thing in the morning before getting out of bed.
- Target Heart Rate: During exercise, aim for 50-85% of your maximum heart rate, which can be estimated as 220 minus your age.
Why It Matters
- Early Detection: Abnormal heart rates can indicate underlying heart conditions.
- Exercise Efficiency: Helps ensure you're exercising within a safe and effective range.
- Overall Health Indicator: Consistently high or low heart rates may require medical attention.
14. Practice Good Oral Hygiene
Recent studies suggest a link between oral health and heart disease. Poor oral hygiene can lead to gum disease, which may increase the risk of heart conditions.
Tips for Maintaining Oral Health
- Brush Regularly: Brush at least twice a day with fluoride toothpaste.
- Floss Daily: Remove plaque and food particles from between teeth.
- Regular Dental Checkups: Visit the dentist at least twice a year for cleanings and examinations.
- Healthy Diet: Limit sugary foods and beverages that can contribute to tooth decay.
- Avoid Tobacco: Smoking and other tobacco use can harm oral health and increase heart disease risk.
15. Stay Hydrated
Proper hydration is essential for maintaining blood volume and ensuring efficient heart function.
Benefits of Staying Hydrated
- Supports Blood Circulation: Adequate fluid levels help maintain optimal blood pressure.
- Prevents Overworking the Heart: Reduces the effort the heart needs to pump blood.
- Enhances Physical Performance: Prevents fatigue and improves exercise efficiency.
Hydration Tips
- Daily Intake: Aim for at least 8 glasses (64 ounces) of water per day, adjusting based on activity level and climate.
- Monitor Hydration: Check urine color; light yellow indicates proper hydration.
- Limit Dehydrating Beverages: Reduce intake of caffeinated and alcoholic drinks that can lead to dehydration.
16. Limit Caffeine Intake
While moderate caffeine consumption is generally safe for most people, excessive intake can lead to increased heart rate and blood pressure.
Caffeine Guidelines
- Moderate Consumption: Up to 400 milligrams of caffeine per day (about four 8-ounce cups of brewed coffee).
- Sensitive Individuals: Some people may experience adverse effects with lower amounts. Monitor your body's response.
Sources of Caffeine
- Coffee and Tea: Be mindful of added sugars and high-calorie creamers.
- Energy Drinks: Often contain high levels of caffeine and sugar.
- Soft Drinks: Opt for caffeine-free versions or limit consumption.
17. Incorporate Plant Sterols and Stanols
Plant sterols and stanols can help lower LDL cholesterol levels, promoting better heart health.
Sources of Plant Sterols and Stanols
- Fortified Foods: Some margarines, orange juices, and cereals are fortified with these compounds.
- Nuts and Seeds: Naturally contain plant sterols.
- Legumes: Beans and lentils are good sources.
How They Work
Plant sterols and stanols block the absorption of cholesterol in the intestines, reducing overall cholesterol levels in the blood.
Usage Tips
- Read Labels: Choose products that are fortified with plant sterols and stanols.
- Balanced Diet: Incorporate a variety of these foods into your daily meals for maximum benefit.
18. Reduce Intake of Refined Sugars
High intake of refined sugars can lead to weight gain, increased triglycerides, and higher risk of heart disease.
Health Risks of Excess Sugar
- Obesity: Excess calories from sugar contribute to weight gain.
- Insulin Resistance: Increases the risk of type 2 diabetes, a major heart disease risk factor.
- Inflammation: High sugar intake can lead to chronic inflammation, damaging blood vessels.
Tips to Cut Down on Sugar
- Read Ingredient Labels: Identify and limit foods with added sugars.
- Choose Natural Sweeteners: Opt for honey or maple syrup in moderation.
- Limit Sugary Beverages: Replace sodas and energy drinks with water or herbal teas.
- Opt for Whole Fruits: Whole fruits provide natural sugars along with fiber and nutrients.
19. Practice Portion Control
Overeating can lead to weight gain and increased strain on the heart. Practicing portion control helps manage calorie intake and maintain a healthy weight.
Strategies for Portion Control
- Use Smaller Plates: Helps control the amount of food consumed per meal.
- Measure Portions: Use measuring cups or a food scale to understand appropriate serving sizes.
- Listen to Your Body: Eat when hungry and stop when satisfied, not when full.
- Avoid Distractions: Eat without watching TV or using devices to focus on the meal.
20. Limit Sodium Intake
Excessive sodium consumption is linked to high blood pressure, a major risk factor for heart disease.
Recommended Sodium Intake
- General Guideline: Less than 2,300 milligrams per day for most adults.
- Ideal Limit: Aim for no more than 1,500 milligrams per day, especially if you have high blood pressure.
Tips to Reduce Sodium
- Cook at Home: Control the amount of salt added to your meals.
- Use Herbs and Spices: Flavor food with herbs, spices, lemon juice, or vinegar instead of salt.
- Choose Low-Sodium Products: Select products labeled as low-sodium or no added salt.
- Limit Processed Foods: Reduce consumption of canned soups, deli meats, and packaged snacks that are high in sodium.
Conclusion
Maintaining a healthy heart is a multifaceted endeavor that involves a combination of a balanced diet, regular physical activity, stress management, and proactive health monitoring. By adopting the strategies outlined in this guide, you can significantly reduce your risk of heart disease and enhance your overall quality of life. Remember, it's never too late to make positive changes, and consulting with healthcare professionals can provide personalized guidance tailored to your unique health needs. Prioritize your heart health today to enjoy a vibrant and active tomorrow.
“Motivation is what gets you started. Habit is what keeps you going.” – Jim Ryun
If you would like more information about the 2024, please send us an email.
Written by Fitness Goal 4U
Smart Fitness Goals - Achieve Health with Simple Steps
Smart fitness goals focus on being Specific, Measurable, Achievable, Relevant, and Time-bound. They help you create a clear path to success, stay motivated, and track progress. Whether its weight loss, strength building, or improved endurance, smart goals guide your fitness journey, ensuring steady growth and sustainable results tailored to your needs.
“Confidence comes from discipline and training.” – Robert Kiyosaki
Cancer remains one of the leading causes of death worldwide, affecting millions of lives each year. While genetic factors do play a role in an individual's risk, a significant portion of cancer cases can be prevented through lifestyle choices and proactive health measures. This article explores effective strategies to maintain overall health and reduce the risk of developing cancer.
1. Maintain a Balanced Diet
- Emphasize Plant-Based Foods : A diet rich in fruits, vegetables, whole grains, and legumes provides essential vitamins, minerals, and antioxidants that help protect cells from damage. Incorporate a variety of colors in your meals to ensure a broad spectrum of nutrients.
- Limit Red and Processed Meats : High consumption of red and processed meats has been linked to an increased risk of colorectal cancer. Opt for lean protein sources such as fish, poultry, beans, and nuts to diversify your protein intake.
- Reduce Sugar and Refined Carbohydrates : Excessive sugar intake can lead to obesity, which is a known risk factor for several cancers. Choose whole grains over refined carbohydrates to maintain steady blood sugar levels and support overall health.
- Incorporate Healthy Fats : Healthy fats from sources like olive oil, avocados, and nuts can reduce inflammation and support cellular health. Avoid trans fats and limit saturated fats to minimize cancer risk.
2. Maintain a Healthy Weight
Obesity is associated with an increased risk of various cancers, including breast, prostate, lung, colon, and kidney cancers. Achieving and maintaining a healthy weight through a balanced diet and regular physical activity is crucial in cancer prevention.
- Calculate Your Body Mass Index (BMI) : Understanding your BMI can help you assess whether you are at a healthy weight. A BMI between 18.5 and 24.9 is generally considered healthy. Consult with a healthcare provider to determine the best weight range for your specific circumstances.
- Adopt Sustainable Eating Habits : Focus on portion control, mindful eating, and avoiding fad diets. Sustainable eating habits are more effective in the long term for weight management and cancer prevention.
3. Engage in Regular Physical Activity
- Benefits of Exercise : Regular physical activity helps regulate hormones, reduce inflammation, and improve immune function—all of which can lower cancer risk. It also aids in weight management, further reducing cancer risk factors.
- Recommended Activity Levels : Aim for at least 150 minutes of moderate-intensity or 75 minutes of high-intensity exercise each week. Activities can include walking, cycling, swimming, or engaging in sports you enjoy.
- Incorporate Strength Training : In addition to aerobic exercises, include strength training exercises at least twice a week. Building muscle mass supports metabolism and overall physical health.
4. Avoid Tobacco and Limit Alcohol ConsumptionM
- Tobacco Use : Smoking and the use of other tobacco products are the leading causes of cancer, responsible for numerous lung, mouth, throat, and bladder cancers. Quitting tobacco at any age can significantly reduce cancer risk.
- Secondhand Smoke : Avoid exposure to secondhand smoke, as it can also increase the risk of cancer in non-smokers, particularly lung cancer.
- Alcohol Consumption : Excessive alcohol intake is linked to various cancers, including breast, liver, and esophageal cancers. Limit alcohol consumption to no more than one drink per day for women and two for men.
5. Protect Your Skin from the Sun
- UV Radiation and Skin Cancer : Excessive exposure to ultraviolet (UV) radiation from the sun or tanning beds is a major risk factor for skin cancers, including melanoma. Protecting your skin can significantly reduce this risk.
- Protective Measures : (1) Use Sunscreen: Apply broad-spectrum sunscreen with an SPF of at least 30, even on cloudy days. (2) Wear Protective Clothing: Long sleeves, hats, and sunglasses can shield your skin from harmful UV rays. (3) Seek Shade: Limit sun exposure, especially between 10 a.m. and 4 p.m., when UV radiation is strongest.
6. Get Regular Screenings and Vaccinations
- Early Detection : Regular cancer screenings can detect cancers early when they are most treatable. Common screenings include mammograms, colonoscopies, Pap tests, and prostate exams. Discuss with your healthcare provider which screenings are appropriate for you based on your age, gender, and risk factors.
- Vaccinations : Certain infections can increase cancer risk. Vaccinations such as the Human Papillomavirus (HPV) vaccine and the Hepatitis B vaccine can prevent infections that lead to cervical and liver cancers, respectively.
7. Manage Stress Effectively
Chronic stress can negatively impact the immune system and overall health, potentially increasing cancer risk. Implementing stress management techniques can contribute to a healthier lifestyle and reduced cancer risk.
Stress Reduction Techniques
- Meditation and Mindfulness: Practices that promote relaxation and mental well-being.
- Exercise: Physical activity is a natural stress reliever.
- Hobbies and Social Activities: Engaging in enjoyable activities and maintaining social connections can enhance emotional health.
8. Limit Exposure to Environmental Toxins
- Reduce Exposure to Carcinogens : Avoid exposure to known carcinogens in the environment, such as asbestos, benzene, and certain pesticides. Follow safety guidelines in workplaces and minimize use of products containing harmful chemicals.
- Safe Practices at Home : Use natural cleaning products when possible, ensure proper ventilation when using chemicals, and be cautious with the use of radon-resistant materials in homes.
9. Prioritize Sleep
Adequate sleep is essential for maintaining overall health and supporting the immune system. Poor sleep patterns can lead to hormonal imbalances and increased inflammation, which may contribute to cancer risk.
- Sleep Recommendations : Adults should aim for 7-9 hours of quality sleep each night. Establish a regular sleep schedule, create a restful environment, and limit screen time before bed to improve sleep quality.
10. Foster Healthy Relationships and Community Connections
Strong social connections and supportive relationships contribute to mental and emotional well-being, which in turn supports physical health. Engaging with community and fostering positive relationships can reduce stress and promote healthier lifestyle choices.
Building a Support Network
- Join Clubs or Groups: Participate in activities that interest you and connect with like-minded individuals.
- Volunteer: Giving back to the community can provide a sense of purpose and fulfillment.
- Maintain Close Relationships: Nurture relationships with family and friends to build a strong support system.
11. Understand Your Family History
Genetics play a role in cancer risk. Understanding your family history can help you and your healthcare provider take proactive measures to monitor and reduce your risk.
- Genetic Counseling : If you have a family history of cancer, consider genetic counseling to assess your risk and discuss potential preventive strategies.
- Personalized Prevention Plans : Based on your genetic risk, your healthcare provider may recommend more frequent screenings, lifestyle modifications, or other preventive measures tailored to your specific needs.
12. Avoid Risky Behaviors
- Safe Practices : Engage in safe sexual practices to prevent infections that can lead to cancer, such as HPV. Use protection and limit the number of sexual partners to reduce infection risks.
- Substance Use : Avoid illicit drug use and seek help if you struggle with substance abuse. Substance use can lead to risky behaviors that increase cancer risk.
13. Stay Informed and Educated
Knowledge is power when it comes to cancer prevention. Stay informed about the latest research, guidelines, and recommendations related to cancer prevention and overall health.
- Reliable Information Sources : (1) Healthcare Providers: Regular consultations with your doctor can provide personalized and up-to-date information. (2) Reputable Health Organizations: Websites like the American Cancer Society, World Health Organization, and National Cancer Institute offer reliable information.
- Continuous Learning : Attend health seminars, read reputable health publications, and participate in community health programs to stay educated about preventive measures and healthy living.
14. Limit Exposure to Radiation
- Medical Imaging : While necessary for diagnosing health conditions, excessive exposure to medical imaging techniques like X-rays and CT scans can increase cancer risk. Discuss the necessity and frequency of such tests with your healthcare provider.
- Everyday Radiation : Limit unnecessary exposure to sources of radiation in daily life, such as minimizing the use of electronic devices and using protective measures when exposure is unavoidable.
15. Practice Safe Cooking Methods
- Reduce Carcinogen Formation : Certain cooking methods, such as grilling, barbecuing, and frying, can produce carcinogenic compounds like heterocyclic amines (HCAs) and polycyclic aromatic hydrocarbons (PAHs). Opt for safer cooking methods to minimize these risks.
- Healthier Cooking Techniques : (1) Baking, Steaming, and Boiling: These methods reduce the formation of harmful compounds. (2) Marinating Meat: Marinating can lower the production of HCAs during cooking. (3) Avoid Charring Food: Cook food thoroughly without burning to decrease carcinogen levels.
Conclusion
Preventing cancer involves a multifaceted approach that includes maintaining a healthy lifestyle, making informed dietary choices, engaging in regular physical activity, and avoiding known risk factors. By incorporating these strategies into your daily routine, you can significantly reduce your risk of developing cancer and promote overall well-being. Additionally, staying informed, undergoing regular screenings, and fostering strong social connections further contribute to a comprehensive cancer prevention plan. Remember, small changes can make a big difference in your long-term health.
“Motivation is what gets you started. Habit is what keeps you going.” – Jim Ryun
If you would like more information about the 2024, please send us an email.
Written by Fitness Goal 4U
Smart Fitness Goals - Achieve Health with Simple Steps
Smart fitness goals focus on being Specific, Measurable, Achievable, Relevant, and Time-bound. They help you create a clear path to success, stay motivated, and track progress. Whether its weight loss, strength building, or improved endurance, smart goals guide your fitness journey, ensuring steady growth and sustainable results tailored to your needs.
“Confidence comes from discipline and training.” – Robert Kiyosaki
Diabetes is a chronic condition that affects millions worldwide, leading to various health complications if not properly managed. However, with the right strategies and proactive measures, individuals with diabetes can significantly reduce the risk of complications and lead a healthy, fulfilling life. This article explores effective ways to prevent diabetes complications through lifestyle changes, medical management, and regular monitoring.
Understanding Diabetes and Its Complications
Diabetes mellitus is a metabolic disorder characterized by high blood sugar levels over a prolonged period. It primarily comes in two forms: Type 1, where the body does not produce insulin, and Type 2, where the body becomes resistant to insulin or doesn't produce enough. Chronic high blood sugar can damage blood vessels and nerves, leading to serious complications such as:
- Cardiovascular Disease: Increased risk of heart attacks, strokes, and hypertension.
- Neuropathy: Nerve damage causing pain, tingling, or numbness, particularly in the extremities.
- Nephropathy: Kidney damage that can lead to kidney failure.
- Retinopathy: Eye damage that may result in blindness.
- Foot Problems: Poor circulation and nerve damage increasing the risk of infections and amputations.
Preventing these complications requires a comprehensive approach that includes lifestyle modifications, proper medical treatment, and regular health monitoring.
1. Maintain Optimal Blood Sugar Levels
a) Regular Monitoring : Consistently monitoring blood sugar levels is crucial in managing diabetes. Keeping blood glucose within the target range helps prevent damage to organs and nerves. Utilize blood glucose meters or continuous glucose monitors (CGMs) as advised by your healthcare provider to track your levels regularly.
b) Medication Adherence : Take prescribed medications, including insulin or oral hypoglycemics, as directed by your healthcare professional. Do not skip doses or alter your medication regimen without consulting your doctor, as this can lead to uncontrolled blood sugar levels and increase the risk of complications.
c) Balanced Diet : Adopting a balanced diet tailored to your diabetes management is essential. Focus on:
- Carbohydrate Control: Understand the impact of carbohydrates on blood sugar and manage intake through portion control and choosing complex carbs like whole grains.
- Healthy Fats: Incorporate unsaturated fats found in nuts, seeds, and olive oil while limiting saturated and trans fats.
- Lean Proteins: Opt for lean sources of protein such as poultry, fish, legumes, and tofu.
- Fiber-Rich Foods: Increase intake of vegetables, fruits, and whole grains to improve blood sugar control and digestive health.
d) Regular Physical Activity : Engaging in regular exercise helps lower blood sugar levels, improve insulin sensitivity, and maintain a healthy weight. Aim for at least 150 minutes of moderate-intensity aerobic activity per week, such as walking, cycling, or swimming, along with strength training exercises twice a week.
2. Manage Blood Pressure and Cholesterol
Individuals with diabetes are at a higher risk of cardiovascular diseases. Controlling blood pressure and cholesterol levels is vital in reducing this risk.
a) Monitor Blood Pressure : Regularly check your blood pressure and aim to keep it within the target range (typically below 140/90 mmHg, but individual targets may vary). Lifestyle changes like reducing sodium intake, maintaining a healthy weight, and exercising can help manage blood pressure. Medications may be necessary if lifestyle changes are insufficient.
b) Control Cholesterol Levels : High cholesterol contributes to the buildup of plaques in arteries, increasing the risk of heart disease and stroke. Manage cholesterol through:
- Diet: Limit intake of saturated and trans fats, and incorporate foods high in omega-3 fatty acids.
- Exercise: Regular physical activity can help raise HDL (good) cholesterol and lower LDL (bad) cholesterol.
- Medications: Statins or other cholesterol-lowering medications may be prescribed if needed.
3. Maintain a Healthy Weight
Achieving and maintaining a healthy weight is crucial in managing diabetes and preventing complications. Excess weight, particularly around the abdomen, increases insulin resistance and the risk of cardiovascular diseases.
Weight Loss Strategies
- Healthy Eating: Follow a balanced diet rich in whole foods, lean proteins, and fiber while limiting processed foods and sugary beverages.
- Regular Exercise: Incorporate both aerobic and strength-training exercises into your routine to burn calories and build muscle.
- Behavioral Changes: Seek support through counseling or support groups to develop sustainable habits for weight management.
4. Prioritize Foot Care
Diabetes can lead to poor circulation and nerve damage in the feet, increasing the risk of infections and amputations. Proper foot care is essential in preventing these complications.
- a) Daily Foot Inspection : Examine your feet daily for cuts, blisters, redness, or swelling. Use a mirror or ask for assistance if you have difficulty seeing the bottoms of your feet.
- b) Proper Foot Hygiene : Wash your feet daily with lukewarm water, dry them thoroughly, and moisturize to prevent dryness and cracking. Avoid soaking your feet for prolonged periods, as this can lead to infections.
- c) Appropriate Footwear : Wear well-fitting shoes that provide adequate support and protection. Avoid walking barefoot to reduce the risk of injuries. Consider custom orthotics if recommended by a healthcare provider.
- d) Regular Foot Exams : Visit a podiatrist regularly for professional foot examinations, especially if you notice any changes or have existing foot problems.
5. Regular Health Check-Ups
Frequent visits to healthcare providers enable early detection and management of potential complications.
a) Comprehensive Exams : Undergo regular comprehensive exams that include:
- Blood Tests: Monitor HbA1c levels, kidney function (creatinine, eGFR), and lipid profiles.
- Eye Exams: Annual dilated eye exams to detect retinopathy.
- Foot Exams: Regular assessments for neuropathy and circulation issues.
- Heart Health: Check for signs of cardiovascular diseases through blood pressure measurements and cholesterol testing.
b) Vaccinations : Stay up-to-date with vaccinations, including the flu shot and pneumococcal vaccine, to prevent infections that can complicate diabetes management.
6. Avoid Smoking and Limit Alcohol Consumption
a) Smoking Cessation : Smoking exacerbates diabetes complications by increasing the risk of cardiovascular diseases, kidney damage, and nerve damage. Seek support to quit smoking through counseling, medications, or support groups.
b) Moderating Alcohol Intake : Excessive alcohol consumption can lead to unpredictable blood sugar levels, liver damage, and other health issues. If you choose to drink, do so in moderation—up to one drink per day for women and up to two drinks per day for men.
7. Manage Stress Effectively
Chronic stress can negatively impact blood sugar levels and overall health. Implement stress management techniques to maintain emotional well-being and diabetes control. Techniques for Stress Management
- Mindfulness and Meditation: Practice mindfulness or meditation to reduce stress and improve focus.
- Physical Activity: Engage in regular exercise, which releases endorphins and helps alleviate stress.
- Hobbies and Leisure Activities: Participate in activities you enjoy to take your mind off stressors.
- Professional Support: Consider therapy or counseling if stress becomes overwhelming.
8. Educate Yourself About Diabetes
Knowledge is power when it comes to managing diabetes and preventing complications. Stay informed about the latest research, treatment options, and self-care strategies.
- Diabetes Education Programs : Enroll in diabetes education programs offered by healthcare providers or community organizations. These programs provide valuable information on managing blood sugar, nutrition, and lifestyle changes.
- Stay Informed : Regularly consult reputable sources such as the American Diabetes Association or the World Health Organization for updates and guidelines on diabetes management.
9. Utilize Technology and Tools
Modern technology offers various tools to aid in diabetes management, making it easier to track and control the condition.
- Mobile Apps : Use diabetes management apps to log blood sugar levels, track carbohydrate intake, and monitor physical activity. These apps can also remind you to take medications and attend appointments.
- Continuous Glucose Monitors (CGMs) : CGMs provide real-time blood sugar readings, helping you make informed decisions about diet, exercise, and medication.
- Insulin Pumps : For those requiring insulin therapy, insulin pumps offer a convenient and precise method of delivering insulin, improving blood sugar control.
10. Build a Support Network
Having a strong support system can make managing diabetes easier and more effective.
- Family and Friends : Share your diabetes management plan with family and friends so they can provide encouragement and assistance when needed.
- Support Groups : Join diabetes support groups, either in-person or online, to connect with others facing similar challenges. Sharing experiences and strategies can provide emotional support and practical advice.
- Healthcare Team : Maintain open communication with your healthcare team, including doctors, nurses, dietitians, and diabetes educators. They can offer guidance, answer questions, and adjust your treatment plan as necessary.
Conclusion
Preventing diabetes complications requires a multifaceted approach that includes maintaining optimal blood sugar levels, managing blood pressure and cholesterol, maintaining a healthy weight, prioritizing foot care, regular health check-ups, avoiding smoking and limiting alcohol, managing stress, educating yourself, utilizing technology, and building a support network. By implementing these strategies, individuals with diabetes can significantly reduce the risk of serious health complications and enhance their quality of life.
“Motivation is what gets you started. Habit is what keeps you going.” – Jim Ryun
If you would like more information about the 2024, please send us an email.
Written by Fitness Goal 4U
Smart Fitness Goals - Achieve Health with Simple Steps
Smart fitness goals focus on being Specific, Measurable, Achievable, Relevant, and Time-bound. They help you create a clear path to success, stay motivated, and track progress. Whether its weight loss, strength building, or improved endurance, smart goals guide your fitness journey, ensuring steady growth and sustainable results tailored to your needs.
“Confidence comes from discipline and training.” – Robert Kiyosaki
Quitting smoking is one of the most significant decisions you can make for your health and well-being. While the journey may seem daunting, numerous strategies and support systems are available to help you achieve a smoke-free life. This comprehensive guide outlines effective tips to assist you in overcoming nicotine addiction and maintaining long-term success.
1. Understand Your Motivation
Before embarking on your quit journey, it's essential to understand why you want to quit. Common motivations include improving health, saving money, protecting loved ones from secondhand smoke, and enhancing overall quality of life. Clearly defining your reasons will provide a strong foundation and keep you focused during challenging times.
Action Steps:
- Write down your reasons for quitting.
- Visualize the benefits of a smoke-free life.
- Revisit your motivations regularly to stay committed.
2. Set a Quit Date
Choosing a specific quit date can enhance your commitment and provide a clear target to work towards. Selecting a date within the next two weeks allows ample time to prepare without losing momentum.
Action Steps:
- Pick a date that is meaningful to you.
- Inform friends and family about your quit date.
- Prepare by removing cigarettes, lighters, and ashtrays from your environment.
3. Seek Professional Support
Professional support can significantly increase your chances of successfully quitting. Healthcare providers can offer personalized advice, prescribe medications, and refer you to support groups.
Options for Support:
- Counseling: Individual or group sessions can provide strategies and emotional support.
- Medication: Nicotine replacement therapies (NRTs) like patches, gum, or prescription medications can reduce withdrawal symptoms.
- Support Groups: Joining a community of individuals with similar goals can offer encouragement and accountability.
4. Utilize Nicotine Replacement Therapy (NRT)
NRTs help manage withdrawal symptoms by supplying controlled doses of nicotine without the harmful chemicals found in cigarettes. They come in various forms, including patches, gums, lozenges, inhalers, and nasal sprays.
Benefits of NRT:
- Reduces cravings and withdrawal symptoms.
- Increases the likelihood of quitting successfully.
- Available over-the-counter or by prescription.
Tips for Using NRT:
- Follow the recommended dosage and schedule.
- Combine different forms if necessary, as advised by a healthcare provider.
- Gradually taper off usage to minimize dependence.
5. Adopt Healthy Lifestyle Changes
Incorporating healthy habits into your daily routine can help distract you from cravings and improve your overall well-being.
Suggested Changes:
- Exercise: Physical activity releases endorphins, which can reduce stress and improve mood.
- Healthy Diet: Eating a balanced diet can help manage weight and provide energy.
- Hydration: Drinking plenty of water helps flush toxins from your body and keeps you feeling full.
- Sleep: Ensure adequate rest to support your body’s healing process.
6. Identify and Avoid Triggers
Understanding the situations, emotions, or activities that trigger your smoking urges is crucial in developing strategies to avoid or manage them.
Common Triggers:
- Stress: Many people smoke to cope with stress.
- Social Situations: Being around other smokers or in environments where smoking is common.
- Routine Activities: Smoking after meals, while driving, or during breaks.
Strategies to Manage Triggers:
- Develop alternative coping mechanisms, such as deep breathing, meditation, or taking a walk.
- Change your daily routine to break associations with smoking.
- Avoid places or situations where you’re likely to be tempted to smoke.
7. Practice Mindfulness and Stress Management
Mindfulness techniques can help you stay present and manage the emotional aspects of quitting smoking. Reducing stress through healthy outlets can decrease the likelihood of relapse.
Techniques to Try:
- Meditation: Regular meditation can enhance focus and reduce anxiety.
- Deep Breathing Exercises: Simple breathing techniques can calm your mind during cravings.
- Yoga: Combines physical movement with mindfulness, promoting relaxation.
- Progressive Muscle Relaxation: Helps reduce physical tension associated with stress.
8. Stay Positive and Patient
Quitting smoking is a process that requires time, effort, and perseverance. Maintaining a positive attitude and being patient with yourself can enhance your resilience against setbacks.
Tips for Staying Positive:
- Celebrate small victories, such as a day or week without smoking.
- Use positive affirmations to reinforce your commitment.
- Surround yourself with supportive people who encourage your efforts.
9. Keep Your Hands and Mouth Busy
Finding alternatives to occupy your hands and mouth can help reduce the urge to smoke. This can be especially helpful during the initial stages of quitting.
Alternative Activities:
- Chewing Gum or Snacks: Choose healthy options like carrots, nuts, or sugar-free gum.
- Fidget Toys: Use stress balls, fidget spinners, or other tactile items to keep your hands busy.
- Hobbies: Engage in activities such as drawing, knitting, or playing a musical instrument.
10. Monitor Your Progress
Tracking your progress can provide motivation and highlight areas where you might need additional support. It allows you to see how far you’ve come and reinforces your commitment to quitting.
Ways to Monitor Progress:
- Journaling: Write about your experiences, challenges, and successes each day.
- Apps: Use smartphone apps designed to track quit-smoking milestones and offer tips.
- Milestone Rewards: Set rewards for reaching specific goals, such as a week or month without smoking.
11. Learn from Relapses
Relapses can occur, but they don't signify failure. Instead, view them as learning opportunities to strengthen your quit plan.
Steps After a Relapse:
- Analyze the situation that led to the relapse.
- Identify what you can do differently next time.
- Reinforce your commitment and adjust your strategies as needed.
- Seek additional support if necessary.
12. Consider Behavioral Therapy
Behavioral therapy focuses on changing the behaviors and thought patterns associated with smoking. It can provide strategies to handle cravings, manage stress, and avoid triggers.
Benefits of Behavioral Therapy:
- Personalized strategies tailored to your specific needs.
- Enhanced coping mechanisms for dealing with cravings.
- Support from a trained professional to guide your quit journey.
13. Educate Yourself About the Benefits
Understanding the immediate and long-term benefits of quitting smoking can strengthen your resolve and provide continuous motivation.
Health Benefits:
- Immediate: Improved circulation, reduced carbon monoxide levels, and enhanced lung function.
- Short-Term: Lowered risk of heart attack, improved sense of taste and smell, and increased energy levels.
- Long-Term: Reduced risk of cancer, stroke, chronic obstructive pulmonary disease (COPD), and other smoking-related illnesses.
Financial Benefits:
- Significant savings from not purchasing cigarettes.
- Lower healthcare costs due to improved health.
14. Leverage Technology and Resources
Numerous resources are available to support your quit journey, including apps, online forums, and educational materials.
Helpful Resources:
- Quitlines: Telephone-based support services offering counseling and resources.
- Websites: Trusted sites like Smokefree.gov provide tools and information.
- Mobile Apps: Apps like QuitNow! or Smoke Free offer tracking, tips, and support communities.
15. Build a Support Network
Having a strong support network can provide encouragement, accountability, and practical assistance when you need it most.
Building Your Network:
- Friends and Family: Let them know about your decision to quit and how they can support you.
- Support Groups: Join local or online groups where members share similar goals.
- Healthcare Providers: Regular check-ins with your doctor or counselor can keep you on track.
16. Stay Active and Engaged
Engaging in activities that you enjoy can distract you from smoking urges and enhance your overall sense of well-being.
Activities to Consider:
- Exercise: Join a gym, go for runs, or participate in sports.
- Creative Pursuits: Explore painting, writing, or other creative outlets.
- Volunteer Work: Helping others can provide a sense of purpose and fulfillment.
17. Avoid Alcohol and Other Triggers
Alcohol consumption can weaken your resolve and increase the likelihood of relapse. Being mindful of other substances that may trigger the urge to smoke is essential.
Tips:
- Limit or avoid alcohol consumption, especially in the early stages of quitting.
- Identify other potential triggers, such as caffeine or certain social settings, and develop strategies to manage them.
18. Reward Yourself
Acknowledging your progress and rewarding yourself can reinforce positive behavior and keep you motivated.
Reward Ideas:
- Treat Yourself: Use the money saved from not buying cigarettes to purchase something you enjoy.
- Plan a Special Activity: Celebrate milestones with a favorite activity or outing.
- Personal Milestones: Set goals and reward yourself when you achieve them, such as a week or month smoke-free.
19. Stay Informed About Smoking Risks
Continuously educating yourself about the dangers of smoking can strengthen your determination to quit.
Key Risks:
- Increased risk of lung cancer, heart disease, stroke, and respiratory illnesses.
- Negative effects on fertility and pregnancy.
- Premature aging and skin damage.
20. Embrace a Long-Term Perspective
Quitting smoking is a lifelong commitment, and maintaining a smoke-free lifestyle requires ongoing effort and mindfulness.
Strategies for Long-Term Success:
- Continue to use coping strategies even after you’ve quit.
- Stay connected with your support network.
- Regularly review your motivations and set new health goals.
Conclusion
Quitting smoking is a challenging but achievable goal that can profoundly impact your health and quality of life. By understanding your motivations, seeking professional support, utilizing effective strategies, and maintaining a positive mindset, you can overcome nicotine addiction and embrace a healthier, smoke-free future. Remember, every step you take towards quitting is a step towards a better, more vibrant life. Stay committed, be patient with yourself, and leverage the resources and support systems available to ensure your success in quitting smoking.
“Motivation is what gets you started. Habit is what keeps you going.” – Jim Ryun
If you would like more information about the 2024, please send us an email.
Written by Fitness Goal 4U
Smart Fitness Goals - Achieve Health with Simple Steps
Smart fitness goals focus on being Specific, Measurable, Achievable, Relevant, and Time-bound. They help you create a clear path to success, stay motivated, and track progress. Whether its weight loss, strength building, or improved endurance, smart goals guide your fitness journey, ensuring steady growth and sustainable results tailored to your needs.
“Confidence comes from discipline and training.” – Robert Kiyosaki
Dark underarms are a common concern for many individuals, affecting both men and women. While they might seem like a minor cosmetic issue, they can impact self-confidence and comfort. The good news is that several natural remedies can help lighten dark underarms effectively and safely. This article explores various natural methods to achieve brighter underarm skin, promoting a healthier and more confident you.
Understanding the Causes of Dark Underarms
Before diving into remedies, it's essential to understand why underarms become dark. Several factors contribute to this condition:
- Shaving and Waxing: Regular hair removal can cause irritation and inflammation, leading to hyperpigmentation.
- Friction: Tight clothing and constant rubbing can thicken the skin, resulting in darkened areas.
- Accumulation of Dead Skin Cells: Poor exfoliation can lead to the buildup of dead skin, making the underarms appear darker.
- Use of Harsh Deodorants: Certain chemicals in deodorants can irritate the skin, causing discoloration.
- Genetics: Family history plays a role in skin pigmentation.
- Medical Conditions: Conditions like acanthosis nigricans, which is related to insulin resistance, can cause darkening of the skin.
Understanding these causes can help in selecting the most effective natural remedy for your specific situation.
1. Lemon Juice
Lemon juice is renowned for its natural bleaching properties and high vitamin C content, which helps in reducing pigmentation.
How to Use:
- Squeeze fresh lemon juice and apply it directly to the dark underarms using a cotton ball.
- Leave it on for 10 minutes before rinsing off with lukewarm water.
- For added exfoliation, mix lemon juice with sugar to create a scrub.
Note: Lemon juice can be drying, so ensure to moisturize the area afterward and avoid sun exposure to prevent irritation.
2. Baking Soda Scrub
Baking soda acts as a gentle exfoliant, removing dead skin cells and reducing dark pigmentation.
How to Use:
- Mix two tablespoons of baking soda with enough water to form a paste.
- Gently scrub the underarms with the paste in circular motions.
- Let it sit for a few minutes before rinsing off with water.
- Repeat this process 2-3 times a week for best results.
Caution: Overuse can lead to dryness. Monitor your skin's response and adjust frequency accordingly.
3. Aloe Vera
Aloe vera is a soothing agent with skin-lightening properties, making it an excellent remedy for dark underarms.
How to Use:
- Extract fresh aloe vera gel from the plant.
- Apply the gel directly to the underarms.
- Leave it on for 15-20 minutes before washing it off with water.
- Use this remedy daily for noticeable improvement.
Aloe vera also helps in moisturizing the skin, preventing dryness and irritation.
4. Coconut Oil
Coconut oil is rich in fatty acids and vitamin E, which nourish the skin and promote lightening of dark areas.
How to Use:
- Warm a small amount of coconut oil.
- Massage it into the underarms for a few minutes.
- Leave it on overnight and wash it off in the morning.
- Apply daily for optimal results.
Coconut oil also acts as a natural deodorant, keeping the area fresh and moisturized.
5. Apple Cider Vinegar
Apple cider vinegar balances the pH level of the skin, reducing pigmentation and preventing the growth of bacteria.
How to Use:
- Dilute apple cider vinegar with equal parts water.
- pply the mixture to the underarms using a cotton ball.
- Leave it on for 5-10 minutes before rinsing off.
- Repeat twice daily for effective lightening.
- Ensure to perform a patch test before use to check for any adverse reactions.
6. Potato Slices
Potatoes contain enzymes and vitamin C, which help in skin lightening and reducing dark pigmentation.
How to Use:
- Slice a raw potato and rub it gently on the dark underarms.
- Leave the juice on for 10 minutes before rinsing off with water.
- Repeat this process daily for the best results.
- For enhanced effectiveness, you can mix potato juice with lemon juice.
7. Turmeric and Gram Flour Scrub
Turmeric has anti-inflammatory and antioxidant properties, while gram flour acts as a natural exfoliant.
How to Use:
- Mix one teaspoon of turmeric powder with two tablespoons of gram flour and enough milk or yogurt to form a paste.
- Apply the mixture to the underarms and scrub gently.
- Let it dry for 15-20 minutes before washing off.
- Use this scrub twice a week to lighten dark underarms.
Turmeric may stain the skin temporarily, so ensure thorough washing after application.
8. Cucumber Extract
Cucumber has a cooling effect and helps in reducing pigmentation and soothing irritated skin.
How to Use:
- Grate a fresh cucumber and extract its juice.
- Apply the juice to the dark underarms using a cotton ball.
- Leave it on for 15 minutes before rinsing off with water.
- Repeat daily for improved skin tone.
Cucumber also provides hydration, keeping the skin soft and supple.
9. Castor Oil and Lemon Juice
Combining castor oil with lemon juice enhances the skin-lightening effects while nourishing the skin.
How to Use:
- Mix two tablespoons of castor oil with one tablespoon of lemon juice.
- Apply the mixture to the underarms and massage gently.
- Leave it on for 15-20 minutes before rinsing off.
- Use this remedy nightly for effective results.
Castor oil is a potent moisturizer, preventing dryness and irritation.
10. Yogurt and Honey Mask
Yogurt contains lactic acid, which exfoliates and lightens the skin, while honey moisturizes and soothes.
How to Use:
- Mix two tablespoons of yogurt with one tablespoon of honey.
- Apply the mixture to the underarms and leave it on for 20 minutes.
- Rinse off with lukewarm water.
- Repeat this process three times a week for brighter skin.
This mask not only lightens dark underarms but also keeps the skin hydrated.
Additional Tips for Preventing Dark Underarms
While natural remedies can effectively lighten dark underarms, adopting certain habits can prevent further pigmentation:
- Avoid Shaving: Consider alternative hair removal methods like laser or waxing, which may reduce irritation.
- Wear Loose Clothing: Tight clothes can cause friction, leading to darkened skin. Opt for breathable fabrics like cotton.
- Maintain Hygiene: Regular washing keeps the area clean and prevents bacterial growth that can contribute to darkening.
- Use Gentle Deodorants: Choose deodorants free from harsh chemicals that can irritate the skin.
- Exfoliate Regularly: Regular exfoliation removes dead skin cells, preventing buildup and pigmentation.
- Stay Hydrated: Drinking plenty of water keeps the skin hydrated and healthy.
- Healthy Diet: A balanced diet rich in vitamins and minerals supports overall skin health.
When to Consult a Dermatologist
While natural remedies are effective for many, persistent dark underarms may indicate underlying medical conditions. If you've tried various home treatments without success, consider consulting a dermatologist. Professional treatments like chemical peels, laser therapy, or topical creams may be necessary for more severe cases.
Conclusion
Dark underarms are a manageable condition with the right natural remedies and preventive measures. Incorporating these natural treatments into your routine can help lighten dark underarms, boost your confidence, and promote healthier skin. Remember to be consistent and patient, as natural remedies may take time to show visible results. Always perform a patch test before trying new treatments to ensure your skin doesn't react adversely. With dedication and care, you can achieve brighter and smoother underarms naturally.
“Motivation is what gets you started. Habit is what keeps you going.” – Jim Ryun
If you would like more information about the 2024, please send us an email.
Written by Fitness Goal 4U
Smart Fitness Goals - Achieve Health with Simple Steps
Smart fitness goals focus on being Specific, Measurable, Achievable, Relevant, and Time-bound. They help you create a clear path to success, stay motivated, and track progress. Whether its weight loss, strength building, or improved endurance, smart goals guide your fitness journey, ensuring steady growth and sustainable results tailored to your needs.
“Confidence comes from discipline and training.” – Robert Kiyosaki
Squats are a fundamental exercise essential for building lower body strength and overall fitness. This versatile movement targets the quadriceps, hamstrings, glutes, and core, making it a cornerstone of effective workout routines. Whether you're a beginner or an advanced athlete, incorporating squats into your fitness regimen can yield significant benefits.
Squats mimic natural movements, improving functional strength and enhancing athletic performance. They help in building muscle mass, increasing power, and boosting metabolic rate, which aids in weight management. Additionally, squats can improve balance and coordination, making everyday activities easier and reducing the risk of injuries.
There are various squat variations to suit different fitness levels and goals, such as bodyweight squats, barbell squats, goblet squats, and more. Each variation adds a unique challenge and helps target different muscle groups. Prioritizing proper form and technique is crucial to maximize the benefits and prevent injuries. Start incorporating squats into your routine to experience the transformative power of this fundamental exercise.
How to Do Squats
1. Bodyweight Squats
Starting Position
- Stand with feet shoulder-width apart, toes slightly turned out.
- Keep your chest up and your core engaged.
- Extend your arms straight out in front of you or place them behind your head.
Execution
- Begin by pushing your hips back as if sitting into a chair.
- Bend your knees and lower your body until your thighs are parallel to the ground (or lower if flexibility allows).
- Ensure your knees track over your toes and don’t collapse inward.
- Keep your chest lifted and your back neutral.
- Press through your heels to return to the starting position.
2. Barbell Back Squats
Starting Position
- Position a barbell across your upper back (trapezius muscles).
- Stand with feet shoulder-width apart.
- Grip the barbell with hands wider than shoulder-width apart.
Execution
- Unrack the barbell and step back to clear the rack.
- Push your hips back and bend your knees to lower your body.
- Descend until your thighs are parallel to the ground (or lower).
- Keep your chest up and back straight throughout the movement.
- Press through your heels to stand back up, extending your hips and knees.
3. Goblet Squats
Starting Position
- Hold a dumbbell or kettlebell close to your chest, with both hands under the weight.
- Stand with feet shoulder-width apart.
Execution
- Push your hips back and bend your knees to lower your body.
- Keep your elbows inside your knees as you descend.
- Lower until your thighs are parallel to the ground (or lower).
- Keep your chest up and back neutral.
- Press through your heels to return to the starting position.
Tips and Tricks for Proper Squat Form
1. Keep Your Heels Down
- Always keep your heels planted on the ground to ensure stability and proper force distribution.
- Avoid rising onto your toes, which can cause instability and improper form.
2. Engage Your Core
- Tighten your core muscles throughout the movement to protect your spine and maintain balance.
- A strong core helps stabilize your entire body during the squat.
3. Maintain a Neutral Spine
- Avoid rounding or over-arching your back; maintain a neutral spine position.
- Look straight ahead or slightly up to keep your spine aligned.
4. Knees Over Toes
- Make sure your knees track over your toes and don’t collapse inward.
- This helps distribute the weight evenly and prevents knee injuries.
5. Depth
- Aim to lower your body until your thighs are parallel to the ground, or lower if flexibility allows.
- Full range of motion engages more muscle fibers and enhances strength and flexibility.
6. Breathing
- Inhale as you lower your body, and exhale as you push through your heels to stand up.
- Proper breathing helps maintain intra-abdominal pressure, stabilizing your core.
7. Foot Position
- Adjust your foot position for comfort and stability; a wider stance can help with depth, while a narrower stance can target the quads more.
- Experiment with different stances to find what works best for you.
8. Progress Gradually
- Start with bodyweight squats to master the form before adding weights.
- Gradually increase the weight and intensity as you become more comfortable with the movement.
Benefits of Squats
1. Strength Building: Squats build strength in the lower body and core, essential for overall athletic performance.
2. Muscle Growth: Effective for hypertrophy in the legs and glutes, promoting muscle mass gain.
3. Functional Movement: Mimics everyday movements, improving overall mobility and functional strength.
4. Calorie Burn: Engages large muscle groups, aiding in calorie burn and weight management.
5. Improved Balance and Stability: Enhances balance and stability, reducing the risk of falls and injuries.
FAQs (Frequently Asked Questions)
1. Why are squats important?
Answer : Squats are crucial for building lower body strength, enhancing muscle mass, and improving overall fitness. They target the quadriceps, hamstrings, glutes, and core, making them a comprehensive exercise for the lower body.
2. How often should I do squats?
Answer : It is recommended to incorporate squats into your workout routine 2-3 times per week. Allow at least 48 hours of rest between sessions to promote muscle recovery and growth.
3. Can beginners do squats?
Answer : Yes, beginners can do squats. Start with bodyweight squats to master the form and gradually progress to adding weights like dumbbells or barbells as you become more comfortable and confident.
4. What is the correct form for squats?
Answer : 1. Stand with feet shoulder-width apart. 2. Lower your hips back and down. 3. Keep your chest up and back straight. 4. Push through your heels to return to standing. Ensure your knees track over your toes and do not collapse inward.
5. What are the benefits of squats?
Answer : Squats build strength in the lower body, increase muscle mass, enhance athletic performance, improve balance and coordination, and boost metabolic rate, aiding in weight management.
6. Are squats bad for your knees?
Answer : When performed with proper form, squats are not bad for your knees. Ensure your knees track over your toes and avoid letting them collapse inward to reduce strain on the joints.
7. How can I add variety to my squat routine?
Answer : Incorporate different squat variations such as goblet squats, sumo squats, Bulgarian split squats, and single-leg squats to target different muscles and add variety to your routine.
8. Can squats help with weight loss?
Answer : Yes, squats can aid in weight loss by building muscle mass, which increases your metabolic rate, and by burning calories during the exercise.
9. Should I use weights for squats?
Answer : Using weights can enhance muscle growth and strength. Start with bodyweight squats to master the form and gradually add weights like dumbbells or barbells for increased resistance.
10. How deep should I squat?
Answer : Aim to lower your body until your thighs are parallel to the ground, or lower if flexibility and strength allow. Ensure proper form is maintained throughout the movement.
Conclusion
Squats are a fundamental exercise that significantly enhances lower body strength, muscle mass, and overall fitness. By targeting the quadriceps, hamstrings, glutes, and core, squats improve functional strength, balance, and coordination, making daily activities easier and reducing the risk of injuries. Incorporating various squat variations into your routine can add diversity and target different muscle groups. Prioritizing proper form and gradually increasing resistance will maximize benefits and minimize injury risks. Whether you're a beginner or an advanced athlete, squats are an essential addition to any effective workout regimen. Start incorporating squats to experience their transformative impact.
You might also like our Best 10 Leg Workouts article in weight loss.
“Motivation is what gets you started. Habit is what keeps you going.” – Jim Ryun
If you would like more information about the 2024, please send us an email.
Written by Fitness Goal 4U
Smart Fitness Goals - Achieve Health with Simple Steps
Smart fitness goals focus on being Specific, Measurable, Achievable, Relevant, and Time-bound. They help you create a clear path to success, stay motivated, and track progress. Whether its weight loss, strength building, or improved endurance, smart goals guide your fitness journey, ensuring steady growth and sustainable results tailored to your needs.
“Confidence comes from discipline and training.” – Robert Kiyosaki
Lunges are a fundamental exercise essential for strengthening the lower body and enhancing overall fitness. This versatile movement targets key muscle groups, including the quadriceps, hamstrings, glutes, and calves, making it a staple in effective workout routines. Lunges mimic everyday activities such as walking, climbing stairs, and balancing, which translates to improved functional performance in daily tasks and athletic endeavors.
There are various lunge variations, including forward lunges, reverse lunges, walking lunges, and side lunges, each offering unique benefits and focusing on different muscles. Lunges can be performed with bodyweight for beginners or with added resistance like dumbbells or barbells for increased intensity, making them suitable for all fitness levels.
Incorporating lunges into your exercise regimen enhances balance, coordination, and flexibility. Proper form is crucial to avoid injury and maximize benefits, including keeping the torso upright, engaging the core, and ensuring the knees track over the toes. Start incorporating lunges today to experience their transformative impact on your lower body strength and overall fitness.
How to Do Lunges
1. Forward Lunges
Starting Position
- Stand tall with feet hip-width apart.
- Place your hands on your hips or hold dumbbells by your sides.
Execution
- Step forward with one leg, lowering your hips until both knees are bent at about a 90-degree angle.
- Ensure the front knee is directly above the ankle and the back knee is hovering just above the ground.
- Push through the heel of the front foot to return to the starting position.
- Repeat on the other leg.
2. Reverse Lunges
Starting Position
- Stand tall with feet hip-width apart.
- Place your hands on your hips or hold dumbbells by your sides.
Execution
- Step backward with one leg, lowering your hips until both knees are bent at about a 90-degree angle.
- Ensure the front knee is directly above the ankle and the back knee is hovering just above the ground.
- Push through the heel of the front foot to return to the starting position.
- Repeat on the other leg.
3. Walking Lunges
Starting Position
- Stand tall with feet hip-width apart.
- Place your hands on your hips or hold dumbbells by your sides.
Execution
- Step forward with one leg and lower your hips into a lunge position.
- Push through the heel of the front foot and bring the back foot forward, stepping into a lunge with the opposite leg.
- Continue alternating legs, moving forward with each step.
4. Side Lunges
Starting Position
- Stand tall with feet hip-width apart.
- Place your hands on your hips or hold a dumbbell at your chest.
Execution
- Step to the side with one leg, bending the knee and pushing your hips back as you lower your body.
- Keep the other leg straight and the foot flat on the ground.
- Push through the heel of the bent leg to return to the starting position.
- Repeat on the other side.
5. Curtsy Lunges
Starting Position
- Stand tall with feet hip-width apart.
- Place your hands on your hips or hold dumbbells by your sides.
Execution
- Step one leg behind and across the other leg, lowering your hips into a lunge position.
- Keep the front knee aligned with the toes and the back knee hovering just above the ground.
- Push through the front heel to return to the starting position.
- Repeat on the other leg.
Tips and Tricks for Proper Lunge Form
1. Knee Alignment
- Ensure the front knee tracks over the toes and does not collapse inward.
- Keep the back knee pointing down toward the ground.
2. Upright Torso
- Maintain an upright posture with your chest lifted and shoulders back.
- Avoid leaning forward or arching your back.
3. Core Engagement
- Tighten your core muscles to maintain balance and stability.
- A strong core helps prevent excessive forward or backward leaning.
4. Controlled Movement
- Perform the movement slowly and with control, avoiding sudden or jerky motions.
- Focus on smooth transitions between steps.
5. Step Length
- Take a step long enough to create a 90-degree angle in both knees when lowered.
- Avoid taking too short or too long steps, which can affect balance and form.
6. Heel Drive
- Push through the heel of the front foot to activate the glutes and hamstrings.
- This ensures better muscle engagement and stability.
7. Breathing
- Inhale as you lower your body into the lunge.
- Exhale as you push through your heel to return to the starting position.
8. Weight Distribution
- Distribute your weight evenly between both legs.
- Avoid putting too much pressure on the back leg.
Benefits of Lunges
1. Strength Building: Lunges build strength in the lower body and core, enhancing overall athletic performance.
2. Muscle Growth: Effective for hypertrophy in the legs and glutes, promoting muscle mass gain.
3. Balance and Stability: Lunges improve balance and stability by working one leg at a time.
4. Functional Movement: Mimics everyday movements, improving overall mobility and functional strength.
5. Versatility: Can be performed with bodyweight or added resistance (dumbbells, barbells) for increased intensity.
FAQs (Frequently Asked Questions)
1. Why are lunges important?
Answer : Lunges are crucial for strengthening the quads, glutes, and hamstrings. They also enhance balance, coordination, and functional movement, aiding in everyday activities and athletic performance.
2. How often should I do lunges?
Answer : Incorporate lunges into your workout routine 2-3 times per week, allowing adequate rest and recovery between sessions.
3. Can beginners do lunges?
Answer : Yes, beginners can start with bodyweight lunges to master the form before progressing to weighted lunges using dumbbells or barbells.
4. What is the correct form for lunges?
Answer : 1. Stand with feet hip-width apart. 2. Step forward with one leg, lowering your hips until both knees are at 90-degree angles. 3. Keep your front knee over your ankle and your back knee hovering above the ground. 4. Push through the front heel to return to the starting position.
5. What are the benefits of lunges?
Answer : Lunges build lower body strength, enhance muscle mass, improve balance and coordination, and contribute to better functional movement and overall fitness.
6. Are lunges bad for your knees?
Answer : When performed with proper form, lunges are not harmful to your knees. Ensure your front knee stays over your ankle and avoid letting it collapse inward.
7. How can I add variety to my lunge routine?
Answer : Try different variations such as reverse lunges, walking lunges, side lunges, and Bulgarian split squats to target different muscles and add variety to your routine.
8. Can lunges help with weight loss?
Answer : Yes, lunges can aid in weight loss by building muscle mass, which increases your metabolic rate, and by burning calories during the exercise.
9. Should I use weights for lunges?
Answer : Using weights can enhance muscle growth and strength. Start with bodyweight lunges to master the form, then gradually add weights like dumbbells or barbells.
10. How deep should I lunge?
Answer : Lower your hips until both knees are bent at 90-degree angles or as deep as your flexibility and strength allow while maintaining proper form.
Conclusion
Lunges are an essential exercise for strengthening the lower body, enhancing muscle mass, and improving overall fitness. By targeting the quads, glutes, and hamstrings, lunges boost balance, coordination, and functional movement, making daily activities and athletic performance easier and more efficient. Incorporating various lunge variations into your routine can add diversity and target different muscle groups. Prioritizing proper form and gradually increasing resistance ensures maximum benefits and minimizes injury risks. Whether you are a beginner or an advanced athlete, lunges are a valuable addition to any effective workout regimen, promoting long-term strength and stability.
You might also like our Best 10 Leg Workouts article in weight loss.
“Motivation is what gets you started. Habit is what keeps you going.” – Jim Ryun
If you would like more information about the 2024, please send us an email.
Written by Fitness Goal 4U
Smart Fitness Goals - Achieve Health with Simple Steps
Smart fitness goals focus on being Specific, Measurable, Achievable, Relevant, and Time-bound. They help you create a clear path to success, stay motivated, and track progress. Whether its weight loss, strength building, or improved endurance, smart goals guide your fitness journey, ensuring steady growth and sustainable results tailored to your needs.
“Confidence comes from discipline and training.” – Robert Kiyosaki
Deadlifts are a cornerstone exercise in strength training, renowned for their ability to build overall body strength and muscle mass. This compound movement primarily targets the hamstrings, glutes, lower back, and core, while also engaging the upper back and grip muscles. Deadlifts mimic everyday movements like lifting and carrying, making them highly functional and beneficial for improving daily activities and athletic performance.
The versatility of deadlifts allows for various forms, including conventional, sumo, Romanian, and stiff-legged deadlifts, each emphasizing different muscle groups and training aspects. Whether you aim to increase strength, enhance muscle growth, or improve functional fitness, deadlifts are indispensable.
Executing deadlifts with proper form is crucial to maximizing their benefits and preventing injury. This involves maintaining a neutral spine, engaging the core, and lifting with controlled motion. Incorporating deadlifts into your workout routine can lead to significant improvements in lower body strength, posture, and overall physical conditioning, making them a vital exercise for anyone serious about fitness.
How to Do Deadlifts
1. Conventional Deadlifts
Starting Position
- Stand with your feet hip-width apart, toes pointing slightly outward.
- Place a barbell in front of you, over the middle of your feet.
- Bend at your hips and knees to grab the bar with an overhand or mixed grip, hands just outside your knees.
Execution
- Engage your core and lift your chest.
- Push through your heels, extending your hips and knees simultaneously to lift the bar.
- Keep the bar close to your body, maintaining a straight back and neutral spine.
- Stand up fully, squeezing your glutes at the top.
- Lower the bar back down by bending at your hips and knees, keeping the bar close to your body.
2. Romanian Deadlifts
Starting Position
- Stand with your feet hip-width apart, holding a barbell or dumbbells in front of your thighs.
- Slightly bend your knees and engage your core.
Execution
- Hinge at your hips, lowering the bar or weights down the front of your legs.
- Keep your back straight and shoulders back, lowering the weight until you feel a stretch in your hamstrings.
- Push through your heels and extend your hips to return to the starting position.
3. Sumo Deadlifts
Starting Position
- Stand with your feet wider than shoulder-width apart, toes pointing outward.
- Place a barbell in front of you, over the middle of your feet.
- Bend at your hips and knees to grab the bar with an overhand grip, hands inside your knees.
Execution
- Engage your core and lift your chest.
- Push through your heels, extending your hips and knees simultaneously to lift the bar.
- Keep the bar close to your body, maintaining a straight back and neutral spine.
- Stand up fully, squeezing your glutes at the top.
- Lower the bar back down by bending at your hips and knees, keeping the bar close to your body.
4. Single-Leg Deadlifts
Starting Position
- Stand on one leg, holding a dumbbell or kettlebell in the opposite hand.
- Slightly bend your standing knee and engage your core.
Execution
- Hinge at your hips, lowering the weight down the front of your leg while lifting the other leg behind you.
- Keep your back straight and shoulders back.
- Lower the weight until you feel a stretch in your hamstrings.
- Push through your heel and extend your hips to return to the starting position.
- Repeat on the other leg.
Tips and Tricks for Proper Deadlift Form:
1. Maintain a Neutral Spine
- Keep your back straight and avoid rounding your lower back.
- Engage your core to support your spine throughout the movement.
2. Bar Path
- Keep the bar close to your body, almost grazing your shins and thighs as you lift.
- A straight bar path ensures proper form and reduces the risk of injury.
3. Hip Hinge
- Focus on hinging at your hips rather than squatting.
- Push your hips back to engage the hamstrings and glutes effectively.
4. Foot Placement
- For conventional deadlifts, keep your feet hip-width apart.
- For sumo deadlifts, take a wider stance with toes pointing outward.
5. Grip
- Use an overhand grip or mixed grip (one hand overhand, one hand underhand) for better grip strength.
- Chalk or lifting straps can help if grip is a limiting factor.
6. Engage Your Lats
- Pull your shoulder blades back and down to engage your lats and create tension in your upper body.
- This helps maintain a stable upper body and proper bar path.
7. Breathing
- Inhale deeply before lifting to create intra-abdominal pressure, stabilizing your core.
- Exhale as you lift the bar, and inhale as you lower it.
8. Glute Squeeze
- At the top of the lift, squeeze your glutes to ensure full hip extension.
- Avoid hyperextending your lower back at the top.
9. Warm-Up
- Perform dynamic stretches and lighter sets to warm up your muscles before lifting heavy weights.
- This helps prevent injuries and improves performance.
10. Progress Gradually
- Start with lighter weights to master the form before increasing the load.
- Gradually increase the weight as you become more comfortable and confident with the movement.
Benefits of Deadlifts
1. Strength Building: Deadlifts build overall strength in the lower and upper body, enhancing athletic performance.
2. Muscle Growth: Effective for hypertrophy in the hamstrings, glutes, lower back, and core, promoting muscle mass gain.
3. Functional Movement: Mimics real-life movements, improving overall mobility and functional strength.
4. Improved Posture: Strengthens the muscles supporting the spine, improving posture and reducing back pain.
5. Calorie Burn: Engages multiple muscle groups, aiding in calorie burn and weight management.
FAQs (Frequently Asked Questions)
1. Why are deadlifts important?
Answer : Deadlifts are crucial for building overall body strength, muscle mass, and functional fitness. They target multiple muscle groups, including the hamstrings, glutes, lower back, and core.
2. How often should I do deadlifts?
Answer : Incorporate deadlifts into your workout routine 1-2 times per week, allowing adequate rest and recovery between sessions to avoid overtraining.
3. Can beginners do deadlifts?
Answer : Yes, beginners can start with lighter weights or a modified version, such as Romanian deadlifts, to master the form before progressing to heavier lifts.
4. What is the correct form for deadlifts?
Answer : 1. Stand with feet hip-width apart. 2. Bend at hips and knees to grasp the barbell with hands just outside your knees. 3. Keep your back straight and chest up. 4. Lift by extending your hips and knees simultaneously. 5. Lower the bar back down with control.
5. What are the benefits of deadlifts?
Answer : Deadlifts build strength in the lower body, back, and core, enhance muscle mass, improve posture, and boost functional fitness by mimicking everyday movements.
6. Are deadlifts bad for your back?
Answer : When performed with proper form, deadlifts are not harmful to your back. Keeping a neutral spine and engaging your core are key to preventing injury.
7. How can I add variety to my deadlift routine?
Answer : Try different variations such as sumo deadlifts, Romanian deadlifts, and stiff-legged deadlifts to target different muscles and add variety to your routine.
8. Can deadlifts help with weight loss?
Answer : Yes, deadlifts can aid in weight loss by building muscle mass, which increases your metabolic rate, and by burning calories during the exercise.
9. Should I use a belt for deadlifts?
Answer : Using a weightlifting belt can provide additional support for your lower back, especially when lifting heavy weights. However, it’s important to also strengthen your core muscles.
10. How heavy should I lift in deadlifts?
Answer : Start with a weight that allows you to perform the exercise with proper form. Gradually increase the weight as you become more comfortable and confident with the movement.
Conclusion
Deadlifts are a fundamental exercise that significantly enhances overall strength, muscle mass, and functional fitness. By targeting key muscle groups such as the hamstrings, glutes, lower back, and core, deadlifts improve posture and athletic performance. Incorporating various deadlift variations into your routine can add diversity and target different muscles. Prioritizing proper form, gradual weight progression, and core engagement ensures maximum benefits and minimizes injury risks. Whether you are a beginner or an advanced lifter, deadlifts are a vital addition to any effective workout regimen, promoting long-term strength, stability, and overall physical conditioning.
You might also like our Best 10 Leg Workouts article in weight loss.
“Motivation is what gets you started. Habit is what keeps you going.” – Jim Ryun
If you would like more information about the 2024, please send us an email.
Written by Fitness Goal 4U
Smart Fitness Goals - Achieve Health with Simple Steps
Smart fitness goals focus on being Specific, Measurable, Achievable, Relevant, and Time-bound. They help you create a clear path to success, stay motivated, and track progress. Whether its weight loss, strength building, or improved endurance, smart goals guide your fitness journey, ensuring steady growth and sustainable results tailored to your needs.
“Confidence comes from discipline and training.” – Robert Kiyosaki
The leg press is a highly effective exercise that targets the quadriceps, hamstrings, and glutes, making it a staple in many strength training routines. Performed on a leg press machine, this exercise allows for controlled movements and the ability to lift heavier weights with reduced risk of injury. The leg press is especially beneficial for those looking to build lower body strength and muscle mass while minimizing strain on the lower back and joints.
To perform the leg press, you sit on the machine with your feet placed shoulder-width apart on the platform. As you press the platform away by extending your legs, you engage the major muscles of the lower body. It’s crucial to avoid locking your knees at the top of the movement and to lower the platform back down with control.
Incorporating the leg press into your workout routine can lead to significant improvements in leg strength, muscle definition, and overall lower body performance. Proper form and gradual weight progression are key to maximizing benefits and preventing injury.
How to Do the Leg Press Exercise
1. Standard Leg Press
Starting Position
- Sit on the leg press machine with your back and head resting against the padded support.
- Place your feet shoulder-width apart on the platform.
- Adjust the seat so that your knees form a 90-degree angle when your feet are on the platform.
Execution
- Grasp the handles on the sides of the seat for stability.
- Press the platform away by extending your knees and hips until your legs are straight, but do not lock your knees.
- Pause briefly at the top of the movement.
- Slowly lower the platform back to the starting position by bending your knees until they are at a 90-degree angle.
Tips and Tricks for Proper Leg Press Form
1. Foot Placement
- Standard Stance: Place feet shoulder-width apart for balanced quad and glute activation.
- High Stance: Place feet higher on the platform to emphasize glutes and hamstrings.
- Low Stance: Place feet lower on the platform to target the quadriceps more.
2. Knee Alignment
- Ensure your knees track over your toes and do not collapse inward or bow outward.
- Avoid locking your knees at the top of the movement to reduce stress on the joints.
3. Back and Head Position
- Keep your back and head firmly pressed against the padded support throughout the exercise.
- Avoid lifting your hips or arching your back to maintain proper form and prevent injury.
4. Controlled Movement
- Perform the exercise with a slow and controlled motion, avoiding jerky movements.
- Focus on both the concentric (pressing) and eccentric (lowering) phases of the movement.
5. Breathing
- Inhale as you lower the platform towards your body.
- Exhale as you press the platform away from you.
6. Range of Motion
- Lower the platform until your knees form a 90-degree angle or slightly deeper, depending on your flexibility and comfort.
- Avoid going too deep if it causes discomfort or loss of form.
7. Adjusting the Seat
- Adjust the seat position to ensure a comfortable and effective range of motion.
- Proper seat adjustment helps maintain the correct knee angle and reduces the risk of injury.
8. Weight Selection
- Start with a lighter weight to master the form before gradually increasing the load.
- Avoid lifting excessively heavy weights that compromise your form.
Benefits of the Leg Press Exercise
1. Strength Building: Builds strength in the quadriceps, glutes, and hamstrings, enhancing lower body power.
2. Muscle Growth: Effective for hypertrophy in the legs, promoting muscle mass gain.
3. Isolation: Allows for better isolation of leg muscles compared to compound exercises like squats.
4. Reduced Back Stress: Less strain on the lower back compared to free weight exercises.
5. Controlled Movement: Provides a controlled environment for safe and effective leg training.
FAQs (Frequently Asked Questions)
1. Why is the leg press important?
Answer : The leg press is essential for building lower body strength and muscle mass. It targets the quadriceps, hamstrings, and glutes, providing an effective workout with minimal strain on the lower back and joints.
2. How often should I do the leg press?
Answer : Incorporate the leg press into your workout routine 1-2 times per week, allowing adequate rest and recovery between sessions to avoid overtraining.
3. Can beginners do the leg press?
Answer : Yes, beginners can start with lighter weights on the leg press machine to master the form before gradually increasing the load.
4. What is the correct form for the leg press?
Answer : 1. Sit on the machine with your back and head against the padded support. 2. Place your feet shoulder-width apart on the platform. 3. Push the platform away by extending your legs, avoiding locking your knees. 4. Lower the platform back down with control.
5. What are the benefits of the leg press?
Answer : The leg press builds lower body strength, enhances muscle mass, and improves overall leg performance. It also helps in achieving muscle definition and supporting functional movements.
6. Are leg presses bad for your knees?
Answer : When performed with proper form, leg presses are not harmful to your knees. Ensure your knees track in line with your toes and avoid locking them at the top of the movement.
7. How can I add variety to my leg press routine?
Answer : Try different foot placements such as narrow, wide, high, and low on the platform to target different parts of the leg muscles.
8. Can leg presses help with weight loss?
Answer : Yes, leg presses can aid in weight loss by building muscle mass, which increases your metabolic rate, and by burning calories during the exercise.
9. Should I use heavy weights for the leg press?
Answer : Start with a weight that allows you to perform the exercise with proper form. Gradually increase the weight as you become more comfortable and confident with the movement.
10. How deep should I go in the leg press?
Answer : Lower the platform until your knees form a 90-degree angle or as deep as your flexibility and strength allow while maintaining proper form. Avoid going too deep to prevent undue stress on your knees and lower back.
Conclusion
The leg press is a highly effective exercise for building lower body strength and muscle mass. By targeting the quadriceps, hamstrings, and glutes, it offers a comprehensive workout with minimal strain on the lower back and joints. Incorporating the leg press into your fitness routine can significantly enhance leg performance, muscle definition, and overall physical fitness. Prioritizing proper form and gradually increasing weight ensures maximum benefits while minimizing the risk of injury. Whether you're a beginner or an advanced athlete, the leg press is a valuable addition to any workout regimen, promoting long-term strength and stability in the lower body.
You might also like our Best 10 Leg Workouts article in weight loss.
“Motivation is what gets you started. Habit is what keeps you going.” – Jim Ryun
If you would like more information about the 2024, please send us an email.
Written by Fitness Goal 4U
Smart Fitness Goals - Achieve Health with Simple Steps
Smart fitness goals focus on being Specific, Measurable, Achievable, Relevant, and Time-bound. They help you create a clear path to success, stay motivated, and track progress. Whether its weight loss, strength building, or improved endurance, smart goals guide your fitness journey, ensuring steady growth and sustainable results tailored to your needs.
“Confidence comes from discipline and training.” – Robert Kiyosaki
Step-ups Exercise are a highly effective lower body exercise that targets the quadriceps, glutes, and hamstrings while also engaging the core for stability. This functional movement mimics everyday activities like climbing stairs, making it an excellent addition to any fitness routine for improving overall strength, balance, and coordination. Step-ups can be performed with bodyweight or added resistance such as dumbbells or barbells, making them suitable for all fitness levels.
The versatility of step-ups allows for various modifications, including different heights of the step or platform and incorporating forward, lateral, or reverse movements to target different muscle groups. Proper execution of step-ups involves stepping onto a stable platform with one leg, pushing through the heel to lift the body up, and then stepping down with control. This exercise not only strengthens the lower body but also enhances cardiovascular fitness and agility.
Incorporating step-ups into your workout routine can lead to significant improvements in leg strength, functional fitness, and overall athletic performance.
How to Do Step-Ups Exercise
1. Bodyweight Step-Ups
Starting Position
- Stand facing a sturdy bench, box, or step that is about knee height.
- Place your hands on your hips or let them hang by your sides.
Execution
- Place your right foot on the bench, ensuring your entire foot is flat.
- Push through your right heel to lift your body up onto the bench, bringing your left foot up to meet the right.
- Step back down with your left foot, followed by your right foot to return to the starting position.
- Repeat the movement starting with your left foot.
- Alternate legs for the desired number of repetitions.
2. Dumbbell Step-Ups
Starting Position
- Hold a dumbbell in each hand with your arms fully extended by your sides.
- Stand facing a sturdy bench, box, or step that is about knee height.
Execution
- Place your right foot on the bench, ensuring your entire foot is flat.
- Push through your right heel to lift your body up onto the bench, bringing your left foot up to meet the right.
- Step back down with your left foot, followed by your right foot to return to the starting position.
- Repeat the movement starting with your left foot.
- Alternate legs for the desired number of repetitions.
3. Barbell Step-Ups
Starting Position
- Position a barbell across your upper back (trapezius muscles).
- Stand facing a sturdy bench, box, or step that is about knee height.
Execution
- Place your right foot on the bench, ensuring your entire foot is flat.
- Push through your right heel to lift your body up onto the bench, bringing your left foot up to meet the right.
- Step back down with your left foot, followed by your right foot to return to the starting position.
- Repeat the movement starting with your left foot.
- Alternate legs for the desired number of repetitions.
Tips and Tricks for Proper Step-Up Exercise
1. Foot Placement
- Ensure your entire foot is flat on the bench to provide stability.
- Avoid letting your heel hang off the edge of the bench.
2. Knee Alignment
- Keep your knee aligned with your toes to prevent excessive strain on the knee joint.
- Avoid allowing your knee to collapse inward.
3. Upright Torso
- Maintain an upright posture with your chest lifted and shoulders back.
- Avoid leaning forward or arching your back.
4. Controlled Movement
- Perform the movement slowly and with control, especially when stepping down.
- Focus on using the working leg to lift your body rather than pushing off the trailing leg.
5. Core Engagement
- Tighten your core muscles to maintain balance and stability throughout the exercise.
- A strong core helps prevent excessive forward or backward leaning.
6. Breathing
- Inhale as you step up onto the bench.
- Exhale as you push through your heel to lift your body.
7. Height of the Step
- Choose a bench or step height that allows for a comfortable and effective range of motion.
- Higher steps increase the challenge but ensure you can maintain proper form.
8. Progress Gradually
- Start with bodyweight step-ups to master the form before adding weights.
- Gradually increase the weight or step height as you become more comfortable and confident with the movement.
Benefits of Step-Ups Exercise
1. Strength Building: Builds strength in the quadriceps, glutes, and hamstrings, enhancing lower body power.
2. Balance and Stability: Improves balance and stability by working one leg at a time.
3. Functional Movement: Mimics everyday activities, improving overall mobility and functional strength.
4. Calorie Burn: Engages multiple muscle groups, aiding in calorie burn and weight management.
5. Versatility: Can be performed with bodyweight or added resistance (dumbbells, barbells) for increased intensity.
FAQs (Frequently Asked Questions)
1. Why are step-ups important?
Answer : Step-ups are essential for building lower body strength, improving balance, and enhancing functional fitness. They target the quadriceps, glutes, and hamstrings while also engaging the core.
2. How often should I do step-ups?
Answer : Incorporate step-ups into your workout routine 2-3 times per week, allowing adequate rest and recovery between sessions.
3. Can beginners do step-ups?
Answer : Yes, beginners can start with bodyweight step-ups on a lower platform to master the form before progressing to higher platforms or adding weights.
4. What is the correct form for step-ups?
Answer : 1. Stand facing a stable platform or step. 2. Place one foot entirely on the platform. 3. Push through the heel of the leading foot to lift your body up. 4. Bring the trailing foot up to meet the leading foot. 5. Step down with the trailing foot, followed by the leading foot.
5. What are the benefits of step-ups?
Answer : Step-ups build lower body strength, improve balance and coordination, enhance cardiovascular fitness, and increase agility. They also mimic everyday movements, improving functional performance.
6. Are step-ups bad for your knees?
Answer : When performed with proper form, step-ups are not harmful to your knees. Ensure your knee tracks over your toes and avoid allowing it to collapse inward.
7. How can I add variety to my step-up routine?
Answer : Incorporate different heights of the step or platform and try variations such as lateral step-ups, reverse step-ups, or adding weights for increased resistance.
8. Can step-ups help with weight loss?
Answer : Yes, step-ups can aid in weight loss by burning calories and building muscle mass, which increases your metabolic rate.
9. Should I use weights for step-ups?
Answer : Using weights can increase the intensity and effectiveness of step-ups. Start with bodyweight to master the form, then gradually add weights like dumbbells or barbells.
10. How high should the step be for step-ups?
Answer : Choose a step height that challenges you but allows you to maintain proper form. Typically, a height between knee and mid-thigh level is appropriate.
Conclusion
Step-ups are an excellent exercise for enhancing lower body strength, balance, and overall functional fitness. By targeting the quadriceps, glutes, and hamstrings, they help improve everyday movements and athletic performance. The versatility of step-ups allows for various modifications and the use of added resistance, making them suitable for all fitness levels. Prioritizing proper form and gradually increasing the intensity will maximize the benefits while minimizing the risk of injury. Incorporating step-ups into your workout routine can lead to significant improvements in leg strength, cardiovascular fitness, and agility, making them a valuable addition to any effective fitness regimen.
You might also like our Best 10 Leg Workouts article in weight loss.
“Motivation is what gets you started. Habit is what keeps you going.” – Jim Ryun
If you would like more information about the 2024, please send us an email.
Written by Fitness Goal 4U
Smart Fitness Goals - Achieve Health with Simple Steps
Smart fitness goals focus on being Specific, Measurable, Achievable, Relevant, and Time-bound. They help you create a clear path to success, stay motivated, and track progress. Whether its weight loss, strength building, or improved endurance, smart goals guide your fitness journey, ensuring steady growth and sustainable results tailored to your needs.
“Confidence comes from discipline and training.” – Robert Kiyosaki
Calf Raises Exercise are a fundamental exercise that specifically targets the calf muscles, including the gastrocnemius and soleus. This exercise is essential for building lower leg strength, endurance, and stability, which are crucial for various athletic activities such as running, jumping, and cycling. Calf raises can be easily incorporated into any fitness routine and can be performed with bodyweight or added resistance, such as dumbbells or barbells.
There are several variations of calf raises, including standing calf raises, seated calf raises, and donkey calf raises, each emphasizing different parts of the calf muscles. Proper execution involves lifting the heels off the ground while balancing on the balls of the feet, then lowering them back down with control. Incorporating calf raises into your workouts helps improve muscle definition, enhance lower leg power, and prevent injuries related to weak or imbalanced calf muscles. Whether you’re a beginner or an advanced athlete, calf raises are a valuable addition to any comprehensive fitness program.
How to Do Calf Raises Exercise
1. Standing Calf Raises
Starting Position
- Stand with your feet hip-width apart, toes pointing forward.
- Place your hands on your hips, hold onto a stable surface for balance, or hold dumbbells by your sides.
Execution
- Lift your heels off the ground by pressing through the balls of your feet.
- Raise your body as high as possible onto your toes.
- Pause briefly at the top, squeezing your calf muscles.
- Slowly lower your heels back down to the starting position.
- Repeat for the desired number of repetitions.
2. Seated Calf Raises
Starting Position
- Sit on a bench or chair with your feet flat on the floor, hip-width apart.
- Place a weight (such as a dumbbell or barbell) across your thighs just above your knees.
Execution
- Lift your heels off the ground by pressing through the balls of your feet.
- Raise your heels as high as possible.
- Pause briefly at the top, squeezing your calf muscles.
- Slowly lower your heels back down to the starting position.
- Repeat for the desired number of repetitions.
3. Donkey Calf Raises
Starting Position
- Stand with your feet hip-width apart and bend forward at the hips to place your hands on a stable surface (such as a bench or platform).
- Your back should be flat, and your torso parallel to the ground.
Execution
- Lift your heels off the ground by pressing through the balls of your feet.
- Raise your heels as high as possible.
- Pause briefly at the top, squeezing your calf muscles.
- Slowly lower your heels back down to the starting position.
- Repeat for the desired number of repetitions.
Tips and Tricks for Proper Calf Raises Exercise
1. Full Range of Motion
- Ensure you lift your heels as high as possible to fully contract the calf muscles.
- Lower your heels back down to the starting position for a full stretch.
2. Controlled Movement
- Perform the exercise with a slow and controlled motion, avoiding bouncing or using momentum.
- Focus on the eccentric (lowering) phase as much as the concentric (lifting) phase.
3. Balance and Stability
- Use a stable surface for balance if needed, especially when lifting heavier weights.
- Keep your core engaged to maintain stability throughout the movement.
4. Proper Foot Position
- Keep your feet hip-width apart and your toes pointing forward.
- Experiment with different foot positions (toes pointing in or out) to target different parts of the calf muscles.
5. Breathing
- Inhale as you lower your heels.
- Exhale as you lift your heels.
6. Adding Resistance
- Start with bodyweight calf raises to master the form before adding weights.
- Gradually increase the weight or resistance to continue challenging your muscles.
7. Progress Gradually
- Increase the number of repetitions or sets as your calves become stronger.
- Vary the type of calf raises you perform to target different parts of the calf muscles.
8. Stretching
- Stretch your calf muscles before and after performing calf raises to prevent tightness and improve flexibility.
- A good stretch involves standing with one leg forward, the other leg back, and pushing against a wall to feel a stretch in the back calf.
Benefits of Calf Raises Exercise
1. Strength Building: Builds strength in the calf muscles, improving overall lower body power and performance.
2. Muscle Definition: Enhances muscle definition and size in the calves, contributing to a more balanced and aesthetically pleasing physique.
3. Improved Stability: Strengthens the calves, which are essential for balance and stability during various physical activities.
4. Enhanced Athletic Performance: Improves performance in activities that involve running, jumping, and quick changes of direction.
5. Injury Prevention: Strong calf muscles can help prevent injuries such as Achilles tendonitis and calf strains.
FAQs (Frequently Asked Questions)
1. Why are calf raises important?
Answer : Calf raises are essential for strengthening the calf muscles, improving lower leg stability, enhancing athletic performance, and preventing injuries related to weak or imbalanced calves.
2. How often should I do calf raises?
Answer : Incorporate calf raises into your workout routine 2-3 times per week, allowing adequate rest and recovery between sessions to avoid overtraining.
3. Can beginners do calf raises?
Answer : Yes, beginners can start with bodyweight calf raises to master the form before progressing to added resistance like dumbbells or barbells.
4. What is the correct form for calf raises?
Answer : 1. Stand with feet hip-width apart. 2. Lift your heels off the ground, balancing on the balls of your feet. 3. Pause briefly at the top, squeezing your calf muscles. 4. Lower your heels back down with control.
5. What are the benefits of calf raises?
Answer : Calf raises build lower leg strength, improve muscle definition, enhance endurance and power, and contribute to better overall lower body stability.
6. Are calf raises bad for your ankles?
Answer : When performed with proper form, calf raises are not harmful to your ankles. Ensure controlled movements and avoid excessive bouncing to reduce strain on the joints.
7. How can I add variety to my calf raise routine?
Answer : Incorporate different variations such as standing calf raises, seated calf raises, and donkey calf raises to target different parts of the calf muscles.
8. Can calf raises help with running performance?
Answer : Yes, calf raises can enhance running performance by improving calf strength, endurance, and the power needed for propulsion during running.
9. Should I use weights for calf raises?
Answer : Using weights can increase the intensity and effectiveness of calf raises. Start with bodyweight to master the form, then gradually add weights like dumbbells or barbells.
10. How high should I lift my heels during calf raises?
Answer : Lift your heels as high as possible while maintaining balance and control. Focus on achieving a full range of motion to maximize muscle activation.
11. How many repetitions should I do?
Answer : Aim for 2-3 sets of 12-15 repetitions, adjusting based on your fitness level and goals. Gradually increase the number of repetitions or sets as you build strength.
Conclusion
Calf raises are a fundamental exercise for developing lower leg strength, endurance, and stability. By targeting the calf muscles, they enhance athletic performance, improve muscle definition, and prevent injuries related to weak or imbalanced calves. Incorporating various calf raise variations into your routine ensures comprehensive muscle development and keeps workouts engaging. Prioritizing proper form and gradually increasing resistance will maximize benefits while minimizing the risk of injury. Whether you are a beginner or an advanced athlete, calf raises are a valuable addition to any fitness regimen, contributing to overall lower body strength and improved functional performance.
You might also like our Best 10 Leg Workouts article in weight loss.
“Motivation is what gets you started. Habit is what keeps you going.” – Jim Ryun
If you would like more information about the 2024, please send us an email.
Written by Fitness Goal 4U
Smart Fitness Goals - Achieve Health with Simple Steps
Smart fitness goals focus on being Specific, Measurable, Achievable, Relevant, and Time-bound. They help you create a clear path to success, stay motivated, and track progress. Whether its weight loss, strength building, or improved endurance, smart goals guide your fitness journey, ensuring steady growth and sustainable results tailored to your needs.
“Confidence comes from discipline and training.” – Robert Kiyosaki
Glute Bridges Exercise are a highly effective exercise designed to target and strengthen the glutes, hamstrings, and core muscles. This versatile movement is ideal for enhancing lower body strength, improving hip stability, and increasing overall functional fitness. Glute bridges can be performed using bodyweight or with added resistance such as dumbbells, barbells, or resistance bands, making them suitable for all fitness levels.
There are several variations of glute bridges, including single-leg bridges, weighted bridges, and elevated bridges, each offering unique benefits and targeting different aspects of the gluteal muscles. The basic form involves lying on your back with your knees bent and feet flat on the ground, then lifting your hips to form a straight line from your shoulders to your knees.
Incorporating glute bridges into your workout routine can help improve posture, reduce lower back pain, and enhance athletic performance. This exercise is particularly beneficial for those looking to build a strong, toned lower body while also promoting better overall stability and mobility.
How to Do Glute Bridges Exercise
1. Bodyweight Glute Bridges
Starting Position
- Lie on your back with your knees bent and feet flat on the floor, hip-width apart.
- Place your arms at your sides, palms facing down.
Execution
- Engage your core and squeeze your glutes.
- Lift your hips off the ground until your body forms a straight line from your shoulders to your knees.
- Pause briefly at the top, squeezing your glutes.
- Slowly lower your hips back down to the starting position.
- Repeat for the desired number of repetitions.
2. Single-Leg Glute Bridges
Starting Position
- Lie on your back with your knees bent and feet flat on the floor, hip-width apart.
- Extend one leg straight out, keeping the other foot flat on the floor.
Execution
- Engage your core and squeeze your glutes.
- Lift your hips off the ground until your body forms a straight line from your shoulders to your knees, with one leg extended.
- Pause briefly at the top, squeezing your glutes.
- Slowly lower your hips back down to the starting position.
- Repeat for the desired number of repetitions, then switch legs.
3. Weighted Glute Bridges
Starting Position
- Lie on your back with your knees bent and feet flat on the floor, hip-width apart.
- Place a dumbbell or barbell across your hips, holding it with both hands for stability.
Execution
- Engage your core and squeeze your glutes.
- Lift your hips off the ground until your body forms a straight line from your shoulders to your knees.
- Pause briefly at the top, squeezing your glutes.
- Slowly lower your hips back down to the starting position.
- Repeat for the desired number of repetitions.
Tips and Tricks for Proper Glute Bridges Exercise
1. Engage Your Core
- Tighten your core muscles throughout the movement to maintain stability and support your lower back.
- A strong core helps prevent excessive arching of the lower back.
2. Squeeze Your Glutes
- Focus on squeezing your glutes at the top of the movement to maximize muscle activation.
- Avoid using momentum to lift your hips; use muscle power instead.
3. Foot Placement
- Keep your feet hip-width apart and flat on the floor.
- Adjust the distance of your feet from your hips to find a comfortable position that allows for full hip extension.
4. Controlled Movement
- Perform the exercise with a slow and controlled motion, avoiding jerky or fast movements.
- Focus on both the concentric (lifting) and eccentric (lowering) phases of the movement.
5. Breathing
- Inhale as you lower your hips.
- Exhale as you lift your hips.
6. Avoid Overextending
- Lift your hips until your body forms a straight line from your shoulders to your knees.
- Avoid overextending your lower back at the top of the movement.
7. Use a Pad for Comfort
- If using a barbell, place a pad or towel on your hips to reduce discomfort and pressure.
8. Progress Gradually
- Start with bodyweight glute bridges to master the form before adding weights.
- Gradually increase the resistance as you become more comfortable and confident with the movement.
Benefits of Glute Bridges Exercise
1. Strength Building: Builds strength in the glutes, hamstrings, and core, enhancing lower body power and performance.
2. Muscle Activation: Effective for targeting and activating the glutes, which can be underutilized in other exercises.
3. Improved Hip Mobility: Enhances hip mobility and flexibility, reducing the risk of injuries.
4. Lower Back Support: Strengthens the muscles supporting the lower back, improving posture and reducing back pain.
5. Functional Movement: Mimics real-life movements, improving overall mobility and functional strength.
FAQs (Frequently Asked Questions)
1. Why are glute bridges important?
Answer : Glute bridges are essential for strengthening the glutes, hamstrings, and core muscles. They improve lower body strength, hip stability, and overall functional fitness.
2. How often should I do glute bridges?
Answer : Incorporate glute bridges into your workout routine 2-3 times per week, allowing adequate rest and recovery between sessions.
3. Can beginners do glute bridges?
Answer : Yes, beginners can start with bodyweight glute bridges to master the form before progressing to variations with added resistance like dumbbells or barbells.
4. What is the correct form for glute bridges?
Answer : 1. Lie on your back with knees bent and feet flat on the floor, hip-width apart. 2. Engage your core and squeeze your glutes. 3. Lift your hips until your body forms a straight line from shoulders to knees. 4. Pause briefly at the top, then lower your hips back down with control.
5. What are the benefits of glute bridges?
Answer : Glute bridges build lower body strength, enhance hip stability, improve posture, reduce lower back pain, and contribute to better athletic performance.
6. Are glute bridges bad for your back?
Answer : When performed with proper form, glute bridges are not harmful to your back. They can actually help alleviate lower back pain by strengthening the supporting muscles.
7. How can I add variety to my glute bridge routine?
Answer : Incorporate variations such as single-leg glute bridges, weighted glute bridges, and elevated glute bridges to target different muscle groups and increase intensity.
8. Can glute bridges help with lower back pain?
Answer : Yes, glute bridges can help alleviate lower back pain by strengthening the glutes and core, which support the lower back and improve posture.
9. Should I use weights for glute bridges?
Answer : Using weights can increase the intensity and effectiveness of glute bridges. Start with bodyweight to master the form, then gradually add weights like dumbbells or barbells.
10. How high should I lift my hips during glute bridges?
Answer : Lift your hips until your body forms a straight line from shoulders to knees. Avoid overextending your lower back to prevent strain. Focus on squeezing your glutes at the top of the movement.
11. How many repetitions should I do?
Answer : Aim for 2-3 sets of 12-15 repetitions, adjusting based on your fitness level and goals. Gradually increase the number of repetitions or sets as you build strength.
Conclusion
Glute bridges are a highly effective exercise for strengthening the glutes, hamstrings, and core. By incorporating glute bridges into your workout routine, you can enhance lower body strength, improve hip stability, and reduce lower back pain. This versatile exercise is suitable for all fitness levels and can be modified with various resistance options to increase intensity. Prioritizing proper form ensures maximum benefits while minimizing the risk of injury. Whether you're aiming to improve athletic performance, enhance functional fitness, or achieve a stronger, more toned lower body, glute bridges are a valuable addition to any exercise regimen.
You might also like our Best 10 Leg Workouts article in weight loss.
“Motivation is what gets you started. Habit is what keeps you going.” – Jim Ryun
If you would like more information about the 2024, please send us an email.
Written by Fitness Goal 4U
Smart Fitness Goals - Achieve Health with Simple Steps
Smart fitness goals focus on being Specific, Measurable, Achievable, Relevant, and Time-bound. They help you create a clear path to success, stay motivated, and track progress. Whether its weight loss, strength building, or improved endurance, smart goals guide your fitness journey, ensuring steady growth and sustainable results tailored to your needs.
“Confidence comes from discipline and training.” – Robert Kiyosaki
Hamstring Curls Exercise are a fundamental exercise targeting the muscles at the back of the thigh, crucial for improving leg strength, stability, and overall lower body functionality. This exercise primarily engages the hamstrings, aiding in enhanced flexibility and injury prevention. There are two main variations: seated and lying hamstring curls, each offering unique benefits. Seated curls focus on isolating the hamstring muscles while reducing strain on the lower back, making them suitable for individuals with back issues. Lying curls, on the other hand, provide a full range of motion, effectively building muscle and enhancing endurance. Hamstring curls can be performed using machines at the gym or resistance bands at home, catering to various fitness levels. Regular incorporation of hamstring curls into workout routines can lead to improved athletic performance, better posture, and a balanced muscular structure, making them an essential component of a well-rounded fitness regimen.
How to Do Hamstring Curls Exercise
1. Lying Hamstring Curls (Machine)
Starting Position
- Adjust the machine so that the padded lever is positioned just above your heels.
- Lie face down on the machine with your legs fully extended.
- Grasp the handles for stability.
Execution
- Engage your hamstrings and curl your legs up towards your buttocks.
- Pause briefly at the top of the movement, squeezing your hamstrings.
- Slowly lower your legs back to the starting position.
- Repeat for the desired number of repetitions.
2. Seated Hamstring Curls (Machine)
Starting Position
- Adjust the machine so that the padded lever is positioned just above your heels and the thigh pad is snug against your thighs.
- Sit on the machine with your legs fully extended.
- Grasp the handles for stability.
Execution
- Engage your hamstrings and curl your legs down towards the floor.
- Pause briefly at the bottom of the movement, squeezing your hamstrings.
- Slowly return your legs to the starting position.
- Repeat for the desired number of repetitions.
3. Stability Ball Hamstring Curls
Starting Position
- Lie on your back with your legs extended and your heels resting on a stability ball.
- Place your arms at your sides, palms facing down.
Execution
- Engage your core and lift your hips off the ground, forming a straight line from your shoulders to your heels.
- Bend your knees and curl the stability ball towards your glutes.
- Pause briefly at the top, squeezing your hamstrings.
- Slowly extend your legs to roll the ball back to the starting position while keeping your hips lifted.
- Repeat for the desired number of repetitions.
4. Resistance Band Hamstring Curls
Starting Position
- Attach a resistance band to a low anchor point and secure the other end around your ankles.
- Lie face down on a mat with your legs fully extended.
Execution
- Engage your hamstrings and curl your legs up towards your buttocks, stretching the resistance band.
- Pause briefly at the top, squeezing your hamstrings.
- Slowly lower your legs back to the starting position.
- Repeat for the desired number of repetitions.
Tips and Tricks for Proper Hamstring Curls Exercise
1. Adjust the Machine Properly
- Ensure the machine is adjusted correctly for your height and leg length.
- The padded lever should rest just above your heels, and the thigh pad should be snug against your thighs.
2. Controlled Movement
- Perform the exercise with a slow and controlled motion, avoiding jerky or fast movements.
- Focus on both the concentric (curling) and eccentric (lowering) phases of the movement.
3. Full Range of Motion
- Use a full range of motion to maximize muscle activation.
- Curl your legs as far as possible without lifting your hips off the bench.
4. Breathing
- Inhale as you lower your legs.
- Exhale as you curl your legs up.
5. Avoid Using Momentum
- Do not use momentum to lift the weight; rely on the strength of your hamstrings.
- Keep the rest of your body still and stable during the exercise.
6. Foot Position
- Keep your feet flexed throughout the movement to maintain tension on the hamstrings.
- Experiment with different foot positions (toes pointed or flexed) to target different parts of the hamstrings.
8. Engage Your Core
- Tighten your core muscles to support your lower back and maintain stability.
- A strong core helps prevent excessive arching of the lower back.
9. Progress Gradually
- Start with a lighter weight or resistance to master the form before increasing the load.
- Gradually increase the weight or resistance as you become more comfortable and confident with the movement.
Benefits of Hamstring Curls Exercise
1. Strength Building: Builds strength in the hamstrings, enhancing lower body power and performance.
2. Muscle Growth: Effective for hypertrophy in the hamstrings, promoting muscle mass gain.
3. Injury Prevention: Strengthening the hamstrings can help prevent injuries such as strains and tears.
4. Improved Leg Function: Enhances overall leg function and stability, which is important for athletic performance.
5. Balanced Muscle Development: Complements quad-dominant exercises to ensure balanced muscle development in the legs.
FAQs (Frequently Asked Questions)
1. What muscles do hamstring curls target?
Answer : Hamstring curls primarily target the hamstring muscles located at the back of the thigh. They also engage the glutes and calves to a lesser extent.
2. What are the benefits of hamstring curls?
Answer : Hamstring curls enhance leg strength, improve flexibility, aid in injury prevention, and contribute to overall lower body stability and functionality.
3. How do I perform a hamstring curl correctly?
Answer : For seated curls, sit on the machine with your legs straight and curl them towards your buttocks. For lying curls, lie face down and curl your legs upwards towards your glutes. Always maintain controlled movements and proper form.
4. Can I do hamstring curls at home?
Answer : Yes, hamstring curls can be performed at home using resistance bands or stability balls as alternatives to gym machines.
5. How often should I include hamstring curls in my workout routine?
Answer : Incorporating hamstring curls 2-3 times a week is recommended for balanced lower body strength and development.
6. Are there any variations of hamstring curls?
Answer : Yes, variations include seated, lying, standing, and single-leg hamstring curls, each offering different benefits and targeting the muscles slightly differently.
7. Can hamstring curls help with lower back pain?
Answer : Strengthening the hamstrings can alleviate lower back pain by improving overall lower body stability and reducing strain on the lower back.
8. Should beginners do hamstring curls?
Answer : Yes, beginners can start with lighter weights or resistance bands and gradually increase intensity as they build strength and confidence.
9. What common mistakes should I avoid during hamstring curls?
Answer : Avoid using excessive weight, arching your back, and performing fast, uncontrolled movements. Focus on maintaining proper form and a slow, steady pace.
10. Can hamstring curls be part of a rehabilitation program?
Answer : Yes, hamstring curls can be included in rehabilitation programs under the guidance of a healthcare professional to aid in recovering from leg or knee injuries.
Conclusion
In conclusion, hamstring curls are a vital exercise for strengthening the hamstrings, improving flexibility, and enhancing overall lower body stability. Whether performed seated, lying, or using resistance bands at home, this versatile exercise can be adapted to fit various fitness levels and goals. Regular inclusion of hamstring curls in your workout regimen can lead to better athletic performance, reduced risk of injury, and a balanced muscular structure. By ensuring proper form and gradually increasing intensity, individuals can effectively harness the benefits of hamstring curls, making them an essential component of a comprehensive fitness program.
You might also like our Best 10 Leg Workouts article in weight loss.
“Motivation is what gets you started. Habit is what keeps you going.” – Jim Ryun
If you would like more information about the 2024, please send us an email.
Written by Fitness Goal 4U
Smart Fitness Goals - Achieve Health with Simple Steps
Smart fitness goals focus on being Specific, Measurable, Achievable, Relevant, and Time-bound. They help you create a clear path to success, stay motivated, and track progress. Whether its weight loss, strength building, or improved endurance, smart goals guide your fitness journey, ensuring steady growth and sustainable results tailored to your needs.
“Confidence comes from discipline and training.” – Robert Kiyosaki
Leg Extensions Exercise are a popular and effective exercise primarily targeting the quadriceps, the large muscles at the front of the thigh. Performed using a leg extension machine, this exercise involves sitting with your legs bent at the knees and then extending them straight out in front of you against resistance. This isolated movement helps to strengthen and tone the quadriceps, improving overall leg strength and stability. Ideal for both beginners and advanced fitness enthusiasts, leg extensions can enhance athletic performance, support knee health, and aid in rehabilitation after injuries. Additionally, they play a crucial role in balanced leg development, which is essential for various physical activities, from running and jumping to daily tasks like walking and climbing stairs. Incorporating leg extensions into your workout routine can lead to stronger, more defined legs and contribute to overall lower body fitness and functionality.
How to Do Leg Extensions Exercise
1. Machine Leg Extensions
Starting Position
- Adjust the seat of the leg extension machine so that your knees align with the machine’s pivot point.
- Sit on the machine with your back against the backrest.
- Place your feet under the padded lever, with your legs bent at a 90-degree angle.
- Grasp the handles on the sides of the seat for stability.
Execution
- Engage your quadriceps and extend your legs fully by lifting the padded lever until your legs are straight.
- Pause briefly at the top of the movement, squeezing your quadriceps.
- Slowly lower the lever back to the starting position, bending your knees to a 90-degree angle.
- Repeat for the desired number of repetitions.
Tips and Tricks for Proper Leg Extensions Exercise
1. Seat Adjustment
- Ensure the seat is adjusted correctly so that your knees are aligned with the machine’s pivot point.
- Proper alignment is crucial for avoiding knee strain and maximizing muscle activation.
2. Foot Placement
- Place your feet under the padded lever so that the pads rest comfortably on your shins, just above your ankles.
- Avoid placing the pads too high or too low on your legs.
3. Controlled Movement
- Perform the exercise with a slow and controlled motion, avoiding jerky or fast movements.
- Focus on both the concentric (lifting) and eccentric (lowering) phases of the movement.
4. Full Range of Motion
- Extend your legs fully to maximize quadriceps activation.
- Avoid locking your knees at the top of the movement to reduce stress on the joints.
5. Breathing
- Inhale as you lower the lever back to the starting position.
- Exhale as you extend your legs.
6. Knee Alignment
- Ensure your knees track in line with your toes and do not collapse inward or bow outward.
- This helps distribute the load evenly and prevents knee injuries.
7. Engage Your Core
- Tighten your core muscles to maintain stability and support your lower back.
- A strong core helps prevent excessive arching of the lower back.
8. Use Appropriate Weight
- Start with a lighter weight to master the form before increasing the load.
- Gradually increase the weight as you become more comfortable and confident with the movement.
9. Avoid Overuse
- While leg extensions are effective, avoid overusing this exercise to prevent undue stress on the knees.
- Incorporate a variety of exercises in your leg workout routine for balanced muscle development.
Benefits of Leg Extensions Exercise
1. Strength Building: Builds strength in the quadriceps, enhancing lower body power and performance.
2. Muscle Definition: Effective for isolating and defining the muscles of the front thighs.
3. Improved Knee Stability: Strengthens the quadriceps, which support and stabilize the knee joint.
4. Rehabilitation: Useful in rehabilitation settings for strengthening the quadriceps after knee injuries.
5. Targeted Isolation: Allows for focused muscle engagement without involving other lower body muscles.
FAQs (Frequently Asked Questions)
1. What muscles do leg extensions target?
Answer : Leg extensions primarily target the quadriceps, the large muscles at the front of the thighs.
2. Are leg extensions safe for the knees?
Answer : When performed with proper form and moderate weight, leg extensions can be safe and beneficial for knee strength. However, it's essential to avoid excessive weights and to maintain control throughout the movement.
3. How do I perform a leg extension correctly?
Answer : Sit on the leg extension machine with your back against the pad. Adjust the pad so it rests just above your ankles. Extend your legs until they are straight, then slowly lower them back to the starting position.
4. Can leg extensions help with knee pain?
Answer : Leg extensions can help strengthen the muscles around the knee, potentially reducing knee pain. However, it's crucial to consult with a healthcare professional before starting if you have existing knee issues.
5. How many sets and reps should I do?
Answer : A typical recommendation is 3-4 sets of 10-15 reps, but this can vary based on individual fitness goals and experience levels.
6. Can leg extensions be part of a rehab program?
Answer : Yes, leg extensions can be included in a rehabilitation program, especially for knee recovery, but should be performed under the guidance of a physical therapist.
7. What are some common mistakes to avoid?
Answer : Avoid using too much weight, which can strain the knees. Ensure controlled movements, don't lock your knees at the top of the extension, and maintain proper seating posture to avoid injury.
8. Are there any alternatives to leg extensions?
Answer : Yes, alternatives include squats, lunges, and step-ups, which also target the quadriceps and other leg muscles.
9. Can leg extensions help build muscle?
Answer : Yes, leg extensions are effective for building and toning the quadriceps muscles, contributing to overall leg muscle development.
10. Should beginners include leg extensions in their routine?
Answer : Leg extensions can be a great exercise for beginners to target their quadriceps, but it's important to start with light weights and focus on proper form.
Conclusion
Leg extensions are a valuable exercise for anyone looking to strengthen and tone their quadriceps, improve leg stability, and enhance overall lower body fitness. By isolating the quadriceps, this exercise can help in developing muscular endurance, power, and aesthetic appeal. When incorporated into a balanced workout routine and performed with proper form, leg extensions can support knee health and aid in rehabilitation processes. Whether you are a beginner or an advanced fitness enthusiast, leg extensions offer a versatile and effective way to achieve your fitness goals. Always remember to use appropriate weights and maintain control to prevent injuries and maximize benefits.
You might also like our Best 10 Leg Workouts article in weight loss.
“Motivation is what gets you started. Habit is what keeps you going.” – Jim Ryun
If you would like more information about the 2024, please send us an email.
Written by Fitness Goal 4U
Smart Fitness Goals - Achieve Health with Simple Steps
Smart fitness goals focus on being Specific, Measurable, Achievable, Relevant, and Time-bound. They help you create a clear path to success, stay motivated, and track progress. Whether its weight loss, strength building, or improved endurance, smart goals guide your fitness journey, ensuring steady growth and sustainable results tailored to your needs.
“Confidence comes from discipline and training.” – Robert Kiyosaki
Box Jumps Exercise is a high-intensity plyometric exercise that involves jumping onto and off a sturdy platform, such as a box or bench. This dynamic movement is widely utilized in athletic training and fitness routines for its ability to enhance explosive power, agility, and cardiovascular endurance. By engaging multiple muscle groups, including the legs, core, and glutes, box jumps effectively improve overall lower body strength and coordination. Additionally, this exercise boosts anaerobic capacity, making it a staple in high-intensity interval training (HIIT) workouts. Whether performed as part of a warm-up, strength training circuit, or conditioning regimen, box jumps provide a challenging yet rewarding workout that can be scaled to various fitness levels by adjusting the height of the box. Proper technique and safety precautions are essential to prevent injuries and maximize benefits, making box jumps an excellent choice for those seeking to elevate their fitness game.
How to Do Box Jumps Exercise
1. Standard Box Jumps
Starting Position
- Stand with your feet shoulder-width apart, facing a sturdy box or platform.
- The box height should be appropriate for your fitness level, typically ranging from 12 to 30 inches.
Execution:
- Lower into a quarter squat position by bending your knees and pushing your hips back.
- Swing your arms backward to build momentum.
- Explosively jump up, swinging your arms forward and extending your hips, knees, and ankles.
- Land softly on the box with both feet, ensuring your knees are slightly bent to absorb the impact.
- Stand up fully on the box, extending your hips.
- Step or jump back down to the starting position.
- Repeat for the desired number of repetitions.
Tips and Tricks for Proper Box Jumps Exercise
1. Choose the Right Box Height
- Start with a lower box height if you are new to box jumps to build confidence and proper form.
- Gradually increase the height as your strength and coordination improve.
2. Warm-Up
- Perform a dynamic warm-up before doing box jumps to prepare your muscles and joints.
- Include exercises like leg swings, high knees, and dynamic stretches.
3. Engage Your Core
- Tighten your core muscles throughout the movement to maintain stability and control.
- A strong core helps with balance and reduces the risk of injury.
4. Use Your Arms
- Swing your arms back as you lower into the squat position and forward as you jump.
- This helps generate momentum and power for a higher jump.
5. Land Softly
- Focus on landing softly on the box with your knees slightly bent.
- Absorb the impact through your muscles rather than your joints to prevent injury.
6. Foot Placement
- Land with both feet fully on the box to ensure stability.
- Avoid landing with your toes hanging off the edge.
7. Step Down Safely
- Step down one foot at a time, especially when using higher boxes, to reduce the impact on your joints.
- Alternatively, jump down softly if the box height is low and you are comfortable with the movement.
8. Controlled Descent
- If jumping back down, do so with control and land softly to reduce the impact on your joints.
- Use your legs to absorb the landing.
9. Progress Gradually
- Increase the box height or the number of repetitions gradually as your strength and confidence improve.
- Avoid pushing yourself too hard too quickly, as this can lead to injury.
10. Stay Focused
- Concentrate on the box and the movement to maintain proper form and prevent missteps.
- Keep your eyes on the box as you jump.
Benefits of Box Jumps Exercise
1. Explosive Power: Builds explosive strength in the lower body, enhancing athletic performance.
2. Agility and Coordination: Improves agility, balance, and coordination, which are essential for various sports and activities.
3. Cardiovascular Fitness: Provides a high-intensity cardiovascular workout, improving heart and lung health.
4. Calorie Burn: Engages multiple muscle groups, aiding in calorie burn and weight management.
5. Functional Strength: Mimics real-life movements, improving overall functional strength and mobility.
FAQs (Frequently Asked Questions)
1. What are box jumps?
Answer : Box jumps are a plyometric exercise where you jump onto and off a sturdy platform, such as a box or bench, to improve explosive power, agility, and cardiovascular endurance.
2. What muscles do box jumps work?
Answer : Box jumps primarily target the quadriceps, hamstrings, glutes, calves, and core muscles.
3. How do I perform a box jump correctly?
Answer : To perform a box jump, stand with your feet shoulder-width apart, bend your knees slightly, swing your arms, and jump onto the box. Land softly with both feet fully on the box, then step or jump back down.
4. What height should I use for box jumps?
Answer : Beginners should start with a lower height (12-18 inches) and gradually increase as they gain strength and confidence. Advanced athletes may use heights of 24-36 inches or more.
5. Are box jumps safe for everyone?
Answer : Box jumps can be safe for most people if performed with proper technique and appropriate height. However, individuals with knee, ankle, or back issues should consult a healthcare professional before attempting this exercise.
6. How can I avoid injuries while doing box jumps?
Answer : Ensure the box is stable and secure, use proper form, start with an appropriate height, and focus on soft, controlled landings to minimize impact on the joints.
7. How often should I include box jumps in my workout routine?
Answer : Incorporate box jumps into your routine 2-3 times per week, allowing for adequate rest and recovery between sessions.
8. Can box jumps help with weight loss?
Answer : Yes, box jumps are a high-intensity exercise that burns a significant number of calories, aiding in weight loss and improving overall fitness.
9. Are there any alternatives to box jumps?
Answer : Alternatives include step-ups, jump squats, or tuck jumps, which can also enhance explosive power and lower body strength.
10. What should I do if I feel pain while doing box jumps?
Answer : Stop immediately if you experience pain and consult a healthcare professional to rule out any injuries or underlying conditions.
Conclusion
In conclusion, box jumps are a versatile and effective exercise that can significantly enhance your overall fitness. By incorporating this plyometric movement into your workout routine, you can improve explosive power, agility, and cardiovascular health while strengthening multiple muscle groups, including the legs, core, and glutes. Whether you are a beginner or an advanced athlete, box jumps can be adjusted to match your fitness level, making them a valuable addition to any training program. Remember to prioritize proper technique and safety to prevent injuries and maximize the benefits of this high-intensity exercise. With consistent practice, box jumps can help you reach new heights in your fitness journey, contributing to better athletic performance and overall well-being.
You might also like our Best 10 Leg Workouts article in weight loss.
“Motivation is what gets you started. Habit is what keeps you going.” – Jim Ryun
If you would like more information about the 2024, please send us an email.
Written by Fitness Goal 4U
Smart Fitness Goals - Achieve Health with Simple Steps
Smart fitness goals focus on being Specific, Measurable, Achievable, Relevant, and Time-bound. They help you create a clear path to success, stay motivated, and track progress. Whether its weight loss, strength building, or improved endurance, smart goals guide your fitness journey, ensuring steady growth and sustainable results tailored to your needs.
“Confidence comes from discipline and training.” – Robert Kiyosaki
The barbell bench press is a fundamental exercise in strength training and bodybuilding, known for its effectiveness in building upper body strength and muscle mass. This compound movement primarily targets the pectoral muscles, while also engaging the shoulders and triceps, making it a key exercise for developing a well-rounded upper body. Performed on a flat bench with a barbell, the bench press allows for lifting heavy weights, which is essential for muscle hypertrophy and strength gains. Its versatility, with variations like the incline and decline bench press, allows lifters to target different areas of the chest. As a staple in many workout routines, the barbell bench press not only enhances physical aesthetics but also improves functional strength, supporting daily activities and athletic performance. Whether you're a beginner or an experienced lifter, mastering the barbell bench press is crucial for achieving a strong, muscular chest and upper body.
How to Do
1. Set Up
- Lie flat on a bench with your feet firmly planted on the floor.
- Position yourself so your eyes are directly under the barbell.
- Grip the barbell with a slightly wider than shoulder-width grip, palms facing forward.
2. Execution
- Unrack the barbell and hold it straight over your chest with arms fully extended.
- Lower the barbell slowly to your mid-chest by bending your elbows.
- Once the bar touches your chest, push it back up to the starting position by extending your arms.
- Repeat for the desired number of repetitions.
3. Rack the Bar
- After completing your set, carefully re-rack the barbell in the starting position.
Tips and Tricks
- Warm-Up: Always start with a light warm-up set to prepare your muscles and joints.
- Proper Grip: Ensure your grip is firm but not too tight to avoid unnecessary strain on your wrists.
- Elbow Position: Keep your elbows at a 45-degree angle to your body to maximize chest engagement and reduce shoulder strain.
- Controlled Movement: Avoid bouncing the bar off your chest; lower it in a controlled manner and push it back up smoothly.
- Breathing: Inhale as you lower the bar and exhale as you press it back up.
- Spotter: Use a spotter when lifting heavy weights to ensure safety.
- Back Position: Keep your back flat on the bench, with a slight natural arch in your lower back.
- Foot Placement: Keep your feet flat on the floor to maintain stability and drive power from your legs.
Benefits
1. Strength Gains: The barbell bench press is highly effective for building upper body strength, particularly in the chest, shoulders, and triceps.
2. Muscle Hypertrophy: Regularly performing this exercise can lead to significant muscle growth, enhancing overall upper body size and definition.
3. Functional Strength: Improves functional strength useful for daily activities and sports that involve pushing movements.
4. Bone Health: Weight-bearing exercises like the bench press can help improve bone density.
5. Testosterone Boost: Heavy lifting can boost testosterone levels, contributing to muscle growth and overall health.
6. Versatility: Can be modified with different grips, bench angles (flat, incline, decline), and equipment variations (Smith machine, dumbbells) to target different areas of the chest and prevent plateaus.
FAQs
1. What muscles does the barbell bench press work?
Answer : The barbell bench press primarily targets the pectoral muscles (chest), but it also engages the deltoids (shoulders) and triceps.
2. How often should I do the barbell bench press?
Answer : It's recommended to include the bench press in your routine 1-2 times per week, with adequate rest between sessions to allow for muscle recovery.
3. What’s the proper form for the barbell bench press?
Answer : Lie flat on a bench with feet planted on the floor. Grip the bar slightly wider than shoulder-width, lower the bar to mid-chest, and press it back up while keeping your back flat and elbows at a 45-degree angle.
4. How much weight should I start with?
Answer : Begin with a weight you can comfortably lift for 8-12 reps with proper form. For beginners, the bar (typically 45 lbs/20 kg) may be a good starting point.
5. Do I need a spotter for the bench press?
Answer : Yes, especially when lifting heavy weights, a spotter can help ensure safety by assisting if you cannot complete a rep.
6. How can I avoid shoulder pain during the bench press?
Answer : Ensure proper form by not flaring your elbows too wide and using a grip width that feels comfortable. Warm up thoroughly and avoid lifting too heavy too soon.
7. Should I arch my back during the bench press?
Answer : A slight natural arch in the lower back is acceptable, but keep your upper back and buttocks in contact with the bench. Avoid excessive arching.
8. How can I increase my bench press strength?
Answer : Incorporate accessory exercises like tricep dips, shoulder presses, and push-ups. Also, focus on progressive overload by gradually increasing the weight.
9. What are common mistakes to avoid in the barbell bench press?
Answer : Common mistakes include lifting too heavy too soon, improper grip width, bouncing the bar off the chest, and not using a full range of motion.
10. How can I break through a bench press plateau?
Answer : To overcome a plateau, vary your training intensity and volume, try different bench press variations, improve technique, and ensure adequate rest and nutrition.
11. Can the bench press help improve athletic performance?
Answer : Yes, the bench press builds upper body strength, which can enhance performance in sports that involve pushing movements, like football and rugby.
Conclusion
The barbell bench press is a cornerstone exercise in strength training, offering significant benefits for building upper body strength and muscle mass. As a compound movement, it effectively targets the chest, shoulders, and triceps, making it an essential component of any comprehensive workout routine. Proper form and technique are crucial to maximizing gains and minimizing the risk of injury. Incorporating variations such as incline and decline bench presses can help target different areas of the chest and promote balanced muscle development. Whether you're a beginner looking to build foundational strength or an experienced lifter aiming to enhance muscle size and power, the barbell bench press is a versatile and valuable exercise. Consistent practice, progressive overload, and attention to form will help you achieve your fitness goals and develop a strong, well-defined upper body.
You might also like our Chest Workouts For Building Muscle article in weight loss.
“Motivation is what gets you started. Habit is what keeps you going.” – Jim Ryun
If you would like more information about the 2024, please send us an email.
Written by Fitness Goal 4U
Smart Fitness Goals - Achieve Health with Simple Steps
Smart fitness goals focus on being Specific, Measurable, Achievable, Relevant, and Time-bound. They help you create a clear path to success, stay motivated, and track progress. Whether its weight loss, strength building, or improved endurance, smart goals guide your fitness journey, ensuring steady growth and sustainable results tailored to your needs.
“Confidence comes from discipline and training.” – Robert Kiyosaki
The dumbbell bench press is a versatile exercise that targets the chest muscles, while also engaging the shoulders and triceps. Unlike the barbell version, the use of dumbbells allows for a greater range of motion and can help correct muscle imbalances. This exercise is performed by lying on a flat bench and pressing dumbbells upward from chest level. It provides the benefits of increased muscle activation and improved stability, as each arm works independently.
To perform the dumbbell bench press, start by lying on a bench with a dumbbell in each hand, positioned at shoulder level. Press the weights upward until your arms are fully extended, then slowly lower them back to the starting position. This movement should be controlled to maximize muscle engagement and reduce injury risk. The dumbbell bench press is an effective way to build upper body strength and enhance muscle definition, making it a staple in any balanced workout routine.
How to Do
1. Set Up
- Lie flat on a bench with your feet firmly planted on the floor.
- Hold a dumbbell in each hand, resting them on your thighs.
- Use your thighs to help lift the dumbbells up, then position them at chest level with palms facing forward.
2. Execution
- Press the dumbbells upward until your arms are fully extended, with the dumbbells above your chest.
- Slowly lower the dumbbells back down to chest level by bending your elbows.
- Ensure the movement is controlled and smooth.
- Repeat for the desired number of repetitions.
3. Finishing the Set
- After completing your set, carefully bring the dumbbells back to your thighs and then lower them to the floor.
Tips and Tricks
- Warm-Up: Always perform a warm-up set with lighter weights to prepare your muscles and joints.
- Grip and Wrist Position: Maintain a neutral wrist position to avoid strain and ensure a firm but not overly tight grip.
- Elbow Position: Keep your elbows at a 45-degree angle to your body to maximize chest engagement and minimize shoulder strain.
- Controlled Movement: Avoid letting the dumbbells touch at the top of the movement; keep the motion smooth and controlled.
- Breathing: Inhale as you lower the dumbbells and exhale as you press them back up.
- Back Position: Keep your back flat on the bench, with a slight natural arch in your lower back.
- Spotter: Consider using a spotter for heavier weights or if you're new to the exercise.
- Foot Placement: Keep your feet flat on the floor to maintain stability and provide a strong base.
Benefits
1. Increased Range of Motion: Allows for a greater range of motion compared to the barbell bench press, which can lead to better muscle activation.
2. Muscle Symmetry: Helps address muscle imbalances as each arm works independently, promoting balanced muscle development.
3. Improved Stability and Coordination: Engages stabilizer muscles to control the movement of the dumbbells, enhancing overall muscle coordination and stability.
4. Functional Strength: Mimics natural movements, improving functional strength useful for daily activities and sports.
5. Joint Health: The independent movement of each arm reduces the risk of joint strain and can be easier on the shoulders.
6. Versatility: Can be performed on a flat, incline, or decline bench to target different areas of the chest.
7. Progressive Overload: Easily adjustable weights allow for gradual increases in resistance, promoting continuous strength and muscle gains.
FAQs
1. What muscles does the dumbbell bench press target?
Answer : The dumbbell bench press primarily targets the pectoral muscles (chest), but also engages the deltoids (shoulders) and triceps.
2. How is the dumbbell bench press different from the barbell bench press?
Answer : The dumbbell bench press allows for a greater range of motion and requires more stabilizer muscle engagement, as each arm works independently. It can also help correct muscle imbalances.
3. How should I position my elbows during the dumbbell bench press?
Answer : Keep your elbows at a 45-degree angle to your body. This position reduces strain on the shoulders and focuses more on the chest muscles.
4. Can I perform the dumbbell bench press at home?
Answer : Yes, the dumbbell bench press can be done at home if you have a pair of dumbbells and a bench.
5. What weight should I start with for the dumbbell bench press?
Answer : Start with a weight that allows you to perform 8-12 reps with proper form. It's better to begin lighter and gradually increase the weight as you build strength.
6. How many sets and reps should I do?
Answer : For muscle growth, 3-4 sets of 8-12 reps are typically recommended. For strength, 4-6 sets of 4-6 reps with heavier weights can be effective.
7. How can I prevent injury during the dumbbell bench press?
Answer : Use proper form, start with lighter weights, and avoid locking your elbows at the top of the movement. Also, maintain a controlled pace and avoid jerky motions.
8. Can the dumbbell bench press help with muscle imbalances?
Answer : Yes, since each arm works independently, the dumbbell bench press can help correct muscle imbalances and ensure balanced development.
9. How can I increase the difficulty of the dumbbell bench press?
Answer : Increase the weight of the dumbbells, perform more reps, slow down the tempo of the movement, or incorporate techniques like drop sets or supersets.
10. Is the dumbbell bench press safe for beginners?
Answer :Yes, it is safe for beginners if performed with proper form and an appropriate weight. Starting with lighter weights is advisable to learn the correct technique.
11. What are some common mistakes to avoid?
Answer : Common mistakes include lifting too heavy, not keeping the elbows at the proper angle, failing to maintain a controlled movement, and not using a full range of motion.
Conclusion
The dumbbell bench press is a versatile and effective exercise that plays a crucial role in developing upper body strength and muscle mass. Its ability to engage the chest, shoulders, and triceps, along with providing a greater range of motion and correcting muscle imbalances, makes it an invaluable addition to any workout routine. Whether you're aiming to increase muscle size, improve stability, or enhance overall upper body aesthetics, the dumbbell bench press offers numerous benefits. As with all exercises, it is important to maintain proper form, control the movement, and progressively challenge yourself with heavier weights. Incorporating the dumbbell bench press into your fitness regimen can help you achieve a well-rounded and powerful upper body, supporting both aesthetic and functional fitness goals.
You might also like our Chest Workouts For Building Muscle article in weight loss.
“Motivation is what gets you started. Habit is what keeps you going.” – Jim Ryun
If you would like more information about the 2024, please send us an email.
Written by Fitness Goal 4U
Smart Fitness Goals - Achieve Health with Simple Steps
Smart fitness goals focus on being Specific, Measurable, Achievable, Relevant, and Time-bound. They help you create a clear path to success, stay motivated, and track progress. Whether its weight loss, strength building, or improved endurance, smart goals guide your fitness journey, ensuring steady growth and sustainable results tailored to your needs.
“Confidence comes from discipline and training.” – Robert Kiyosaki
The incline bench press is a popular variation of the traditional bench press that specifically targets the upper portion of the chest muscles (pectoralis major) and the shoulders. Performed on a bench set at a 30-45 degree angle, this exercise helps to develop a fuller and more defined upper chest, contributing to a balanced upper body physique.
To perform the incline bench press, lie back on the inclined bench and grip the barbell slightly wider than shoulder-width apart. Lower the barbell to your upper chest by bending your elbows, then press it back up to the starting position. The incline position shifts more of the workload to the upper chest and shoulders, making it an excellent exercise for those looking to enhance these areas.
This exercise is beneficial for both strength and muscle development, making it a staple in many workout routines. As with all exercises, using proper form and a controlled motion is crucial to maximizing effectiveness and preventing injury.
How to Do
1. Set Up
- Adjust the bench to an incline angle of 30-45 degrees.
- Lie back on the bench with your feet flat on the floor.
- Grip the barbell slightly wider than shoulder-width apart, palms facing forward.
2. Execution
- Unrack the barbell and hold it straight above your upper chest with arms fully extended.
- Lower the barbell to the upper part of your chest by bending your elbows.
- Push the barbell back up to the starting position by extending your arms.
- Repeat for the desired number of repetitions.
3. Rack the Bar
- After completing your set, carefully re-rack the barbell in the starting position.
Tips and Tricks
- Warm-Up: Start with a light warm-up set to prepare your muscles and joints.
- Proper Grip: Ensure your grip is firm but not overly tight to avoid wrist strain.
- Elbow Position: Keep your elbows at a 45-degree angle to your body to maximize chest engagement and reduce shoulder strain.
- Controlled Movement: Avoid bouncing the bar off your chest; lower it in a controlled manner and push it back up smoothly.
- Breathing: Inhale as you lower the bar and exhale as you press it back up.
- Spotter: Use a spotter when lifting heavy weights to ensure safety.
- Back Position: Keep your back flat on the bench with a slight natural arch in your lower back.
- Foot Placement: Keep your feet flat on the floor to maintain stability and drive power from your legs.
Benefits
1. Upper Chest Development: Specifically targets the upper portion of the chest muscles, contributing to a fuller, more defined chest.
2. Shoulder Engagement: Involves more shoulder activation than the flat bench press, helping to build shoulder strength and size.
3. Balanced Chest: Helps create a balanced chest appearance by emphasizing the upper chest.
4. Functional Strength: Improves functional strength useful for activities and sports that involve upward pushing movements.
5. Versatility: Can be performed with a barbell or dumbbells, and the angle can be adjusted to vary the intensity.
6. Bone Health: Weight-bearing exercises like the incline bench press can help improve bone density.
7. Testosterone Boost: Heavy lifting can boost testosterone levels, contributing to muscle growth and overall health.
FAQs
1. What muscles does the incline bench press target?
Answer : The incline bench press primarily targets the upper portion of the chest muscles (pectoralis major) and also engages the shoulders (deltoids) and triceps.
2. What angle should the bench be set at for incline bench press?
Answer : The bench should typically be set at an angle of 30-45 degrees. A steeper incline will involve more shoulder activation, while a lower incline focuses more on the upper chest.
3. How is the incline bench press different from the flat bench press?
Answer : The incline bench press targets the upper chest and shoulders more than the flat bench press, which targets the middle chest more evenly.
4. Should I use dumbbells or a barbell for incline bench press?
Answer : Both dumbbells and barbells are effective. Dumbbells allow for a greater range of motion and can help correct muscle imbalances, while barbells can typically allow for heavier lifting.
5. How can I ensure proper form during the incline bench press?
Answer : Keep your feet flat on the floor, back firmly against the bench, and grip the bar or dumbbells with a firm, neutral grip. Lower the weight in a controlled manner to your upper chest and press back up.
6. Is the incline bench press safe for beginners?
Answer : Yes, it can be safe for beginners if performed with proper form and an appropriate weight. Beginners may want to start with lighter weights or even just the barbell to learn the correct technique.
7. How many sets and reps should I do for incline bench press?
Answer : For muscle growth, aim for 3-4 sets of 8-12 reps. For strength, 4-6 sets of 4-6 reps with heavier weights are recommended.
8. What are common mistakes to avoid during the incline bench press?
Answer : Common mistakes include setting the bench at too steep of an incline, using excessive weight, not keeping the elbows at the correct angle, and lifting with the lower back off the bench.
9. Can I adjust the incline angle to target different areas?
Answer : Yes, adjusting the bench angle can slightly change the emphasis. A lower incline focuses more on the upper chest, while a steeper incline engages more of the shoulders.
10. How can I increase the difficulty of the incline bench press?
Answer : Increase the weight, slow down the tempo, or perform variations like single-arm dumbbell incline presses or incorporate supersets with other chest exercises.
11. Should I use a spotter for the incline bench press?
Answer : Using a spotter is advisable, especially when lifting heavy weights, to ensure safety and help with the bar if needed.
12. How often should I incorporate incline bench press into my routine?
Answer : It's recommended to include the incline bench press 1-2 times per week, allowing adequate rest between sessions to ensure muscle recovery.
Conclusion
The incline bench press is an essential exercise for anyone looking to develop a well-rounded upper body. By specifically targeting the upper chest and shoulders, it helps create a fuller, more defined look that complements other chest exercises. Whether using dumbbells or a barbell, the incline bench press can effectively enhance muscle strength and growth, making it a staple in both strength training and bodybuilding routines. As with any exercise, proper form and technique are crucial to maximizing benefits and minimizing the risk of injury. Incorporating the incline bench press into your workout regimen, along with other chest exercises, can significantly contribute to balanced upper body development and overall fitness. Remember to progressively increase weight and intensity, and allow for adequate recovery time between workouts to achieve the best results.
You might also like our Chest Workouts For Building Muscle article in weight loss.
“Motivation is what gets you started. Habit is what keeps you going.” – Jim Ryun
If you would like more information about the 2024, please send us an email.
Written by Fitness Goal 4U
Smart Fitness Goals - Achieve Health with Simple Steps
Smart fitness goals focus on being Specific, Measurable, Achievable, Relevant, and Time-bound. They help you create a clear path to success, stay motivated, and track progress. Whether its weight loss, strength building, or improved endurance, smart goals guide your fitness journey, ensuring steady growth and sustainable results tailored to your needs.
“Confidence comes from discipline and training.” – Robert Kiyosaki
The decline bench press is a powerful variation of the traditional bench press that emphasizes the lower portion of the chest muscles (pectoralis major). Performed on a decline bench set at a downward angle, this exercise shifts more of the workload to the lower chest, making it an excellent choice for achieving a well-defined and balanced chest. In addition to targeting the chest, the decline bench press also engages the triceps and shoulders, contributing to overall upper body strength.
To execute the decline bench press, lie back on the decline bench and grip the barbell slightly wider than shoulder-width apart. Lower the barbell to your lower chest, then press it back up to the starting position. This movement should be performed with control to ensure proper muscle engagement and reduce the risk of injury. The decline bench press is ideal for lifters looking to enhance their lower chest development and diversify their chest workout routine.
How to Do
1. Set Up
- Adjust the bench to a decline angle, typically around 15-30 degrees.
- Secure your feet under the foot pads to prevent sliding.
- Lie back on the bench with your head lower than your torso.
- Grip the barbell slightly wider than shoulder-width apart, palms facing forward.
2. Execution
- Unrack the barbell and hold it straight above your lower chest with arms fully extended.
- Lower the barbell to the lower part of your chest by bending your elbows.
- Push the barbell back up to the starting position by extending your arms.
- Repeat for the desired number of repetitions.
3. Rack the Bar
- After completing your set, carefully re-rack the barbell in the starting position.
Tips and Tricks
- Warm-Up: Start with a light warm-up set to prepare your muscles and joints.
- Proper Grip: Ensure your grip is firm but not overly tight to avoid wrist strain.
- Elbow Position: Keep your elbows at a 45-degree angle to your body to maximize chest engagement and reduce shoulder strain.
- Controlled Movement: Avoid bouncing the bar off your chest; lower it in a controlled manner and push it back up smoothly.
- Breathing: Inhale as you lower the bar and exhale as you press it back up.
- Spotter: Use a spotter when lifting heavy weights to ensure safety.
- Back Position: Keep your back flat on the bench with a slight natural arch in your lower back.
- Foot Placement: Ensure your feet are secure under the foot pads to maintain stability.
Benefits
1. Lower Chest Development: Specifically targets the lower portion of the chest muscles, contributing to a fuller, more defined chest.
2. Shoulder Engagement: Involves different shoulder activation compared to the flat and incline bench presses, helping to build shoulder strength and size.
3. Variety: Adds variety to your chest workouts, helping to break through plateaus and promote balanced muscle development.
4. Functional Strength: Improves functional strength useful for activities and sports that involve downward pushing movements.
5. Versatility: Can be performed with a barbell or dumbbells, and the angle can be adjusted to vary the intensity.
6. Bone Health: Weight-bearing exercises like the decline bench press can help improve bone density.
7. Reduced Shoulder Strain: The decline angle may be more comfortable for individuals with shoulder issues, as it places less stress on the shoulders compared to the flat bench press.
FAQs
1. What muscles does the decline bench press target?
Answer : The decline bench press primarily targets the lower portion of the pectoral muscles, while also engaging the triceps and shoulders.
2. How does the decline bench press differ from the flat bench press?
Answer : The decline bench press focuses more on the lower chest, whereas the flat bench press targets the middle portion of the chest more evenly.
3. What angle should the bench be set at for the decline bench press?
Answer : The bench is typically set at a decline angle of 15-30 degrees. This angle effectively shifts the emphasis to the lower chest.
4. Is the decline bench press safe for beginners?
Answer : Yes, it can be safe for beginners if performed with proper form and appropriate weights. Beginners should start with lighter weights to learn the correct technique.
5. Should I use a barbell or dumbbells for the decline bench press?
Answer : Both barbells and dumbbells are effective. Barbells allow for heavier lifting, while dumbbells provide a greater range of motion and can help correct muscle imbalances.
6. How should I position my elbows during the decline bench press?
Answer : Keep your elbows at a 45-degree angle to your body to minimize shoulder strain and maximize chest engagement.
7. Can the decline bench press help improve lower chest definition?
Answer : Yes, the decline bench press specifically targets the lower chest, helping to enhance muscle definition and overall chest aesthetics.
8. How many sets and reps should I do for the decline bench press?
Answer : For muscle growth, aim for 3-4 sets of 8-12 reps. For strength, 4-6 sets of 4-6 reps with heavier weights are recommended.
9. What are common mistakes to avoid during the decline bench press?
Answer : Common mistakes include setting the bench at too steep of a decline, lifting too heavy, not maintaining proper form, and bouncing the bar off the chest.
10. How can I increase the difficulty of the decline bench press?
Answer : Increase the weight, slow down the tempo, or incorporate variations like single-arm decline dumbbell presses.
11. Do I need a spotter for the decline bench press?
Answer : A spotter is advisable, especially when lifting heavy weights, to ensure safety and assist if you cannot complete a rep.
12. How often should I incorporate the decline bench press into my routine?
Answer : Include the decline bench press 1-2 times per week, ensuring adequate rest and recovery time between sessions for optimal muscle growth.
Conclusion
The decline bench press is an effective exercise for specifically targeting the lower portion of the chest muscles, making it a valuable addition to any upper body workout routine. By incorporating this exercise, you can achieve a more balanced and well-defined chest, enhancing overall upper body strength and aesthetics. As with all exercises, proper form and controlled movements are essential to maximize benefits and minimize the risk of injury. The decline bench press can be performed with both barbells and dumbbells, offering versatility and the ability to cater to individual preferences and fitness levels. Whether you're aiming to increase muscle mass, improve strength, or add variety to your chest workouts, the decline bench press is an excellent choice. Consistency, progressive overload, and attention to technique will help you achieve the best results and build a strong, defined lower chest.
You might also like our Chest Workouts For Building Muscle article in weight loss.
“Motivation is what gets you started. Habit is what keeps you going.” – Jim Ryun
If you would like more information about the 2024, please send us an email.
Written by Fitness Goal 4U
Smart Fitness Goals - Achieve Health with Simple Steps
Smart fitness goals focus on being Specific, Measurable, Achievable, Relevant, and Time-bound. They help you create a clear path to success, stay motivated, and track progress. Whether its weight loss, strength building, or improved endurance, smart goals guide your fitness journey, ensuring steady growth and sustainable results tailored to your needs.
“Confidence comes from discipline and training.” – Robert Kiyosaki
Chest dips are a highly effective bodyweight exercise that primarily targets the lower portion of the pectoral muscles, along with the triceps and shoulders. This versatile movement is performed on parallel bars and is a staple in many upper body workout routines due to its ability to build muscle mass and enhance upper body strength. Unlike some chest exercises, chest dips allow for a natural range of motion and require significant stabilization, engaging the core and improving overall body control.
To perform chest dips, you grip the parallel bars and lift your body with your arms fully extended. Lean slightly forward to emphasize the chest muscles as you lower yourself by bending your elbows until your upper arms are parallel to the ground. Then, push back up to the starting position. This exercise is excellent for those looking to enhance their chest definition and upper body strength without the need for heavy weights, making it accessible and beneficial for all fitness levels.
How to Do
1. Set Up
- Position yourself between two parallel bars.
- Grip the bars firmly and lift your body so your arms are fully extended and your feet are off the ground.
2. Execution
- Lean your torso slightly forward to emphasize the chest muscles.
- Lower your body by bending your elbows until your upper arms are parallel to the ground.
- Push your body back up to the starting position by straightening your arms.
- Repeat for the desired number of repetitions.
3. Finishing the Set
- After completing your set, carefully lower yourself back to the ground.
Tips and Tricks
- Warm-Up: Perform a light warm-up set or some dynamic stretches to prepare your muscles and joints.
- Forward Lean: Leaning forward helps to target the chest more effectively. Keep your body at a slight forward angle throughout the movement.
- Elbow Position: Keep your elbows close to your body to reduce shoulder strain and focus more on the chest.
- Controlled Movement: Lower your body in a slow, controlled manner and avoid swinging or using momentum.
- Breathing: Inhale as you lower yourself and exhale as you push back up.
- Range of Motion: Ensure you lower yourself until your upper arms are parallel to the ground for full muscle engagement.
- Foot Position: Keep your legs straight or slightly bent and crossed at the ankles for better balance.
Benefits
Lower Chest Development: Chest dips primarily target the lower chest, helping to build a more defined and balanced chest.
Triceps and Shoulders: In addition to the chest, dips also engage the triceps and shoulders, contributing to overall upper body strength.
Functional Strength: Dips mimic natural pushing movements, improving functional strength useful for daily activities and sports.
Bodyweight Exercise: As a bodyweight exercise, dips can be performed almost anywhere and require minimal equipment.
Progressive Overload: Can be made more challenging by adding weight with a dip belt or holding a dumbbell between your feet.
Core Engagement: Performing dips requires core stability, helping to strengthen the core muscles.
Joint Health: Helps improve shoulder mobility and stability when performed with proper form.
FAQs
1. What muscles do chest dips target?
Answer : Chest dips primarily target the lower chest (pectoralis major) but also engage the triceps and shoulders.
2. How should I position my body during chest dips?
Answer : Lean slightly forward during the exercise to emphasize the chest muscles. Keep your elbows close to your body to engage the triceps effectively.
3. Can chest dips be modified for beginners?
Answer : Yes, beginners can use assistance by placing their feet on a bench or using a dip assist machine to reduce the load and build strength gradually.
4. How many sets and reps should I do for chest dips?
Answer : For muscle growth, aim for 3-4 sets of 8-12 reps. For strength, 4-6 sets of 4-6 reps can be effective, using additional weight if necessary.
5. How can I increase the difficulty of chest dips?
Answer : To make chest dips more challenging, add weight using a dip belt, hold a dumbbell between your feet, or perform the exercise more slowly.
6. What is the difference between chest dips and tricep dips?
Answer : The difference lies in the body angle: leaning forward targets the chest more, while maintaining an upright position emphasizes the triceps.
7. Are chest dips safe for everyone?
Answer : While chest dips are generally safe, they can place strain on the shoulders. Those with shoulder issues should proceed with caution or consult a professional.
8. Can I do chest dips at home?
Answer : Yes, chest dips can be performed at home using parallel bars, sturdy chairs, or a dip station.
9. What are common mistakes to avoid during chest dips?
Answer : Common mistakes include not leaning forward enough, flaring elbows outward, and not using a full range of motion.
10. How often should I include chest dips in my workout routine?
Answer : Chest dips can be included 1-2 times per week, allowing for adequate rest and recovery between sessions.
11. Are chest dips effective for building chest muscles?
Answer : Yes, chest dips are highly effective for building lower chest muscles, providing a strong and defined chest appearance.
12. Do I need any special equipment for chest dips?
Answer : Typically, you need parallel bars or a dip station. At home, sturdy surfaces at an appropriate height can also be used.
Conclusion
Chest dips are an excellent exercise for targeting the lower chest, triceps, and shoulders, making them a valuable addition to any upper body workout routine. This bodyweight exercise not only helps in building muscle mass and strength but also enhances overall upper body stability and control. The versatility of chest dips allows for variations and progressions, making them suitable for all fitness levels, from beginners to advanced athletes. Proper form is crucial to maximize benefits and minimize the risk of injury, particularly for the shoulders. Incorporating chest dips into your regular workout regimen can significantly contribute to a well-rounded and defined upper body, helping you achieve your fitness goals. Whether performed at the gym or at home, chest dips are a simple yet highly effective exercise that can lead to noticeable improvements in strength and muscle definition.
You might also like our Chest Workouts For Building Muscle article in weight loss.
“Motivation is what gets you started. Habit is what keeps you going.” – Jim Ryun
If you would like more information about the 2024, please send us an email.
Written by Fitness Goal 4U
Smart Fitness Goals - Achieve Health with Simple Steps
Smart fitness goals focus on being Specific, Measurable, Achievable, Relevant, and Time-bound. They help you create a clear path to success, stay motivated, and track progress. Whether its weight loss, strength building, or improved endurance, smart goals guide your fitness journey, ensuring steady growth and sustainable results tailored to your needs.
“Confidence comes from discipline and training.” – Robert Kiyosaki
Push-ups are a classic bodyweight exercise that primarily targets the chest muscles, while also engaging the shoulders, triceps, and core. They are an essential component of any fitness routine due to their effectiveness, simplicity, and versatility. Push-ups can be performed anywhere without any equipment, making them accessible to everyone, regardless of fitness level. This exercise not only helps build upper body strength but also improves endurance and stability.
To perform a standard push-up, start in a plank position with your hands placed slightly wider than shoulder-width apart. Lower your body by bending your elbows until your chest nearly touches the ground, then push back up to the starting position. Proper form is crucial to maximize benefits and prevent injuries. Push-ups can be easily modified to increase or decrease difficulty, such as by adjusting hand placement, elevating feet, or incorporating different variations. Overall, push-ups are a foundational exercise for building a strong and balanced upper body.
How to Do
1. Set Up
- Begin in a plank position with your hands placed slightly wider than shoulder-width apart.
- Keep your body in a straight line from head to heels.
- Engage your core to maintain stability.
2. Execution
- Lower your body by bending your elbows until your chest nearly touches the floor.
- Keep your elbows at a 45-degree angle to your body.
- Push your body back up to the starting position by straightening your arms.
- Repeat for the desired number of repetitions.
3. Finishing the Set
- After completing your set, carefully lower your knees to the ground if needed.
Tips and Tricks
- Warm-Up: Perform a light warm-up or some dynamic stretches to prepare your muscles and joints.
- Hand Placement: Position your hands slightly wider than shoulder-width for optimal chest engagement.
- Elbow Position: Keep your elbows at a 45-degree angle to your body to reduce shoulder strain and maximize chest involvement.
- Core Engagement: Engage your core throughout the movement to maintain a straight body line and prevent sagging hips.
- Controlled Movement: Lower your body in a slow, controlled manner and avoid bouncing off the floor.
- Breathing: Inhale as you lower yourself and exhale as you push back up.
- Variation: To increase difficulty, elevate your feet on a bench or perform clap push-ups. To decrease difficulty, do knee push-ups or incline push-ups with your hands on a raised surface.
Benefits
1. Chest Development: Push-ups effectively target the chest muscles, contributing to a stronger and more defined chest.
2. Upper Body Strength: In addition to the chest, push-ups also strengthen the shoulders and triceps.
3. Core Stability: Maintaining a plank position throughout the exercise engages and strengthens the core muscles.
4. Functional Fitness: Push-ups mimic natural pushing movements, improving functional strength useful for daily activities and sports.
5. No Equipment Needed: Push-ups require no equipment, making them accessible and easy to incorporate into any workout routine.
6. Versatility: There are numerous variations of push-ups (e.g., diamond push-ups, wide push-ups, pike push-ups) that can target different muscle groups and increase difficulty.
7. Joint Health: Push-ups can improve shoulder stability and overall joint health when performed with proper form.
8. Caloric Burn: As a compound exercise, push-ups engage multiple muscle groups, leading to higher caloric burn and aiding in weight management.
FAQs
1. What muscles do push-ups target?
Answer : Push-ups primarily target the chest muscles (pectoralis major), shoulders (deltoids), and triceps. They also engage the core and stabilize muscles.
2. How can I modify push-ups if I’m a beginner?
Answer : Beginners can perform knee push-ups, incline push-ups (hands on a raised surface), or wall push-ups to reduce the difficulty.
3. How can I increase the difficulty of push-ups?
Answer : To make push-ups harder, you can elevate your feet, add weight (e.g., wearing a weighted vest), perform clap push-ups, or do one-arm push-ups.
4. How many push-ups should I do?
Answer : The number depends on your fitness level. Start with a number you can do with proper form, such as 10-15 reps, and gradually increase.
5. What is the proper form for push-ups?
Answer : Keep your body in a straight line from head to heels, hands slightly wider than shoulder-width apart, elbows at a 45-degree angle, and lower your chest to just above the ground.
6. How often should I do push-ups?
Answer : Push-ups can be done 2-3 times per week, allowing adequate rest between sessions for muscle recovery.
7. Can push-ups help build muscle mass?
Answer : Yes, when performed regularly and progressively challenging the muscles, push-ups can help increase muscle mass, particularly in the chest, shoulders, and triceps.
8. Are push-ups good for building core strength?
Answer : Yes, maintaining a straight body position during push-ups engages the core muscles, helping to build strength and stability.
9. What are common mistakes to avoid in push-ups?
Answer : Common mistakes include flaring elbows too wide, not going low enough, letting hips sag or rise too much, and improper hand placement.
10. Can push-ups replace bench presses in a workout routine?
Answer : While push-ups are excellent for building upper body strength, they are not a complete replacement for bench presses, which allow for heavier loads and different muscle activation. Both exercises complement each other.
11. Do push-ups help improve posture?
Answer : Yes, push-ups can help strengthen the muscles responsible for good posture, particularly if done with proper form.
12. How can I track progress with push-ups?
Answer : Track progress by noting the number of push-ups you can perform in a set, or by gradually increasing the difficulty through different variations or adding weight.
Conclusion
Push-ups are a fundamental exercise that offers a multitude of benefits for building upper body strength, enhancing endurance, and engaging the core. Their simplicity and versatility make them suitable for all fitness levels, from beginners to advanced athletes. With various modifications and variations, push-ups can be tailored to meet specific fitness goals, whether you're aiming to increase muscle mass, improve athletic performance, or simply maintain overall physical fitness. Consistent practice and attention to proper form are key to maximizing the effectiveness of push-ups and avoiding injury. By incorporating push-ups into your regular workout routine, you can develop a stronger, more resilient upper body, and contribute to a balanced and well-rounded fitness regimen. Whether performed at home, in the gym, or on the go, push-ups remain a timeless and essential exercise for anyone looking to improve their physical health and strength.
You might also like our Chest Workouts For Building Muscle article in weight loss.
“Motivation is what gets you started. Habit is what keeps you going.” – Jim Ryun
If you would like more information about the 2024, please send us an email.
Written by Fitness Goal 4U
Smart Fitness Goals - Achieve Health with Simple Steps
Smart fitness goals focus on being Specific, Measurable, Achievable, Relevant, and Time-bound. They help you create a clear path to success, stay motivated, and track progress. Whether its weight loss, strength building, or improved endurance, smart goals guide your fitness journey, ensuring steady growth and sustainable results tailored to your needs.
“Confidence comes from discipline and training.” – Robert Kiyosaki
Dumbbell flyes are an isolation exercise that effectively targets the chest muscles, specifically focusing on enhancing the inner and outer regions of the pectorals. This exercise is performed by lying on a flat bench with a dumbbell in each hand, extending the arms out to the sides and then bringing them together above the chest in a wide arc. Unlike compound movements, dumbbell flyes emphasize stretching and contracting the chest muscles, helping to increase muscle definition and flexibility.
To perform dumbbell flyes correctly, maintain a slight bend in your elbows and control the movement to avoid putting undue stress on your shoulder joints. This exercise is beneficial for both beginners and advanced lifters, as it helps improve muscle symmetry and can be easily adjusted for different levels of difficulty. Incorporating dumbbell flyes into your chest workout routine can lead to a more sculpted and well-defined upper body, making it a valuable addition to any fitness regimen.
How to Do
1. Set Up
- Lie on a flat bench with a dumbbell in each hand, resting them on your thighs.
- Use your thighs to help lift the dumbbells up, then extend your arms above your chest with palms facing each other and a slight bend in your elbows.
2. Execution
- Slowly lower the dumbbells out to the sides in a wide arc, keeping a slight bend in your elbows to reduce strain on your joints.
- Lower the dumbbells until you feel a stretch in your chest.
- Bring the dumbbells back up to the starting position by squeezing your chest muscles together.
- Repeat for the desired number of repetitions.
3. Finishing the Set
- After completing your set, carefully bring the dumbbells back to your thighs and then lower them to the floor.
Tips and Tricks
- Warm-Up: Start with a light warm-up set to prepare your muscles and joints.
- Controlled Movement: Perform the exercise slowly and with control to maximize muscle engagement and reduce the risk of injury.
- Elbow Position: Maintain a slight bend in your elbows throughout the movement to avoid joint strain.
- Range of Motion: Only lower the dumbbells until you feel a stretch in your chest; avoid overstretching to prevent injury.
- Breathing: Inhale as you lower the dumbbells and exhale as you bring them back up.
- Proper Grip: Hold the dumbbells securely but not too tightly to prevent unnecessary wrist strain.
- Bench Stability: Ensure your back remains flat on the bench with a natural arch in your lower back.
Benefits
1. Chest Development: Dumbbell flyes effectively isolate and target the chest muscles, contributing to better muscle definition and growth.
2. Flexibility: The stretching motion of the exercise enhances flexibility and range of motion in the chest muscles.
3. Muscle Isolation: Focuses on the pectoral muscles, allowing for more precise muscle engagement compared to compound movements.
4. Improved Muscle Symmetry: Helps address muscle imbalances as each arm works independently, promoting balanced muscle development.
5. Versatility: Can be performed on a flat, incline, or decline bench to target different areas of the chest.
6. Joint Health: The controlled, slow movement can improve shoulder joint stability and overall joint health.
7. Core Engagement: Performing the exercise on a bench requires core stability, helping to strengthen the core muscles.
8. Complementary Exercise: Pairs well with other chest exercises like bench presses and push-ups to create a comprehensive chest workout routine.
FAQs
1. What muscles do dumbbell flyes target?
Answer : Dumbbell flyes primarily target the pectoral muscles, specifically focusing on the inner and outer portions of the chest. They also engage the anterior deltoids and, to a lesser extent, the biceps.
2. How are dumbbell flyes different from a dumbbell bench press?
Answer : While the dumbbell bench press is a compound movement that involves pressing, targeting the chest, shoulders, and triceps, dumbbell flyes are an isolation exercise focusing solely on stretching and contracting the chest muscles.
3. What is the proper form for dumbbell flyes?
Answer : Lie on a flat bench, hold dumbbells above your chest with a slight bend in your elbows, lower the weights in a wide arc until you feel a stretch in your chest, then bring them back up.
4. Should I use a flat, incline, or decline bench for dumbbell flyes?
Answer : Dumbbell flyes can be performed on a flat, incline, or decline bench to target different areas of the chest: flat for overall chest, incline for upper chest, and decline for lower chest.
5. How much weight should I use for dumbbell flyes?
Answer : Start with lighter weights to ensure proper form, as this exercise focuses on controlled movement and a full range of motion. Gradually increase the weight as you become comfortable.
6. How many sets and reps should I do for dumbbell flyes?
Answer : Typically, 3-4 sets of 10-15 reps are recommended for muscle growth and definition.
7. What are common mistakes to avoid during dumbbell flyes?
Answer : Common mistakes include using too heavy weights, lowering the dumbbells too far (causing shoulder strain), and not maintaining a slight bend in the elbows.
8. Can dumbbell flyes improve chest flexibility?
Answer : Yes, the stretching motion of dumbbell flyes can improve flexibility and range of motion in the chest muscles.
9. Are dumbbell flyes safe for beginners?
Answer : Yes, dumbbell flyes are safe for beginners if performed with proper form and lighter weights. It’s important to avoid overextending the shoulders.
10. How can I make dumbbell flyes more challenging?
Answer : Increase the weight, slow down the tempo, or use a stability ball instead of a bench to engage more stabilizer muscles.
11. Can I do dumbbell flyes at home?
Answer : Yes, dumbbell flyes can be performed at home with a pair of dumbbells and a bench or a stable surface to lie on.
12. Should I include dumbbell flyes in every chest workout?
Answer : While not necessary for every chest workout, including dumbbell flyes periodically can help enhance chest muscle definition and symmetry.
Conclusion
Dumbbell flyes are an essential exercise for anyone looking to enhance chest muscle definition and flexibility. As an isolation movement, they allow for precise targeting of the pectoral muscles, helping to achieve a well-rounded and sculpted upper body. Proper form is crucial to maximize the benefits and minimize the risk of injury, especially to the shoulders. Incorporating dumbbell flyes into your workout routine can complement compound movements like presses, providing a comprehensive approach to chest development. Whether you're a beginner or an advanced lifter, varying the bench angle and adjusting the weight can keep the exercise challenging and effective. By consistently including dumbbell flyes in your regimen, you can achieve greater muscle symmetry, improve chest aesthetics, and enhance overall upper body strength.
You might also like our Chest Workouts For Building Muscle article in weight loss.
“Motivation is what gets you started. Habit is what keeps you going.” – Jim Ryun
If you would like more information about the 2024, please send us an email.
Written by Fitness Goal 4U
Smart Fitness Goals - Achieve Health with Simple Steps
Smart fitness goals focus on being Specific, Measurable, Achievable, Relevant, and Time-bound. They help you create a clear path to success, stay motivated, and track progress. Whether its weight loss, strength building, or improved endurance, smart goals guide your fitness journey, ensuring steady growth and sustainable results tailored to your needs.
“Confidence comes from discipline and training.” – Robert Kiyosaki
Cable crossovers are a popular exercise in strength training routines, particularly for targeting the chest muscles. This versatile exercise is performed using a cable machine, allowing for a full range of motion and continuous tension throughout the movement. By adjusting the pulley height and using a variety of grip positions, cable crossovers can engage different parts of the chest, making it an excellent choice for developing both the upper and lower pectoral muscles. The exercise also engages the shoulders and triceps as secondary muscles, contributing to overall upper body strength. Whether you're a beginner or an advanced lifter, cable crossovers can be adapted to fit your fitness level and goals. Proper form and technique are crucial to maximize effectiveness and prevent injury. Incorporating cable crossovers into your workout routine can help enhance muscle definition and build a strong, well-rounded chest.
How to Do
1. Set Up
- Position the pulleys on a cable machine to the highest setting.
- Stand in the center of the machine and grab a handle in each hand.
- Step forward into a staggered stance with one foot in front of the other to maintain balance.
2. Execution
- Start with your arms extended out to your sides, elbows slightly bent, and palms facing downward.
- Pull the handles downward and across your body in a wide arc until your hands meet in front of your lower chest.
- Squeeze your chest muscles at the end of the movement.
- Slowly return to the starting position, maintaining control.
- Repeat for the desired number of repetitions.
3. Finishing the Set
- After completing your set, carefully return the handles to the starting position and step back from the machine.
Tips and Tricks
- Warm-Up: Start with a light warm-up set to prepare your muscles and joints.
- Controlled Movement: Perform the exercise with a slow and controlled motion to maximize muscle engagement and reduce the risk of injury.
- Elbow Position: Keep a slight bend in your elbows throughout the movement to avoid joint strain.
- Core Engagement: Engage your core to maintain stability and prevent swaying.
- Breathing: Inhale as you return to the starting position and exhale as you pull the handles together.
- Proper Stance: Use a staggered stance for better balance and stability.
- Hand Position: Keep your palms facing downward or slightly inward to target the chest effectively.
- Range of Motion: Ensure a full range of motion by allowing your arms to stretch out wide and bringing your hands together fully at the end of each repetition.
Benefits
1. Inner Chest Development: Cable crossovers effectively target the inner part of the chest, helping to build a well-defined and aesthetically pleasing chest.
2. Constant Tension: The cable machine provides continuous tension throughout the movement, leading to better muscle activation.
3. Muscle Isolation: Focuses on the pectoral muscles, allowing for more precise muscle engagement compared to compound movements.
4. Versatility: Can be performed at different angles (high to low, low to high) to target various parts of the chest.
5. Improved Muscle Symmetry: Helps address muscle imbalances as each arm works independently, promoting balanced muscle development.
6. Flexibility: The wide arc motion of the exercise enhances flexibility and range of motion in the chest muscles.
7. Joint Health: The controlled, slow movement can improve shoulder joint stability and overall joint health.
8. Core Engagement: Performing the exercise requires core stability, helping to strengthen the core muscles.
9. Complementary Exercise: Pairs well with other chest exercises like bench presses and push-ups to create a comprehensive chest workout routine.
FAQs
1. What muscles do cable crossovers target?
Answer : Cable crossovers primarily target the pectoralis major (chest muscles). They also engage the anterior deltoids (front shoulders) and triceps as secondary muscles.
2. How should I position my feet during cable crossovers?
Answer : A staggered stance (one foot in front of the other) is recommended for better stability and balance. You can also keep your feet shoulder-width apart if you prefer.
3. What is the correct form for cable crossovers?
Answer : Keep a slight bend in your elbows, maintain tension on the cables throughout the movement, and avoid using momentum. Bring your hands together in front of you in a controlled manner and return slowly.
4. How do I adjust the cable machine to target different parts of the chest?
Answer : To target the upper chest, set the pulleys low and pull the cables upward. For the lower chest, set the pulleys high and pull the cables downward.
5. Can beginners do cable crossovers?
Answer : Yes, beginners can perform cable crossovers by starting with a lighter weight and focusing on mastering proper form.
6. How many sets and reps should I do?
Answer : Typically, 3-4 sets of 10-15 reps are recommended for muscle hypertrophy. Adjust based on your fitness goals and experience level.
7. Should I lean forward during cable crossovers?
Answer : A slight forward lean can help engage the chest more effectively, but avoid excessive leaning, which can strain your lower back.
8. Are cable crossovers better than dumbbell flyes?
Answer : Both exercises are effective for chest development. Cable crossovers provide continuous tension throughout the movement, while dumbbell flyes offer a different range of motion. Incorporating both can provide a comprehensive chest workout.
9. Can I use different grips for cable crossovers?
Answer : Yes, you can use a neutral grip (palms facing each other), an overhand grip (palms facing down), or a mixed grip to target different muscle fibers.
10. How can I avoid injury while doing cable crossovers?
Answer : Warm up properly, start with a manageable weight, maintain proper form, and avoid overstretching or using excessive weights. If unsure, consult a trainer.
Conclusion
Incorporating cable crossovers into your workout routine is an effective way to target and sculpt your chest muscles. This versatile exercise offers a range of motion that engages different parts of the chest, allowing for a balanced and well-defined upper body. By adjusting the pulley height and varying your grip, you can emphasize different muscle fibers and keep your workouts challenging and fresh. Whether you're a beginner or an experienced lifter, mastering the proper form and technique for cable crossovers is key to maximizing benefits and minimizing the risk of injury. As with any exercise, consistency, and attention to detail will yield the best results, helping you achieve a stronger, more toned chest.
You might also like our Chest Workouts For Building Muscle article in weight loss.
“Motivation is what gets you started. Habit is what keeps you going.” – Jim Ryun
If you would like more information about the 2024, please send us an email.
Written by Fitness Goal 4U
Smart Fitness Goals - Achieve Health with Simple Steps
Smart fitness goals focus on being Specific, Measurable, Achievable, Relevant, and Time-bound. They help you create a clear path to success, stay motivated, and track progress. Whether its weight loss, strength building, or improved endurance, smart goals guide your fitness journey, ensuring steady growth and sustainable results tailored to your needs.
“Confidence comes from discipline and training.” – Robert Kiyosaki
The Pec Deck Machine exercise is an essential addition to any chest workout routine, offering targeted muscle isolation and a controlled range of motion. This exercise specifically focuses on the pectoralis major, providing an effective way to enhance chest muscle definition and strength. Suitable for beginners and advanced lifters alike, the Pec Deck Machine helps users maintain proper form and minimize the risk of injury. By adjusting the machine's seat height and arm positioning, you can customize the workout to suit your fitness level and goals. Consistent use of the Pec Deck Machine can lead to noticeable improvements in upper body strength and muscle tone. Whether you're looking to build muscle mass or refine your chest's shape, this exercise offers a straightforward and efficient way to achieve your objectives. Remember to pair it with other complementary exercises for a well-rounded chest workout.
How to Do
1. Set Up
- Adjust the seat height so that your upper arms are parallel to the floor when holding the handles.
- Sit with your back flat against the pad and feet firmly planted on the floor.
- Grip the handles with your elbows slightly bent and at shoulder level.
2. Execution
- Begin by bringing the handles together in front of your chest by contracting your pectoral muscles.
- Squeeze your chest at the peak of the movement.
- Slowly return to the starting position, allowing your chest muscles to stretch.
- Repeat for the desired number of repetitions.
3. Finishing the Set
- After completing your set, carefully release the handles and step away from the machine.
Tips and Tricks
- Warm-Up: Perform a light warm-up set to prepare your muscles and joints.
- Seat Adjustment: Ensure the seat is adjusted so that your elbows are in line with your shoulders to maximize chest engagement.
- Controlled Movement: Maintain a slow and controlled motion to focus on muscle contraction and reduce the risk of injury.
- Elbow Position: Keep a slight bend in your elbows throughout the movement to avoid joint strain.
- Breathing: Inhale as you return to the starting position and exhale as you bring the handles together.
- Back Position: Keep your back flat against the pad to maintain proper form and support.
- Full Range of Motion: Ensure a full range of motion by allowing your chest muscles to fully stretch and contract during each repetition.
- Weight Selection: Choose a weight that allows you to perform the exercise with proper form and control.
Benefits
1. Chest Development: The pec deck machine effectively isolates and targets the pectoral muscles, contributing to better muscle definition and growth.
2. Muscle Isolation: Focuses specifically on the chest muscles, allowing for precise muscle engagement compared to compound movements.
3. Safety and Stability: Provides a controlled movement path, reducing the risk of injury and allowing for safe lifting, especially for beginners.
4. Improved Muscle Symmetry: Helps address muscle imbalances as each arm moves independently, promoting balanced muscle development.
5. Flexibility: The controlled movement enhances flexibility and range of motion in the chest muscles.
6. Joint Health: The machine provides support and stability, which can be beneficial for individuals with joint issues or those recovering from injuries.
7. Core Engagement: Maintaining proper form on the machine requires core stability, helping to strengthen the core muscles.
8. Complementary Exercise: Pairs well with other chest exercises like bench presses and push-ups to create a comprehensive chest workout routine.
FAQs
1. What muscles does the Pec Deck Machine target?
Answer : The Pec Deck Machine primarily targets the pectoralis major muscles of the chest. It also engages the anterior deltoids (front shoulders) and, to a lesser extent, the triceps.
2. How should I position myself on the Pec Deck Machine?
Answer : Adjust the seat height so that your arms are parallel to the floor when gripping the handles. Your elbows should be slightly bent, and your back should rest against the pad.
3. Is the Pec Deck Machine suitable for beginners?
Answer : Yes, the Pec Deck Machine is beginner-friendly. It provides a guided range of motion, making it easier to maintain proper form and reduce the risk of injury.
4. How does the Pec Deck Machine differ from cable flyes?
Answer : The Pec Deck Machine offers a fixed path of movement, providing consistent tension and stability. Cable flyes, on the other hand, allow for a more flexible range of motion and can target the chest muscles from different angles.
5. How many sets and reps should I do on the Pec Deck Machine?
Answer : For muscle hypertrophy, aim for 3-4 sets of 10-15 reps. Adjust the weight and repetitions based on your fitness level and goals.
6. Should I keep my arms straight during the exercise?
Answer : Keep a slight bend in your elbows throughout the exercise to reduce strain on your joints and focus the tension on your chest muscles.
7. How can I increase the intensity of the Pec Deck Machine exercise?
Answer : Increase the weight or slow down the movement to increase time under tension. Ensure you maintain proper form to avoid injury.
8. Can the Pec Deck Machine help improve my bench press?
Answer : Yes, strengthening the chest muscles with the Pec Deck Machine can contribute to improved bench press performance by building muscle mass and endurance.
9. What are common mistakes to avoid on the Pec Deck Machine?
Answer : Avoid locking your elbows, using too much weight, and failing to control the movement. Also, ensure that your seat height is adjusted correctly.
10. How often should I use the Pec Deck Machine?
Answer : Incorporate the Pec Deck Machine into your chest workout routine 1-2 times per week, allowing adequate rest and recovery between sessions.
Conclusion
The Pec Deck Machine is an excellent choice for isolating and strengthening the chest muscles, providing a controlled and effective workout. Its guided motion helps users maintain proper form and focus on the pectoralis major, making it a valuable addition to any fitness routine. Whether you're a beginner or an experienced lifter, the Pec Deck Machine offers a safe and efficient way to build muscle definition and improve upper body strength. Consistency and attention to detail are key to maximizing the benefits of this exercise. By incorporating the Pec Deck Machine into your regular workouts and combining it with other chest exercises, you can achieve a well-rounded and sculpted upper body. Always prioritize proper form and gradually increase the resistance to ensure progress while minimizing the risk of injury.
You might also like our Chest Workouts For Building Muscle article in weight loss.
“Motivation is what gets you started. Habit is what keeps you going.” – Jim Ryun
If you would like more information about the 2024, please send us an email.
Written by Fitness Goal 4U
Smart Fitness Goals - Achieve Health with Simple Steps
Smart fitness goals focus on being Specific, Measurable, Achievable, Relevant, and Time-bound. They help you create a clear path to success, stay motivated, and track progress. Whether its weight loss, strength building, or improved endurance, smart goals guide your fitness journey, ensuring steady growth and sustainable results tailored to your needs.
“Confidence comes from discipline and training.” – Robert Kiyosaki
The Smith Machine Bench Press is a popular exercise for targeting the chest muscles, providing a guided and controlled movement that enhances safety and stability. Unlike the traditional free-weight bench press, the Smith Machine features a barbell fixed within a vertical track, reducing the need for balance and allowing users to focus solely on lifting the weight. This makes it an excellent option for beginners looking to build strength and confidence, as well as for experienced lifters aiming to isolate their chest muscles more effectively. The exercise primarily targets the pectoralis major but also engages the shoulders and triceps, making it a comprehensive upper body workout. By adjusting the bench's incline, decline, or flat position, you can emphasize different parts of the chest, allowing for a versatile and customizable training experience. The Smith Machine Bench Press is a valuable addition to any strength training routine, promoting muscle growth and enhancing overall chest development.
How to Do
1. Set Up
- Adjust the bench to a flat position and place it under the Smith machine bar.
- Lie back on the bench with your feet flat on the floor.
- Grip the barbell with a slightly wider than shoulder-width grip, palms facing forward.
- Unrack the bar by rotating your wrists to release the safety hooks.
2. Execution
- Lower the barbell to your chest by bending your elbows.
- Push the barbell back up to the starting position by extending your arms.
- Ensure the bar follows the fixed path provided by the Smith machine.
- Repeat for the desired number of repetitions.
3. Rack the Bar
- After completing your set, carefully rotate your wrists to re-engage the safety hooks and rack the bar.
Tips and Tricks
- Warm-Up: Start with a light warm-up set to prepare your muscles and joints.
- Proper Grip: Ensure your grip is firm but not overly tight to avoid wrist strain.
- Elbow Position: Keep your elbows at a 45-degree angle to your body to maximize chest engagement and minimize shoulder strain.
- Controlled Movement: Lower the bar in a controlled manner and push it back up smoothly to maintain tension on the chest muscles.
- Breathing: Inhale as you lower the bar and exhale as you press it back up.
- Back Position: Keep your back flat on the bench with a slight natural arch in your lower back.
- Foot Placement: Keep your feet flat on the floor to maintain stability and drive power from your legs.
- Use Safety Stops: Set the safety stops at an appropriate height to catch the bar in case of failure, ensuring safety during heavy lifts.
Benefits
1. Safety and Stability: The fixed bar path and safety stops make the Smith machine bench press a safer option, especially for those lifting heavy weights without a spotter.
2. Chest Development: Effectively targets the chest muscles, contributing to increased strength and muscle growth.
3. Consistent Form: The fixed path helps maintain consistent form and can reduce the risk of injury caused by improper technique.
4. Progressive Overload: Allows for precise weight adjustments, facilitating progressive overload for continuous muscle and strength gains.
5. Reduced Joint Strain: The stability of the machine can reduce strain on the joints, making it a good option for individuals with joint issues.
6. Muscle Isolation: Focuses on the pectoral muscles while also engaging the shoulders and triceps, promoting balanced upper body development.
7. Versatility: Can be performed with different bench angles (flat, incline, decline) to target various parts of the chest.
8. Core Engagement: Requires core stability to maintain proper form, helping to strengthen the core muscles.
FAQs
1. What muscles does the Smith Machine Bench Press target?
Answer : The primary muscle targeted is the pectoralis major (chest). It also works the anterior deltoids (front shoulders) and triceps.
2. How does the Smith Machine Bench Press differ from the free-weight bench press?
Answer : The Smith Machine Bench Press uses a barbell fixed in a vertical track, providing guided movement and reducing the need for balance. This setup enhances safety but limits the range of motion compared to the free-weight version.
3. Is the Smith Machine Bench Press suitable for beginners?
Answer : Yes, it is beginner-friendly due to its stable and controlled movement, which helps beginners focus on proper form without worrying about balance.
4. Can I adjust the bench's angle on the Smith Machine?
Answer : Yes, you can use an adjustable bench to perform incline, flat, or decline variations, targeting different parts of the chest.
5. What are the benefits of using a Smith Machine for the bench press?
Answer : The Smith Machine offers increased safety, controlled movement, and reduced risk of injury, especially when training alone. It also allows for more focused muscle isolation.
6. How should I position myself on the Smith Machine for a bench press?
Answer : Lie on the bench with your eyes under the barbell. Grip the bar slightly wider than shoulder-width apart, lower the bar to your mid-chest, and press up.
7. How much weight should I start with on the Smith Machine Bench Press?
Answer : Start with a light weight to focus on mastering the proper form. Gradually increase the weight as you become more comfortable and confident.
8. Can the Smith Machine Bench Press help improve my free-weight bench press?
Answer : Yes, it can help strengthen the chest, shoulders, and triceps, which may translate to improved performance in the free-weight bench press.
9. Is it safe to perform the Smith Machine Bench Press without a spotter?
Answer : The Smith Machine provides built-in safety features, such as adjustable safety stops. However, always set these stops at an appropriate height for added safety.
10. How often should I include the Smith Machine Bench Press in my workout routine?
Answer : Incorporate it 1-2 times per week, depending on your overall training program and recovery needs.
Conclusion
The Smith Machine Bench Press is a valuable addition to any chest workout routine, offering a safe and effective way to build strength and muscle mass. Its guided movement provides stability and reduces the risk of injury, making it an excellent choice for beginners and those training without a spotter. The exercise targets the pectoral muscles while also engaging the shoulders and triceps, contributing to a well-rounded upper body workout. By allowing for various bench angles, it offers versatility to target different areas of the chest. As with any exercise, maintaining proper form and progressively increasing the weight are key to maximizing benefits. Whether you're looking to enhance your chest development or complement your free-weight training, the Smith Machine Bench Press can help you achieve your fitness goals while providing a safer training environment.
You might also like our Chest Workouts For Building Muscle article in weight loss.
“Motivation is what gets you started. Habit is what keeps you going.” – Jim Ryun
If you would like more information about the 2024, please send us an email.
Written by Fitness Goal 4U
Smart Fitness Goals - Achieve Health with Simple Steps
Smart fitness goals focus on being Specific, Measurable, Achievable, Relevant, and Time-bound. They help you create a clear path to success, stay motivated, and track progress. Whether its weight loss, strength building, or improved endurance, smart goals guide your fitness journey, ensuring steady growth and sustainable results tailored to your needs.
“Confidence comes from discipline and training.” – Robert Kiyosaki
The barbell curl is a classic and highly effective exercise for building biceps strength and size. It involves lifting a barbell with an underhand grip, engaging the biceps brachii muscles in the arms. As one of the most fundamental movements in strength training, the barbell curl isolates the biceps, allowing for concentrated effort and muscle development. Suitable for lifters of all levels, from beginners to advanced athletes, this exercise can be easily adjusted for different training goals by varying the weight, grip width, and tempo. Incorporating barbell curls into a workout routine not only enhances arm aesthetics but also contributes to overall upper body strength. When performed with proper form, barbell curls are a safe and effective way to target the biceps, making them a staple in many bodybuilding and fitness programs.
How to Do It
1. Setup
- Stand upright with your feet shoulder-width apart.
- Hold a barbell with both hands, using an underhand (supinated) grip.
- Your hands should be slightly wider than shoulder-width apart.
2. Starting Position
- Keep your arms fully extended with the barbell resting against your thighs.
- Maintain a slight bend in your knees and keep your back straight.
3. Execution
- Inhale and slowly curl the barbell upwards, contracting your biceps.
- Keep your elbows close to your torso and avoid using your shoulders or back to lift the weight.
- Continue lifting until your biceps are fully contracted and the barbell is at shoulder level.
- Pause for a moment at the top of the movement, squeezing your biceps.
4. Lowering
- Exhale and slowly lower the barbell back to the starting position, fully extending your arms.
5. Repetition
- Repeat for the desired number of repetitions.
Tips and Tricks
- Maintain Proper Form: Avoid swinging your body or using momentum to lift the barbell. Focus on isolating the biceps by keeping your elbows stationary and close to your body.
- Control the Movement: Both the lifting (concentric) and lowering (eccentric) phases should be controlled. Avoid dropping the weight quickly.
- Use Appropriate Weight: Start with a manageable weight that allows you to maintain proper form throughout the exercise. Gradually increase the weight as you build strength.
- Avoid Locking Out: Keep a slight bend in your elbows at the bottom of the movement to maintain tension on the biceps. Breathing: Inhale as you lift the barbell and exhale as you lower it.
Benefits
1. Biceps Development: The barbell curl effectively targets the biceps, helping to increase muscle size and strength.
2. Forearm Strength: Holding the barbell and curling it also engages the forearm muscles, enhancing grip strength.
3. Improved Arm Aesthetics: Regularly performing barbell curls can lead to more defined and muscular arms.
4. Versatility: This exercise can be easily modified with variations such as close-grip or wide-grip curls to target different parts of the biceps.
FAQs
1. What muscles do barbell curls primarily work?
Answer : Barbell curls primarily target the biceps brachii, which includes the long head and short head of the biceps. They also engage the brachialis and brachioradialis muscles to a lesser extent, as well as the forearm flexors.
2. How should I grip the barbell for barbell curls?
Answer : Use an underhand (supinated) grip, with your palms facing upward. Your hands should be shoulder-width apart or slightly wider. A narrower grip emphasizes the outer part of the biceps, while a wider grip targets the inner part.
3. Should I keep my elbows stationary during the exercise?
Answer : Yes, keeping your elbows stationary and close to your torso is crucial for isolating the biceps. Moving your elbows forward can involve the shoulders and reduce the effectiveness of the exercise.
4. What is the proper range of motion for barbell curls?
Answer : The proper range of motion involves fully extending your arms at the bottom of the movement and curling the barbell up to shoulder height, where your biceps are fully contracted. Avoid shortening the range of motion to ensure full muscle engagement.
5. How much weight should I use for barbell curls?
Answer : Start with a weight that allows you to perform the exercise with proper form and control for 8-12 repetitions. Gradually increase the weight as your strength improves. It's better to use a lighter weight with good form than a heavier weight with poor form.
6. How many sets and repetitions should I do?
Answer : A typical recommendation for hypertrophy (muscle growth) is 3-4 sets of 8-12 repetitions. For strength gains, you may perform 3-5 sets of 4-6 repetitions with a heavier weight. Adjust based on your fitness goals.
7. Can I perform barbell curls with an EZ bar instead of a straight bar?
Answer : Yes, an EZ bar is a great alternative to a straight bar for barbell curls. The angled grip of an EZ bar can reduce wrist strain and make the exercise more comfortable for some people.
8. Is it normal to feel discomfort in my wrists during barbell curls?
Answer : Some people may experience wrist discomfort due to the supinated grip. If this occurs, consider switching to an EZ bar or adjusting your grip width. Warming up your wrists and forearms before lifting can also help.
9. How can I avoid cheating during barbell curls?
Answer : To avoid cheating, keep your back straight, avoid swinging your body, and focus on lifting the barbell solely with your biceps. Using a lighter weight can also help you maintain proper form.
10. Can barbell curls be part of a full-body workout?
Answer : Yes, barbell curls can be incorporated into a full-body workout or an upper-body workout routine. They are a versatile exercise for biceps development and can be paired with other compound and isolation exercises.
11. How can I progress with barbell curls?
Answer : You can progress by gradually increasing the weight, adding more sets or repetitions, or incorporating different variations such as drop sets, tempo changes, or supersets with other biceps exercises.
Conclusion
In conclusion, the barbell curl is a quintessential exercise for targeting the biceps and enhancing upper body strength. Its simplicity and effectiveness make it a staple in any strength training regimen, suitable for both beginners and seasoned lifters. By isolating the biceps, the barbell curl promotes muscle growth and definition, contributing to a well-rounded arm development. Proper form and controlled execution are crucial to maximizing benefits and preventing injury. Whether aiming for muscle hypertrophy or improving functional strength, incorporating barbell curls into your workout routine is a proven method to achieve strong, defined biceps. As part of a comprehensive fitness program, this exercise helps build a solid foundation for overall upper body strength and muscular aesthetics.
You might also like our Best 10 Biceps Workouts for Building Muscle article in weight loss.
“Motivation is what gets you started. Habit is what keeps you going.” – Jim Ryun
If you would like more information about the 2024, please send us an email.
Written by Fitness Goal 4U
Smart Fitness Goals - Achieve Health with Simple Steps
Smart fitness goals focus on being Specific, Measurable, Achievable, Relevant, and Time-bound. They help you create a clear path to success, stay motivated, and track progress. Whether its weight loss, strength building, or improved endurance, smart goals guide your fitness journey, ensuring steady growth and sustainable results tailored to your needs.
“Confidence comes from discipline and training.” – Robert Kiyosaki
The dumbbell curl is a fundamental exercise for developing biceps strength and size. This exercise involves lifting dumbbells with an underhand grip, allowing for a more natural range of motion compared to barbell curls. Dumbbell curls are versatile and can be performed with various grip styles and positions, such as standing, seated, or on an incline, each targeting different parts of the biceps. This exercise is excellent for isolating the biceps, promoting muscle growth, and enhancing the peak of the muscle. Whether you're a beginner looking to build foundational strength or an experienced lifter aiming to fine-tune your biceps, dumbbell curls are a valuable addition to any workout routine. They also help improve arm symmetry by allowing each arm to work independently. With proper form and controlled movements, dumbbell curls effectively contribute to overall arm aesthetics and upper body strength.
How to Do It
1. Setup
- Stand upright with your feet shoulder-width apart.
- Hold a dumbbell in each hand with an underhand (supinated) grip.
- Let your arms hang by your sides with your palms facing forward.
2. Starting Position
- Keep your elbows close to your torso and maintain a straight posture.
- Your arms should be fully extended, and the dumbbells should be near your thighs.
3. Execution
- Inhale and curl one dumbbell upwards, bending at the elbow and contracting your biceps.
- Keep your elbow stationary and close to your body as you lift the weight.
- Continue lifting until your biceps are fully contracted and the dumbbell is at shoulder level.
- Pause at the top of the movement, squeezing your biceps.
4. Lowering
- Exhale and slowly lower the dumbbell back to the starting position, fully extending your arm.
5. Repetition
- Repeat the movement with the opposite arm.
- Continue alternating arms for the desired number of repetitions.
Tips and Tricks
- Control the Movement: Avoid using momentum to lift the weights. Perform the exercise in a slow and controlled manner, both during the lifting and lowering phases.
- Maintain Proper Posture: Keep your back straight and avoid swinging your body. This helps isolate the biceps and prevents injury.
- Elbow Position: Keep your elbows close to your sides throughout the exercise. This ensures that the biceps are the primary muscles being worked.
- Range of Motion: Fully extend your arms at the bottom of the movement and lift the dumbbell until your biceps are fully contracted.
- Breathing: Inhale as you curl the dumbbell and exhale as you lower it.
Benefits
1. Biceps Isolation: Dumbbell curls effectively isolate the biceps, promoting muscle growth and definition.
2. Balanced Development: By working one arm at a time, dumbbell curls help identify and correct any strength imbalances between the arms.
3. Greater Range of Motion: The use of dumbbells allows for a more natural movement and a greater range of motion compared to barbells.
4. Functional Strength: This exercise also engages the forearms and improves grip strength, which is beneficial for everyday activities and other exercises.
5. Versatility: Dumbbell curls can be performed in various positions (standing, seated, incline) and grips (hammer, supinated) to target different parts of the biceps and forearms.
FAQs
1. What muscles do dumbbell curls primarily work?
Answer : Dumbbell curls primarily target the biceps brachii, particularly the short head and long head. They also engage the brachialis and brachioradialis muscles, as well as the forearm flexors.
2. How should I grip the dumbbells during dumbbell curls?
Answer : Use an underhand (supinated) grip, with your palms facing upward. You can also experiment with a neutral grip (palms facing each other) for a hammer curl variation that targets different muscles.
3. Should I perform dumbbell curls standing or seated?
Answer : Both standing and seated dumbbell curls are effective. Standing curls allow for a natural range of motion and can engage core stabilizers, while seated curls help reduce cheating and focus more on the biceps.
4. How much weight should I use for dumbbell curls?
Answer : Start with a weight that allows you to perform the exercise with proper form for 8-12 repetitions. Gradually increase the weight as your strength improves. It's better to use lighter weights with good form than heavier weights with poor form.
5. How many sets and repetitions should I do?
Answer : A typical recommendation for muscle growth is 3-4 sets of 8-12 repetitions. For strength, you might do 3-5 sets of 4-6 repetitions. Adjust based on your fitness goals and experience level.
6. Can I perform dumbbell curls with different grips?
Answer : Yes, varying your grip can target different parts of the biceps and forearms. Common variations include the hammer curl (neutral grip) and the reverse curl (pronated grip).
7. What is the difference between alternating and simultaneous dumbbell curls?
Answer : Alternating curls involve lifting one dumbbell at a time, allowing for more focus on each arm. Simultaneous curls involve lifting both dumbbells at the same time, which can save time and create a balanced workload.
8. How can I avoid using momentum during dumbbell curls?
Answer : To avoid using momentum, focus on slow and controlled movements. Keep your elbows close to your torso, avoid swinging your body, and use a weight that you can lift without cheating.
9. How can I progress with dumbbell curls?
Answer : You can progress by gradually increasing the weight, adding more sets or repetitions, or incorporating different variations such as hammer curls or concentration curls.
10. Are dumbbell curls suitable for beginners?
Answer : Yes, dumbbell curls are suitable for beginners. They are easy to learn, require minimal equipment, and can be adjusted to suit any fitness level.
11. Can dumbbell curls help with muscle imbalances?
Answer : Yes, dumbbell curls can help correct muscle imbalances since each arm works independently. This allows you to focus on weaker or less developed muscles.
Conclusion
In conclusion, the dumbbell curl is an essential exercise for anyone looking to build strong and defined biceps. Its versatility, allowing for various grip styles and positions, makes it a valuable addition to any workout routine, catering to both beginners and advanced lifters. The exercise not only isolates the biceps for targeted muscle growth but also helps improve overall arm symmetry and forearm strength. By focusing on proper form and controlled movements, you can effectively engage the biceps, minimize the risk of injury, and achieve optimal results. Incorporating dumbbell curls into your regular training regimen will contribute significantly to developing well-rounded arm muscles and enhancing upper body aesthetics. As with any exercise, gradual progression and consistency are key to achieving your fitness goals.
You might also like our Best 10 Biceps Workouts for Building Muscle article in weight loss.
“Motivation is what gets you started. Habit is what keeps you going.” – Jim Ryun
If you would like more information about the 2024, please send us an email.
Written by Fitness Goal 4U
Smart Fitness Goals - Achieve Health with Simple Steps
Smart fitness goals focus on being Specific, Measurable, Achievable, Relevant, and Time-bound. They help you create a clear path to success, stay motivated, and track progress. Whether its weight loss, strength building, or improved endurance, smart goals guide your fitness journey, ensuring steady growth and sustainable results tailored to your needs.
“Confidence comes from discipline and training.” – Robert Kiyosaki
The hammer curl is a strength training exercise targeting the biceps and brachialis muscles. Unlike traditional bicep curls, this variation involves a neutral grip, with palms facing each other throughout the movement. To perform the exercise, stand upright with feet shoulder-width apart, holding a dumbbell in each hand. Keep your elbows close to your torso and slowly curl the weights upward while keeping the wrists in a neutral position. At the top of the movement, squeeze the biceps and then lower the weights back down with control. The hammer curl not only engages the biceps but also the brachioradialis, a muscle in the forearm, providing a well-rounded workout for the arm muscles. It is particularly beneficial for building overall arm strength and improving grip. This exercise can be included in a variety of fitness routines and is suitable for different fitness levels.
How to Do It
1. Setup
- Stand upright with your feet shoulder-width apart.
- Hold a dumbbell in each hand with a neutral grip (palms facing each other).
2. Starting Position
- Let your arms hang by your sides, fully extended, with the dumbbells close to your thighs.
- Keep your elbows close to your torso and maintain a straight posture.
3. Execution
- Inhale and curl both dumbbells upwards simultaneously, bending at the elbows.
- Keep your elbows stationary and close to your body as you lift the weights.
- Continue lifting until your forearms are vertical, and the dumbbells are near your shoulders.
- Pause briefly at the top of the movement, squeezing your forearms and biceps.
4. Lowering
- Exhale and slowly lower the dumbbells back to the starting position, fully extending your arms.
5. Repetition
- Repeat for the desired number of repetitions.
Tips and Tricks
- Control the Movement: Avoid using momentum to lift the weights. Perform the exercise in a slow and controlled manner to maximize muscle engagement.
- Maintain Proper Posture: Keep your back straight and avoid swinging your body. This helps isolate the target muscles and reduces the risk of injury.
- Elbow Position: Keep your elbows close to your sides and stationary throughout the exercise. This ensures that the brachialis and brachioradialis are the primary muscles being worked.
- Grip and Wrist Position: Maintain a firm grip on the dumbbells and avoid excessive wrist movement.
- Breathing: Inhale as you curl the dumbbells and exhale as you lower them.
Benefits
1. Forearm and Brachialis Development: The hammer curl specifically targets the brachialis and brachioradialis, contributing to overall arm thickness and strength.
2. Increased Grip Strength: The neutral grip and controlled movement enhance grip strength, which is beneficial for various physical activities and other exercises.
3. Balanced Arm Development: Incorporating hammer curls into your routine helps ensure balanced development of the biceps, brachialis, and forearms.
4. Reduced Risk of Injury: The neutral grip is generally easier on the wrists and elbows, making hammer curls a good option for those with joint concerns.
5. Functional Strength: The muscles worked in hammer curls are essential for many everyday tasks and sports, improving functional strength and performance.
FAQs
1. What muscles do hammer curls target?
Answer : Hammer curls primarily target the biceps brachii, brachialis, and brachioradialis muscles. The neutral grip also engages the forearm muscles, enhancing grip strength.
2. How do hammer curls differ from traditional bicep curls?
Answer : The main difference is the grip: hammer curls use a neutral grip with palms facing each other, while traditional bicep curls typically use a supinated grip with palms facing up. This grip variation shifts emphasis slightly to the brachialis and forearm muscles.
3. Can beginners perform hammer curls?
Answer : Yes, hammer curls are suitable for all fitness levels, including beginners. It's essential to start with lighter weights and focus on proper form before progressing to heavier weights.
4. How many sets and reps should I do?
Answer : A common recommendation is 3-4 sets of 8-12 reps. However, this can vary depending on your fitness goals and training program.
5. Should I use dumbbells or other equipment for hammer curls?
Answer : Dumbbells are the most common equipment used for hammer curls, but you can also use resistance bands or a cable machine with a rope attachment for variation.
6. How can I avoid injuries when doing hammer curls?
Answer : To avoid injuries, maintain proper form by keeping your elbows close to your torso, avoiding swinging or using momentum, and not lifting excessively heavy weights. It's also important to warm up before starting and to cool down after the exercise.
7. Can hammer curls help with overall arm strength?
Answer : Yes, hammer curls are effective for improving overall arm strength, particularly in the biceps and forearms, making them a valuable addition to upper body workouts.
Conclusion
In conclusion, the hammer curl is an effective and versatile exercise for targeting the biceps, brachialis, and forearm muscles. Its unique neutral grip offers a balanced approach to arm training, enhancing muscle engagement and grip strength. Suitable for all fitness levels, the hammer curl can be easily incorporated into various workout routines, whether using dumbbells, resistance bands, or cable machines. By focusing on proper form and gradually increasing resistance, individuals can achieve significant improvements in arm strength and muscle development. As with any exercise, consistency and correct technique are key to maximizing benefits and minimizing the risk of injury.
You might also like our Best 10 Biceps Workouts for Building Muscle article in weight loss.
“Motivation is what gets you started. Habit is what keeps you going.” – Jim Ryun
If you would like more information about the 2024, please send us an email.
Written by Fitness Goal 4U
Smart Fitness Goals - Achieve Health with Simple Steps
Smart fitness goals focus on being Specific, Measurable, Achievable, Relevant, and Time-bound. They help you create a clear path to success, stay motivated, and track progress. Whether its weight loss, strength building, or improved endurance, smart goals guide your fitness journey, ensuring steady growth and sustainable results tailored to your needs.
“Confidence comes from discipline and training.” – Robert Kiyosaki
The preacher curl is a popular exercise targeting the biceps, specifically designed to isolate and strengthen the muscles of the upper arm. By using a preacher bench, this exercise positions the upper arms on a padded surface, preventing them from moving and thus focusing all the effort on the biceps. This isolation helps in achieving a more controlled and effective workout, making it an excellent choice for building size and strength in the biceps. Preacher curls can be performed with a barbell, dumbbells, or an EZ curl bar, allowing for variations that can challenge the muscles differently. This exercise is particularly useful for individuals looking to enhance the peak of their biceps, as the unique positioning emphasizes the contraction at the top of the movement. Incorporating preacher curls into a workout routine can lead to well-defined and stronger biceps over time.
How to Do It
1. Setup
- Adjust the seat height of the preacher bench so that your armpits rest comfortably on the top of the pad.
- Sit on the bench and place your arms over the angled pad, extending them fully.
- Grip an EZ curl bar or dumbbell with an underhand (supinated) grip, shoulder-width apart.
2. Starting Position
- Keep your chest pressed against the pad and your back straight.
- Your arms should be fully extended with a slight bend at the elbows, holding the weight securely.
3. Execution
- Inhale and curl the weight upwards, bending at the elbows and contracting your biceps.
- Keep your upper arms pressed against the pad and avoid lifting your elbows off the bench.
- Continue curling until your forearms are vertical and your biceps are fully contracted.
- Pause briefly at the top of the movement, squeezing your biceps.
4. Lowering
- Exhale and slowly lower the weight back to the starting position, fully extending your arms.
5. Repetition
- Repeat for the desired number of repetitions.
Tips and Tricks
- Proper Elbow Position: Keep your elbows firmly against the pad throughout the exercise to ensure proper isolation of the biceps.
- Controlled Movement: Avoid using momentum to lift the weight. Perform the exercise slowly and with control, especially during the lowering phase.
- Full Range of Motion: Fully extend your arms at the bottom of the movement and bring the weight up as far as possible to maximize biceps engagement.
- Grip Variation: Experiment with different grips (narrow or wide) to target different parts of the biceps.
- Breathing: Inhale as you lift the weight and exhale as you lower it.
Benefits
1. Biceps Isolation: The preacher curl bench helps isolate the biceps by preventing the involvement of other muscles, making it an effective exercise for building biceps strength and size.
2. Long Head Emphasis: This exercise specifically targets the long head of the biceps, helping to develop the peak of the muscle.
3. Strict Form: The preacher bench eliminates the use of momentum, ensuring that the biceps do the majority of the work, which can lead to better muscle development.
4. Reduced Risk of Injury: By providing support and stabilization, the preacher bench reduces the risk of improper form and potential injuries.
5. Variety: The preacher curl can be performed with different equipment, such as an EZ curl bar, straight bar, or dumbbells, offering variety in your training routine.
FAQs
1. What muscles do preacher curls target?
Answer : Preacher curls primarily target the biceps brachii, with secondary engagement of the brachialis and brachioradialis muscles.
2. How do I perform a preacher curl correctly?
Answer : Sit on a preacher bench with your upper arms resting on the pad. Grip the barbell or dumbbells with an underhand grip, shoulder-width apart. Curl the weight towards your shoulders while keeping your upper arms stationary, then slowly lower it back down.
3. What equipment is needed for preacher curls?
Answer : Preacher curls require a preacher bench and a barbell, EZ curl bar, or dumbbells.
4. Can beginners do preacher curls?
Answer : Yes, preacher curls are suitable for beginners. Start with lighter weights to focus on proper form and gradually increase the weight as you become more comfortable with the exercise.
5. How many sets and reps should I do?
Answer : A common recommendation is 3-4 sets of 8-12 reps. However, this can vary based on individual goals and fitness levels.
6. Can preacher curls cause injuries?
Answer : Like any exercise, improper form or using excessive weight can lead to injury. It's important to maintain proper technique and start with manageable weights to avoid strain on the wrists and elbows.
7. What's the difference between preacher curls and regular curls?
Answer : Preacher curls provide more isolation for the biceps by preventing upper arm movement, which helps in focusing the effort on the muscle. Regular curls allow for more movement and may engage additional muscle groups.
8. Are preacher curls effective for building bicep peak?
Answer : Yes, preacher curls are effective for targeting the peak of the biceps due to the concentrated contraction at the top of the movement.
9. Can preacher curls be done with resistance bands?
Answer : Yes, preacher curls can be performed using resistance bands by anchoring them under the bench and holding the handles with your hands.
10. How often should I do preacher curls?
Answer : It's recommended to incorporate preacher curls into your bicep workout routine 1-2 times per week, allowing sufficient recovery time between sessions.
Conclusion
In conclusion, preacher curls are a highly effective exercise for isolating and developing the biceps, offering a focused and controlled way to enhance muscle size and definition. By using a preacher bench, this exercise minimizes the involvement of other muscle groups, allowing for maximum concentration on the biceps. Whether performed with a barbell, dumbbells, or resistance bands, preacher curls can be adapted to suit various fitness levels and goals. Incorporating preacher curls into a balanced workout routine can help achieve well-rounded bicep development and contribute to overall arm strength. As with any exercise, proper form and gradual progression in weight are crucial to avoid injury and ensure optimal results.
You might also like our Best 10 Biceps Workouts for Building Muscle article in weight loss.
“Motivation is what gets you started. Habit is what keeps you going.” – Jim Ryun
If you would like more information about the 2024, please send us an email.
Written by Fitness Goal 4U
Smart Fitness Goals - Achieve Health with Simple Steps
Smart fitness goals focus on being Specific, Measurable, Achievable, Relevant, and Time-bound. They help you create a clear path to success, stay motivated, and track progress. Whether its weight loss, strength building, or improved endurance, smart goals guide your fitness journey, ensuring steady growth and sustainable results tailored to your needs.
“Confidence comes from discipline and training.” – Robert Kiyosaki
The concentration curl is a focused exercise targeting the biceps, ideal for isolating the muscle and promoting growth. This exercise involves sitting on a bench with one arm resting on the inner thigh, holding a dumbbell. The movement is performed by curling the dumbbell towards the shoulder, with a controlled contraction and slow release. Concentration curls are effective in emphasizing the peak of the bicep, as they minimize the involvement of other muscles, making them an excellent choice for developing definition and strength. The exercise also helps improve mind-muscle connection, as it requires concentration and controlled movements. Suitable for all fitness levels, concentration curls can be easily integrated into any arm workout routine, offering benefits in muscle hypertrophy and endurance. For optimal results, focus on proper form and technique, gradually increasing weight as strength improves.
How to Do It
1. Setup
- Sit on a bench with your legs spread apart.
- Hold a dumbbell in one hand with an underhand (supinated) grip.
- Lean forward slightly and rest your elbow against the inside of your thigh, just above the knee. Your upper arm should be perpendicular to the floor.
2. Starting Position
- Let the dumbbell hang at arm's length, with your arm fully extended.
- Keep your torso stationary and your opposite hand resting on your opposite thigh or knee for support.
3. Execution
- Inhale and slowly curl the dumbbell towards your shoulder, contracting your biceps.
- Keep your elbow stationary against your thigh, and focus on using your biceps to lift the weight.
- Continue curling until your biceps are fully contracted and the dumbbell is at shoulder height.
- Pause briefly at the top of the movement, squeezing your biceps.
4. Lowering
- Exhale and slowly lower the dumbbell back to the starting position, fully extending your arm.
5. Repetition
- Complete the desired number of repetitions with one arm before switching to the other.
Tips and Tricks
- Elbow Stability: Keep your elbow pressed firmly against your inner thigh to prevent movement and ensure proper isolation of the biceps.
- Controlled Motion: Perform the exercise with slow and controlled movements, especially during the lowering phase, to maximize muscle engagement.
- Focus on Contraction: Concentrate on the contraction of your biceps throughout the movement. Visualizing the muscle working can enhance the mind-muscle connection.
- Avoid Swinging: Do not use momentum or swing your body to lift the weight. The movement should come solely from the biceps.
- Breathing: Inhale as you curl the weight and exhale as you lower it.
Benefits
1. Biceps Isolation: The concentration curl provides excellent isolation of the biceps, allowing for a more focused and intense contraction.
2. Peak Development: By emphasizing the contraction at the top of the movement, concentration curls help in developing the peak of the biceps.
3. Mind-Muscle Connection: The seated and controlled nature of this exercise allows for a strong mind-muscle connection, enhancing biceps engagement.
4. Minimal Equipment: Requires only a dumbbell and a bench, making it a convenient exercise to perform in most settings.
5. Muscle Imbalance Correction: Since the exercise is performed unilaterally (one arm at a time), it helps in identifying and correcting muscle imbalances between arms.
FAQs
1. What is a concentration curl?
Answer : Concentration curls are a bicep isolation exercise where you curl a dumbbell with one arm, focusing on maximizing the contraction of the bicep.
2. How do I perform a concentration curl correctly?
Answer : Sit on a bench with your legs spread, rest your elbow on the inner thigh, and curl a dumbbell towards your shoulder with a controlled motion, focusing on squeezing the bicep.
3. What muscles do concentration curls target?
Answer : Concentration curls primarily target the biceps brachii, specifically the peak of the muscle.
4. Are concentration curls effective for bicep growth?
Answer : Yes, they are effective for isolating and strengthening the biceps, helping to improve muscle definition and peak.
5. What is the recommended weight for beginners?
Answer : Beginners should start with a lighter weight, around 5-15 pounds, focusing on proper form and gradually increasing as they gain strength.
6. How many sets and reps should I do?
Answer : Typically, 3-4 sets of 8-12 reps are recommended, depending on your fitness level and goals.
7. Can I do concentration curls if I have a shoulder injury?
Answer : It's best to consult with a medical professional before doing any exercise if you have a shoulder injury, as concentration curls may place stress on the shoulder joint.
8. How do concentration curls differ from other bicep exercises?
Answer : Concentration curls emphasize the bicep peak and offer greater isolation compared to other exercises like barbell curls, which may engage multiple muscles.
9. Can concentration curls help improve muscle symmetry?
Answer : Yes, because they allow you to work each arm individually, helping to correct imbalances between the left and right biceps.
10. How can I progress with concentration curls?
Answer : Progress by increasing the weight, improving form, and varying rep ranges. Adding pauses at the peak contraction can also increase difficulty.
Conclusion
In conclusion, concentration curls are an essential exercise for anyone looking to enhance their bicep strength, definition, and symmetry. By isolating the biceps and focusing on proper form, this exercise effectively targets the muscle peak, promoting growth and improving muscle control. Suitable for all fitness levels, concentration curls can be easily adapted to individual capabilities, making them a versatile addition to any arm workout routine. Consistent practice, mindful execution, and gradual progression in weight and intensity are key to maximizing the benefits of this exercise. Whether you're a beginner or an experienced lifter, incorporating concentration curls into your regimen can significantly contribute to achieving well-developed, sculpted biceps.
You might also like our Best 10 Biceps Workouts for Building Muscle article in weight loss.
“Motivation is what gets you started. Habit is what keeps you going.” – Jim Ryun
If you would like more information about the 2024, please send us an email.
Written by Fitness Goal 4U
Smart Fitness Goals - Achieve Health with Simple Steps
Smart fitness goals focus on being Specific, Measurable, Achievable, Relevant, and Time-bound. They help you create a clear path to success, stay motivated, and track progress. Whether its weight loss, strength building, or improved endurance, smart goals guide your fitness journey, ensuring steady growth and sustainable results tailored to your needs.
“Confidence comes from discipline and training.” – Robert Kiyosaki
The cable curl is a popular and effective exercise for targeting the biceps. It utilizes a cable machine, which offers constant tension throughout the movement, making it a great alternative to free weights. To perform the exercise, you stand facing the cable machine with a straight bar attached to the low pulley. Keeping your elbows close to your sides, you curl the bar towards your shoulders by contracting your biceps, then slowly lower it back to the starting position. The cable curl can be adjusted to target different parts of the biceps by changing the attachment or grip. It's an excellent choice for anyone looking to build strength and definition in their arms, as the consistent tension helps maximize muscle engagement. This exercise is suitable for all fitness levels, from beginners to advanced lifters, and can be easily incorporated into any arm workout routine.
How to Do It
1. Setup
- Attach a straight bar or EZ bar to a low pulley on a cable machine.
- Stand facing the machine, with your feet shoulder-width apart.
- Grasp the bar with an underhand (supinated) grip, shoulder-width apart.
2. Starting Position
- Stand upright with your arms fully extended and the bar resting against your thighs.
- Keep your elbows close to your torso and maintain a slight bend in your knees.
- Your back should be straight, and your core engaged.
3. Execution
- Inhale and curl the bar upwards, contracting your biceps.
- Keep your elbows stationary and close to your sides as you lift the bar.
- Continue curling until your biceps are fully contracted and the bar is at shoulder level.
- Pause briefly at the top of the movement, squeezing your biceps.
4. Lowering
- Exhale and slowly lower the bar back to the starting position, fully extending your arms.
5. Repetition
- Repeat for the desired number of repetitions.
Tips and Tricks
- Constant Tension: The cable provides constant tension on the biceps throughout the movement, so focus on maintaining control during both the lifting and lowering phases.
- Elbow Position: Keep your elbows stationary and close to your sides to prevent shoulder involvement and ensure maximum biceps isolation.
- Grip Variations: Experiment with different attachments (straight bar, EZ bar, rope) and grips (narrow, wide) to target various parts of the biceps.
- Controlled Movement: Avoid using momentum to lift the weight. Perform the exercise in a slow and controlled manner to maximize muscle engagement.
- Breathing: Inhale as you curl the bar and exhale as you lower it.
Benefits
1. Constant Tension: The cable machine provides continuous resistance throughout the entire range of motion, leading to greater muscle activation.
2. Biceps Isolation: The cable curl isolates the biceps, promoting muscle growth and definition.
3. Versatility: Cable machines offer a variety of attachment options and grip positions, allowing you to target different angles of the biceps.
4. Reduced Joint Stress: The smooth motion of the cable can reduce stress on the joints compared to free weights, making it a good option for those with joint concerns.
5. Improved Mind-Muscle Connection: The controlled nature of the exercise helps improve focus on the biceps contraction, enhancing the mind-muscle connection.
FAQs
1. What muscles do cable curls primarily target?
Answer : Cable curls primarily target the biceps brachii, but they also engage the brachialis and brachioradialis muscles to a lesser extent.
2. How do I perform a cable curl correctly?
Answer : Stand facing the cable machine with your feet shoulder-width apart. Grip the bar or attachment with an underhand grip, keeping your elbows close to your sides. Curl the bar toward your shoulders, squeezing your biceps at the top, then slowly lower it back down.
3. What are the benefits of using a cable machine for curls?
Answer : The cable machine provides constant tension throughout the movement, leading to better muscle engagement. It also allows for a variety of grips and attachments, offering versatility in targeting different parts of the biceps.
4. How can I modify cable curls to target different parts of the biceps?
Answer : You can use different attachments like straight bars, EZ bars, or ropes and adjust the grip width to focus on different areas of the biceps. For example, a wider grip emphasizes the inner biceps, while a narrow grip targets the outer biceps.
5. Are cable curls suitable for beginners?
Answer : Yes, cable curls are suitable for all fitness levels. Beginners can start with lighter weights and gradually increase as they build strength.
6. How many sets and reps should I do?
Answer : For general muscle building, 3-4 sets of 8-12 reps are recommended. However, this can vary based on your fitness goals.
7. Can cable curls help with building arm strength?
Answer : Yes, cable curls are effective for building arm strength and muscle definition, especially when combined with a well-rounded arm workout routine.
8. What are common mistakes to avoid during cable curls?
Answer : Common mistakes include using too much weight, which can lead to improper form, swinging the arms or body, and not fully extending the arms at the bottom of the movement.
9. How can I avoid injury while doing cable curls?
Answer : Use proper form, avoid using excessive weight, and ensure a controlled motion throughout the exercise. Warm up adequately before starting your workout and listen to your body to prevent overexertion.
10. Can I incorporate cable curls into a full-body workout?
Answer : Yes, cable curls can be included in a full-body workout routine or as part of an upper body or arm-focused day. They are a versatile exercise that complements other movements well.
Conclusion
In conclusion, cable curls are an excellent exercise for developing strong and well-defined biceps. They provide consistent tension throughout the movement, making them a superior option for engaging the biceps compared to free weights. With the versatility to target different parts of the biceps through various grips and attachments, cable curls can be tailored to suit individual fitness goals. They are suitable for all fitness levels, from beginners to advanced lifters, and can be easily integrated into any arm or upper body workout routine. By maintaining proper form and avoiding common mistakes, you can safely and effectively incorporate cable curls into your training regimen to build strength and muscle definition in your arms.
You might also like our Best 10 Biceps Workouts for Building Muscle article in weight loss.
“Motivation is what gets you started. Habit is what keeps you going.” – Jim Ryun
If you would like more information about the 2024, please send us an email.
Written by Fitness Goal 4U
Smart Fitness Goals - Achieve Health with Simple Steps
Smart fitness goals focus on being Specific, Measurable, Achievable, Relevant, and Time-bound. They help you create a clear path to success, stay motivated, and track progress. Whether its weight loss, strength building, or improved endurance, smart goals guide your fitness journey, ensuring steady growth and sustainable results tailored to your needs.
“Confidence comes from discipline and training.” – Robert Kiyosaki
The incline dumbbell curl is an effective exercise for targeting the biceps. This movement involves sitting on an incline bench set at a 45-degree angle, holding a dumbbell in each hand with your arms fully extended. The incline position allows for a greater range of motion, emphasizing the stretch at the bottom of the curl. To perform the exercise, start by curling the dumbbells toward your shoulders, keeping your elbows close to your body and focusing on contracting the biceps. Slowly lower the weights back to the starting position, ensuring full extension of the arms. The incline dumbbell curl not only builds bicep strength and size but also helps in improving muscle definition. It's important to use a weight that allows for proper form and control throughout the movement. This exercise can be incorporated into upper body or arm-specific workouts for balanced muscle development.
How to Do It
1. Setup
- Set an adjustable bench to an incline of about 45 to 60 degrees.
- Sit on the bench with your back firmly against the pad and your feet flat on the ground.
- Hold a dumbbell in each hand with an underhand (supinated) grip.
2. Starting Position
- Let your arms hang down fully extended, with your palms facing forward.
- Keep your shoulders back and your chest up.
3. Execution
- Inhale and curl the dumbbells upward, bending at the elbows and contracting your biceps.
- Keep your upper arms stationary and close to your body as you lift the weights.
- Continue curling until your biceps are fully contracted and the dumbbells are at shoulder height.
- Pause briefly at the top of the movement, squeezing your biceps.
4. Lowering
- Exhale and slowly lower the dumbbells back to the starting position, fully extending your arms.
5. Repetition
- Repeat for the desired number of repetitions.
Tips and Tricks
- Maintain Proper Posture: Keep your back firmly against the bench and avoid arching your back or lifting your shoulders off the bench.
- Elbow Position: Keep your elbows slightly behind your torso and avoid letting them move forward during the lift.
- Controlled Movement: Perform the exercise slowly and with control, especially during the lowering phase, to maximize muscle tension and minimize the risk of injury.
- Full Range of Motion: Allow your arms to fully extend at the bottom of the movement to stretch the biceps and engage them fully.
- Breathing: Inhale as you curl the dumbbells and exhale as you lower them.
Benefits
1. Long Head Emphasis: The incline position places more emphasis on the long head of the biceps, helping to develop the peak of the muscle.
2. Increased Range of Motion: The stretched starting position increases the range of motion, leading to a more intense contraction and greater muscle activation.
3. Isolation and Focus: The incline position reduces the involvement of other muscles, allowing for greater focus on the biceps.
4. Variety and Muscle Confusion: Including incline curls in your routine can provide variety and prevent plateaus by challenging the muscles differently than standard curls.
5. Improved Arm Aesthetics: Regularly performing incline dumbbell curls can enhance the overall shape and definition of the biceps.
FAQs
1. What muscles does the incline dumbbell curl target?
Answer : The incline dumbbell curl primarily targets the biceps brachii, with secondary engagement of the brachialis and brachioradialis muscles.
2. What is the proper form for incline dumbbell curls?
Answer : Sit on an incline bench set at a 45-degree angle. Hold dumbbells in each hand with arms fully extended. Curl the weights towards your shoulders while keeping your elbows close to your sides, then slowly lower them back to the starting position.
3. What are the benefits of the incline position?
Answer : The incline position increases the stretch on the biceps at the bottom of the movement, allowing for a greater range of motion and more effective muscle activation.
4. How should I choose the right weight?
Answer : Select a weight that allows you to complete the exercise with proper form and control. It should be challenging but not so heavy that it compromises your technique.
5. How many sets and reps should I do?
Answer : Typically, 3-4 sets of 8-12 reps are recommended, depending on your fitness level and goals.
6. Can beginners do incline dumbbell curls?
Answer : Yes, beginners can perform this exercise. Start with lighter weights to master the form and gradually increase the weight as you gain strength.
7. How does the incline dumbbell curl differ from regular dumbbell curls?
Answer : The incline dumbbell curl places the biceps in a stretched position, emphasizing the long head of the biceps more than regular dumbbell curls, which target the biceps evenly.
Conclusion
The incline dumbbell curl is a valuable addition to any strength training routine, especially for those looking to enhance their bicep development. By incorporating the incline angle, this exercise provides a unique challenge, promoting a greater range of motion and targeting the biceps more effectively than standard curls. It not only helps in building strength and muscle size but also improves overall arm definition. Whether you're a beginner or an experienced lifter, the incline dumbbell curl can be adapted to suit your fitness level by adjusting the weight and reps. Consistently practicing this exercise with proper form will lead to noticeable improvements in your upper body strength and aesthetics. Remember to combine it with a well-rounded workout regimen and proper nutrition for the best results.
You might also like our Best 10 Biceps Workouts for Building Muscle article in weight loss.
“Motivation is what gets you started. Habit is what keeps you going.” – Jim Ryun
If you would like more information about the 2024, please send us an email.
Written by Fitness Goal 4U
Smart Fitness Goals - Achieve Health with Simple Steps
Smart fitness goals focus on being Specific, Measurable, Achievable, Relevant, and Time-bound. They help you create a clear path to success, stay motivated, and track progress. Whether its weight loss, strength building, or improved endurance, smart goals guide your fitness journey, ensuring steady growth and sustainable results tailored to your needs.
“Confidence comes from discipline and training.” – Robert Kiyosaki
The spider curl is a targeted exercise for developing the biceps. To perform this exercise, position yourself on an incline bench with your chest pressed against it and your arms hanging straight down. Hold a dumbbell in each hand with an underhand grip, palms facing up. Begin by curling the dumbbells up towards your shoulders, focusing on contracting your biceps. Keep your upper arms stationary and avoid using momentum. Squeeze the biceps at the top of the movement, then slowly lower the weights back to the starting position. This exercise isolates the biceps effectively, allowing for a strong contraction and a full range of motion. It’s an excellent addition to your arm workout routine, helping to enhance muscle growth and definition in the biceps.
How to Do It
1. Setup
- Adjust an incline bench to a steep angle, or use the opposite side of a preacher bench.
- Lie face down on the bench with your chest supported and your legs straight or slightly bent.
- Let your arms hang straight down in front of you, holding a dumbbell in each hand with an underhand (supinated) grip.
2. Starting Position
- Position yourself so that your arms hang fully extended, with your shoulders and upper arms supported by the bench or pad.
- Keep your palms facing forward and your elbows slightly bent.
3. Execution
- Inhale and curl the dumbbells upward by bending your elbows, contracting your biceps.
- Focus on lifting the weight with your biceps, keeping your upper arms stationary.
- Continue curling until your biceps are fully contracted and the dumbbells are at shoulder level.
- Pause briefly at the top of the movement, squeezing your biceps.
4. Lowering
- Exhale and slowly lower the dumbbells back to the starting position, fully extending your arms.
5. Repetition
- Repeat for the desired number of repetitions.
Tips and Tricks
- Elbow Stability: Keep your elbows stationary and close to your torso to ensure that the biceps are doing most of the work.
- Controlled Motion: Perform the exercise slowly and with control, especially during the lowering phase, to maximize muscle tension and reduce the risk of injury.
- Full Range of Motion: Allow your arms to fully extend at the bottom of the movement to engage the biceps completely.
- Mind-Muscle Connection: Focus on the contraction of your biceps throughout the exercise to enhance the mind-muscle connection.
- Breathing: Inhale as you lift the weights and exhale as you lower them.
Benefits
1. Biceps Isolation: The spider curl effectively isolates the biceps, minimizing the involvement of other muscles and allowing for focused biceps development.
2. Enhanced Muscle Contraction: The unique angle of the exercise places a greater emphasis on the short head of the biceps, helping to build muscle thickness and peak.
3. Reduced Cheating: The chest-supported position helps eliminate momentum and body movement, encouraging strict form and better muscle engagement.
4. Variety in Training: Including spider curls in your routine can add variety and challenge the biceps from a different angle, promoting balanced muscle development.
5. Increased Range of Motion: The hanging position of the arms allows for a greater range of motion, leading to a more intense contraction and stretch of the biceps.
FAQs
1. What is a spider curl?
Answer : A spider curl is a bicep exercise performed on an incline bench, where the chest is supported, and the arms hang down, allowing for a full range of motion and isolation of the biceps.
2. What muscles does the spider curl target?
Answer : The primary muscle targeted is the biceps brachii, with secondary emphasis on the brachialis and brachioradialis.
3. How do I perform a spider curl correctly?
Answer : Lie face down on an incline bench, let your arms hang straight, hold dumbbells with an underhand grip, and curl them towards your shoulders. Focus on using your biceps without swinging or using momentum.
4. What are the benefits of doing spider curls?
Answer : Spider curls isolate the biceps, allowing for maximum contraction and muscle engagement. They help improve bicep strength and definition.
5. How many sets and reps should I do?
Answer : For strength and hypertrophy, aim for 3-4 sets of 8-12 reps, adjusting the weight accordingly.
6. Can I use a barbell instead of dumbbells?
Answer : Yes, a barbell can be used for spider curls, offering a variation that allows for more weight to be lifted.
7. Are spider curls suitable for beginners?
Answer : Yes, spider curls can be performed by beginners. Start with lighter weights to master the form before increasing the load.
8. How often should I include spider curls in my workout?
Answer : Include them 1-2 times per week as part of a balanced arm workout routine.
9. What is the difference between spider curls and preacher curls?
Answer : Both exercises target the biceps, but spider curls allow for a greater range of motion and constant tension, while preacher curls focus more on the lower portion of the biceps.
10. Can spider curls help with bicep peak development?
Answer : Yes, spider curls can help enhance the bicep peak due to the isolated and concentrated contraction they provide.
Conclusion
In conclusion, the spider curl is a highly effective exercise for isolating and developing the biceps. By positioning the body on an incline bench with the arms hanging freely, this movement allows for a full range of motion and a strong contraction at the peak. Whether you're aiming to increase bicep strength, improve muscle definition, or target the bicep peak, incorporating spider curls into your workout routine can provide significant benefits. This exercise is suitable for all fitness levels, from beginners to advanced lifters, and can be adapted using dumbbells or a barbell. For optimal results, perform spider curls with proper form, focusing on controlled movements and consistent tension on the biceps.
You might also like our Best 10 Biceps Workouts for Building Muscle article in weight loss.
“Motivation is what gets you started. Habit is what keeps you going.” – Jim Ryun
If you would like more information about the 2024, please send us an email.
Written by Fitness Goal 4U
Smart Fitness Goals - Achieve Health with Simple Steps
Smart fitness goals focus on being Specific, Measurable, Achievable, Relevant, and Time-bound. They help you create a clear path to success, stay motivated, and track progress. Whether its weight loss, strength building, or improved endurance, smart goals guide your fitness journey, ensuring steady growth and sustainable results tailored to your needs.
“Confidence comes from discipline and training.” – Robert Kiyosaki
The Zottman Curl is an effective bicep exercise that combines the benefits of a traditional bicep curl and a reverse curl. To perform it, hold a dumbbell in each hand with palms facing up and elbows close to your sides. Curl the weights up while contracting your biceps, then rotate your wrists so that palms face down at the top of the movement. Slowly lower the weights in this position, emphasizing the eccentric phase, which targets the brachioradialis muscle. This dual-action motion not only enhances bicep strength and size but also improves forearm development and grip strength. Incorporating the Zottman Curl into your routine can add variety and effectively target multiple arm muscles, making it an excellent addition for balanced upper arm training.
How to Do It
1. Setup
- Stand upright with your feet shoulder-width apart.
- Hold a dumbbell in each hand with an underhand (supinated) grip.
2. Starting Position
- Let your arms hang down at your sides, fully extended.
- Keep your elbows close to your torso and your palms facing forward.
3. Execution (Curl Phase)
- Inhale and curl the dumbbells upwards, bending at the elbows and contracting your biceps.
- Keep your upper arms stationary and close to your body.
- Continue curling until your biceps are fully contracted and the dumbbells are at shoulder level.
4. Transition
- At the top of the curl, rotate your wrists so that your palms face downward (pronated grip). This is the starting position for the reverse curl phase.
5. Lowering (Reverse Curl Phase)
- Exhale and slowly lower the dumbbells back down with a pronated grip, fully extending your arms. Focus on using your forearms to control the descent.
6. Repetition
- Rotate your wrists back to the supinated position at the bottom and repeat for the desired number of repetitions.
Tips and Tricks
- Controlled Motion: Perform both the curling and lowering phases slowly and with control. This maximizes muscle tension and engagement.
- Elbow Position: Keep your elbows stationary and close to your sides throughout the exercise to prevent shoulder involvement and ensure proper isolation of the target muscles.
- Wrist Rotation: Focus on a smooth and controlled rotation of the wrists at the top of the movement. This transition is crucial for properly engaging the forearms.
- Breathing: Inhale during the curling phase and exhale during the lowering phase.
- Appropriate Weight: Start with a lighter weight to master the movement and ensure proper form. Gradually increase the weight as you become more comfortable with the exercise.
Benefits
1. Biceps and Forearm Development: The Zottman curl effectively targets both the biceps and forearm muscles, providing a comprehensive arm workout.
2. Improved Grip Strength: The pronated lowering phase enhances grip strength and forearm endurance, which can benefit other lifts and everyday tasks.
3. Muscle Balance: By incorporating both supinated and pronated grips, the Zottman curl helps ensure balanced development of the arm muscles.
4. Variety in Training: This exercise adds variety to traditional arm workouts, helping to prevent plateaus and promote continued muscle growth.
5. Functional Strength: The combination of curling and reverse curling mimics real-world movements, contributing to improved functional strength.
FAQs
1. What muscles does the Zottman Curl target?
Answer : The Zottman Curl primarily targets the biceps brachii, brachialis, and brachioradialis muscles, with additional benefits for the forearms due to the reverse curl phase.
2. How do I perform the Zottman Curl correctly?
Answer : Start with dumbbells in your hands, palms facing up. Curl the weights up, rotate your wrists so palms face down at the top, and then slowly lower the weights. Keep your elbows close to your sides throughout the movement.
3. What are the benefits of the Zottman Curl?
Answer : It combines the benefits of traditional and reverse curls, enhancing bicep and forearm development, improving grip strength, and providing a balanced arm workout.
4. How much weight should I use?
Answer : Begin with a lighter weight to master the form, then gradually increase as your strength improves.
5. How many sets and reps should I do?
Answer : A typical recommendation is 3-4 sets of 8-12 reps, depending on your fitness level and goals.
Conclusion
In conclusion, the Zottman Curl is a versatile and effective exercise for building strength and size in the biceps and forearms. By combining the benefits of both traditional and reverse curls, this movement helps to improve overall arm muscle development and enhance grip strength. It's an excellent addition to any upper body workout routine, providing variety and targeting multiple muscles in a single exercise. Whether you're a beginner or an advanced lifter, incorporating the Zottman Curl can help you achieve a well-rounded and balanced arm workout. Remember to focus on proper form and control to maximize benefits and prevent injury.
You might also like our Best 10 Biceps Workouts for Building Muscle article in weight loss.
“Motivation is what gets you started. Habit is what keeps you going.” – Jim Ryun
If you would like more information about the 2024, please send us an email.
Written by Fitness Goal 4U
Smart Fitness Goals - Achieve Health with Simple Steps
Smart fitness goals focus on being Specific, Measurable, Achievable, Relevant, and Time-bound. They help you create a clear path to success, stay motivated, and track progress. Whether its weight loss, strength building, or improved endurance, smart goals guide your fitness journey, ensuring steady growth and sustainable results tailored to your needs.
“Confidence comes from discipline and training.” – Robert Kiyosaki
Chin-ups are an excellent exercise for targeting the biceps, as well as the back and shoulders. To perform a chin-up, grasp a bar with an underhand grip, palms facing you, and hands shoulder-width apart. Begin by hanging with your arms fully extended. Engage your core and pull your chest towards the bar by bending your elbows and squeezing your shoulder blades together. Focus on using your biceps to lift your body. Pause briefly at the top, then lower yourself slowly back to the starting position. Repeat for the desired number of repetitions. Chin-ups are a challenging but effective way to build upper body strength and muscle definition, particularly in the biceps. To progress, consider adding weight or increasing the number of repetitions as you become stronger.
How to Do It
Setup:
- Find a stable pull-up bar.
- Grip the bar with your palms facing you (underhand grip) and your hands about shoulder-width apart.
Starting Position:
- Hang from the bar with your arms fully extended, your feet off the ground, and your body straight.
- Engage your core and slightly retract your shoulder blades.
Execution:
- Inhale and pull yourself upward by flexing your elbows and contracting your biceps and back muscles.
- Keep your elbows close to your body as you lift yourself.
- Continue pulling until your chin is above the bar.
Lowering:
- Exhale and slowly lower yourself back to the starting position, fully extending your arms.
Repetition:
- Repeat for the desired number of repetitions.
Tips and Tricks
- Full Range of Motion: Ensure that you achieve a full range of motion by fully extending your arms at the bottom and bringing your chin above the bar at the top.
- Controlled Movement: Perform both the upward and downward phases of the movement in a controlled manner to maximize muscle engagement and reduce the risk of injury.
- Avoid Kipping: Focus on using strict form without swinging or using momentum (kipping) to perform the movement.
- Grip Width: Adjust your grip width to find a position that is comfortable for your shoulders and allows for effective muscle engagement.
- Breathing: Inhale as you pull yourself up and exhale as you lower yourself down.
Benefits
Upper Body Strength: Chin-ups are a highly effective exercise for building upper body strength, particularly in the biceps, lats, and upper back.
Muscle Mass: This exercise promotes muscle hypertrophy in the biceps and back, contributing to a well-rounded and muscular upper body.
Functional Strength: Chin-ups mimic many everyday pulling movements, improving functional strength and athletic performance.
Core Engagement: Keeping the body stable during chin-ups requires core activation, providing an additional abdominal workout.
Minimal Equipment: Chin-ups require only a pull-up bar, making them a convenient exercise that can be performed in many settings.
FAQs
1. What muscles do chin-ups target?
Answer : Chin-ups primarily target the biceps and the latissimus dorsi muscles in the back. They also engage the shoulders, forearms, and core.
2. How should I grip the bar for chin-ups?
Answer : Use an underhand grip with palms facing towards you. Hands should be shoulder-width apart.
3. How many chin-ups should I do?
Answer : The number depends on your fitness level. Beginners might start with 1-3 repetitions, while more advanced individuals can aim for 10-15 or more.
4. Can I do chin-ups if I’m a beginner?
Answer : Yes! Beginners can start with assisted chin-ups using a resistance band or an assisted pull-up machine.
5. How can I increase my chin-up strength?
Answer : Focus on proper form, gradually increase the number of repetitions, and incorporate other bicep and back exercises into your routine.
6. Are chin-ups safe for everyone?
Answer : Chin-ups are generally safe for most people, but those with shoulder or elbow issues should consult a healthcare professional before starting.
7. Should I use extra weight for chin-ups?
Answer : Advanced individuals can add weight using a dip belt or weighted vest, but beginners should focus on mastering bodyweight first.
Conclusion
Chin-ups are a highly effective exercise for building strength and muscle definition in the biceps, as well as the back and shoulders. By using an underhand grip, chin-ups specifically target the biceps, making them a valuable addition to any upper body workout routine. Whether you're a beginner starting with assisted variations or an advanced athlete adding extra weight, chin-ups offer a challenging and rewarding way to improve your fitness. Consistency, proper form, and gradual progression are key to maximizing the benefits of this exercise. Remember to listen to your body and consult with a professional if you have any concerns. Incorporating chin-ups into your regimen can lead to impressive gains in strength and muscle size, enhancing both your physical appearance and functional capabilities.
You might also like our Best 10 Biceps Workouts for Building Muscle article in weight loss.
“Motivation is what gets you started. Habit is what keeps you going.” – Jim Ryun
If you would like more information about the 2024, please send us an email.
Written by Fitness Goal 4U
Smart Fitness Goals - Achieve Health with Simple Steps
Smart fitness goals focus on being Specific, Measurable, Achievable, Relevant, and Time-bound. They help you create a clear path to success, stay motivated, and track progress. Whether its weight loss, strength building, or improved endurance, smart goals guide your fitness journey, ensuring steady growth and sustainable results tailored to your needs.
“Confidence comes from discipline and training.” – Robert Kiyosaki
Mental health refers to our emotional, psychological, and social well-being, affecting how we think, feel, and act. It plays a crucial role in how we handle stress, relate to others, and make decisions. Mental health encompasses a range of conditions, from anxiety and depression to more severe disorders like schizophrenia. These conditions can result from a combination of genetic, biological, environmental, and psychological factors. Maintaining good mental health is essential for leading a balanced life, allowing individuals to function effectively in daily activities, form healthy relationships, and cope with life’s challenges. Awareness, early intervention, and treatment are key to managing mental health issues and improving quality of life. Understanding and addressing mental health is vital for fostering overall well-being and resilience.
Common Symptoms of Mental Health
Common symptoms of mental health issues can vary widely depending on the specific condition but generally include:
1. Emotional Symptoms
- Persistent feelings of sadness,- anxiety, or emptiness
- Excessive fears, worries, or guilt
- Mood swings or emotional instability
- Irritability or anger
2. Behavioral Symptoms
- Withdrawal from friends, family, and social activities
- Changes in eating or sleeping patterns
- Increased use of substances like alcohol or drugs
- Decline in performance at work or school
3. Cognitive Symptoms
- Difficulty concentrating or making decisions
- Racing thoughts or slowed thinking
- Memory problems
- Persistent negative thoughts or feelings of hopelessness
4. Physical Symptoms
- Unexplained aches and pains
- Fatigue or low energy
- Changes in weight or appetite
5. Psychosomatic Symptoms:
- Panic attacks or intense anxiety
- Physical symptoms without a clear medical cause (e.g., headaches, stomach issues)
Causes for Mental Health
Mental health conditions arise from a complex interplay of factors, which can be broadly categorized into biological, psychological, and environmental causes:
1. Biological Factors
- Genetics: A family history of mental health disorders can increase the likelihood of developing similar conditions.
- Brain Chemistry: Imbalances in neurotransmitters, which are chemicals in the brain that regulate mood and behavior, can contribute to mental health issues.
- Physical Health Conditions: Chronic illnesses, neurological disorders, or hormonal imbalances can impact mental well-being.
- Substance Abuse: Long-term use or misuse of drugs and alcohol can alter brain function and increase the risk of mental health disorders.
2. Psychological Factors
- Childhood Trauma: Experiencing abuse, neglect, or significant loss during childhood can lead to long-term psychological issues.
- Chronic Stress: Ongoing stress from work, relationships, or financial problems can contribute to anxiety, depression, and other mental health conditions.
- Cognitive Patterns: Negative thinking patterns, low self-esteem, and poor coping mechanisms can increase vulnerability to mental health disorders.
3. Environmental Factors
- Social Isolation: Lack of social support and feelings of loneliness can exacerbate mental health issues.
- Economic Hardship: Financial instability, unemployment, or poverty can create stress and increase the risk of mental health problems.
- Cultural and Societal Influences: Cultural norms, societal expectations, and discrimination can contribute to the development of mental health disorders.
- Life Events: Significant life changes, such as the loss of a loved one, divorce, or major transitions, can trigger mental health issues.
Prevention for Mental Health - Ways to reduce your risk
Preventing mental health issues or reducing the risk of developing them involves a combination of lifestyle choices, early intervention, and social support. Here are some effective ways to promote mental well-being and reduce the risk of mental health problems:
1. Maintain a Healthy Lifestyle
- Regular Exercise: Physical activity helps reduce stress, anxiety, and depression while improving overall mood.
- Balanced Diet: Eating a nutritious diet rich in fruits, vegetables, and whole grains supports brain health.
- Adequate Sleep: Prioritize 7-9 hours of quality sleep each night to help regulate mood and cognitive function.
- Avoid Substance Abuse: Limit or avoid alcohol, drugs, and smoking, as these can negatively impact mental health.
2. Stress Management
- Mindfulness and Relaxation Techniques: Practices like meditation, yoga, and deep breathing can help manage stress and promote mental calmness.
- Time Management: Prioritize tasks and set realistic goals to reduce overwhelm and stress.
- Hobbies and Recreation: Engage in activities you enjoy to relax and recharge.
3. Build Strong Social Connections
- Stay Connected: Maintain relationships with family, friends, and community members to provide emotional support.
- Seek Support: Don’t hesitate to talk to someone if you’re feeling overwhelmed or stressed.
- Participate in Community Activities: Join clubs, groups, or volunteer work to foster a sense of belonging and purpose.
4. Education and Awareness
- Learn About Mental Health: Understand the signs and symptoms of mental health issues to recognize them early in yourself or others.
- Challenge Stigma: Promote open discussions about mental health to reduce stigma and encourage seeking help.
- Teach Coping Skills: Develop healthy coping strategies to deal with life's challenges, such as problem-solving, communication, and emotional regulation.
5. Early Intervention
- Recognize Early Signs: Pay attention to changes in mood, behavior, or thoughts that may indicate a developing mental health issue.
- Seek Professional Help: If you or someone you know is experiencing persistent emotional or psychological distress, consult a mental health professional promptly.
- Regular Check-ups: Routine health check-ups can help identify and address mental health issues early.
6. Create a Supportive Environment
- Foster a Positive Environment: Surround yourself with positive influences and environments that encourage mental wellness.
- Work-Life Balance: Maintain a healthy balance between work and personal life to prevent burnout and stress.
- Safe Spaces: Ensure that your home, work, and social environments are safe and supportive.
Treatment for Mental Health
Treating mental health conditions typically involves a combination of therapies, medications, lifestyle changes, and support systems. The approach to treatment depends on the specific condition, its severity, and the individual’s needs. Here’s an overview of common treatment options for mental health:
1. Psychotherapy (Talk Therapy)
- Cognitive Behavioral Therapy (CBT): Focuses on identifying and changing negative thought patterns and behaviors. Effective for conditions like depression, anxiety, and PTSD.
- Dialectical Behavior Therapy (DBT): A form of CBT that helps individuals manage emotions, especially in conditions like borderline personality disorder.
- Psychodynamic Therapy: Explores unconscious thoughts and past experiences to understand current behaviors and emotions. Interpersonal Therapy (IPT): Focuses on improving interpersonal relationships and social functioning.
- Group Therapy: Involves one or more therapists working with a group of people with similar issues, providing support and shared experiences.
2. Medication
- Antidepressants: Used to treat depression, anxiety disorders, and some personality disorders. Examples include SSRIs and SNRIs.
- Anti-Anxiety Medications: Benzodiazepines and other medications that help reduce symptoms of anxiety.
- Antipsychotics: Used for conditions like schizophrenia and bipolar disorder to manage symptoms such as delusions or hallucinations.
- Mood Stabilizers: Commonly used in bipolar disorder to control mood swings.
- Stimulants: Often prescribed for ADHD to improve focus and reduce hyperactivity.
3. Lifestyle Changes
- Regular Exercise: Physical activity can help alleviate symptoms of depression and anxiety.
- Healthy Diet: Nutrient-rich foods support overall brain function and mental health.
- Sleep Hygiene: Ensuring adequate and quality sleep is crucial for mental health.
- Stress Management: Techniques like meditation, mindfulness, and relaxation exercises can reduce stress levels.
4. Support Groups and Peer Support
- Support Groups: These provide a platform for individuals with similar experiences to share and support each other. Examples include groups for depression, anxiety, addiction, and grief.
- Peer Support: Involves individuals who have experienced mental health issues offering support to others going through similar challenges.
5. Hospitalization and Intensive Treatment
- Inpatient Care: For severe cases where the individual poses a risk to themselves or others, hospitalization may be necessary to stabilize the situation.
- Day Programs/Partial Hospitalization: Structured programs that provide intensive therapy while allowing the individual to return home at night.
- Crisis Intervention: Emergency support for individuals experiencing a mental health crisis, such as suicidal thoughts or severe panic attacks.
6. Alternative and Complementary Therapies
- Mindfulness and Meditation: Techniques that promote relaxation and stress reduction.
- Art and Music Therapy: Creative therapies that can help individuals express emotions and improve mental well-being.
- Acupuncture and Herbal Remedies: Some individuals find relief through alternative therapies, though these should be used in conjunction with, and not as a replacement for, traditional treatments.
7. Family and Couples Therapy
- Family Therapy: Involves family members in the treatment process, focusing on improving communication and resolving conflicts.
- Couples Therapy: Helps partners address relationship issues that may be contributing to mental health challenges.
8. Long-term Management
- Ongoing Therapy: Regular sessions with a therapist to maintain mental health and manage symptoms.
- Medication Management: Regular check-ins with a psychiatrist or doctor to adjust medications as needed.
- Relapse Prevention: Developing a plan to recognize and respond to early signs of relapse in conditions like depression or bipolar disorder.
Frequently Asked Questions (FAQs)
1. What is mental health?
Answer : Mental health refers to our emotional, psychological, and social well-being. It influences how we think, feel, and behave, and it affects how we handle stress, relate to others, and make decisions. Good mental health is essential for overall well-being and functioning.
2. What are common signs that someone might have a mental health issue?
Answer : Common signs include persistent sadness, anxiety, mood swings, withdrawal from social activities, changes in eating or sleeping patterns, difficulty concentrating, and thoughts of self-harm or suicide. If these symptoms interfere with daily life, it may indicate a mental health issue.
3. How are mental health conditions diagnosed?
Answer : Mental health conditions are typically diagnosed by a mental health professional, such as a psychiatrist or psychologist, based on a comprehensive evaluation. This includes discussing symptoms, medical history, and sometimes using standardized assessment tools or psychological tests.
4. Can mental health issues be treated?
Answer : Yes, most mental health conditions can be effectively treated or managed with a combination of therapies, medications, lifestyle changes, and support. Early intervention often leads to better outcomes.
5. What should I do if I think I have a mental health problem?
Answer : If you’re experiencing symptoms of a mental health issue, it’s important to seek help from a mental health professional. They can provide a proper diagnosis and recommend an appropriate treatment plan. Don’t hesitate to reach out for support from trusted friends or family as well.
6. Is it possible to prevent mental health issues?
Answer : While not all mental health issues can be prevented, certain lifestyle choices and coping strategies can reduce the risk. This includes maintaining a healthy lifestyle, managing stress, staying connected with supportive people, and seeking early intervention if problems arise.
7. How can I support someone who is struggling with their mental health?
Answer : Listen without judgment, offer emotional support, and encourage them to seek professional help. Avoid offering simplistic solutions or minimizing their feelings. It’s also helpful to educate yourself about mental health to better understand what they might be experiencing.
8. Are mental health issues common?
Answer : Yes, mental health issues are very common. According to global statistics, 1 in 4 people will experience a mental health disorder at some point in their lives. Conditions like anxiety, depression, and stress-related disorders are particularly prevalent.
9. What are the risks of untreated mental health conditions?
Answer : Untreated mental health conditions can lead to worsening symptoms, impaired functioning in daily life, relationship difficulties, and in severe cases, increased risk of substance abuse, self-harm, or suicide. Early treatment is crucial to prevent these outcomes.
10. How can I reduce the stigma around mental health?
Answer : Reducing stigma starts with education and open conversations. Encourage discussions about mental health, challenge stereotypes, and support those who are seeking help. Being compassionate and informed can help create a more accepting environment for everyone.
Conclusion
Mental health is a vital component of our overall well-being, influencing every aspect of our lives, from how we think and feel to how we interact with others and manage challenges. Understanding mental health, recognizing the signs of mental health issues, and seeking timely help are crucial steps in fostering a balanced and fulfilling life. While mental health conditions are common and can affect anyone, effective treatments and support systems are available, making it possible to manage symptoms and improve quality of life. By prioritizing mental health, reducing stigma, and encouraging open conversations, we can create a more compassionate and supportive society where everyone has the opportunity to thrive.
“Motivation is what gets you started. Habit is what keeps you going.” – Jim Ryun
If you would like more information about the 2024, please send us an email.
Written by Fitness Goal 4U
Smart Fitness Goals - Achieve Health with Simple Steps
Smart fitness goals focus on being Specific, Measurable, Achievable, Relevant, and Time-bound. They help you create a clear path to success, stay motivated, and track progress. Whether its weight loss, strength building, or improved endurance, smart goals guide your fitness journey, ensuring steady growth and sustainable results tailored to your needs.
“Confidence comes from discipline and training.” – Robert Kiyosaki
Heart health is essential for overall well-being, as the heart is the body's engine, responsible for pumping blood and delivering oxygen and nutrients to every cell. A healthy heart ensures that this process runs smoothly, supporting all bodily functions. However, poor heart health can lead to serious conditions like heart disease, heart attacks, and strokes, which are leading causes of death worldwide. Factors such as unhealthy diet, lack of exercise, smoking, and stress can negatively impact heart health. Fortunately, making lifestyle changes—like eating a balanced diet, exercising regularly, and managing stress—can significantly improve heart health and reduce the risk of cardiovascular diseases. Understanding the importance of heart health and taking proactive steps to maintain it is crucial for a long, healthy life.
Common Symptoms of Heart Health
1. Chest Pain or Discomfort: Often described as pressure, squeezing, or fullness, especially during physical activity.
2. Shortness of Breath: Can occur during exertion or at rest, indicating heart problems.
3. Fatigue: Unusual or excessive tiredness, even with minimal effort, can signal heart issues.
4. Palpitations: A feeling of irregular, rapid, or pounding heartbeats.
5. Swelling: In the legs, ankles, or feet due to fluid retention, often linked to heart failure.
6. Dizziness or Lightheadedness: Especially if accompanied by chest pain or shortness of breath.
7. Nausea or Vomiting: Sometimes associated with heart attacks, particularly in women.
8. Sweating: Unexplained sweating, especially cold sweats, can be a sign of a heart attack.
Causes for Heart Health
Several factors can contribute to poor heart health and increase the risk of cardiovascular diseases. These causes include:
1. High Blood Pressure (Hypertension): Consistently high blood pressure strains the heart and arteries, leading to heart disease.
2. High Cholesterol: Elevated levels of cholesterol can cause plaque build-up in the arteries, narrowing them and increasing the risk of heart attack and stroke.
3. Smoking: Tobacco use damages blood vessels, reduces oxygen in the blood, and raises blood pressure, all of which harm the heart.
4. Sedentary Lifestyle: Lack of regular physical activity weakens the heart muscle and contributes to obesity and other heart disease risk factors.
5. Unhealthy Diet: Diets high in saturated fats, trans fats, cholesterol, sodium, and sugar can lead to obesity, high blood pressure, and high cholesterol.
6. Obesity: Excess body weight puts extra strain on the heart and is associated with high blood pressure, high cholesterol, and diabetes.
7. Diabetes: High blood sugar levels damage blood vessels and nerves that control the heart.
8. Stress: Chronic stress can lead to behaviors that harm heart health, such as overeating, smoking, and lack of physical activity.
9. Alcohol: Excessive alcohol consumption can lead to high blood pressure, heart failure, and stroke.
10. Genetics: A family history of heart disease increases the likelihood of developing similar conditions, although lifestyle choices can modify this risk.
Prevention for Heart Health - Ways to reduce your risk
Preventing heart disease and maintaining heart health involves adopting a heart-healthy lifestyle. Here are key ways to reduce your risk:
1. Healthy Diet
- Eat a balanced diet rich in fruits, vegetables, whole grains, lean proteins, and healthy fats like those found in nuts and olive oil.
- Limit intake of saturated fats, trans fats, salt, and sugar to maintain healthy cholesterol levels and blood pressure.
2. Regular Exercise
- Engage in at least 150 minutes of moderate-intensity aerobic exercise per week, such as brisk walking, cycling, or swimming.
- Include muscle-strengthening activities at least twice a week.
3. Quit Smoking
- If you smoke, seek help to quit. Avoiding tobacco is one of the most significant steps you can take for heart health.
- Avoid exposure to secondhand smoke.
4. Manage Stress
- Practice stress-reducing techniques such as meditation, deep breathing, yoga, or regular physical activity.
- Maintain strong social connections and seek professional help if needed.
5. Maintain a Healthy Weight
- Achieve and maintain a healthy weight through a combination of diet and exercise.
- Monitor your body mass index (BMI) and waist circumference as indicators of healthy weight.
6. Limit Alcohol Consumption
- If you drink alcohol, do so in moderation—up to one drink per day for women and up to two drinks per day for men.
7. Regular Health Check-Ups
- Monitor your blood pressure, cholesterol levels, and blood sugar levels regularly.
- Follow your healthcare provider's advice regarding medications and lifestyle changes.
8. Get Adequate Sleep
- Aim for 7-8 hours of quality sleep each night. Poor sleep can contribute to high blood pressure, obesity, and diabetes, all of which are risk factors for heart disease.
9. Stay Hydrated
- Drink plenty of water to keep your body and heart functioning optimally.
10. Control Chronic Conditions
- If you have conditions like diabetes, high blood pressure, or high cholesterol, work closely with your healthcare provider to manage them effectively.
Treatment for Heart Health
Treating heart health issues typically involves a combination of lifestyle changes, medications, and sometimes medical procedures. The specific treatment plan depends on the individual’s condition and the severity of the heart problem. Here’s an overview of common treatments:
1. Lifestyle Changes
- Healthy Diet: Continue with a heart-healthy diet low in saturated fats, trans fats, cholesterol, sodium, and sugars. Incorporate more fruits, vegetables, whole grains, and lean proteins.
- Regular Exercise: Engage in regular physical activity as recommended by your healthcare provider, focusing on cardiovascular exercises like walking, swimming, or cycling.
- Quit Smoking: Completely stop smoking to improve heart function and reduce further damage. Avoid exposure to secondhand smoke.
- Stress Management: Practice stress-reducing activities like meditation, yoga, or mindfulness to lower the risk of heart problems.
2. Medications
- Antihypertensives: Medications like ACE inhibitors, beta-blockers, or calcium channel blockers to control high blood pressure.
- Statins: Drugs that help lower cholesterol levels, reducing plaque build-up in arteries.
- Antiplatelets/Anticoagulants: Medications like aspirin or warfarin to prevent blood clots, reducing the risk of heart attack and stroke.
- Diuretics: Help remove excess fluid from the body, easing the burden on the heart, especially in cases of heart failure.
- Nitrates: Used to relieve chest pain (angina) by relaxing blood vessels and improving blood flow to the heart.
- Heart Rate Regulators: Beta-blockers or other medications to help regulate abnormal heart rhythms.
3. Medical Procedures and Surgeries
- Angioplasty and Stenting: A procedure to open narrowed or blocked arteries, often involving the placement of a stent to keep the artery open.
- Coronary Artery Bypass Grafting (CABG): Surgery to create a bypass around blocked arteries using a vein or artery from another part of the body.
- Valve Repair or Replacement: Surgery to repair or replace damaged heart valves that are not functioning properly.
- Pacemaker or Implantable Cardioverter Defibrillator (ICD): Devices implanted to help manage abnormal heart rhythms. Heart Transplant: In severe cases of heart failure, a heart transplant may be necessary.
4. Cardiac Rehabilitation
- Supervised Program: Involves medically supervised exercise training, education on heart-healthy living, and counseling to reduce stress. This program is essential for patients recovering from heart attacks, heart surgery, or other heart conditions.
5. Regular Monitoring and Follow-Up
- Regular Check-Ups: Continuous monitoring of blood pressure, cholesterol levels, and heart function.
- Adherence to Treatment: Follow the prescribed medication regimen and lifestyle recommendations closely to manage symptoms and prevent complications.
Frequently Asked Questions (FAQs)
1. What are the early signs of heart disease?
Answer : Early signs of heart disease can include chest pain or discomfort, shortness of breath, fatigue, and palpitations. Some people may also experience dizziness, nausea, or swelling in the legs. It's important to consult a healthcare provider if you notice any of these symptoms.
2. How can I prevent heart disease?
Answer : Preventing heart disease involves maintaining a healthy diet, engaging in regular physical activity, avoiding smoking, managing stress, and keeping conditions like high blood pressure, diabetes, and high cholesterol under control. Regular check-ups with your healthcare provider are also crucial.
3. Can heart disease be reversed?
Answer : While some damage from heart disease may be permanent, lifestyle changes and treatments can significantly improve heart health and slow the progression of the disease. In some cases, early intervention can reverse certain conditions like high blood pressure or cholesterol levels.
4. What should I eat to keep my heart healthy?
Answer : A heart-healthy diet includes plenty of fruits, vegetables, whole grains, lean proteins, and healthy fats such as those found in nuts, seeds, and olive oil. Limiting saturated fats, trans fats, cholesterol, sodium, and sugars is also important for heart health.
5. How much exercise do I need for heart health?
Answer : The American Heart Association recommends at least 150 minutes of moderate-intensity aerobic exercise per week, such as brisk walking, or 75 minutes of vigorous-intensity exercise, like running. Additionally, muscle-strengthening activities should be done at least two days per week.
6. Is heart disease hereditary?
Answer : Yes, a family history of heart disease can increase your risk. However, lifestyle choices such as diet, exercise, and not smoking can significantly reduce this risk, even if you have a genetic predisposition.
7. How does stress affect heart health?
Answer : Chronic stress can lead to behaviors that increase heart disease risk, such as overeating, smoking, and physical inactivity. Stress also raises blood pressure and can contribute to artery damage. Managing stress through relaxation techniques, exercise, and adequate sleep is essential for heart health.
8. When should I see a doctor about my heart?
Answer : You should see a doctor if you experience symptoms like chest pain, shortness of breath, dizziness, or palpitations. Additionally, regular check-ups are important if you have risk factors like high blood pressure, high cholesterol, diabetes, or a family history of heart disease.
9. What role does cholesterol play in heart health?
Answer : Cholesterol, particularly LDL (low-density lipoprotein), can lead to the build-up of plaque in the arteries, increasing the risk of heart attacks and strokes. Managing cholesterol levels through diet, exercise, and medication is crucial for heart health.
10. Can alcohol consumption affect heart health?
Answer : Yes, excessive alcohol consumption can raise blood pressure, contribute to weight gain, and increase the risk of heart disease. Drinking alcohol in moderation—up to one drink per day for women and up to two drinks per day for men—can be part of a heart-healthy lifestyle.
Conclusion
Maintaining heart health is vital for overall well-being and longevity. The heart is central to the body's functioning, and its health directly impacts every other organ and system. By adopting a heart-healthy lifestyle—focusing on a balanced diet, regular exercise, avoiding harmful habits like smoking, and managing stress—you can significantly reduce the risk of heart disease. Early detection and proactive management of risk factors such as high blood pressure, high cholesterol, and diabetes are crucial in preventing complications. Through informed choices and regular healthcare, it's possible to protect and enhance heart health, leading to a longer, healthier life. Remember, the small changes you make today can have a profound impact on your heart's health in the future.
“Motivation is what gets you started. Habit is what keeps you going.” – Jim Ryun
If you would like more information about the 2024, please send us an email.
Written by Fitness Goal 4U
Smart Fitness Goals - Achieve Health with Simple Steps
Smart fitness goals focus on being Specific, Measurable, Achievable, Relevant, and Time-bound. They help you create a clear path to success, stay motivated, and track progress. Whether its weight loss, strength building, or improved endurance, smart goals guide your fitness journey, ensuring steady growth and sustainable results tailored to your needs.
“Confidence comes from discipline and training.” – Robert Kiyosaki
Prostate health is a crucial aspect of men’s well-being, especially as they age. The prostate, a small gland located below the bladder, plays a vital role in the reproductive system by producing seminal fluid. Common prostate conditions include benign prostatic hyperplasia (BPH), prostatitis, and prostate cancer, which can significantly impact quality of life. Symptoms such as frequent urination, difficulty urinating, and pelvic pain often indicate a prostate issue. While some risk factors like age and genetics are uncontrollable, maintaining a healthy lifestyle, including a balanced diet and regular exercise, can help reduce risks. Early detection through regular screenings is key to managing and treating prostate conditions effectively, making awareness and proactive healthcare essential for preserving prostate health throughout life.
Common Symptoms of Prostate Health
1. Frequent urination: Especially noticeable at night (nocturia).
2. Difficulty starting urination: Often referred to as hesitancy or a weak urinary stream.
3. Weak or interrupted urine flow: Urine flow may start and stop or be weaker than usual.
4. Pain or burning sensation during urination: A possible sign of infection or inflammation.
5. Feeling of incomplete bladder emptying: The sensation that the bladder is not fully emptied after urination.
6. Blood in urine or semen: May indicate a more serious condition like prostate cancer.
7. Erectile dysfunction: Difficulty achieving or maintaining an erection.
8. Pain in the pelvic area, lower back, or hips: Often associated with prostatitis or advanced prostate conditions.
9. Urgent need to urinate: A sudden, strong urge to urinate, sometimes leading to incontinence.
Causes for Prostate Health
1. Benign Prostatic Hyperplasia (BPH)
- Aging: BPH is most commonly associated with aging. As men age, hormonal changes, particularly an increase in dihydrotestosterone (DHT), contribute to prostate enlargement.
- Hormonal Imbalance: Imbalances between testosterone and estrogen may also play a role in the development of BPH.
2. Prostatitis
- Bacterial Infection: Acute or chronic bacterial prostatitis is caused by bacterial infections, often from urinary tract infections that spread to the prostate.
- Non-Bacterial Factors: Non-bacterial prostatitis can result from stress, immune response, or physical injury to the pelvic area, though the exact cause is often unclear.
3. Prostate Cancer
- Genetic Factors: A family history of prostate cancer significantly increases the risk.
- Age: The risk of prostate cancer rises significantly with age, particularly after 50.
- Race: African-American men have a higher risk of developing prostate cancer.
- Diet: High-fat diets and low intake of fruits and vegetables are linked to a higher risk.
- Hormonal Influence: Higher levels of testosterone and other hormones can stimulate the growth of prostate cancer cells.
4. Lifestyle Factors
- Obesity: Being overweight increases the risk of BPH and prostate cancer.
- Sedentary Lifestyle: Lack of physical activity is associated with a higher risk of prostate issues.
- Smoking and Alcohol: Both can contribute to the development of prostate problems.
Prevention for Prostate Health - Ways to reduce your risk
1. Maintain a Healthy Diet
- Eat a Balanced Diet: Focus on fruits, vegetables, whole grains, and lean proteins. A diet rich in antioxidants and anti-inflammatory foods can support prostate health.
- Reduce Fat Intake: Limit consumption of high-fat foods, particularly from red and processed meats, which are linked to an increased risk of prostate cancer.
- Include Lycopene-Rich Foods: Tomatoes, watermelon, and pink grapefruit contain lycopene, an antioxidant that may lower the risk of prostate cancer.
2. Exercise Regularly
- Stay Active: Regular physical activity helps maintain a healthy weight and reduce the risk of BPH and prostate cancer.
- Include Strength Training: Building muscle mass and improving overall fitness can have protective effects against prostate issues.
3. Maintain a Healthy Weight
- Avoid Obesity: Excess weight is associated with a higher risk of prostate problems, including BPH and cancer.
- Monitor Body Mass Index (BMI): Aim for a healthy BMI through a balanced diet and regular exercise.
4. Limit Alcohol and Avoid Tobacco
- Moderate Alcohol Consumption: Excessive alcohol intake can contribute to prostate issues, so it’s important to drink in moderation.
- Quit Smoking: Smoking is linked to a higher risk of prostate cancer and other health problems.
5. Regular Screenings
- Get Screened: Regular prostate screenings (PSA tests and digital rectal exams) starting at age 50, or earlier for those at higher risk, can help detect issues early.
- Discuss with Your Doctor: Talk to your healthcare provider about your risk factors and the best screening schedule for you.
6. Stay Hydrated, But Wisely
- Manage Fluid Intake: Reduce fluid intake in the evening to minimize nighttime urination.
- Avoid Bladder Irritants: Limit caffeine and spicy foods, which can irritate the bladder and exacerbate symptoms of prostate conditions.
7. Manage Stress
- Practice Stress-Reduction Techniques: Chronic stress can affect hormone levels and overall health. Techniques like meditation, yoga, and deep breathing can help manage stress.
8. Regular Check-Ups
- See Your Doctor Regularly: Regular check-ups with your healthcare provider can help monitor prostate health and address any concerns early on.
Treatment for Prostate Health
1. Benign Prostatic Hyperplasia (BPH)
Medications:
- Alpha-Blockers: These relax the muscles of the prostate and bladder neck to improve urine flow (e.g., tamsulosin, alfuzosin).
- 5-Alpha-Reductase Inhibitors: These reduce the size of the prostate by blocking the hormone DHT, which promotes prostate growth (e.g., finasteride, dutasteride).
- Combination Therapy: Sometimes, a combination of alpha-blockers and 5-alpha-reductase inhibitors is prescribed for better symptom control.
Minimally Invasive Procedures:
- Transurethral Resection of the Prostate (TURP): A surgical procedure that removes part of the prostate to relieve symptoms. Laser Therapy: Uses laser energy to remove excess prostate tissue.
- UroLift System: Implants are used to lift and hold the enlarged prostate tissue, so it no longer blocks the urethra.
Lifestyle Changes: Reducing fluid intake before bedtime, limiting caffeine and alcohol, and regular exercise can help manage symptoms.
2. Prostatitis
- Antibiotics: Used to treat bacterial prostatitis. The type and duration of antibiotic treatment depend on the severity and type of infection.
- Alpha-Blockers: These may be prescribed to relax the bladder neck and muscle fibers where the prostate joins the bladder, easing symptoms.
- Anti-Inflammatory Medications: Nonsteroidal anti-inflammatory drugs (NSAIDs) can help reduce pain and inflammation.
- Physical Therapy: For chronic prostatitis, physical therapy may be recommended to relieve pelvic floor muscle tension.
- Lifestyle Modifications: Stress management, dietary changes, and increased fluid intake can help manage symptoms.
3. Prostate Cancer
Active Surveillance: For slow-growing prostate cancer, especially in older men, active surveillance involves regular monitoring with PSA tests, digital rectal exams, and biopsies.
Surgery:
- Radical Prostatectomy: The surgical removal of the entire prostate gland. It is a common treatment for localized prostate cancer.
Radiation Therapy:
- External Beam Radiation Therapy: Targets cancer cells with high-energy rays from outside the body.
- Brachytherapy: Involves placing radioactive seeds directly into or near the prostate.
Hormone Therapy: Reduces or blocks the production of testosterone, which can slow the growth of prostate cancer cells.
Chemotherapy: Used for advanced prostate cancer that has spread to other parts of the body. It targets rapidly dividing cancer cells.
Immunotherapy: Enhances the body's immune system to fight cancer cells. It is typically used in advanced cases or when other treatments are ineffective.
Targeted Therapy: Focuses on specific genes or proteins that contribute to cancer growth. This approach is used when the cancer has specific genetic mutations.
4. Lifestyle and Supportive Care
- Diet and Nutrition: Maintaining a healthy diet rich in fruits, vegetables, and low in red meat can support overall prostate health.
- Physical Activity: Regular exercise helps manage symptoms and improve overall well-being.
- Emotional and Psychological Support: Support groups, counseling, and mental health care can help patients and families cope with the emotional aspects of prostate health issues, especially cancer.
Frequently Asked Questions (FAQs)
1. What is the prostate, and what does it do?
Answer : The prostate is a small gland in men, located below the bladder and in front of the rectum. It produces seminal fluid, which nourishes and transports sperm during ejaculation.
2. What are the most common prostate problems?
Answer : The most common prostate issues are benign prostatic hyperplasia (BPH), prostatitis, and prostate cancer. BPH is an enlargement of the prostate, prostatitis is inflammation, and prostate cancer involves the growth of cancerous cells in the prostate.
3. What are the symptoms of prostate problems?
Answer : Symptoms can include frequent urination, difficulty starting or stopping urination, weak urine flow, pain or burning during urination, blood in urine or semen, erectile dysfunction, and pelvic pain.
4. At what age should I start getting screened for prostate cancer?
Answer : Most men should begin prostate cancer screenings at age 50. However, men at higher risk, such as those with a family history of prostate cancer or African-American men, should consider starting screenings at age 45 or even 40.
5. How is prostate cancer detected?
Answer : Prostate cancer is typically detected through a PSA (prostate-specific antigen) blood test and a digital rectal exam (DRE). If these tests indicate a potential issue, further testing, such as a biopsy, may be recommended.
6. Can diet and lifestyle affect my prostate health?
Answer : Yes, diet and lifestyle play a significant role in prostate health. A diet rich in fruits, vegetables, and low in red and processed meats can help reduce the risk of prostate issues. Regular exercise, maintaining a healthy weight, and avoiding tobacco and excessive alcohol are also important.
7. What treatment options are available for prostate problems?
Answer : Treatment depends on the specific condition. BPH can be managed with medications, lifestyle changes, or surgery. Prostatitis may require antibiotics, pain management, or physical therapy. Prostate cancer treatments include active surveillance, surgery, radiation, hormone therapy, chemotherapy, and targeted therapies.
8. Can prostate problems affect sexual function?
Answer : Yes, conditions like BPH, prostatitis, and prostate cancer can lead to erectile dysfunction, reduced libido, or other sexual problems. Some treatments for prostate conditions, such as surgery or radiation, can also affect sexual function.
9. Is prostatitis contagious?
Answer : No, prostatitis is not contagious. While bacterial prostatitis is caused by an infection, it cannot be passed from person to person.
10. How can I prevent prostate problems?
Answer : To reduce the risk of prostate problems, maintain a healthy diet, exercise regularly, keep a healthy weight, avoid smoking and excessive alcohol, and get regular screenings as recommended by your healthcare provider.
11. What should I do if I have symptoms of a prostate problem?
Answer : If you experience symptoms like frequent urination, difficulty urinating, or pain during urination, you should see a healthcare provider for evaluation. Early detection and treatment can help manage symptoms and prevent complications.
12. Can younger men have prostate problems?
Answer : Yes, although prostate issues are more common in older men, younger men can develop conditions like prostatitis. BPH and prostate cancer are rare in younger men but can still occur, especially in those with a family history of prostate cancer.
13. Is there a link between vasectomy and prostate cancer?
Answer : Research has not conclusively proven a link between vasectomy and an increased risk of prostate cancer. Most studies suggest that having a vasectomy does not significantly increase the risk.
Conclusion
Prostate health is a critical aspect of men's overall well-being, particularly as they age. The prostate plays a vital role in the reproductive system, but it is also susceptible to various conditions, including benign prostatic hyperplasia (BPH), prostatitis, and prostate cancer. These conditions can significantly impact quality of life, making early detection and management essential.
Proactive measures such as maintaining a healthy diet, regular exercise, and avoiding smoking and excessive alcohol can help reduce the risk of prostate issues. Regular screenings, particularly for those at higher risk, are crucial for early detection and effective treatment.
By staying informed and taking preventive steps, men can better manage their prostate health, ensuring a higher quality of life and reducing the risk of serious complications.
“Motivation is what gets you started. Habit is what keeps you going.” – Jim Ryun
If you would like more information about the 2024, please send us an email.
Written by Fitness Goal 4U
Smart Fitness Goals - Achieve Health with Simple Steps
Smart fitness goals focus on being Specific, Measurable, Achievable, Relevant, and Time-bound. They help you create a clear path to success, stay motivated, and track progress. Whether its weight loss, strength building, or improved endurance, smart goals guide your fitness journey, ensuring steady growth and sustainable results tailored to your needs.
“Confidence comes from discipline and training.” – Robert Kiyosaki
Testicular health is a crucial aspect of men’s overall well-being, focusing on the proper functioning of the testicles, which are responsible for producing sperm and testosterone. Maintaining good testicular health is essential for fertility, hormone production, and the prevention of diseases such as testicular cancer. Common issues related to testicular health include pain, swelling, lumps, and changes in size or shape, which can indicate conditions like testicular torsion, infections, or cancer. Regular self-examinations and awareness of symptoms are vital for early detection and treatment of these conditions. Ensuring testicular health involves practicing safe sex, protecting the testicles from injury, and seeking medical advice when abnormalities are noticed. Early intervention can significantly improve outcomes and preserve reproductive health.
Common Symptoms of Testicular Health
1. Pain or Discomfort: Persistent or intermittent pain in one or both testicles.
2. Swelling: Swelling or a feeling of heaviness in the scrotum.
3. Lumps or Nodules: Detectable lumps or hard areas on the testicles, which can be felt during self-examination.
4. Changes in Size or Shape: Noticeable changes in the size, shape, or firmness of the testicles.
5. Sudden or Severe Pain: Acute, intense pain that may indicate a medical emergency, such as testicular torsion.
6. Dull Ache: A dull, persistent ache in the lower abdomen or groin area.
7. Fluid Accumulation: Presence of fluid in the scrotum, leading to swelling (hydrocele).
8. Enlarged Veins: Visible or palpable enlarged veins in the scrotum (varicocele).
9. Redness or Warmth: Redness or warmth in the scrotum, possibly indicating an infection.
Causes for Testicular Health
1. Testicular Torsion: This occurs when the spermatic cord twists, cutting off the blood supply to the testicle. It's a medical emergency that requires immediate surgery.
2. Epididymitis: Inflammation of the epididymis, often caused by bacterial infections, including sexually transmitted infections (STIs) like chlamydia or gonorrhea.
3. Orchitis: Inflammation of one or both testicles, typically resulting from bacterial or viral infections, such as mumps.
4. Testicular Cancer: A malignant growth in the testicles, most commonly affecting young men between the ages of 15 and 35.
5. Hydrocele: Accumulation of fluid around the testicle, leading to swelling and discomfort.
6. Varicocele: Enlargement of veins within the scrotum, similar to varicose veins, which can affect fertility.
7. Inguinal Hernia: Occurs when part of the intestine protrudes through a weak spot in the abdominal muscles into the groin, sometimes extending into the scrotum.
8. Trauma or Injury: Physical trauma to the testicles, such as from sports injuries or accidents, can cause pain, swelling, and other complications.
9. Infections: Infections, including urinary tract infections or sexually transmitted infections, can lead to testicular inflammation and other complications.
10. Congenital Abnormalities: Some men are born with conditions that increase the risk of testicular health issues, such as undescended testicles (cryptorchidism), which can lead to complications if not treated.
Prevention for Testicular Health - Ways to reduce your risk
Maintaining good testicular health involves adopting certain preventive measures that can help reduce the risk of developing testicular problems. Here are some key ways to protect your testicular health:
1. Perform Regular Self-Examinations: Conduct monthly self-examinations to check for any lumps, changes in size, or unusual firmness in the testicles. Early detection of abnormalities can lead to prompt treatment.
2. Practice Safe Sex: Use condoms and practice safe sex to reduce the risk of sexually transmitted infections (STIs), which can lead to conditions like epididymitis and orchitis.
3. Vaccination: Ensure you are vaccinated against mumps, which can cause orchitis and potentially lead to infertility.
4. Protect Against Injury: Wear protective gear, such as an athletic cup, during sports or activities that could result in trauma to the testicles.
5. Avoid Prolonged Heat Exposure: Prolonged exposure to high temperatures, such as hot baths or saunas, can affect sperm production. Limiting time in such environments can help maintain testicular health.
6. Maintain a Healthy Lifestyle: A balanced diet, regular exercise, and avoiding smoking or excessive alcohol consumption can support overall reproductive health.
7. Manage Stress: Chronic stress can affect hormone levels and overall health, including reproductive health. Practicing stress management techniques like mindfulness or regular physical activity can be beneficial.
8. Stay Informed and Seek Medical Advice: Be aware of the symptoms of testicular problems and consult a healthcare provider if you notice any changes or experience discomfort.
9. Avoid Tight Clothing: Wearing tight clothing, especially tight underwear, can increase testicular temperature and potentially impact sperm production. Opt for looser, breathable fabrics.
10. Address Any Congenital Issues Early: If you were born with conditions like undescended testicles (cryptorchidism), seek medical intervention early to reduce the risk of future complications, including infertility and cancer.
Treatment for Testicular Health
Treatment for testicular health issues varies depending on the specific condition affecting the testicles. Here are some common treatments:
1. Testicular Torsion
- Emergency Surgery: Testicular torsion is a medical emergency requiring immediate surgery to untwist the spermatic cord and restore blood flow. Delays can lead to permanent damage or loss of the testicle.
2. Epididymitis and Orchitis
- Antibiotics: Bacterial infections causing epididymitis or orchitis are treated with antibiotics. The choice of antibiotic depends on the underlying infection, such as an STI.
- Pain Relief: Anti-inflammatory medications or pain relievers are often prescribed to reduce pain and swelling.
- Supportive Care: Rest, scrotal support, and applying cold packs can help alleviate symptoms.
3. Testicular Cancer
- Surgery (Orchiectomy): The primary treatment for testicular cancer is the surgical removal of the affected testicle (orchiectomy).
- Radiation Therapy: Used in some cases, particularly for seminoma, a type of testicular cancer.
- Chemotherapy: Employed for advanced stages or specific types of testicular cancer to destroy cancer cells that have spread beyond the testicle.
- Surveillance: Regular follow-ups and imaging tests are crucial to monitor for recurrence after treatment.
4. Hydrocele
- Observation: In many cases, hydroceles resolve on their own, especially in infants.
- Surgical Repair: If the hydrocele persists or causes discomfort, surgery (hydrocelectomy) may be performed to remove the fluid-filled sac.
5. Varicocele
- Observation: Many varicoceles do not require treatment unless they cause pain or fertility issues.
- Surgical Ligation: Surgery to tie off the enlarged veins can improve blood flow and potentially enhance fertility.
- Embolization: A minimally invasive procedure where a catheter is used to block the affected vein, reducing blood flow and relieving symptoms.
6. Inguinal Hernia
- Surgical Repair: Inguinal hernias are typically treated with surgery to reposition the protruding tissue and repair the abdominal wall. This may be done via open surgery or laparoscopically.
7. Trauma or Injury
- Rest and Ice: Minor injuries to the testicles can often be treated with rest, ice application, and over-the-counter pain relievers.
- Surgical Intervention: Severe trauma may require surgical repair to address any internal damage or bleeding.
8. Infections
- Antibiotics or Antiviral Medications: Infections affecting the testicles, such as bacterial or viral orchitis, are treated with appropriate medications to eliminate the infection.
- Supportive Care: Rest, scrotal support, and pain management are often recommended alongside medical treatment.
9. Hormonal Therapy
- Hormone Replacement: For conditions affecting testosterone production, such as hypogonadism, hormone replacement therapy may be prescribed to maintain normal testosterone levels.
10. Fertility Treatments
- Assisted Reproductive Techniques: For men with fertility issues due to testicular problems, treatments such as sperm retrieval, in vitro fertilization (IVF), or intracytoplasmic sperm injection (ICSI) may be considered.
Frequently Asked Questions (FAQs)
1. What is the best way to check for testicular health?
Answer :Performing regular self-examinations is the best way to monitor testicular health. Gently feel each testicle for lumps, swelling, or changes in size or shape, typically done monthly after a warm shower when the scrotum is relaxed.
2. How often should I perform a testicular self-exam?
Answer :It is recommended to perform a testicular self-exam once a month, particularly for men aged 15-35, who are at higher risk for testicular cancer.
3. What are the signs of testicular cancer?
Answer :Common signs include a lump or swelling in one of the testicles, a feeling of heaviness in the scrotum, or a dull ache in the lower abdomen or groin. Some men may also experience a sudden collection of fluid in the scrotum.
4. Is testicular pain always serious?
Answer : While not all testicular pain is serious, it should never be ignored. Persistent or severe pain, especially if accompanied by swelling or other symptoms, should be evaluated by a healthcare professional, as it could indicate conditions like testicular torsion or infection.
5. Can testicular health issues affect fertility?
Answer : Yes, conditions like varicocele, infections, or untreated testicular torsion can affect sperm production and lead to fertility issues. Early diagnosis and treatment can help prevent long-term effects on fertility.
6. What should I do if I find a lump on my testicle?
Answer : If you find a lump or any other abnormality during a self-exam, it's important to schedule an appointment with a healthcare provider for further evaluation. Not all lumps are cancerous, but they should be checked to rule out serious conditions.
7. Can tight clothing affect testicular health?
Answer : Wearing tight clothing, especially tight underwear, can increase the temperature around the testicles, which may affect sperm production. Opting for looser, breathable clothing can help maintain a healthier environment for the testicles.
8. How can I prevent testicular injuries?
Answer : Wearing protective gear, such as an athletic cup during sports or physical activities, can help prevent injuries to the testicles. Additionally, avoiding activities that pose a high risk of trauma can reduce the likelihood of injury.
9. What are the treatment options for testicular cancer?
Answer : Treatment options for testicular cancer include surgery (orchiectomy), radiation therapy, and chemotherapy. The choice of treatment depends on the type and stage of cancer, with early detection offering the best outcomes.
10. Is it normal for one testicle to be larger than the other?
Answer : Yes, it is common for one testicle to be slightly larger or hang lower than the other. However, if you notice a sudden change in size, shape, or feel, it’s important to get it checked by a healthcare provider.
11. Can testicular issues recur after treatment?
Answer : Some testicular conditions, like infections, can recur if not fully treated or if underlying risk factors persist. Regular follow-up with a healthcare provider and adherence to treatment plans can help prevent recurrence.
12. What is the role of testosterone in testicular health?
Answer : Testosterone, produced by the testicles, is crucial for male reproductive health, muscle mass, bone density, and overall well-being. Maintaining normal testosterone levels is important for testicular and overall health.
Conclusion
Testicular health is a vital component of men's overall well-being, encompassing both reproductive and hormonal functions. Regular self-examinations, awareness of symptoms, and prompt medical attention are key to early detection and treatment of testicular issues. By adopting preventive measures, such as practicing safe sex, wearing protective gear during physical activities, and maintaining a healthy lifestyle, men can significantly reduce their risk of testicular problems. Early intervention, particularly in conditions like testicular cancer or torsion, can lead to better outcomes and preserve fertility and overall health. Prioritizing testicular health through education, vigilance, and proactive healthcare can ensure long-term well-being and quality of life for men.
“Motivation is what gets you started. Habit is what keeps you going.” – Jim Ryun
If you would like more information about the 2024, please send us an email.
Written by Fitness Goal 4U
Smart Fitness Goals - Achieve Health with Simple Steps
Smart fitness goals focus on being Specific, Measurable, Achievable, Relevant, and Time-bound. They help you create a clear path to success, stay motivated, and track progress. Whether its weight loss, strength building, or improved endurance, smart goals guide your fitness journey, ensuring steady growth and sustainable results tailored to your needs.
“Confidence comes from discipline and training.” – Robert Kiyosaki
Sexual health is an essential aspect of overall well-being, encompassing the physical, emotional, mental, and social dimensions of sexuality. It involves having a positive and respectful approach to sexual relationships, ensuring safe and pleasurable sexual experiences, and protecting oneself from sexually transmitted infections (STIs), unintended pregnancies, and sexual dysfunction. Maintaining sexual health requires informed decision-making, understanding the risks associated with sexual activity, and practicing safe sex. It also includes regular health checkups, open communication with partners, and addressing any psychological or emotional issues related to sexuality. By prioritizing sexual health, individuals can enjoy a fulfilling sexual life while safeguarding their health and the health of their partners. This introduction explores the key aspects of sexual health, including prevention, symptoms, causes, and treatment options.
Common Symptoms of Sexual Health
Common symptoms related to sexual health issues can vary depending on the specific condition or concern. Here are some common symptoms:
1. Sexually Transmitted Infections (STIs)
- Unusual discharge from the penis, vagina, or rectum.
- Painful or burning sensation during urination.
- Genital sores, blisters, or warts.
- Itching, redness, or irritation in the genital area.
- Pain during sexual intercourse.
- Unexplained bleeding or spotting between periods.
2. Sexual Dysfunction
- Difficulty achieving or maintaining an erection (erectile dysfunction).
- Lack of sexual desire (low libido).
- Pain during intercourse (dyspareunia).
- Inability to achieve orgasm (anorgasmia).
- Premature or delayed ejaculation in men.
3. Emotional and Mental Health Issues
- Anxiety or fear related to sexual activity.
- Depression or low mood linked to sexual dissatisfaction.
- Body image issues affecting sexual confidence.
- Relationship stress or communication difficulties with a partner.
4. Reproductive Health Issues
- Irregular menstrual cycles or missed periods.
- Painful menstrual cramps (dysmenorrhea).
- Infertility or difficulty conceiving.
- Unusual vaginal odor or discharge.
Causes for Sexual Health
Sexual health issues can arise from a variety of causes, including physical, psychological, and social factors. Here are some common causes:
1. Physical Causes
- Hormonal Imbalances: Fluctuations in hormones like estrogen, testosterone, and progesterone can affect libido, sexual function, and reproductive health.
- Chronic Illnesses: Conditions such as diabetes, heart disease, and hypertension can impact sexual function and desire.
- Medications: Certain medications, including antidepressants, blood pressure drugs, and birth control pills, can lead to sexual side effects.
- Infections: Sexually transmitted infections (STIs) like chlamydia, gonorrhea, and herpes can cause symptoms that affect sexual health.
- Injuries: Physical trauma to the reproductive organs or pelvic area can result in sexual dysfunction or pain.
2. Psychological Causes
- Stress and Anxiety: Mental health issues such as stress, anxiety, and depression can negatively impact sexual desire and performance.
- Past Trauma: Experiences of sexual abuse, assault, or other traumatic events can lead to psychological barriers to sexual intimacy.
- Body Image Issues: Negative perceptions of one’s body can reduce self-esteem and affect sexual confidence.
- Relationship Problems: Conflicts, lack of communication, or emotional distance in a relationship can lead to sexual dissatisfaction or dysfunction.
3. Social and Environmental Factors:
- Lack of Sexual Education: Insufficient or inaccurate knowledge about sexual health can lead to risky behaviors and poor sexual decision-making.
- Cultural or Religious Beliefs: Cultural norms or religious beliefs may stigmatize certain sexual practices or create guilt and shame around sexual activity.
- Economic Factors: Limited access to healthcare, including contraception and STI testing, can increase the risk of sexual health problems.
- Gender-Based Violence: Experiences of violence, coercion, or discrimination can have long-lasting effects on sexual health and well-being.
4. Lifestyle Factors:
- Substance Abuse: The use of alcohol, drugs, or tobacco can impair sexual function and decision-making.
- Poor Diet and Lack of Exercise: Unhealthy lifestyle choices can contribute to conditions like obesity or cardiovascular disease, which can, in turn, affect sexual health.
- Sleep Deprivation: Lack of sleep can reduce energy levels, libido, and overall sexual health.
Prevention for Sexual Health - Ways to reduce your risk
Preventing sexual health issues involves adopting safe practices, maintaining regular health care, and making informed decisions. Here are some key ways to reduce your risk:
1. Practice Safe Sex
- Use Condoms: Consistently using condoms during vaginal, anal, and oral sex significantly reduces the risk of sexually transmitted infections (STIs) and unintended pregnancies.
- Use Dental Dams: Dental dams can help prevent the transmission of STIs during oral sex.
- Get Vaccinated: Vaccinations for HPV (human papillomavirus) and Hepatitis B can prevent infections that can lead to serious health issues.
2. Regular Health Checkups
- Routine STI Screenings: Regular testing for STIs, especially if you have multiple partners or engage in high-risk sexual activities, is crucial for early detection and treatment.
- Annual Exams: Regular gynecological exams for women (including Pap smears) and testicular exams for men can help detect potential issues early.
- Prenatal Care: Pregnant women should receive appropriate prenatal care to prevent complications that can affect both the mother and the baby.
3. Open Communication
- Discuss Sexual Health with Partners: Talk openly with your partner(s) about sexual health, boundaries, and safe sex practices. Ensure mutual consent and respect in all sexual activities.
- Get Tested Together: Consider getting tested for STIs with your partner before becoming sexually active to ensure both of you are aware of your status.
4. Educate Yourself
- Understand Sexual Health: Educate yourself about sexual health, STIs, contraception options, and healthy relationships to make informed decisions.
- Know the Signs: Be aware of the symptoms of common sexual health issues, so you can seek treatment early if needed.
5. Maintain a Healthy Lifestyle
- Limit Alcohol and Drug Use: Reducing the use of alcohol and drugs can lower the risk of engaging in risky sexual behaviors.
- Healthy Diet and Exercise: A healthy lifestyle can improve overall well-being, including sexual health.
- Adequate Sleep: Ensure you get enough sleep, as it plays a role in maintaining healthy sexual function and desire.
6. Avoid High-Risk Behaviors
- Limit Number of Sexual Partners: Having fewer sexual partners reduces the risk of STIs.
- Avoid Sharing Needles or Razors: This reduces the risk of bloodborne infections, such as HIV and Hepatitis C.
7. Seek Help for Emotional or Psychological Issues
- Therapy and Counseling: If you experience anxiety, depression, or past trauma related to sexual activity, seek professional help. Addressing these issues can improve your sexual health and relationships.
Treatment for Sexual Health
Treatment for sexual health issues varies depending on the underlying condition. Here’s an overview of common treatments for different sexual health concerns:
1. Sexually Transmitted Infections (STIs)
Bacterial Infections: STIs like chlamydia, gonorrhea, and syphilis are typically treated with antibiotics. Early detection and treatment are crucial to prevent complications.
Viral Infections: While viral STIs like herpes, HIV, and HPV cannot be cured, they can be managed with antiviral medications. For example:
- Herpes: Antiviral medications such as acyclovir can reduce the frequency and severity of outbreaks.
- HIV: Antiretroviral therapy (ART) helps manage the virus, maintain a healthy immune system, and prevent transmission.
- HPV: While there’s no treatment for the virus itself, vaccines can prevent infection, and treatments like cryotherapy can remove genital warts.
2. Sexual Dysfunction
Erectile Dysfunction (ED)
- Medications: Drugs like sildenafil (Viagra), tadalafil (Cialis), and vardenafil (Levitra) can help achieve and maintain an erection.
- Lifestyle Changes: Reducing alcohol consumption, quitting smoking, and exercising regularly can improve ED.
- Counseling: Therapy can address psychological causes like anxiety or relationship issues.
Low Libido
- Hormone Therapy: Hormonal imbalances, particularly low testosterone, may be treated with hormone replacement therapy.
- Lifestyle Modifications: Improving diet, exercise, and sleep can enhance libido.
- Psychotherapy: Addressing underlying psychological issues, such as stress or depression, can help restore sexual desire.
Pain During Sex (Dyspareunia)
- Medical Treatments: Depending on the cause, treatments might include topical estrogen creams, lubricants, or antibiotics for infections.
- Physical Therapy: Pelvic floor therapy can help with pain related to muscle tension or spasms.
- Counseling: Therapy can assist with anxiety or trauma-related pain.
3. Reproductive Health Issues
Menstrual Disorders
- Medications: Hormonal contraceptives (birth control pills, patches, IUDs) can regulate menstrual cycles and reduce symptoms like heavy bleeding or severe cramps.
- Surgery: In some cases, surgical interventions, such as removing fibroids, may be necessary.
Infertility
- Medications: Drugs like clomiphene citrate (Clomid) can stimulate ovulation in women.
- Assisted Reproductive Technologies (ART): In vitro fertilization (IVF) and intrauterine insemination (IUI) are common treatments for infertility.
- Surgery: Surgical procedures may be required to correct structural issues in the reproductive organs.
4. Psychological and Emotional Issues
- Therapy and Counseling: Individual or couples therapy can help address sexual dysfunctions related to psychological factors, such as performance anxiety, past trauma, or relationship problems.
- Cognitive Behavioral Therapy (CBT): CBT is effective in treating sexual health issues like premature ejaculation or low libido by addressing negative thought patterns and behaviors.
- Sex Therapy: A specialized form of therapy focused on sexual issues, often involving both partners, can help improve sexual satisfaction and intimacy.
5. Lifestyle Changes
- Diet and Exercise: Improving overall health through a balanced diet and regular physical activity can positively impact sexual health.
- Stress Management: Techniques such as mindfulness, meditation, and yoga can reduce stress and improve sexual function.
- Sleep Improvement: Ensuring adequate, high-quality sleep can enhance sexual desire and performance.
6. Surgical Interventions
- For Structural Issues: Surgery may be necessary for conditions like Peyronie’s disease (curvature of the penis), endometriosis, or uterine fibroids, which can affect sexual health.
- Gender-Affirming Surgery: For transgender individuals, gender-affirming surgeries can be a crucial part of sexual health and well-being.
7. Alternative and Complementary Therapies
- Acupuncture: Some individuals find relief from sexual dysfunctions or pain through acupuncture.
- Herbal Supplements: Certain herbal supplements, such as ginseng or maca, may help with sexual function, though it’s important to consult a healthcare provider before use.
Frequently Asked Questions (FAQs)
1. How often should I get tested for STIs?
Answer : It depends on your sexual activity and risk factors. Generally, sexually active individuals should get tested at least once a year. More frequent testing is recommended for those with multiple partners, or those engaging in unprotected sex.
2. Can I get an STI from oral sex??
Answer : Yes, STIs can be transmitted through oral sex. Using protection, such as condoms or dental dams, can help reduce the risk of transmission.
3. What should I do if I experience pain during sex?
Answer : If you experience pain during sex, it’s important to consult a healthcare provider to determine the underlying cause. Pain could be due to infections, hormonal changes, psychological factors, or other medical conditions.
4. What are some signs that I might have an STI?
Answer : Common signs of STIs include unusual discharge from the genitals, pain during urination, genital sores or warts, itching or irritation in the genital area, and pain during sex. However, some STIs may be asymptomatic, so regular testing is crucial.
5. How can I improve my sexual health?
Answer : Practice safe sex by using condoms, get regular health checkups, communicate openly with your partner, and adopt a healthy lifestyle. Additionally, addressing any psychological issues with a professional can also improve sexual health.
6. Are there any vaccines available for STIs?
Answer : Yes, vaccines are available for certain STIs, including the HPV (human papillomavirus) vaccine, which can prevent certain types of genital warts and cancers, and the Hepatitis B vaccine, which protects against a liver infection caused by the Hepatitis B virus.
7. Can sexual health issues affect fertility?
Answer : Yes, untreated STIs, hormonal imbalances, and certain sexual dysfunctions can impact fertility. Regular checkups and prompt treatment of any issues are important for maintaining reproductive health.
8. What is the best way to prevent unintended pregnancy?
Answer : Using effective contraception, such as birth control pills, IUDs, condoms, or other methods, is the best way to prevent unintended pregnancy. Discussing options with a healthcare provider can help you choose the method that is right for you.
9. How does mental health affect sexual health?
Answer : Mental health issues like stress, anxiety, and depression can significantly impact sexual desire, performance, and satisfaction. Addressing mental health through therapy, counseling, or stress management techniques is essential for overall sexual well-being.
10. Can lifestyle changes really improve sexual health?
Answer : Yes, lifestyle changes such as maintaining a healthy diet, regular exercise, reducing alcohol and tobacco use, managing stress, and getting adequate sleep can greatly enhance sexual health and function.
11. Is it normal to have a low sex drive?
Answer : Sexual desire varies from person to person and can be influenced by various factors, including stress, hormonal changes, relationship dynamics, and overall health. If low libido is concerning or affects your relationship, consulting a healthcare provider is advisable.
12. What should I do if I’m experiencing sexual health issues?
Answer : If you’re experiencing sexual health issues, it’s important to seek help from a healthcare provider. They can diagnose the problem, provide treatment options, and refer you to specialists if needed.
Conclusion
Sexual health is a vital component of overall well-being, encompassing physical, emotional, mental, and social aspects of sexuality. Prioritizing sexual health involves practicing safe sex, maintaining regular health checkups, and fostering open communication with partners. It also requires understanding the risks associated with sexual activity and taking proactive steps to prevent and address any issues that may arise. By staying informed, seeking timely medical care, and adopting a healthy lifestyle, individuals can enhance their sexual health and enjoy fulfilling and safe sexual experiences. Addressing both physical and psychological factors is essential for a balanced and positive approach to sexual health, ultimately leading to a healthier, happier life.
“Motivation is what gets you started. Habit is what keeps you going.” – Jim Ryun
If you would like more information about the 2024, please send us an email.
Written by Fitness Goal 4U
Smart Fitness Goals - Achieve Health with Simple Steps
Smart fitness goals focus on being Specific, Measurable, Achievable, Relevant, and Time-bound. They help you create a clear path to success, stay motivated, and track progress. Whether its weight loss, strength building, or improved endurance, smart goals guide your fitness journey, ensuring steady growth and sustainable results tailored to your needs.
“Confidence comes from discipline and training.” – Robert Kiyosaki
Breast health is vital for overall well-being, encompassing the prevention, detection, and management of various breast conditions, including benign (non-cancerous) and malignant (cancerous) diseases. Understanding breast health involves recognizing changes in breast tissue, such as lumps, pain, or skin alterations, which can signal underlying issues. Regular self-examinations and routine screenings like mammograms are crucial for early detection, significantly improving outcomes for conditions like breast cancer. Factors such as hormonal fluctuations, genetics, lifestyle choices, and environmental exposures can impact breast health. By adopting a proactive approach—maintaining a healthy lifestyle, managing risk factors, and staying informed—individuals can better protect their breast health and ensure early intervention when necessary. Breast health awareness is key to promoting long-term health and well-being for both women and men.
Common Symptoms of Breast Health
1. Lumps or Thickening: A noticeable lump or an area of thickened tissue in the breast or underarm.
2. Breast Pain: Persistent or unexplained pain in the breast or nipple.
3. Nipple Discharge: Any unusual discharge from the nipple, especially if it’s bloody or occurs without squeezing.
4. Changes in Breast Size or Shape: Any significant changes in the size, shape, or contour of one or both breasts.
5. Skin Changes: Redness, dimpling, pitting, or other changes in the texture of the breast skin, often resembling an orange peel.
6. Nipple Changes: Alterations in the appearance of the nipple, such as retraction (inward pulling), scaling, or peeling.
Causes for Breast Health
1. Hormonal Fluctuations: Changes in hormone levels due to the menstrual cycle, pregnancy, breastfeeding, or menopause can affect breast tissue, leading to symptoms like tenderness, lumps, or cysts.
2. Genetics: A family history of breast cancer or other breast conditions significantly increases the risk of developing similar issues, especially if close relatives have had breast cancer.
3. Lifestyle Factors: Poor diet, lack of physical activity, obesity, smoking, and excessive alcohol consumption can negatively impact breast health and increase the risk of conditions like breast cancer.
4. Environmental Exposures: Exposure to certain chemicals, radiation, and endocrine-disrupting compounds in the environment may increase the risk of breast health problems, including cancer.
5. Infections and Injuries: Infections like mastitis, which commonly occurs during breastfeeding, and physical injuries to the breast can lead to pain, inflammation, and other breast issues.
6. Benign Breast Conditions: Conditions such as fibroadenomas, cysts, and fibrocystic breast changes are common and usually benign, but they can still cause discomfort or concern.
Prevention for Breast Health - Ways to reduce your risk
1. Regular Self-Exams: Perform monthly breast self-examinations to detect any changes, such as lumps or abnormalities, early.
2. Routine Screenings: Follow guidelines for regular mammograms and clinical breast exams based on your age and risk factors. Early detection is key to successful treatment.
3. Healthy Diet: Eat a balanced diet rich in fruits, vegetables, and whole grains. Limit intake of saturated fats and processed foods to support overall health and reduce cancer risk.
4. Exercise Regularly: Engage in regular physical activity, which helps maintain a healthy weight and balances hormone levels, lowering the risk of breast cancer.
5. Limit Alcohol Consumption: Reduce alcohol intake, as even small amounts can increase the risk of breast cancer.
6. Avoid Smoking: Smoking is linked to numerous health issues, including an increased risk of breast cancer. Quitting smoking improves overall health.
7. Manage Hormone Therapy Cautiously: If using hormone replacement therapy (HRT) or birth control pills, discuss the risks with your healthcare provider, as long-term use may increase breast cancer risk.
8. Awareness of Family History: If you have a family history of breast cancer, consider genetic testing and more frequent screenings to detect potential issues early.
9. Limit Exposure to Environmental Toxins: Minimize exposure to harmful chemicals and radiation, which may contribute to breast health issues.
10. Breastfeed, if Possible: Breastfeeding has been shown to reduce the risk of breast cancer, especially if done for an extended period.
Treatment for Breast Health
Treatment for breast health issues varies depending on the specific condition and its severity. Here are some common treatment options:
1. Benign Breast Conditions
- Fibroadenomas and Cysts: Often, no treatment is necessary, but monitoring is recommended. If the lump is large or causes discomfort, it may be surgically removed.
- Mastitis: This breast infection, commonly associated with breastfeeding, is typically treated with antibiotics. Warm compresses and pain relief medications can also help.
2. Breast Pain (Mastalgia)
- Lifestyle Modifications: Reducing caffeine, wearing a supportive bra, and applying warm or cold compresses can alleviate pain.
- Medications: Over-the-counter pain relievers like ibuprofen or acetaminophen can manage discomfort. In some cases, hormonal treatments may be prescribed.
3. Breast Cancer
- Surgery: Options include lumpectomy (removal of the tumor) or mastectomy (removal of one or both breasts). The choice depends on the cancer's stage and location.
- Radiation Therapy: High-energy rays are used to target and destroy cancer cells remaining after surgery.
- Chemotherapy: Drugs are used to kill cancer cells or stop their growth. This treatment may be administered before surgery (neoadjuvant therapy) or after (adjuvant therapy).
- Hormone Therapy: Used for hormone receptor-positive breast cancers, this treatment blocks hormones like estrogen that fuel cancer growth.
- Targeted Therapy: Drugs or other substances target specific characteristics of cancer cells, such as proteins or genes that help cancer grow.
- Immunotherapy: Boosts the body's immune system to fight cancer cells.
4. Post-Treatment Care
- Rehabilitation: After surgery or radiation, physical therapy may be needed to regain full range of motion and strength.
- Surveillance: Regular follow-ups and imaging tests to monitor for any recurrence of breast cancer.
- Supportive Care: Emotional and psychological support is crucial. Support groups, counseling, and nutritional advice can help manage the mental and physical side effects of treatment.
5. Lifestyle and Home Remedies
- Diet and Exercise: A healthy diet and regular exercise can help reduce the risk of recurrence and improve overall well-being.
- Pain Management: Over-the-counter pain relievers, relaxation techniques, and acupuncture can be helpful for managing chronic breast pain or post-treatment discomfort.
6. Advanced Breast Cancer
- Palliative Care: Focuses on providing relief from symptoms and improving quality of life. It may include pain management, nutritional support, and emotional care.
- Clinical Trials: Participation in clinical trials may provide access to new therapies not yet widely available.
FAQs
1. How often should I perform a breast self-exam?
Answer : It is recommended to perform a breast self-examination once a month, ideally a few days after your menstrual period ends when your breasts are least likely to be swollen or tender. For postmenopausal women, choosing a consistent day each month is advisable.
2. At what age should I start getting mammograms?
Answer : Most guidelines suggest starting annual mammograms at age 40, but women with a higher risk due to family history or genetic factors may need to begin earlier. It's best to discuss a personalized screening plan with your healthcare provider.
3. Can men get breast cancer?
Answer : Yes, men can develop breast cancer, although it is much rarer than in women. Symptoms in men may include lumps, nipple discharge, or changes in breast tissue. Men, especially those with a family history of breast cancer, should report any unusual breast changes to a doctor.
4. Are all breast lumps cancerous?
Answer : No, most breast lumps are benign (non-cancerous), such as cysts or fibroadenomas. However, any new or unusual lump should be evaluated by a healthcare professional to determine its nature.
5. What can I do to reduce my risk of breast cancer?
Answer : To lower your risk of breast cancer, maintain a healthy weight, engage in regular physical activity, limit alcohol consumption, avoid smoking, and eat a balanced diet rich in fruits, vegetables, and whole grains. Additionally, be vigilant about regular screenings and understanding your family history.
6. How do I know if I’m at high risk for breast cancer?
Answer : High-risk factors include having a close relative with breast cancer, carrying genetic mutations like BRCA1 or BRCA2, having a personal history of breast cancer, or having had radiation therapy to the chest area. A healthcare provider can assess your risk through detailed family history and possibly recommend genetic testing.
7. What should I do if I find a lump during a self-exam?
Answer : If you discover a lump or any other unusual changes during a self-exam, schedule an appointment with your healthcare provider for further evaluation. While most lumps are benign, it's important to rule out any serious conditions.
8. Can breastfeeding reduce the risk of breast cancer?
Answer : Yes, breastfeeding has been shown to reduce the risk of breast cancer, especially if done for an extended period. It’s believed that breastfeeding lowers the total number of menstrual cycles a woman has, which in turn reduces exposure to certain hormones that may increase breast cancer risk.
9. What are the side effects of breast cancer treatments?
Answer : Side effects vary depending on the treatment type but may include fatigue, pain, hair loss, nausea, lymphedema (swelling), and changes in breast appearance. Long-term effects might include hormonal changes or risks associated with surgery. Supportive care and rehabilitation can help manage these effects.
10. How can I support someone going through breast cancer treatment?
Answer : Offer emotional support, listen to their concerns, and help with day-to-day tasks. Accompany them to appointments, provide a healthy diet, and encourage them to rest and take care of themselves. Being present and empathetic is often the most valuable support you can offer.
Conclusion
Maintaining breast health is a crucial aspect of overall well-being, requiring a proactive approach to prevention, early detection, and effective treatment of any issues that may arise. Regular self-examinations, routine screenings, and an understanding of risk factors are key components in ensuring breast health. Adopting a healthy lifestyle—incorporating a balanced diet, regular exercise, and avoiding harmful habits—can significantly reduce the risk of breast-related conditions, including breast cancer.
Awareness and education are powerful tools in the fight against breast disease, empowering individuals to take control of their health and seek timely medical advice when needed. By staying informed and vigilant, both women and men can protect their breast health, leading to better outcomes and improved quality of life. Early detection and treatment are vital, making breast health a lifelong priority.
“Motivation is what gets you started. Habit is what keeps you going.” – Jim Ryun
If you would like more information about the 2024, please send us an email.
Written by Fitness Goal 4U
Smart Fitness Goals - Achieve Health with Simple Steps
Smart fitness goals focus on being Specific, Measurable, Achievable, Relevant, and Time-bound. They help you create a clear path to success, stay motivated, and track progress. Whether its weight loss, strength building, or improved endurance, smart goals guide your fitness journey, ensuring steady growth and sustainable results tailored to your needs.
“Confidence comes from discipline and training.” – Robert Kiyosaki
Pregnancy health is crucial for the well-being of both the mother and the developing baby. It encompasses the physical, mental, and emotional aspects of a woman's health throughout pregnancy, childbirth, and the postpartum period. Proper prenatal care, a balanced diet, regular exercise, and avoidance of harmful substances are essential components of maintaining good pregnancy health. Early and consistent prenatal visits help monitor the baby's development and address any potential complications. Additionally, mental health support plays a key role in ensuring a positive pregnancy experience. By prioritizing maternal health, expecting mothers can reduce the risk of complications, promote healthy fetal development, and prepare for a safe delivery. Understanding and managing pregnancy health is a vital step towards ensuring a healthy start for both mother and child.
Common Symptoms of Pregnancy Health
1. Missed Period: Often the earliest and most obvious sign of pregnancy.
2. Nausea and Vomiting: Known as morning sickness, usually occurring in the first trimester.
3. Breast Changes: Tenderness, swelling, or darkening of the areolas.
4. Fatigue: Increased tiredness due to hormonal changes and the body's increased energy demands.
5. Frequent Urination: Caused by hormonal changes and the growing uterus pressing on the bladder.
6. Food Cravings or Aversions: Sudden changes in appetite or aversions to certain foods.
7. Mood Swings: Emotional fluctuations due to hormonal shifts.
8. Dizziness or Fainting: Caused by changes in blood circulation.
9. Constipation: Slowed digestion due to increased progesterone levels.
10. Back Pain: Due to the added weight and pressure on the lower back as pregnancy progresses.
Causes for Pregnancy Health
1. Genetics: Inherited genetic traits can affect pregnancy health, including the risk of certain conditions like gestational diabetes or pre-eclampsia.
2. Hormonal Changes: Pregnancy triggers significant hormonal shifts that support fetal development but can also cause symptoms like nausea, fatigue, and mood swings.
3. Nutrition: A well-balanced diet rich in essential nutrients like folic acid, iron, calcium, and protein is crucial for the health of both mother and baby. Poor nutrition can lead to complications such as anemia or low birth weight.
4. Pre-existing Health Conditions: Conditions like diabetes, hypertension, or thyroid disorders can affect pregnancy health and require careful management.
5. Lifestyle Factors: Smoking, alcohol consumption, drug use, and exposure to environmental toxins can negatively impact pregnancy health and increase the risk of complications.
6. Age: Maternal age can influence pregnancy health, with younger and older mothers facing different risks and challenges.
7. Mental Health: Stress, anxiety, and depression can affect both the mother’s well-being and pregnancy outcomes, emphasizing the importance of mental health support.
8. Access to Prenatal Care: Regular prenatal check-ups help monitor the pregnancy, manage any health issues, and ensure the well-being of both mother and baby. Lack of access to proper care can lead to undetected complications.
Prevention for Pregnancy Health - Ways to reduce your risk
Reducing the risk of complications during pregnancy involves adopting healthy habits and following medical advice. Here are key prevention strategies:
1. Early and Regular Prenatal Care: Start prenatal visits as soon as you know you're pregnant and continue regularly throughout the pregnancy. This helps monitor the baby's development and catch potential issues early.
2. Healthy Diet: Eat a balanced diet rich in fruits, vegetables, whole grains, lean proteins, and dairy. Ensure adequate intake of essential nutrients like folic acid, iron, calcium, and omega-3 fatty acids to support both maternal and fetal health.
3. Prenatal Vitamins: Take prenatal vitamins as recommended by your healthcare provider, particularly those containing folic acid to prevent neural tube defects.
4. Stay Active: Engage in regular, moderate exercise, such as walking, swimming, or prenatal yoga, to improve overall health, reduce stress, and prevent gestational diabetes and excessive weight gain.
5. Avoid Harmful Substances: Refrain from smoking, alcohol, and illicit drug use, as they can lead to serious complications like low birth weight, preterm birth, and developmental issues in the baby.
6. Manage Stress: Practice stress-reducing techniques like meditation, deep breathing exercises, and adequate rest. Mental health support is also important if you experience anxiety or depression during pregnancy.
7. Maintain a Healthy Weight: If possible, achieve a healthy weight before pregnancy, and gain weight within the recommended range during pregnancy to reduce the risk of complications like gestational diabetes and pre-eclampsia.
8. Get Vaccinated: Ensure you are up to date on vaccinations, such as the flu shot and Tdap, to protect both you and your baby from serious illnesses.
9. Avoid Exposure to Toxins: Minimize exposure to environmental hazards like pesticides, chemicals, and heavy metals that can affect pregnancy health.
10. Follow Medical Advice for Pre-existing Conditions: If you have conditions like diabetes or hypertension, work closely with your healthcare provider to manage them during pregnancy.
Treatment for Pregnancy Health
Treatment during pregnancy focuses on managing any health conditions that arise and ensuring the well-being of both mother and baby. Here are common treatment approaches:
1. Prenatal Vitamins: These supplements, particularly those containing folic acid, iron, and calcium, are essential for supporting the baby’s development and preventing complications like neural tube defects and anemia.
2. Medications for Pre-existing Conditions: If you have conditions such as diabetes, hypertension, or thyroid disorders, your healthcare provider will prescribe or adjust medications that are safe for use during pregnancy. Regular monitoring is necessary to manage these conditions effectively.
3. Gestational Diabetes Management: If diagnosed with gestational diabetes, treatment involves a combination of dietary changes, physical activity, blood sugar monitoring, and sometimes insulin therapy to keep blood sugar levels under control.
4. Pre-eclampsia Management: For pre-eclampsia, a condition characterized by high blood pressure and potential organ damage, treatment may include blood pressure medications, regular monitoring, and possibly early delivery if the condition becomes severe.
5. Mental Health Support: Pregnancy can impact mental health, leading to conditions like depression or anxiety. Treatment may include counseling, therapy, and, if necessary, medications that are safe during pregnancy.
6. Infection Management: Infections such as urinary tract infections (UTIs), sexually transmitted infections (STIs), or group B strep require prompt treatment with antibiotics or other appropriate medications to prevent complications for both mother and baby.
7. Bed Rest or Activity Modification: In some cases, particularly with complications like preterm labor or placenta previa, your healthcare provider may recommend bed rest or limiting physical activity to reduce the risk of preterm birth.
8. Monitoring and Intervention: For conditions like multiple pregnancies (twins, triplets), intrauterine growth restriction (IUGR), or placental issues, close monitoring through ultrasounds and other tests is essential. In some cases, interventions such as early delivery may be necessary to ensure the health of the baby.
9. Labor and Delivery Planning: For pregnancies with complications, a detailed birth plan is essential. This may include planning for a cesarean section (C-section) or ensuring that specialized care is available during delivery.
10. Nutritional Counseling: If you have dietary restrictions or nutritional deficiencies, a registered dietitian can provide tailored advice to ensure you and your baby are getting the nutrients you need.
Frequently Asked Questions (FAQs)
1. When should I start prenatal care?
Answer : It’s best to start prenatal care as soon as you know you’re pregnant. Early and regular visits help monitor your health and the baby’s development, catching any potential issues early.
2. How much weight should I gain during pregnancy?
Answer : Weight gain recommendations vary depending on your pre-pregnancy weight. Typically, women of average weight should gain 25-35 pounds. Your healthcare provider will give you specific guidelines.
3. Is it safe to exercise during pregnancy?
Answer : Yes, moderate exercise like walking, swimming, or prenatal yoga is generally safe and beneficial. However, always consult your healthcare provider before starting any new exercise routine.
4. What foods should I avoid during pregnancy?
Answer : Avoid raw or undercooked meat, fish with high mercury levels, unpasteurized dairy products, and certain types of seafood. It’s also advisable to limit caffeine intake.
5. Can I continue working during pregnancy?
Answer : Most women can continue working during pregnancy, but it depends on the nature of your job and how your pregnancy is progressing. Discuss any concerns with your healthcare provider.
6. How can I manage morning sickness?
Answer : Eating small, frequent meals, staying hydrated, and avoiding strong odors can help manage nausea. Ginger and vitamin B6 supplements are also effective for some women.
7. What should I do if I experience bleeding during pregnancy?
Answer : Light spotting can be normal in early pregnancy, but any bleeding should be reported to your healthcare provider immediately, as it could indicate a problem.
8. How do I know if I'm in labor?
Answer : Signs of labor include regular contractions, lower back pain, water breaking, and a bloody show. If you experience these symptoms, contact your healthcare provider or go to the hospital.
9. Can I travel during pregnancy?
Answer : Traveling is generally safe until the third trimester, but consult your healthcare provider before planning any trips, especially if you’re flying or traveling long distances.
10. How can I prepare for breastfeeding?
Answer : Attend breastfeeding classes, consult with a lactation consultant, and learn about proper latching techniques. Preparing mentally and gathering necessary supplies like nursing bras can also help.
11. What are Braxton Hicks contractions?
Answer : Braxton Hicks contractions are irregular, painless contractions that can occur during the second and third trimesters. They are often called “false labor” and help prepare the uterus for actual labor.
12. Is it normal to feel emotional or anxious during pregnancy?
Answer : Yes, hormonal changes can cause mood swings, anxiety, or depression. If you feel overwhelmed, talk to your healthcare provider, who can offer support or refer you to a mental health professional.
13. What is the importance of folic acid during pregnancy?
Answer : Folic acid is crucial for preventing neural tube defects in the developing baby. It’s recommended to start taking folic acid supplements even before conception and continue throughout pregnancy.
14. When should I go to the hospital if my water breaks?
Answer : If your water breaks, call your healthcare provider immediately. They will advise you on when to go to the hospital based on your specific situation and the stage of your pregnancy.
15. Can I have sex during pregnancy?
Answer : In most cases, sex is safe during pregnancy unless your healthcare provider advises otherwise due to specific complications or risk factors.
Conclusion
Pregnancy health is a critical aspect of ensuring the well-being of both mother and baby. By prioritizing regular prenatal care, maintaining a healthy lifestyle, and managing any pre-existing or emerging conditions, expectant mothers can significantly reduce the risk of complications. Proper nutrition, physical activity, and mental health support are essential components of a healthy pregnancy. With the right care and attention, pregnancy can be a positive and empowering experience, laying the foundation for a healthy start to life for the newborn. Ultimately, informed and proactive healthcare during pregnancy leads to safer outcomes and a smoother transition into motherhood.
“Motivation is what gets you started. Habit is what keeps you going.” – Jim Ryun
If you would like more information about the 2024, please send us an email.
Written by Fitness Goal 4U
Smart Fitness Goals - Achieve Health with Simple Steps
Smart fitness goals focus on being Specific, Measurable, Achievable, Relevant, and Time-bound. They help you create a clear path to success, stay motivated, and track progress. Whether its weight loss, strength building, or improved endurance, smart goals guide your fitness journey, ensuring steady growth and sustainable results tailored to your needs.
“Confidence comes from discipline and training.” – Robert Kiyosaki
Hormonal health is a vital aspect of overall well-being, as hormones are key regulators of many bodily functions, including metabolism, growth, mood, and reproduction. When hormones are balanced, the body operates smoothly, supporting physical and mental health. However, hormonal imbalances can lead to various symptoms, such as fatigue, mood swings, weight fluctuations, and irregular periods, affecting quality of life. These imbalances can result from factors like stress, poor diet, lack of exercise, age, and underlying medical conditions. Maintaining hormonal health involves adopting a balanced diet, regular exercise, stress management, and sufficient sleep. Understanding the role of hormones and recognizing symptoms of imbalance can help in early detection and effective treatment, ensuring a healthier, more balanced life.
Common Symptoms of Hormonal Health
1. Fatigue: Persistent tiredness, even with adequate rest.
2. Weight Changes: Unexplained weight gain or loss.
3. Mood Swings: Increased anxiety, depression, or irritability.
4. Irregular Periods: For women, irregular, heavy, or missed menstrual cycles.
5. Sleep Disturbances: Difficulty falling asleep, staying asleep, or waking up feeling unrefreshed.
6. Skin Issues: Acne, dry skin, or other skin changes.
7. Hair Loss or Excessive Hair Growth: Changes in hair thickness, texture, or abnormal hair growth patterns.
8. Digestive Problems: Bloating, constipation, or other gastrointestinal issues.
9. Reduced Libido: Decreased interest in sexual activity.
10. Hot Flashes or Night Sweats: Common in menopause but can occur in other hormonal imbalances.
Causes for Hormonal Health
1. Stress: Chronic stress can disrupt hormone production, particularly cortisol, which affects other hormones.
2. Diet: Poor nutrition, excessive sugar, processed foods, and lack of essential nutrients can impact hormone levels.
3. Lack of Exercise: A sedentary lifestyle can contribute to hormonal imbalances, especially those related to metabolism and weight.
4. Age: Natural aging processes, like menopause in women and andropause in men, lead to significant hormonal changes.
5. Medical Conditions: Disorders such as polycystic ovary syndrome (PCOS), thyroid disorders, diabetes, and adrenal insufficiency can alter hormone levels.
6. Environmental Toxins: Exposure to chemicals and endocrine disruptors in food, water, and air can interfere with hormone function.
7. Medications: Certain medications, including birth control pills and hormone replacement therapies, can influence hormone balance.
8. Sleep Patterns: Inadequate or irregular sleep can disrupt the body's circadian rhythms, affecting hormone production.
Prevention for Hormonal Health - Ways to reduce your risk
1. Eat a Balanced Diet: Focus on a diet rich in whole foods, including fruits, vegetables, lean proteins, and healthy fats. Minimize processed foods, excessive sugar, and refined carbohydrates, which can negatively impact hormone levels.
2. Exercise Regularly: Engage in regular physical activity, including aerobic exercises, strength training, and yoga. Exercise helps regulate hormones involved in metabolism, stress, and reproductive health.
3. Manage Stress: Incorporate stress-reduction techniques such as meditation, deep breathing, mindfulness, and yoga into your daily routine. Managing stress is crucial for maintaining balanced cortisol levels.
4. Get Adequate Sleep: Aim for 7-9 hours of quality sleep each night. Consistent sleep patterns support hormone production and regulation, especially those related to metabolism and stress.
5. Limit Toxin Exposure: Reduce exposure to environmental toxins and endocrine disruptors found in plastics, pesticides, and certain household products. Choose natural and organic alternatives whenever possible.
6. Stay Hydrated: Drink plenty of water to support overall health and hormone function. Dehydration can affect hormonal balance, particularly in regulating body temperature and metabolism.
7. Regular Medical Check-ups: Schedule routine health check-ups to monitor hormone levels and catch any imbalances early. Early detection allows for prompt intervention and management.
8. Avoid Excessive Caffeine and Alcohol: Limit intake of caffeine and alcohol, as they can interfere with hormone regulation, especially cortisol and estrogen.
9. Maintain a Healthy Weight: Achieve and maintain a healthy weight through diet and exercise, as excessive body fat can lead to hormonal imbalances, particularly related to insulin and estrogen.
10. Consider Supplements: If needed, take supplements like Vitamin D, Omega-3 fatty acids, and magnesium, which support hormonal balance, but always consult a healthcare provider before starting any supplements.
Treatment for Hormonal Health
1. Lifestyle Changes
- Dietary Adjustments: Adopting a balanced diet rich in whole foods, fiber, and healthy fats can help stabilize hormone levels. Reducing sugar and processed food intake is also crucial.
- Regular Exercise: Engaging in consistent physical activity helps regulate hormones like insulin, cortisol, and endorphins.
- Stress Management: Techniques such as meditation, deep breathing exercises, and yoga can lower cortisol levels and improve overall hormonal balance.
- Adequate Sleep: Prioritizing 7-9 hours of quality sleep each night supports the natural rhythm of hormone production.
2. Medications
- Hormone Replacement Therapy (HRT): For conditions like menopause, HRT can help restore estrogen and progesterone levels.
- Thyroid Medications: For those with hypothyroidism or hyperthyroidism, synthetic thyroid hormones or medications that inhibit thyroid hormone production can be prescribed.
- Insulin: In cases of diabetes, insulin therapy or other medications to manage blood sugar levels may be necessary.
- Birth Control Pills: These can help regulate menstrual cycles and manage symptoms of hormonal imbalances in women, such as those seen in polycystic ovary syndrome (PCOS).
3. Supplements
- Vitamins and Minerals: Supplements like Vitamin D, magnesium, and Omega-3 fatty acids can support hormonal health.
- Herbal Remedies: Herbs such as ashwagandha, maca root, and evening primrose oil may help balance hormones, though they should be used under the guidance of a healthcare provider.
4. Medical Procedures
- Surgery: In some cases, surgery may be necessary, such as removing ovarian cysts or tumors affecting hormone production.
- Radiation Therapy: For hormone-producing tumors, radiation may be used to shrink the tumor and reduce hormone production.
5. Alternative Therapies
- Acupuncture: Some individuals find relief from hormonal symptoms through acupuncture, which is believed to help regulate the body's energy flow and balance hormones.
- Bioidentical Hormone Therapy: This involves using hormones that are chemically identical to those produced by the human body, often used for menopause symptoms.
6. Behavioral and Psychological Support
- Therapy: Counseling or therapy can help manage the emotional and psychological effects of hormonal imbalances, such as anxiety and depression.
7. Regular Monitoring
- Ongoing monitoring of hormone levels through blood tests and medical check-ups is important to adjust treatment as needed and ensure that hormone levels are balanced.
8. Personalized Treatment Plans
- Because hormonal imbalances can vary greatly from person to person, treatment plans are often personalized. Working closely with a healthcare provider to develop a plan that addresses specific symptoms and underlying causes is essential.
FAQs
1. What are hormones, and why are they important?
Answer : Hormones are chemical messengers produced by glands in the endocrine system. They regulate various bodily functions, including metabolism, growth, reproduction, and mood. Balanced hormones are essential for overall health and well-being.
2. What causes hormonal imbalances?
Answer : Hormonal imbalances can be caused by factors such as chronic stress, poor diet, lack of exercise, aging, medical conditions like thyroid disorders or diabetes, environmental toxins, and certain medications.
3. How do I know if I have a hormonal imbalance?
Answer : Common symptoms of hormonal imbalance include fatigue, weight changes, mood swings, irregular periods, sleep disturbances, skin problems, hair loss, digestive issues, and reduced libido. If you experience these symptoms, it's advisable to consult a healthcare provider for evaluation.
4. Can hormonal imbalances be treated?
Answer : Yes, hormonal imbalances can often be treated through lifestyle changes, medications, hormone replacement therapy, supplements, and other medical interventions. The specific treatment depends on the cause and severity of the imbalance.
5. Are hormonal imbalances common?
Answer : Hormonal imbalances are relatively common and can affect people of all ages and genders. They are particularly prevalent during certain life stages, such as puberty, pregnancy, and menopause.
6. Can men experience hormonal imbalances?
Answer : Yes, men can experience hormonal imbalances, particularly with testosterone levels. Low testosterone can lead to symptoms like fatigue, depression, reduced libido, and muscle loss.
7. How can I prevent hormonal imbalances?
Answer : Preventive measures include maintaining a balanced diet, regular exercise, stress management, getting adequate sleep, limiting toxin exposure, and regular medical check-ups to monitor hormone levels.
8. How are hormonal imbalances diagnosed?
Answer : Hormonal imbalances are typically diagnosed through blood tests that measure hormone levels. Your healthcare provider may also review your symptoms, medical history, and lifestyle factors.
9. Is it possible to manage hormonal health naturally?
Answer : Many people manage hormonal health naturally through diet, exercise, stress reduction, and supplements. However, some cases may require medical intervention, so it's important to work with a healthcare provider.
10. Can stress affect my hormones?
Answer : Yes, chronic stress can lead to elevated cortisol levels, which can disrupt the balance of other hormones and lead to various health issues, including weight gain, anxiety, and sleep disturbances.
11. What role does sleep play in hormonal health?
Answer : Sleep is crucial for hormonal regulation. Lack of sleep can disrupt the production of hormones like cortisol, insulin, and leptin, which are involved in stress, metabolism, and appetite control.
12. Are there specific diets that support hormonal health?
Answer : A diet rich in whole foods, healthy fats, lean proteins, and fiber supports hormonal health. Avoiding excessive sugar, refined carbs, and processed foods is also beneficial for maintaining hormone balance.
13. Can birth control pills affect hormonal health?
Answer : Yes, birth control pills can affect hormone levels by altering the production of hormones related to the menstrual cycle. While they can help manage certain conditions like PCOS, they may also cause side effects in some individuals.
14. What are the long-term effects of untreated hormonal imbalances?
Answer : Untreated hormonal imbalances can lead to serious health issues, including infertility, metabolic disorders, cardiovascular disease, osteoporosis, and mental health conditions like depression and anxiety.
15. When should I see a doctor about a potential hormonal imbalance?
Answer : You should see a doctor if you experience persistent symptoms like extreme fatigue, unexplained weight changes, mood disturbances, irregular periods, or any other symptoms that affect your quality of life. Early diagnosis and treatment are key to managing hormonal health.
Conclusion
Maintaining hormonal health is crucial for overall well-being, as hormones play a vital role in regulating numerous bodily functions, including metabolism, mood, reproduction, and energy levels. Hormonal imbalances can significantly impact quality of life, but with proper understanding, prevention, and treatment, many of these imbalances can be effectively managed. By adopting a healthy lifestyle that includes a balanced diet, regular exercise, stress management, and sufficient sleep, individuals can support their hormonal health. Regular medical check-ups and early intervention are also essential in addressing any imbalances promptly. In conclusion, prioritizing hormonal health is a key component of achieving long-term physical and mental wellness.
“Motivation is what gets you started. Habit is what keeps you going.” – Jim Ryun
If you would like more information about the 2024, please send us an email.
Written by Fitness Goal 4U
Smart Fitness Goals - Achieve Health with Simple Steps
Smart fitness goals focus on being Specific, Measurable, Achievable, Relevant, and Time-bound. They help you create a clear path to success, stay motivated, and track progress. Whether its weight loss, strength building, or improved endurance, smart goals guide your fitness journey, ensuring steady growth and sustainable results tailored to your needs.
“Confidence comes from discipline and training.” – Robert Kiyosaki
Cervical And Ovarian Health are vital aspects of women's reproductive well-being. The cervix, located at the lower end of the uterus, and the ovaries, responsible for producing eggs and hormones, play crucial roles in fertility and overall health. Issues affecting these organs, such as cervical and ovarian cancers, can have significant impacts if not detected early. Human Papillomavirus (HPV) is a major cause of cervical cancer, while genetic factors and age increase the risk of ovarian cancer. Regular screenings like Pap tests, HPV vaccination, and awareness of symptoms are essential in preventing and managing these conditions. By prioritizing cervical and ovarian health through preventive measures and early intervention, women can significantly reduce their risk of serious complications and maintain their reproductive health.
Common Symptoms of Cervical and Ovarian Health
1. Cervical Health Symptoms
- Abnormal Vaginal Bleeding: Bleeding between periods, after sexual intercourse, or post-menopause.
- Unusual Vaginal Discharge: Discharge with an unusual color, odor, or consistency.
- Pelvic Pain: Discomfort or pain during intercourse or pelvic exams.
- Painful Urination: Discomfort or burning sensation while urinating.
- Pain during Intercourse: Discomfort or pain during sexual activity.
2. Ovarian Health Symptoms
- Persistent Bloating: Continuous bloating or increase in abdominal size.
- Pelvic or Abdominal Pain: Ongoing pain in the pelvic or lower abdominal area.
- Difficulty Eating or Feeling Full Quickly: A noticeable change in appetite or feeling full with small amounts of food.
- Frequent Urination: Increased need to urinate, often suddenly.
- Changes in Menstrual Cycle: Irregular periods or changes in the menstrual flow.
Causes for Cervical and Ovarian Health
1. Cervical Health Causes
- Human Papillomavirus (HPV): The primary cause of cervical cancer, with certain strains of HPV being high-risk for developing cancerous cells in the cervix.
- Sexually Transmitted Infections (STIs): Infections like chlamydia and gonorrhea can increase the risk of cervical abnormalities.
- Smoking: Smoking is linked to an increased risk of cervical cancer, as it weakens the immune system and contributes to the development of cancerous cells.
- Immune System Deficiency: Conditions that weaken the immune system, such as HIV, can make it harder for the body to fight off HPV infections, leading to cervical cancer.
- Multiple Full-Term Pregnancies: Women who have had multiple full-term pregnancies have an increased risk of developing cervical cancer.
2. Ovarian Health Causes
- Genetic Factors: Mutations in the BRCA1 and BRCA2 genes significantly increase the risk of ovarian cancer. A family history of ovarian or breast cancer also raises the risk.
- Age: The risk of ovarian cancer increases with age, particularly after menopause.
- Endometriosis: A condition where the tissue similar to the uterine lining grows outside the uterus, which can lead to ovarian cancer.
- Hormone Replacement Therapy (HRT): Long-term use of hormone replacement therapy, especially after menopause, is associated with an increased risk of ovarian cancer.
- Infertility or Not Having Children: Women who have never been pregnant or have experienced infertility may have a slightly higher risk of developing ovarian cancer.
Prevention for Cervical and Ovarian Health - Ways to reduce your risk
1. Cervical Health Prevention
- HPV Vaccination: The HPV vaccine is highly effective in preventing the types of HPV that cause most cervical cancers. It is recommended for preteens but can also be administered to older individuals.
- Regular Pap Smears and HPV Testing: Regular screening helps detect precancerous changes in the cervix early. Women aged 21-65 should have regular Pap tests, and women over 30 may combine this with HPV testing.
- Practice Safe Sex: Using condoms and limiting the number of sexual partners can reduce the risk of HPV and other sexually transmitted infections (STIs) that increase the risk of cervical cancer.
- Quitting Smoking: Smoking cessation lowers the risk of cervical cancer by improving the body’s ability to fight HPV infections.
- Routine Gynecological Examinations: Regular check-ups with a healthcare provider ensure that any changes in cervical health are caught early.
2. Ovarian Health Prevention:
- Regular Medical Check-ups: Routine pelvic exams and discussions about your family history with your healthcare provider are essential for early detection of ovarian health issues.
- Healthy Diet and Regular Exercise: Maintaining a healthy weight and lifestyle can help reduce the risk of ovarian cancer. A diet rich in fruits, vegetables, and whole grains, combined with regular physical activity, is beneficial.
- Oral Contraceptives: Long-term use of birth control pills has been shown to reduce the risk of ovarian cancer. However, this should be discussed with a healthcare provider, considering the individual’s health history.
- Genetic Counseling and Testing: Women with a family history of ovarian or breast cancer should consider genetic counseling to assess their risk. Those with BRCA1 or BRCA2 mutations may discuss preventive options with their doctor.
- Awareness of Symptoms: Early detection is crucial. Being aware of and promptly addressing symptoms such as bloating, pelvic pain, or changes in appetite can lead to earlier diagnosis and more effective treatment.
Treatment for Cervical and Ovarian Health
1. Cervical Health Treatment
- Cryotherapy: A procedure that involves freezing abnormal cells on the cervix. This is typically used for treating pre-cancerous conditions and early-stage cervical issues.
- Loop Electrosurgical Excision Procedure (LEEP): LEEP uses a small electrical wire loop to remove abnormal tissue from the cervix. It’s effective for treating pre-cancerous cells and early cervical cancer.
- Cone Biopsy (Conization): A surgical procedure that removes a cone-shaped piece of tissue from the cervix. It is often used to diagnose or treat early-stage cervical cancer.
- Hysterectomy: In cases of more advanced cervical cancer, a hysterectomy (removal of the uterus) may be required. Depending on the cancer’s spread, the ovaries, fallopian tubes, and part of the vagina may also be removed.
- Radiation Therapy: Used in conjunction with chemotherapy or surgery, radiation therapy targets and kills cancerous cells in the cervix. It can be delivered externally or through internal brachytherapy.
- Chemotherapy: Often used in more advanced stages of cervical cancer, chemotherapy involves the use of drugs to kill cancer cells or shrink tumors. It can be used alone or in combination with radiation therapy.
- Targeted Therapy: Targeted drugs, such as bevacizumab, work by interfering with the growth of cancer cells. These are usually combined with chemotherapy in more advanced cases.
2. Ovarian Health Treatment
Surgery
- Oophorectomy: Removal of one or both ovaries, often the first step in treating ovarian cancer.
- Hysterectomy: Removal of the uterus, which may also involve the removal of fallopian tubes, ovaries, and nearby lymph nodes, depending on the cancer's spread.
Chemotherapy: Administered after surgery to kill any remaining cancer cells. Chemotherapy can be given intravenously or directly into the abdomen (intraperitoneal chemotherapy). It’s commonly used for treating ovarian cancer.
Radiation Therapy: Although less common for ovarian cancer, radiation therapy may be used to target and destroy cancer cells that remain after surgery or to treat specific areas where cancer has spread.
Targeted Therapy: Drugs like PARP inhibitors (e.g., olaparib) target specific genetic mutations in cancer cells, particularly for those with BRCA1 or BRCA2 mutations. These therapies can slow the progression of ovarian cancer.
Hormone Therapy: Used primarily for ovarian cancers that are sensitive to hormones. It involves the use of drugs to block hormones like estrogen, which can fuel the growth of certain types of ovarian cancer.
Immunotherapy: A treatment that uses the body's immune system to fight cancer. While not yet standard for ovarian cancer, it is being explored in clinical trials and may offer new avenues for treatment.
Palliative Care: For advanced cases, palliative care focuses on relieving symptoms and improving quality of life. This may include pain management, nutritional support, and emotional support.
FAQs
1. What are the early warning signs of cervical and ovarian cancer?
Answer : Cervical cancer: Early signs include abnormal vaginal bleeding, unusual discharge, and pelvic pain. Ovarian cancer: Early symptoms are often vague but may include persistent bloating, abdominal pain, difficulty eating, and frequent urination.
2. How often should I get screened for cervical cancer?
Answer : Women aged 21-65 should have a Pap test every three years. Women aged 30 and above may opt for a combined Pap test and HPV test every five years.
3. Is there a screening test for ovarian cancer?
Answer : Currently, there is no standard screening test for ovarian cancer. Regular pelvic exams, along with awareness of symptoms, are important for early detection.
4. Can HPV vaccination prevent cervical cancer?
Answer : Yes, the HPV vaccine is highly effective in preventing the types of HPV that cause most cervical cancers. It is recommended for preteens but can be given to individuals up to age 45.
5. What increases the risk of cervical and ovarian cancer?
Answer : Cervical cancer: Major risk factors include HPV infection, smoking, and having a weakened immune system. Ovarian cancer: Risk factors include age, family history, BRCA1/BRCA2 gene mutations, and endometriosis.
6. What are the treatment options for cervical and ovarian cancer?
Answer : Cervical cancer: Treatment options include cryotherapy, LEEP, conization, hysterectomy, radiation therapy, chemotherapy, and targeted therapy. Ovarian cancer: Treatment may involve surgery, chemotherapy, radiation therapy, targeted therapy, hormone therapy, and immunotherapy.
7. Can lifestyle changes help in preventing cervical and ovarian cancers?
Answer : Yes, for cervical cancer, quitting smoking, practicing safe sex, and getting vaccinated against HPV are key preventive measures. For ovarian cancer, maintaining a healthy weight, considering the use of oral contraceptives, and regular medical check-ups can help reduce risk.
8. Should I consider genetic testing for ovarian cancer?
Answer : If you have a family history of ovarian or breast cancer, genetic counseling and testing for BRCA1 or BRCA2 mutations can help assess your risk and guide preventive measures.
9. How effective are regular Pap smears in preventing cervical cancer?
Answer : Regular Pap smears are very effective in detecting precancerous changes in the cervix, allowing for early treatment and significantly reducing the risk of developing cervical cancer.
10. What should I do if I experience symptoms related to cervical or ovarian health?
Answer : If you experience symptoms such as abnormal bleeding, persistent bloating, or pelvic pain, it’s important to see a healthcare provider promptly for evaluation and potential early intervention. Early detection significantly improves treatment outcomes.
Conclusion
Cervical and ovarian health are critical components of women’s overall well-being, with significant implications for reproductive health and quality of life. Awareness, prevention, and early detection are key in managing the risks associated with cervical and ovarian cancers. Regular screenings, such as Pap smears and pelvic exams, along with the HPV vaccine, play crucial roles in preventing cervical cancer. For ovarian health, understanding genetic risks, maintaining a healthy lifestyle, and being vigilant about symptoms are essential steps in early detection and treatment.
Advances in medical treatments, including surgery, chemotherapy, and targeted therapies, have improved the prognosis for many women facing these conditions. However, the best outcomes are achieved when these health issues are detected early. By staying informed, engaging in regular health checks, and adopting preventive measures, women can significantly reduce their risk of cervical and ovarian health issues, leading to better health outcomes and improved quality of life.
“Motivation is what gets you started. Habit is what keeps you going.” – Jim Ryun
If you would like more information about the 2024, please send us an email.
Written by Fitness Goal 4U
Smart Fitness Goals - Achieve Health with Simple Steps
Smart fitness goals focus on being Specific, Measurable, Achievable, Relevant, and Time-bound. They help you create a clear path to success, stay motivated, and track progress. Whether its weight loss, strength building, or improved endurance, smart goals guide your fitness journey, ensuring steady growth and sustainable results tailored to your needs.
“Confidence comes from discipline and training.” – Robert Kiyosaki
Healthy Aging is the process of maintaining physical, mental, and social well-being as we grow older. It focuses on optimizing quality of life, preserving independence, and preventing chronic diseases. As we age, adopting a balanced diet, engaging in regular physical activity, and staying mentally active are crucial for sustaining health. Social connections and regular health check-ups also play significant roles in promoting longevity and vitality. Healthy aging isn't just about adding years to life; it's about adding life to years, ensuring that older adults can enjoy their later years with energy, purpose, and fulfillment. By making informed lifestyle choices and staying proactive about health, individuals can significantly enhance their aging experience, leading to a longer, healthier, and happier life.
Common Symptoms of Healthy Aging
1. Gradual Physical Changes
- Slight decrease in muscle mass and strength.
- Minor joint stiffness or reduced flexibility.
- Slower metabolism, which can affect weight management.
2. Cognitive Adjustments
- Slower processing speed in thinking or reacting.
- Mild memory lapses, like forgetting names or misplacing items, but not severe enough to interfere with daily life.
3. Sensory Changes
- Gradual reduction in vision or hearing acuity.
- Decreased sensitivity to taste and smell.
4. Emotional Well-being
- Increased contentment and emotional stability.
- Greater resilience in coping with life's challenges.
5. Social Adjustments
- Shift in social roles, such as retirement or becoming a grandparent.
- Desire for meaningful activities and relationships.
Causes for Healthy Aging
1. Healthy Lifestyle Choices
- Balanced Diet: Consuming a variety of nutrient-rich foods, including fruits, vegetables, whole grains, and lean proteins, supports physical and cognitive health.
- Regular Physical Activity: Engaging in regular exercise helps maintain muscle mass, bone density, and cardiovascular health, which are crucial for aging well.
- Mental Stimulation: Continuous learning, engaging in hobbies, and social interactions help preserve cognitive function and mental sharpness.
2. Social Engagement
- Strong Social Connections: Maintaining relationships with family, friends, and community reduces the risk of loneliness and depression, contributing to emotional well-being.
- Active Participation: Involvement in meaningful activities and volunteering can enhance a sense of purpose and satisfaction in life.
3. Environmental Factors
- Access to Healthcare: Regular check-ups, vaccinations, and preventive care help manage chronic conditions and catch potential issues early.
- Safe Living Environment: Living in a safe, supportive environment with access to clean air, water, and healthy food contributes to overall well-being.
4. Genetics
- Inherited Longevity: Some individuals are genetically predisposed to longer life spans and a lower risk of age-related diseases.
5. Stress Management
- Effective Coping Strategies: Managing stress through mindfulness, relaxation techniques, and social support helps maintain mental and physical health.
6. Adequate Sleep
- Quality Sleep: Regular, restful sleep is essential for physical recovery, mental clarity, and emotional balance, all of which contribute to healthy aging.
Prevention for Healthy Aging - Ways to reduce your risk
1. Maintain a Balanced Diet
- Eat a variety of nutrient-dense foods, including plenty of fruits, vegetables, whole grains, lean proteins, and healthy fats.
- Limit processed foods, added sugars, and high sodium intake to reduce the risk of chronic conditions like heart disease and diabetes.
2. Engage in Regular Physical Activity
- Aim for at least 150 minutes of moderate-intensity aerobic activity per week, such as brisk walking or cycling.
- Include strength training exercises twice a week to maintain muscle mass and bone density.
- Incorporate flexibility and balance exercises to reduce the risk of falls.
3. Stay Mentally Active
- Engage in activities that challenge your brain, such as puzzles, reading, learning new skills, or playing musical instruments.
- Stay socially connected by participating in group activities, volunteering, or maintaining regular contact with friends and family.
4. Manage Stress Effectively
- Practice relaxation techniques such as deep breathing, meditation, or yoga to reduce stress and its impact on health.
- Maintain a positive outlook and develop healthy coping mechanisms for dealing with life's challenges.
5. Get Regular Health Check-ups
- Schedule regular visits with your healthcare provider for screenings, vaccinations, and early detection of potential health issues.
- Monitor and manage chronic conditions like hypertension, diabetes, and cholesterol to prevent complications.
6. Avoid Harmful Habits
- Quit smoking and limit alcohol consumption to reduce the risk of cancer, cardiovascular disease, and other health problems.
- Practice safe behaviors to avoid injury, such as wearing seat belts, using protective gear during physical activities, and avoiding risky situations.
7. Prioritize Sleep
- Ensure you get 7-9 hours of quality sleep each night to support physical and mental health.
- Maintain a consistent sleep schedule and create a restful sleep environment.
8. Protect Your Senses
- Protect your vision and hearing by wearing sunglasses in bright light and avoiding loud noises.
- Get regular eye and hearing check-ups to detect any early signs of impairment.
9. Stay Hydrated
- Drink plenty of water throughout the day to maintain hydration, which is crucial for overall health, particularly in older adults.
10. Foster Strong Social Connections
- Cultivate relationships with friends, family, and community members to combat loneliness and improve emotional well-being.
- Participate in social activities that provide a sense of belonging and purpose.
Treatment for Healthy Aging
1. Medical Management
- Chronic Disease Management: Regular monitoring and treatment of chronic conditions such as diabetes, hypertension, arthritis, and heart disease are essential to prevent complications and maintain quality of life.
- Medication Management: Ensuring that medications are taken as prescribed, with regular reviews to avoid interactions and side effects. Adjustments may be needed as health status changes.
2. Physical Therapy and Rehabilitation
- Physical Therapy: Customized exercise programs designed to improve mobility, strength, and flexibility, particularly after injury or surgery.
- Occupational Therapy: Assistance with daily living activities to maintain independence and improve the ability to perform everyday tasks.
- Rehabilitation Programs: Specialized programs to recover and regain function after strokes, surgeries, or other significant health events.
3. Nutritional Support
- Dietary Adjustments: Working with a nutritionist or dietitian to create a diet plan that meets the specific nutritional needs of older adults, focusing on adequate protein, calcium, and vitamin D intake.
- Supplements: When necessary, the use of dietary supplements to address deficiencies in vitamins, minerals, or other essential nutrients.
4. Mental Health Care
- Counseling and Therapy: Psychological support through counseling, cognitive-behavioral therapy, or other therapeutic approaches to address depression, anxiety, or other mental health concerns.
- Cognitive Training: Engaging in activities or programs designed to improve or maintain cognitive functions such as memory, attention, and problem-solving skills.
- Medication for Mental Health: When necessary, the use of medications to manage mental health conditions like depression or anxiety.
5. Social and Emotional Support
- Social Engagement: Encouraging participation in social activities, community groups, and family gatherings to maintain emotional well-being and prevent loneliness.
- Support Groups: Joining or forming support groups for individuals facing similar age-related challenges can provide emotional support and practical advice.
6. Assistive Technologies and Devices
- Mobility Aids: Use of canes, walkers, or wheelchairs to enhance mobility and prevent falls.
- Hearing Aids and Vision Devices: Tools such as hearing aids, eyeglasses, and magnifiers to improve sensory functions and enhance quality of life.
- Home Modifications: Making adjustments in the living environment, such as installing grab bars, ramps, and stairlifts to improve safety and accessibility.
7. Holistic and Complementary Therapies
- Alternative Therapies: Exploring options like acupuncture, massage therapy, and yoga to manage pain, improve relaxation, and enhance overall well-being.
- Mind-Body Practices: Practices such as tai chi, meditation, and mindfulness to improve physical and mental health.
8. Regular Health Screenings
- Preventive Screenings: Regular check-ups and screenings for conditions like cancer, osteoporosis, and cardiovascular diseases, allowing for early detection and treatment.
- Vaccinations: Keeping up with recommended vaccinations, such as flu shots and shingles vaccines, to prevent infections.
9. End-of-Life Care Planning
- Advance Care Planning: Discussing and documenting preferences for end-of-life care, including living wills and power of attorney.
- Palliative and Hospice Care: Providing comfort and support for those with terminal illnesses, focusing on quality of life rather than curative treatment.
FAQs
1. What is healthy aging?
Answer : Healthy aging refers to the process of maintaining physical, mental, and social well-being as we grow older. It involves adopting a lifestyle that promotes health and well-being, preventing chronic diseases, and preserving independence and quality of life.
2. What are the key factors in promoting healthy aging?
Answer : Key factors include a balanced diet, regular physical activity, mental stimulation, strong social connections, effective stress management, regular health check-ups, and avoiding harmful habits like smoking and excessive alcohol consumption.
3. How much exercise do older adults need?
Answer : The CDC recommends that older adults engage in at least 150 minutes of moderate-intensity aerobic activity per week, along with muscle-strengthening activities on two or more days. Balance and flexibility exercises are also important to prevent falls.
4. What can I do to maintain cognitive health as I age?
Answer : To maintain cognitive health, engage in regular mental exercises, stay socially active, manage stress, get adequate sleep, and maintain a healthy diet. Activities like puzzles, reading, learning new skills, and socializing can help keep your mind sharp.
5. Is it normal to experience memory loss as I age?
Answer : Mild memory lapses, such as occasionally forgetting names or misplacing items, can be a normal part of aging. However, significant memory loss that interferes with daily life should be discussed with a healthcare provider, as it may indicate a more serious condition.
6. How can I prevent falls as I age?
Answer : To prevent falls, engage in balance and strength exercises, keep your home well-lit and free of tripping hazards, wear supportive shoes, and have your vision and hearing checked regularly. Using assistive devices if needed can also help.
7. What role does diet play in healthy aging?
Answer : A balanced diet rich in fruits, vegetables, whole grains, lean proteins, and healthy fats can reduce the risk of chronic diseases, improve physical health, and support cognitive function. Staying hydrated is also crucial for overall well-being.
8. How important is social interaction for healthy aging?
Answer : Social interaction is very important for mental and emotional well-being. Staying connected with family, friends, and community can reduce the risk of depression, loneliness, and cognitive decline, and contribute to a sense of purpose.
9. What should I do if I feel depressed or anxious as I age?
Answer : If you feel depressed or anxious, it's important to talk to a healthcare provider. Counseling, therapy, medication, and social support can help manage mental health issues. Engaging in regular physical activity and maintaining social connections can also improve mood.
10. What are the benefits of regular health check-ups for older adults?
Answer : Regular health check-ups allow for early detection and management of chronic conditions, prevention of complications, and keeping vaccinations up to date. They also provide an opportunity to discuss any health concerns with your doctor.
11. How can I ensure that I am aging healthily?
Answer : Aging healthily involves making proactive lifestyle choices, such as eating a balanced diet, exercising regularly, staying mentally and socially active, managing stress, and keeping up with medical care. Regularly assessing and adjusting your habits and routines can help ensure you are on the right track.
12. What resources are available to support healthy aging?
Answer : Numerous resources, including community centers, senior programs, health care providers, support groups, and online platforms, offer information and support for healthy aging. These resources can provide guidance on everything from exercise programs to social activities and health management.
Conclusion
Healthy aging is about more than just adding years to life—it's about adding life to years. By making informed choices and embracing a lifestyle that prioritizes physical health, mental well-being, and social connections, individuals can enjoy a high quality of life well into their later years. Through balanced nutrition, regular exercise, mental stimulation, and proactive healthcare, the risks of chronic diseases and cognitive decline can be minimized. Additionally, maintaining strong social ties and effectively managing stress contribute to emotional resilience and a sense of purpose. Healthy aging is a lifelong journey that empowers individuals to live with vitality, independence, and fulfillment, ensuring that their later years are as rewarding and enriching as possible.
“Motivation is what gets you started. Habit is what keeps you going.” – Jim Ryun
If you would like more information about the 2024, please send us an email.
Written by Fitness Goal 4U
Smart Fitness Goals - Achieve Health with Simple Steps
Smart fitness goals focus on being Specific, Measurable, Achievable, Relevant, and Time-bound. They help you create a clear path to success, stay motivated, and track progress. Whether its weight loss, strength building, or improved endurance, smart goals guide your fitness journey, ensuring steady growth and sustainable results tailored to your needs.
“Confidence comes from discipline and training.” – Robert Kiyosaki
Home remedies for glowing skin offer natural, cost-effective solutions to achieve radiant and healthy skin. These remedies often use ingredients readily available in your kitchen, such as honey, turmeric, aloe vera, and coconut oil, which are packed with nutrients and antioxidants. They help nourish the skin, reduce inflammation, and promote a natural glow without harsh chemicals. Simple treatments like honey masks, turmeric scrubs, and aloe vera gel can moisturize, soothe, and rejuvenate your skin. Additionally, lifestyle choices such as staying hydrated, eating a balanced diet rich in fruits and vegetables, and getting enough sleep complement these remedies for lasting results. With regular use, home remedies can help you achieve a naturally glowing complexion, providing a gentle yet effective approach to skincare suitable for all skin types.
Top 5 Home Remedies for Glowing Skin
1. Honey and Lemon Face Mask
Ingredients:
- 1 tablespoon honey
- 1 tablespoon lemon juice
Method:
- Mix the honey and lemon juice in a bowl.
- Apply the mixture evenly to your face.
- Leave it on for 15-20 minutes.
- Rinse off with lukewarm water.
Benefits: Honey is a natural humectant, which means it draws moisture from the air into the skin, keeping it hydrated and supple. It also has antibacterial properties that help prevent acne and soothe the skin. Lemon juice, on the other hand, is rich in vitamin C, which brightens the skin and reduces dark spots. It also helps in exfoliating dead skin cells due to its natural acidity.
Precautions:
- Lemon juice can make your skin more sensitive to sunlight, so it's important to use sunscreen if you’re going out after applying this mask.
- If you have sensitive skin, do a patch test first to ensure you don't have a reaction to the lemon juice.
2. Aloe Vera and Turmeric Paste
Ingredients:
- 2 tablespoons aloe vera gel (fresh or store-bought)
- A pinch of turmeric powder
Method:
- Combine aloe vera gel and turmeric powder in a bowl.
- Apply the paste evenly to your face.
- Leave it on for 10-15 minutes.
- Rinse off with lukewarm water.
Benefits: Aloe vera is renowned for its soothing and moisturizing properties. It helps to heal the skin, reduce redness, and provide essential nutrients. Turmeric has anti-inflammatory and antioxidant properties that can reduce blemishes and even out skin tone. Together, they make an effective combination for a glowing complexion.
Precautions:
- Turmeric can leave a temporary yellow tint on the skin. This is usually harmless and can be washed away with additional cleansing if needed.
- Aloe vera gel should be tested on a small skin area first to ensure it does not cause any allergic reaction.
3. Cucumber and Yogurt Face Pack
Ingredients:
- 1/2 cucumber
- 2 tablespoons plain yogurt
Method:
- Peel and grate the cucumber, then squeeze out the juice.
- Mix the cucumber juice with yogurt in a bowl.
- Apply the mixture to your face and neck.
- Leave it on for 15-20 minutes.
- Rinse off with cool water.
Benefits: Cucumber is known for its hydrating and cooling properties. It contains antioxidants and vitamins that help to soothe the skin and reduce puffiness. Yogurt contains lactic acid, which gently exfoliates the skin, removes dead skin cells, and promotes a natural glow. Together, they provide hydration and a smoother texture to the skin.
Precautions:
- Make sure to use plain yogurt without added sugars or flavors.
- If you have very sensitive skin, test the yogurt on a small patch before applying it to your entire face.
4. Oatmeal and Milk Scrub
Ingredients:
- 2 tablespoons oatmeal (finely ground)
- 2 tablespoons milk
Method:
- Mix the oatmeal and milk to form a paste.
- Gently massage the paste onto your face in circular motions.
- Leave it on for 10 minutes.
- Rinse off with warm water, then pat your face dry.
Benefits: Oatmeal is a gentle exfoliant that helps to remove dead skin cells and impurities without being too harsh. It also has anti-inflammatory properties that can soothe irritated skin. Milk contains lactic acid, which helps to exfoliate and hydrate the skin, leaving it soft and glowing.
Precautions:
- Ensure the oatmeal is finely ground to avoid scratching the skin.
- If you have a milk allergy or are lactose intolerant, you can substitute milk with a non-dairy alternative like almond or soy milk.
5. Tomato and Olive Oil Treatment
Ingredients:
- 1 ripe tomato
- 1 tablespoon olive oil
Method:
- Mash the tomato into a pulp.
- Mix in the olive oil until well combined.
- Apply the mixture to your face.
- Leave it on for 15 minutes.
- Rinse off with lukewarm water.
Benefits: Tomatoes are rich in antioxidants, particularly lycopene, which helps protect the skin from damage and promotes a healthy complexion. They also help in reducing the appearance of pores and controlling excess oil. Olive oil is an excellent moisturizer that provides essential fatty acids and vitamins that nourish and hydrate the skin, giving it a natural glow.
Precautions:
- If you have oily or acne-prone skin, be cautious with olive oil as it can potentially clog pores.
- Always perform a patch test before applying new ingredients to your face.
Tips for Best Results
- Consistency is Key: Regular use of these remedies, ideally once a week, will yield the best results. Consistency helps in maintaining healthy skin and achieving a radiant glow.
- Patch Test: Always perform a patch test before using new ingredients to ensure you don’t have an allergic reaction.
- Hydrate and Eat Well: In addition to these remedies, drinking plenty of water and consuming a balanced diet rich in fruits and vegetables can significantly enhance your skin’s natural glow.
- Sun Protection: Protect your skin from excessive sun exposure by wearing sunscreen or using natural sunblock ingredients.
- Gentle Cleansing: Always cleanse your face gently to remove any dirt or impurities, and avoid harsh scrubbing which can damage the skin.
FAQs
1. Are home remedies safe for all skin types?
Answer : Most home remedies use natural ingredients and are generally safe for all skin types. However, it’s important to perform a patch test before applying any new remedy to ensure you’re not allergic or sensitive to any ingredient.
2. How long does it take to see results from home remedies?
Answer : Home remedies can take time to show visible results, usually within a few weeks of consistent use. Patience and regular application are key to achieving glowing skin.
3. Can I use home remedies if I have acne-prone skin?
Answer : Yes, many home remedies are suitable for acne-prone skin, such as aloe vera, turmeric, and honey. These ingredients have anti-inflammatory and antibacterial properties that can help soothe and heal acne.
4. How often should I use home remedies?
Answer : The frequency depends on the remedy and your skin type. Generally, face masks and scrubs can be used 2-3 times a week, while moisturizers like coconut oil or aloe vera can be used daily.
5. Do home remedies replace skincare products?
Answer : Home remedies can complement your skincare routine but may not fully replace all products, especially if you have specific skin concerns like acne, pigmentation, or aging. It’s essential to maintain a balanced skincare routine with both natural and store-bought products for optimal results.
Conclusion
In conclusion, home remedies for glowing skin offer a natural, accessible, and gentle approach to skincare. By harnessing the power of ingredients like turmeric, honey, aloe vera, and coconut oil, you can nourish your skin and achieve a radiant complexion without harsh chemicals. Consistency is key, and when paired with a healthy lifestyle, these remedies can provide lasting benefits for all skin types. While home remedies are effective, they work best as part of a balanced skincare routine tailored to your individual needs. With patience and regular use, you can enjoy glowing, healthy skin naturally.
You might also like our beauty articles.
“Motivation is what gets you started. Habit is what keeps you going.” – Jim Ryun
If you would like more information about the 2024, please send us an email.
Written by Fitness Goal 4U
Smart Fitness Goals - Achieve Health with Simple Steps
Smart fitness goals focus on being Specific, Measurable, Achievable, Relevant, and Time-bound. They help you create a clear path to success, stay motivated, and track progress. Whether its weight loss, strength building, or improved endurance, smart goals guide your fitness journey, ensuring steady growth and sustainable results tailored to your needs.
“Confidence comes from discipline and training.” – Robert Kiyosaki
Skin allergies are common conditions that can cause discomfort and irritation due to exposure to allergens such as pollen, dust, or certain chemicals. These allergies often manifest as redness, itching, swelling, or rashes on the skin. While medical treatments are available, home remedies offer a natural and accessible approach to alleviating symptoms. Remedies like applying aloe vera gel, using oatmeal baths, or incorporating coconut oil into your skincare routine can soothe and calm irritated skin. These natural solutions are gentle, making them suitable for various skin types and reducing the risk of harsh side effects. Understanding and addressing skin allergies with simple home treatments can help maintain healthy skin and provide relief from allergic reactions, allowing you to feel more comfortable and confident in your skin.
Top 5 Home Remedies for Skin Allergy
1. Aloe Vera
Aloe vera is well-known for its soothing and healing properties. The gel extracted from the aloe vera plant is a natural anti-inflammatory and can help calm irritated skin. Its moisturizing properties also help prevent further dryness and discomfort.
How to Use:
- Cut a fresh aloe vera leaf and extract the gel.
- Apply the gel directly to the affected area.
- Leave it on for about 20-30 minutes before rinsing off with lukewarm water.
- Repeat this process 2-3 times a day for best results.
Aloe vera not only alleviates itching and redness but also promotes healing of the skin.
2. Oatmeal Baths
Oatmeal is another excellent remedy for skin allergies, particularly for soothing itchy and inflamed skin. It contains compounds known as avenanthramides, which have anti-inflammatory properties. Oatmeal also forms a protective barrier over the skin, which can help reduce irritation.
How to Use:
- Fill a bathtub with lukewarm water.
- Add one to two cups of colloidal oatmeal (finely ground oatmeal) to the water.
- Stir well to ensure the oatmeal is fully dissolved.
- Soak in the bath for 15-20 minutes.
- Pat your skin dry with a soft towel, avoiding rubbing.
Regular oatmeal baths can provide relief from symptoms and help maintain skin moisture.
3. Coconut Oil
Coconut oil is rich in fatty acids and has antimicrobial properties that make it an effective remedy for skin allergies. It helps to moisturize the skin, reduce inflammation, and combat bacteria or fungi that may exacerbate allergic reactions.
How to Use:
- Use organic, virgin coconut oil for the best results.
- Apply a thin layer of coconut oil to the affected area.
- Gently massage it into the skin until absorbed.
- Reapply 2-3 times a day as needed.
Coconut oil can help reduce dryness and irritation while improving overall skin health.
4. Apple Cider Vinegar
Apple cider vinegar (ACV) is known for its antiseptic properties and can help balance the skin’s pH levels. It is effective in reducing itching and inflammation associated with skin allergies. However, it is essential to use it correctly to avoid skin irritation.
How to Use:
- Dilute apple cider vinegar with equal parts of water (for sensitive skin, use more water).
- Apply the diluted vinegar to the affected area using a cotton ball or pad.
- Leave it on for about 5-10 minutes.
- Rinse off with lukewarm water.
- Repeat once or twice a day, depending on tolerance.
Apple cider vinegar should be used with caution, as it can be potent and may cause irritation in some individuals.
5. Chamomile Tea Compress
Chamomile has anti-inflammatory and calming properties that can help relieve symptoms of skin allergies. A chamomile tea compress can reduce redness and itching and promote healing.
How to Use:
- Brew a strong cup of chamomile tea and let it cool.
- Soak a clean cloth or cotton pad in the tea.
- Apply the compress to the affected area for 15-20 minutes.
- Repeat 2-3 times a day as needed.
Chamomile tea compresses can provide immediate relief and help soothe irritated skin.
Additional Tips for Managing Skin Allergies
While these home remedies can be effective, managing skin allergies often requires a holistic approach. Here are some additional tips to help you manage skin allergies more effectively:
- Identify and Avoid Triggers: Keep a diary of your symptoms and potential triggers to identify what might be causing your skin allergies. Avoiding these triggers can significantly reduce the frequency and severity of your reactions.
- Maintain Good Skin Hygiene: Regularly wash your skin with gentle, fragrance-free cleansers to remove allergens and irritants. Avoid using harsh soaps or hot water, which can further irritate your skin.
- Stay Hydrated: Drinking plenty of water helps keep your skin hydrated from the inside out, which can reduce dryness and irritation.
- Use Hypoallergenic Products: Choose skincare and household products that are labeled as hypoallergenic to minimize the risk of allergic reactions.
- Consult a Dermatologist: If home remedies are not providing relief or if your symptoms are severe, consult a dermatologist. They can provide personalized advice and may prescribe medications or treatments to manage your skin allergy more effectively.
FAQs
1. What are some effective home remedies for skin allergies?
Answer : Some effective home remedies include aloe vera gel, oatmeal baths, coconut oil, honey, and cold compresses. These remedies help reduce inflammation, itching, and irritation caused by allergic reactions.
2. How often should I apply aloe vera gel to my skin allergy?
Answer : You can apply aloe vera gel 2-3 times a day or as needed until the symptoms subside. It’s safe to use and can be reapplied whenever the affected area feels itchy or irritated.
3. Is coconut oil safe for all skin types?
Answer : Yes, coconut oil is generally safe for most skin types, but if you have very oily or acne-prone skin, it’s best to use it sparingly or consult a dermatologist before use.
4. Can honey cause skin irritation?
Answer : While honey is generally safe for most people, those with allergies to pollen or bee products should avoid it. Always do a patch test before applying honey to large areas of the skin.
5. How long should I soak in an oatmeal bath for skin allergies?
Answer : Soak in an oatmeal bath for about 15-20 minutes to relieve itching and irritation. Make sure the water is lukewarm, not hot, to avoid further aggravating your skin.
6. When should I seek medical attention for skin allergies?
Answer : If home remedies do not provide relief, or if the skin allergy worsens, spreads, or is accompanied by symptoms like difficulty breathing or swelling of the face, seek medical attention immediately.
Conclusion
Home remedies can be an effective and natural way to manage the discomfort associated with skin allergies. Remedies such as aloe vera, oatmeal baths, coconut oil, honey, and cold compresses provide soothing relief by reducing inflammation, itching, and irritation. While these remedies are gentle and accessible, it's essential to monitor your symptoms and consult a healthcare professional if the condition persists or worsens. By incorporating these natural treatments into your skincare routine, you can promote healthier skin and reduce the frequency of allergic reactions, leading to a more comfortable and confident you.
You might also like our beauty articles.
“Motivation is what gets you started. Habit is what keeps you going.” – Jim Ryun
If you would like more information about the 2024, please send us an email.
Written by Fitness Goal 4U
Smart Fitness Goals - Achieve Health with Simple Steps
Smart fitness goals focus on being Specific, Measurable, Achievable, Relevant, and Time-bound. They help you create a clear path to success, stay motivated, and track progress. Whether its weight loss, strength building, or improved endurance, smart goals guide your fitness journey, ensuring steady growth and sustainable results tailored to your needs.
“Confidence comes from discipline and training.” – Robert Kiyosaki
Home Remedies for Hair Growth, explores natural and cost-effective solutions to promote healthier, longer hair. This guide highlights the benefits of using everyday ingredients such as oils, herbs, and foods, all of which can enhance hair growth without the need for expensive treatments or harmful chemicals. From coconut oil to aloe vera and onion juice, these time-tested remedies not only strengthen hair but also nourish the scalp, reduce hair loss, and improve overall hair texture. Embracing natural remedies allows you to harness the power of nature to achieve your hair goals while avoiding unnecessary additives. Perfect for those seeking a holistic approach, this guide offers practical tips and routines that can easily be incorporated into your hair care regimen, leading to stronger, healthier hair over time.
Top 5 Home Remedies for Hair Growth
1. Aloe Vera
Benefits: Aloe vera has been used for centuries for its medicinal properties. It is known for its soothing and moisturizing effects, which can be beneficial for the scalp. Aloe vera contains enzymes that promote the health of hair follicles and helps to balance the pH of the scalp. It also has anti-inflammatory properties that can reduce scalp irritation and dandruff, creating a healthier environment for hair growth.
How to Use:
- Aloe Vera Gel Application: Extract fresh aloe vera gel from the leaf of the plant. Apply it directly to your scalp and hair. Leave it on for about 30 minutes, then rinse with lukewarm water. Repeat this process 2-3 times a week for best results.
- Aloe Vera and Coconut Oil: Mix equal parts of aloe vera gel and coconut oil. Apply the mixture to your scalp and hair, and leave it on for 30-45 minutes before rinsing. Coconut oil adds moisture and essential nutrients, enhancing the effects of aloe vera.
Tips:
- Use fresh aloe vera gel for maximum benefits. Store-bought aloe vera products may contain preservatives and additives that can reduce effectiveness.
- If you have sensitive skin, perform a patch test before applying aloe vera to your scalp.
2. Rosemary Oil
Benefits: Rosemary oil is renowned for its ability to stimulate hair growth and improve circulation to the scalp. It contains antioxidants and essential nutrients that help strengthen hair follicles, prevent premature graying, and combat hair thinning. Some studies suggest that rosemary oil can be as effective as minoxidil, a common over-the-counter hair loss treatment, but without the side effects.
How to Use:
- Rosemary Oil Scalp Massage: Mix a few drops of rosemary oil with a carrier oil like jojoba or coconut oil. Gently massage the mixture into your scalp for about 5-10 minutes. Leave it on for at least 30 minutes before washing it out. Repeat 2-3 times a week.
- Rosemary Oil and Shampoo: Add a few drops of rosemary oil to your regular shampoo. Use it as you normally would, allowing the oil to work its way into your scalp.
Tips:
- Avoid using rosemary oil directly on your scalp without a carrier oil, as it can be potent and may cause irritation.
- Consistency is key. Regular application is necessary to see noticeable results.
3. Onion Juice
Benefits: Onion juice is a powerhouse when it comes to promoting hair growth. It is rich in sulfur, which helps to improve blood circulation to the scalp, reduce inflammation, and provide essential nutrients to hair follicles. Sulfur is a key component of keratin, the protein that makes up hair, and thus can help in strengthening hair and reducing hair fall.
How to Use:
- Onion Juice Application: Grate an onion and squeeze out the juice. Apply the juice to your scalp, focusing on areas where hair thinning is evident. Leave it on for about 30 minutes, then wash it out with a mild shampoo. Repeat 2-3 times a week.
- Onion Juice and Honey: Mix onion juice with a teaspoon of honey. Apply the mixture to your scalp and leave it on for 30 minutes before rinsing. Honey adds moisture and has antibacterial properties that can complement the benefits of onion juice.
Tips:
- Onion juice has a strong odor. To minimize this, rinse your hair with a mixture of water and lemon juice after washing out the onion juice. Perform a patch test to ensure you don’t have an allergic reaction to onion juice.
4. Fenugreek Seeds
Benefits: Fenugreek seeds are known for their rich content of proteins and nicotinic acid, which can help to strengthen hair follicles, reduce dandruff, and improve hair texture. They also contain hormones that are thought to enhance hair growth and prevent premature graying.
How to Use:
- Fenugreek Seed Paste: Soak fenugreek seeds in water overnight. In the morning, grind the seeds into a paste and apply it to your scalp and hair. Leave it on for 30-45 minutes before rinsing with a mild shampoo. Repeat this treatment 2-3 times a week.
- Fenugreek and Coconut Oil: Mix fenugreek seed powder with coconut oil to create a thick paste. Apply it to your scalp and hair, and leave it on for about 30 minutes. Rinse thoroughly with shampoo.
Tips:
- Fenugreek seeds can be found in health food stores or online. Make sure to use high-quality seeds for the best results.
- Be patient; fenugreek treatments may take a few weeks to show noticeable improvements.
5. Castor Oil
Benefits: Castor oil is a popular remedy for promoting hair growth due to its high concentration of ricinoleic acid, which has anti-inflammatory properties and enhances blood circulation to the scalp. It also contains omega-6 fatty acids and other nutrients that nourish and strengthen hair follicles, leading to healthier and thicker hair.
How to Use:
- Castor Oil Scalp Massage: Warm a small amount of castor oil and massage it into your scalp. Leave it on overnight or for a few hours before washing it out with a mild shampoo. Repeat this treatment 2-3 times a week.
- Castor Oil and Essential Oils: For added benefits, mix castor oil with a few drops of essential oils like rosemary or peppermint oil. Apply the mixture to your scalp and hair, and leave it on for several hours before rinsing.
Tips:
Castor oil is quite thick and may be difficult to wash out. Consider using a clarifying shampoo or a mixture of baking soda and water to help remove the oil.
Perform a patch test to ensure you don’t have any allergic reactions to castor oil.
FAQs
1. Do home remedies for hair growth really work?
Answer : Yes, many natural ingredients such as oils, herbs, and certain foods can promote hair growth by nourishing the scalp, strengthening hair follicles, and improving blood circulation. However, consistency and patience are key to seeing results.
2. How often should I use home remedies for hair growth?
Answer : The frequency of use depends on the remedy. For example, coconut oil or rosemary oil massages can be done 2-3 times a week, while treatments like onion juice or egg masks may be applied once a week for best results.
3. Are home remedies safe for all hair types?
Answer : Most home remedies are generally safe for all hair types since they use natural ingredients. However, it's always a good idea to do a patch test first, especially if you have sensitive skin or allergies.
4. How long does it take to see results with home remedies?
Answer : Results can vary depending on individual hair types and the consistency of the remedies used. Typically, it may take 4-6 weeks of regular application to notice visible improvements in hair growth.
5. Can I use multiple home remedies at once?
Answer : Yes, you can combine different remedies, such as alternating between oil massages and hair masks throughout the week. Just ensure that you’re not overloading your hair with treatments, which can cause build-up or irritation.
Conclusion
In conclusion, home remedies for hair growth offer a natural and affordable way to nurture your hair and scalp. By incorporating ingredients such as coconut oil, aloe vera, onion juice, and herbs like rosemary into your hair care routine, you can stimulate hair growth and improve hair health over time. While these remedies may not provide instant results, with patience and consistency, they can help you achieve stronger, longer, and healthier hair. Embracing these natural solutions allows you to care for your hair holistically, avoiding harsh chemicals and expensive treatments, all while enjoying the benefits of nature's own healing powers.
You might also like our beauty articles.
“Motivation is what gets you started. Habit is what keeps you going.” – Jim Ryun
If you would like more information about the 2024, please send us an email.
Written by Fitness Goal 4U
Smart Fitness Goals - Achieve Health with Simple Steps
Smart fitness goals focus on being Specific, Measurable, Achievable, Relevant, and Time-bound. They help you create a clear path to success, stay motivated, and track progress. Whether its weight loss, strength building, or improved endurance, smart goals guide your fitness journey, ensuring steady growth and sustainable results tailored to your needs.
“Confidence comes from discipline and training.” – Robert Kiyosaki
Home remedies for pimples offer a natural and cost-effective way to address acne without the need for harsh chemicals. Pimples, often caused by clogged pores, excess oil, bacteria, and inflammation, can be treated with ingredients commonly found in your kitchen or home. Natural remedies such as tea tree oil, aloe vera, honey, and apple cider vinegar are known for their anti-inflammatory and antibacterial properties, helping to reduce redness and prevent breakouts. Additionally, simple lifestyle changes, like staying hydrated and eating a balanced diet, can support skin health from within. While home remedies may not replace professional treatments for severe acne, they can be a helpful option for mild cases, offering gentle yet effective care for clearer skin. Always test for allergies before trying new remedies and consult a dermatologist if necessary.
Top 5 Home Remedies for Pimples
1. Tea Tree Oil
Benefits:
Tea tree oil is well-known for its antibacterial and anti-inflammatory properties, making it a popular choice for treating pimples. It helps reduce the bacteria that contribute to acne, calms inflammation, and promotes healing of the skin.
How to Use:
- Dilution: Tea tree oil is potent and can be irritating if used undiluted. Mix 1 part tea tree oil with 9 parts carrier oil, such as jojoba oil, almond oil, or coconut oil.
- Application: Using a cotton swab, apply the diluted tea tree oil directly to the affected area. Avoid the surrounding skin to prevent irritation.
- Frequency: Use this treatment twice daily—morning and night—for best results.
Precautions:
- Always perform a patch test before using tea tree oil to ensure you do not have an allergic reaction.
- Avoid direct contact with the eyes and mucous membranes.
2. Honey and Cinnamon Mask
Benefits:
- Honey has natural antibacterial and moisturizing properties, while cinnamon has anti-inflammatory effects. Together, they form a powerful combination that can help reduce pimples and prevent future breakouts.
How to Use:
- Preparation: Mix 2 tablespoons of raw honey with 1 teaspoon of cinnamon powder to create a paste.
- Application: Apply the mixture evenly to the affected areas of the skin, avoiding sensitive areas like the eyes.
- Duration: Leave the mask on for 10-15 minutes.
- Removal: Rinse off with lukewarm water and pat your face dry.
Frequency:
- Apply this mask 2-3 times a week for optimal results.
Precautions:
- Ensure you use raw honey as processed honey may not have the same beneficial properties.
- Perform a patch test to check for any allergic reactions.
3. Aloe Vera
Benefits:
Aloe vera is celebrated for its soothing, anti-inflammatory, and healing properties. It helps reduce redness and swelling and accelerates the healing of acne lesions.
How to Use:
- Extraction: Extract the gel from a fresh aloe vera leaf or use store-bought pure aloe vera gel.
- Application: Apply a thin layer of aloe vera gel directly to the affected areas.
- Duration: Leave it on for about 20 minutes.
- Removal: Rinse off with lukewarm water and pat your face dry.
Frequency:
- Use aloe vera gel twice daily—morning and night.
Precautions:
- Conduct a patch test before full application to ensure you do not have a sensitivity to aloe vera.
4. Green Tea
Benefits:
- Green tea is rich in antioxidants and has anti-inflammatory properties that can help reduce the severity of pimples. It also contains compounds that inhibit the growth of acne-causing bacteria.
How to Use:
- Preparation: Brew a cup of green tea and let it cool to room temperature.
- Application: Using a cotton ball, apply the cooled green tea to the affected areas or use it as a facial toner.
- Duration: Allow the green tea to dry on your skin for about 10-15 minutes.
- Removal: You do not need to rinse; simply let it absorb into your skin.
Frequency:
- Apply green tea 1-2 times daily.
Precautions:
- Ensure the green tea is completely cool before application to avoid irritation.
5. Apple Cider Vinegar
Benefits:
Apple cider vinegar (ACV) has antibacterial properties and helps balance the skin’s pH levels. It can help remove excess oil, prevent bacterial growth, and reduce inflammation.
How to Use:
- Dilution: Mix 1 part apple cider vinegar with 3 parts water. Adjust the ratio if your skin is sensitive.
- Application: Apply the diluted solution to the affected areas using a cotton ball.
- Duration: Leave it on for 5-10 minutes.
- Removal: Rinse off with lukewarm water and pat your face dry.
Frequency:
- Use this remedy once or twice daily, depending on your skin's tolerance.
Precautions:
- Apple cider vinegar is acidic and can be harsh on sensitive skin, so always dilute it properly.
- Perform a patch test to check for any adverse reactions.
FAQs
1. Are home remedies effective for treating pimples?
Answer : Home remedies can be effective for mild acne or occasional pimples. Ingredients like tea tree oil, aloe vera, and honey have natural antibacterial and anti-inflammatory properties that may help reduce pimples. However, results vary, and they may not be as potent as prescription treatments for severe acne.
2. How long does it take for home remedies to work on pimples?
Answer : The effectiveness and time frame can vary depending on the individual and the remedy used. Some may see results within a few days, while others might need to apply the remedy consistently for a few weeks. Patience and consistency are key.
3. Can I use home remedies for severe acne?
Answer : Home remedies are generally best suited for mild to moderate acne. For severe acne, it's advisable to consult a dermatologist for professional treatments. Home remedies may not address underlying causes of severe acne, such as hormonal imbalances.
4. Are there any side effects of using home remedies for pimples?
Answer : While natural ingredients are generally gentle, they can still cause reactions in some people. For instance, tea tree oil can be irritating if used undiluted, and apple cider vinegar can cause dryness or burning if not diluted properly. Always do a patch test before applying a new remedy to your face.
5. Should I stop using home remedies if I don’t see immediate results?
Answer : It’s normal for natural treatments to take longer to show results compared to over-the-counter or prescription acne products. If you don’t see any improvement after consistent use for a few weeks, it may be time to try a different remedy or consult a skincare professional.
Conclusion
In conclusion, home remedies for pimples offer a natural, accessible, and gentle approach to treating mild acne. Ingredients like tea tree oil, aloe vera, honey, apple cider vinegar, and green tea have been valued for their skin-healing properties and can help reduce inflammation, kill bacteria, and soothe irritated skin. While these remedies can be effective for some, it's important to manage expectations, as results may vary. Consistency and proper application are key to seeing benefits. However, for persistent or severe acne, consulting a dermatologist is essential to ensure the right treatment plan. Always prioritize your skin’s health and test new remedies carefully to avoid irritation.
You might also like our beauty articles.
“Motivation is what gets you started. Habit is what keeps you going.” – Jim Ryun
If you would like more information about the 2024, please send us an email.
Written by Fitness Goal 4U
Smart Fitness Goals - Achieve Health with Simple Steps
Smart fitness goals focus on being Specific, Measurable, Achievable, Relevant, and Time-bound. They help you create a clear path to success, stay motivated, and track progress. Whether its weight loss, strength building, or improved endurance, smart goals guide your fitness journey, ensuring steady growth and sustainable results tailored to your needs.
“Confidence comes from discipline and training.” – Robert Kiyosaki
Dark circles under the eyes are a common concern for many, often caused by factors like stress, lack of sleep, aging, or genetics. While they are not usually a sign of a serious health issue, dark circles can affect one's appearance and confidence. Fortunately, there are various home remedies that can help reduce their appearance. These remedies use natural ingredients and techniques to soothe the skin, improve blood circulation, and lighten the under-eye area. From simple items like cucumber slices and tea bags to more intensive treatments with aloe vera or almond oil, these home solutions offer affordable and gentle alternatives to expensive cosmetic treatments. By incorporating these remedies into your skincare routine and making a few lifestyle adjustments, you can effectively diminish dark circles and restore a refreshed, youthful look.
Top 5 Home Remedies for Dark Circles
1. Cucumber Slices
Cucumbers are renowned for their soothing and hydrating properties. They contain antioxidants and flavonoids that can reduce inflammation and irritation, making them an excellent remedy for dark circles.
How to Use:
- Chill a cucumber in the refrigerator for about 30 minutes.
- Cut the cucumber into thick slices.
- Place the slices on your closed eyes and leave them on for about 10 to 15 minutes.
- Rinse your eyes with cool water afterward.
The cooling effect of the cucumber helps to constrict blood vessels and reduce puffiness, while its hydration helps in reducing the appearance of dark circles.
2. Tea Bags
Tea bags, particularly those containing caffeine and antioxidants, are another popular remedy for dark circles. Caffeine constricts blood vessels and reduces swelling, while antioxidants help combat free radicals that contribute to skin damage.
How to Use:
- Steep two tea bags (preferably green or black tea) in hot water for about 5 minutes.
- Remove the tea bags and allow them to cool to a comfortable temperature.
- Place the cooled tea bags over your closed eyes and leave them on for 10 to 15 minutes.
- Remove the tea bags and rinse your eyes with cool water.
This remedy helps in reducing puffiness and improving the overall appearance of the under-eye area.
3. Almond Oil and Vitamin E
Almond oil is rich in vitamin E, which is known for its skin-rejuvenating properties. It helps in moisturizing the delicate skin around the eyes and reducing the appearance of dark circles by improving blood circulation.
How to Use:
- Gently massage a few drops of almond oil around your eyes before bedtime.
- Leave it on overnight to allow it to penetrate the skin and work its magic.
- In the morning, wash your face with lukewarm water.
Regular use of almond oil can help lighten dark circles and improve skin texture over time.
4. Potato Slices
Potatoes have natural bleaching agents and starch that can lighten dark circles and reduce puffiness. They also have anti-inflammatory properties that help in soothing the skin.
How to Use:
- Peel and grate a raw potato.
- Extract the juice from the grated potato using a cheesecloth or a strainer.
- Soak a cotton ball in the potato juice and place it on your closed eyes.
- Leave it on for 10 to 15 minutes, then rinse with cool water.
Potatoes can help lighten dark circles and reduce puffiness due to their natural astringent properties.
5. Honey and Lemon Juice
Honey is a natural moisturizer with healing properties, while lemon juice contains vitamin C, which can help brighten the skin and reduce pigmentation.
How to Use:
- Mix equal parts of honey and fresh lemon juice in a small bowl.
- Gently apply the mixture to the area under your eyes using your fingertip.
- Leave it on for 10 to 15 minutes.
- Rinse off with lukewarm water.
Be cautious when using lemon juice, as it can make your skin more sensitive to sunlight. Always perform a patch test before applying it to your skin and avoid sun exposure immediately after use.
Additional Tips for Preventing and Treating Dark Circles
While home remedies can be highly effective, it's also important to incorporate good habits and lifestyle changes to prevent and treat dark circles. Here are some additional tips:
- Get Adequate Sleep: Aim for 7-9 hours of quality sleep each night to prevent and reduce dark circles.
- Stay Hydrated: Drink plenty of water throughout the day to keep your skin hydrated and healthy.
- Healthy Diet: Eat a balanced diet rich in fruits and vegetables, which provide essential vitamins and minerals that support skin health.
- Reduce Stress: Stress can contribute to dark circles. Practice stress-reducing techniques like meditation, yoga, or deep breathing exercises.
- Protect Your Skin: Always use sunscreen to protect your skin from harmful UV rays, which can worsen dark circles and cause premature aging.
FAQs
1. How long will it take to see results from home remedies for dark circles?
Answer : The time it takes to see results varies depending on the cause of your dark circles and the consistency of using remedies. Generally, visible improvements can be seen within 2 to 4 weeks of regular application.
2. Can home remedies completely eliminate dark circles?
Answer : Home remedies can significantly reduce the appearance of dark circles, but they may not completely eliminate them, especially if they are caused by genetic factors or aging. They work best for dark circles due to lifestyle factors like lack of sleep or stress.
3. Are these remedies safe for all skin types?
Answer : Most home remedies are safe for all skin types, but it's essential to perform a patch test before applying anything to your face to avoid any allergic reactions. If you have sensitive skin, opt for milder remedies like aloe vera or cucumber.
4. Can dark circles be prevented?
Answer : Yes, dark circles can often be prevented by maintaining a healthy lifestyle. Getting enough sleep, staying hydrated, reducing stress, and using sunscreen around the eyes can help prevent dark circles from developing.
5. What lifestyle changes can help reduce dark circles?
Answer : In addition to home remedies, lifestyle changes such as improving sleep habits, managing stress, eating a balanced diet rich in vitamins, and avoiding excessive screen time can help minimize dark circles over time.
Conclusion
In conclusion, dark circles are a common cosmetic concern that can affect anyone, but they don't have to be permanent. By incorporating simple, natural home remedies into your daily routine, you can effectively reduce their appearance. Remedies like cucumber slices, tea bags, aloe vera, almond oil, and potato juice offer affordable and gentle alternatives to commercial products. While these remedies may not provide instant results, consistent use can lead to noticeable improvements over time. Additionally, adopting a healthy lifestyle with proper sleep, hydration, and stress management will further support your efforts to diminish dark circles and maintain refreshed, youthful-looking skin. With patience and care, these natural solutions can help restore your skin's vitality.
You might also like our beauty articles.
“Motivation is what gets you started. Habit is what keeps you going.” – Jim Ryun
If you would like more information about the 2024, please send us an email.
Written by Fitness Goal 4U
Smart Fitness Goals - Achieve Health with Simple Steps
Smart fitness goals focus on being Specific, Measurable, Achievable, Relevant, and Time-bound. They help you create a clear path to success, stay motivated, and track progress. Whether its weight loss, strength building, or improved endurance, smart goals guide your fitness journey, ensuring steady growth and sustainable results tailored to your needs.
“Confidence comes from discipline and training.” – Robert Kiyosaki
Oily skin can be a challenge, often leading to acne, enlarged pores, and an overly shiny appearance. Many people turn to home remedies to manage excess oil and achieve a balanced complexion. Natural treatments, such as applying aloe vera, honey, and lemon juice, can help control sebum production while providing essential nutrients. Additionally, regular exfoliation with ingredients like oatmeal or baking soda can remove dead skin cells, reduce clogged pores, and promote smoother skin. A balanced diet, proper hydration, and using non-comedogenic products are also vital steps in maintaining oil-free skin. These simple, accessible remedies offer a cost-effective solution to managing oily skin without harsh chemicals, making them a popular choice for those seeking a natural approach to skincare.
Top 5 Home Remedies for Oily Skin
1. Aloe Vera: The Miracle Plant
Aloe vera has been used for centuries for its soothing and healing properties. It's a versatile plant that is widely recognized for its ability to treat various skin conditions, including oily skin.
How It Works:
Aloe vera contains natural astringent properties that help in absorbing excess oil from the skin. Additionally, it is rich in antioxidants and vitamins A, C, and E, which help in promoting healthy skin. Its anti-inflammatory properties can also soothe irritated skin, reducing the chances of acne breakouts that are often associated with oily skin.
How to Use:
- Pure Aloe Vera Gel: If you have an aloe vera plant at home, you can extract the gel directly from its leaves. Apply a thin layer of the gel to your face, focusing on the oily areas. Leave it on overnight and wash it off with lukewarm water in the morning. Repeat this daily for the best results.
- Aloe Vera and Lemon Juice Mask: Mix a teaspoon of fresh aloe vera gel with a few drops of lemon juice. Apply this mixture to your face and leave it on for 15-20 minutes before rinsing it off. This mask not only helps in controlling oil but also brightens the skin.
Why It’s Effective:
Aloe vera is particularly effective for oily skin because it hydrates without adding any grease. Its astringent properties ensure that excess oil is removed, while its hydrating properties ensure that your skin remains moisturized. This dual action makes it an ideal remedy for those with oily skin.
2. Honey: Nature’s Antibacterial Elixir
Honey is another natural ingredient that has been cherished for its skin benefits. Known for its antibacterial and antiseptic properties, honey is particularly useful for oily and acne-prone skin.
How It Works:
Honey is a natural humectant, which means it helps in retaining moisture without making the skin oily. Its antibacterial properties help in fighting off acne-causing bacteria, while its antiseptic nature helps in healing the skin. Honey also has a mild bleaching effect, which can help in fading scars and dark spots that are often left behind by acne.
How to Use:
- Raw Honey Mask: Apply a thin layer of raw honey directly to your face. Leave it on for 15-20 minutes before washing it off with lukewarm water. You can use this mask daily for best results.
- Honey and Cinnamon Mask: Mix a tablespoon of honey with half a teaspoon of cinnamon powder. Apply this mixture to your face and leave it on for 10-15 minutes before rinsing it off. This mask is especially beneficial for those who suffer from acne, as cinnamon also has antibacterial properties.
Why It’s Effective:
Honey’s ability to moisturize without adding oil makes it an excellent remedy for oily skin. Its antibacterial properties help in keeping the skin clean and clear, reducing the chances of acne breakouts. Additionally, its mild bleaching effect can help in improving the overall complexion, giving your skin a healthy glow.
3. Clay Masks: The Ultimate Oil Absorbers
Clay masks have long been a staple in skincare routines, particularly for those with oily skin. Different types of clay, such as bentonite and kaolin, are known for their oil-absorbing properties.
How It Works:
Clay works by drawing out impurities and excess oil from the skin, leaving it clean and matte. Bentonite clay, for example, swells when mixed with water, allowing it to absorb toxins and oil from the skin. Kaolin clay is another popular option, especially for sensitive skin, as it is gentle yet effective in controlling oil production.
How to Use:
- Bentonite Clay Mask: Mix a tablespoon of bentonite clay with enough water to form a paste. Apply this paste to your face and leave it on for 10-15 minutes or until it dries. Rinse off with lukewarm water. Use this mask once or twice a week to control oiliness.
- Kaolin Clay and Rose Water Mask: Mix a tablespoon of kaolin clay with enough rose water to form a paste. Apply this mixture to your face and let it dry for 10-15 minutes before rinsing it off. This mask is gentle enough to be used twice a week.
Why It’s Effective:
Clay masks are highly effective for oily skin because they directly target the excess oil and impurities that can lead to clogged pores and acne. They provide an immediate mattifying effect, making them a go-to option for those who need quick results. Additionally, regular use of clay masks can help in balancing oil production over time.
4. Apple Cider Vinegar: The Natural Toner
Apple cider vinegar (ACV) is another powerful remedy for oily skin. Its natural astringent properties help in balancing the skin’s pH levels and controlling oil production.
How It Works:
Apple cider vinegar contains acetic acid, which has astringent properties that help in tightening pores and reducing oiliness. It also has antimicrobial properties that help in keeping the skin clear of bacteria and preventing acne breakouts. Additionally, ACV helps in balancing the skin’s pH levels, which is crucial for maintaining healthy skin.
How to Use:
- ACV Toner: Dilute one part apple cider vinegar with two parts water. After cleansing your face, apply this mixture to your skin using a cotton ball. Let it dry naturally. You can use this toner daily, but if you have sensitive skin, it’s advisable to start with a more diluted solution and gradually increase the concentration.
- ACV and Green Tea Toner: Mix equal parts of apple cider vinegar and cooled green tea. Apply this mixture to your face using a cotton ball. This toner not only helps in controlling oil but also provides the antioxidant benefits of green tea, making it a potent remedy for oily skin.
Why It’s Effective:
Apple cider vinegar is a natural and cost-effective toner that helps in controlling oil production and tightening pores. Its antimicrobial properties also help in preventing acne, making it a great option for those with oily and acne-prone skin. The added benefit of balancing the skin’s pH levels ensures that your skin remains healthy and less prone to oiliness in the long run.
5. Tea Tree Oil: The Potent Antiseptic
Tea tree oil is a popular essential oil known for its powerful antiseptic and anti-inflammatory properties. It’s particularly beneficial for oily and acne-prone skin.
How It Works:
Tea tree oil contains terpenes, which are antimicrobial compounds that help in fighting off acne-causing bacteria. Its anti-inflammatory properties help in reducing redness and swelling associated with acne. Additionally, tea tree oil helps in regulating the skin’s oil production, making it a great remedy for oily skin.
How to Use:
- Tea Tree Oil Spot Treatment: Mix a few drops of tea tree oil with a carrier oil like jojoba oil. Apply this mixture directly to acne spots using a cotton swab. Leave it on overnight and wash it off in the morning. This treatment helps in drying out pimples and reducing inflammation.
- Tea Tree Oil Toner: Add a few drops of tea tree oil to your regular toner or mix it with witch hazel. Apply this mixture to your face using a cotton ball. This toner can be used daily to keep your skin clear and oil-free.
Why It’s Effective:
Tea tree oil is highly effective for oily skin due to its ability to control oil production and fight acne-causing bacteria. Its anti-inflammatory properties also help in calming irritated skin, making it a versatile remedy for various skin issues associated with oiliness.
FAQs
1. Are home remedies effective for oily skin?
Answer : Yes, many home remedies can be effective in controlling oily skin. Natural ingredients like aloe vera, honey, and lemon juice help balance oil production, reduce acne, and soothe the skin. However, consistency and patience are key.
2. How often should I use home remedies for oily skin?
Answer : It depends on the remedy. Gentle treatments like honey or aloe vera can be used daily, while exfoliating remedies like oatmeal or lemon juice should be used 2-3 times per week to avoid over-drying or irritating the skin.
3. Can oily skin be permanently cured with home remedies?
Answer : Oily skin is often due to genetics, so it can’t be permanently "cured." However, regular use of home remedies can help manage oil production and improve the overall condition of the skin.
4. Are home remedies safe for sensitive skin?
Answer : Most home remedies are gentle, but some ingredients like lemon juice or tea tree oil may cause irritation in sensitive skin. Always perform a patch test before applying any remedy to your face and dilute stronger ingredients when necessary.
5. Should I still use a moisturizer if I have oily skin?
Answer : Yes, even oily skin needs hydration. Opt for lightweight, non-comedogenic moisturizers that won’t clog pores or add excess oil to your skin. Some home remedies, like aloe vera, can double as a natural moisturizer.
Conclusion
In summary, home remedies for oily skin provide a gentle, natural solution to control excess oil, reduce acne, and improve skin texture. Ingredients like aloe vera, honey, and oatmeal can be incorporated into your skincare routine for effective results. While these remedies can help manage oily skin, consistency and care are essential for long-term success. Combining natural treatments with a healthy lifestyle and proper skincare can help you achieve a balanced and clearer complexion.
You might also like our beauty articles.
“Motivation is what gets you started. Habit is what keeps you going.” – Jim Ryun
If you would like more information about the 2024, please send us an email.
Written by Fitness Goal 4U
Smart Fitness Goals - Achieve Health with Simple Steps
Smart fitness goals focus on being Specific, Measurable, Achievable, Relevant, and Time-bound. They help you create a clear path to success, stay motivated, and track progress. Whether its weight loss, strength building, or improved endurance, smart goals guide your fitness journey, ensuring steady growth and sustainable results tailored to your needs.
“Confidence comes from discipline and training.” – Robert Kiyosaki
Creams for glowing skin are specially formulated skincare products designed to enhance your skin’s natural radiance. These creams work by nourishing the skin, improving hydration, and boosting collagen production. They often contain a mix of active ingredients like vitamins C and E, hyaluronic acid, and antioxidants, which help to repair damaged skin cells, reduce the appearance of dark spots, and promote a brighter complexion. Regular use can lead to smoother, softer, and more even-toned skin. Additionally, glowing skin creams can protect against environmental damage, such as UV rays and pollution, while providing moisture for a youthful glow. Suitable for all skin types, these creams can be used as part of your daily skincare routine to maintain healthy, vibrant skin, helping you achieve a luminous and radiant appearance year-round.
Understanding the Basics of Glowing Skin
Before diving into specific products, it’s essential to understand what "glowing skin" means. Glowing skin is characterized by a smooth texture, even tone, and a natural, dewy radiance. It reflects light well, giving an appearance of vitality and health. Achieving glowing skin often involves a combination of good skincare practices, including cleansing, exfoliation, hydration, and protection from the sun.
Key factors that contribute to glowing skin include:
- Hydration: Well-hydrated skin is plump and less prone to fine lines and wrinkles. Moisture also helps maintain the skin’s barrier, which protects against environmental damage.
- Exfoliation: Regular exfoliation removes dead skin cells, promoting cell turnover and revealing a fresher, more vibrant complexion.
- Sun Protection: UV rays can cause hyperpigmentation and dullness, making sun protection a crucial step in achieving glowing skin.
- Nutrition: A balanced diet rich in vitamins, minerals, and antioxidants supports healthy skin from within.
Top 5 Creams for Glowing Skin
1. La Mer Crème de la Mer
La Mer’s Crème de la Mer is a legendary product in the world of luxury skincare. Known for its transformative properties, this cream has a cult following among celebrities and skincare enthusiasts. It’s particularly renowned for its ability to soothe and hydrate, leaving the skin with a luminous finish.
Key Ingredients:
- Miracle Broth™: The heart of Crème de la Mer, this proprietary blend of sea kelp, vitamins, and minerals is fermented to enhance its potency. It’s known for its healing properties, promoting skin regeneration and reducing the appearance of fine lines.
- Lime Tea Extract: A powerful antioxidant that helps protect the skin from environmental stressors, which can contribute to dullness and aging.
Benefits:
- Deep hydration, making it ideal for dry and sensitive skin.
- Improves the appearance of fine lines and wrinkles.
- Enhances the skin’s natural radiance over time.
Best For:
How to Use:
- Warm a small amount between your fingers and gently press it onto the face and neck. The warmth helps activate the Miracle Broth™, allowing it to penetrate the skin more effectively.
2. Olay Regenerist Micro-Sculpting Cream
Olay’s Regenerist Micro-Sculpting Cream is a popular choice for those seeking both anti-aging benefits and a glowing complexion. This cream is often praised for its affordability and effectiveness, making it a staple in many skincare routines.
Key Ingredients:
- Niacinamide (Vitamin B3): Known for its ability to brighten skin and reduce the appearance of pores, niacinamide is a powerhouse ingredient in this cream. It also helps improve skin elasticity and barrier function.
- Hyaluronic Acid: A hydrating agent that can hold up to 1,000 times its weight in water, helping to plump the skin and reduce the appearance of fine lines.
- Amino-Peptides: These help support the skin’s natural renewal process, promoting a smoother, firmer complexion.
Benefits:
- Provides deep hydration and helps retain moisture throughout the day.
- Brightens the skin, improving its overall tone and texture.
- Reduces the appearance of fine lines and wrinkles, giving the skin a youthful glow.
Best For:
- Individuals with normal to combination skin who are looking for an affordable yet effective anti-aging cream.
How to Use:
- Apply the cream to cleansed skin in the morning and evening, focusing on areas prone to wrinkles, such as the forehead, around the eyes, and the neck.
3. Sunday Riley C.E.O. Vitamin C Rich Hydration Cream
Sunday Riley’s C.E.O. Vitamin C Rich Hydration Cream is a favorite among those seeking a radiant, even complexion. Packed with a potent form of vitamin C, this cream not only hydrates but also brightens and firms the skin, making it ideal for those with dull or uneven skin tones.
Key Ingredients:
- THD Ascorbate (Vitamin C): A stable and oil-soluble form of vitamin C that penetrates the skin more deeply. It’s known for its brightening properties and its ability to fight free radicals, which can cause premature aging.
- Exopolysaccharides: These help protect the skin from pollution and environmental stressors that can lead to dullness.
- Bisabolol: Derived from chamomile, bisabolol has soothing properties, making it ideal for sensitive skin.
Benefits:
- Brightens the skin and evens out skin tone.
- Provides rich hydration without feeling greasy.
- Protects the skin from environmental damage, which can lead to dullness and signs of aging.
Best For:
- Those with dull or uneven skin tone who are looking for a brightening and hydrating cream.
How to Use:
- Apply to clean, dry skin in the morning, followed by sunscreen. The vitamin C in this cream helps enhance the effectiveness of your SPF, making it an excellent addition to your morning routine.
4. Charlotte Tilbury Magic Cream
Charlotte Tilbury’s Magic Cream is a cult favorite, often referred to as a “miracle in a jar.” This cream is designed to transform tired, dull skin into a glowing, dewy complexion instantly. Its formula is rich in nourishing ingredients that hydrate, plump, and smooth the skin.
Key Ingredients:
- BioNymph Peptide Complex: This ingredient stimulates collagen production, helping to reduce the appearance of fine lines and wrinkles.
- Hyaluronic Acid: A hydration powerhouse that helps keep the skin plump and moisturized throughout the day.
- Rosehip Oil: Rich in antioxidants and essential fatty acids, rosehip oil nourishes the skin and helps improve its texture and tone.
- Vitamins C and E: These vitamins work together to brighten the skin and protect it from environmental damage.
Benefits:
- Instantly revitalizes and brightens dull, tired skin.
- Hydrates deeply, making the skin look plump and youthful.
- Smooths out fine lines and wrinkles, giving the skin a more even texture.
Best For:
- Those with dull, tired skin looking for an instant pick-me-up.
How to Use:
- Apply a small amount of Magic Cream to the face and neck, massaging in upward motions. For an extra dewy finish, it can be used as a base before makeup application.
5. Drunk Elephant Protini™ Polypeptide Cream
Drunk Elephant’s Protini™ Polypeptide Cream is a breakthrough in skincare, combining the power of peptides with the benefits of a lightweight, moisturizing cream. This product is particularly beneficial for those looking to improve skin elasticity and achieve a youthful glow.
Key Ingredients:
- Signal Peptide Complex: A blend of peptides that work to restore the skin’s natural balance and improve its firmness and elasticity.
- Pygmy Waterlily Stem Cell Extract: This ingredient provides antioxidant protection and soothes the skin, reducing inflammation and promoting a clear, radiant complexion.
- Amino Acids: These help strengthen the skin’s barrier, improving its ability to retain moisture and defend against environmental stressors.
Benefits:
- Strengthens the skin’s barrier and improves its elasticity.
- Hydrates without being heavy or greasy, making it suitable for all skin types.
- Helps reduce the appearance of fine lines and wrinkles, giving the skin a smoother, more youthful appearance.
Best For:
- Those with combination or oily skin who are looking for a lightweight, hydrating cream that also offers anti-aging benefits.
How to Use:
- Apply to clean, dry skin in the morning and evening. For best results, use in conjunction with other Drunk Elephant products as part of a comprehensive skincare routine.
Tips for Choosing the Right Cream for Glowing Skin
When selecting a cream for glowing skin, it’s important to consider your specific skin type and concerns. Here are some tips to help you choose the right product:
1. Know Your Skin Type:
- Dry Skin: Look for creams that are rich in hydrating ingredients like hyaluronic acid, glycerin, and natural oils.
- Oily Skin: Opt for lightweight, non-comedogenic creams that hydrate without clogging pores.
- Combination Skin: Choose a balanced formula that hydrates without being too heavy or greasy.
2. Consider Your Skin Concerns:
- Aging: If fine lines and wrinkles are a concern, look for creams with peptides, retinoids, or collagen-boosting ingredients.
- Dullness: Brightening ingredients like vitamin C, niacinamide, and AHAs can help revive a lackluster complexion.
- Hyperpigmentation: Look for creams with ingredients like vitamin C, licorice extract, or alpha arbutin to even out skin tone.
3. Check the Ingredients:
- Avoid creams with harsh chemicals or fragrances if you have sensitive skin. Opt for products with natural, soothing ingredients.
- Look for creams with antioxidants like vitamins C and E, which help protect the skin from environmental damage.
4. Patch Test New Products:
- Always patch test a new cream before applying it to your entire face, especially if you have sensitive skin. This can help prevent potential allergic reactions or irritations.
FAQs
1. What ingredients should I look for in a cream for glowing skin?
Answer : Look for ingredients like vitamin C, hyaluronic acid, retinol, niacinamide, and glycolic acid. These ingredients help brighten the skin, boost hydration, and promote cell turnover for a radiant glow.
2. How often should I use a glowing skin cream?
Answer : It depends on the product. Many creams can be used daily, while stronger formulas containing retinol or exfoliating acids might be best used every other day or as directed by the product label. Always follow the instructions provided by the manufacturer.
3. Can creams for glowing skin work on all skin types?
Answer : Most creams are formulated to be suitable for various skin types, but it's essential to choose a product that aligns with your specific skin needs (e.g., oily, dry, sensitive). For example, if you have sensitive skin, look for creams with soothing ingredients like aloe vera or chamomile.
4. Will a glowing skin cream help with hyperpigmentation?
Answer : Yes, many glowing skin creams are formulated with brightening ingredients like vitamin C and niacinamide, which can help reduce dark spots and even out skin tone.
5. Are there any side effects to using glowing skin creams?
Answer : Some creams, particularly those with active ingredients like retinol or exfoliating acids, can cause initial irritation, redness, or peeling. It's important to do a patch test before full application and follow up with sunscreen during the day if the cream is used at night.
6. Can I use a glowing skin cream along with other skincare products?
Answer : Yes, but layering needs to be done carefully. For example, if you’re using a vitamin C cream, avoid combining it with strong acids or retinoids unless advised by a dermatologist. Pairing with sunscreen is essential to protect the skin from UV damage.
Conclusion
In conclusion, creams for glowing skin are powerful tools in your skincare routine, designed to enhance radiance, improve texture, and brighten your complexion. By selecting products rich in key ingredients like vitamin C, hyaluronic acid, and retinol, you can achieve a natural glow and healthier-looking skin. Regular use, combined with sun protection and a well-rounded skincare regimen, can provide long-lasting results. However, it’s important to choose products that suit your skin type and address your specific concerns. For optimal results, consider consulting with a dermatologist to tailor your skincare routine to your unique needs.
You might also like our beauty articles.
“Motivation is what gets you started. Habit is what keeps you going.” – Jim Ryun
If you would like more information about the 2024, please send us an email.
Written by Fitness Goal 4U
Smart Fitness Goals - Achieve Health with Simple Steps
Smart fitness goals focus on being Specific, Measurable, Achievable, Relevant, and Time-bound. They help you create a clear path to success, stay motivated, and track progress. Whether its weight loss, strength building, or improved endurance, smart goals guide your fitness journey, ensuring steady growth and sustainable results tailored to your needs.
“Confidence comes from discipline and training.” – Robert Kiyosaki
A face serum for glowing skin is a lightweight, fast-absorbing skincare product designed to penetrate deep into the skin, delivering active ingredients directly to where they are needed most. Formulated with potent antioxidants, vitamins, and hydrating agents, these serums target issues such as dullness, uneven texture, and lack of radiance. Unlike heavier creams, serums have smaller molecules that allow them to work effectively without clogging pores. Regular use helps to enhance skin luminosity, improve texture, and provide long-lasting hydration, resulting in a healthy, glowing complexion. Whether your skin is oily, dry, or combination, a face serum can be a powerful addition to your daily routine, boosting skin radiance and promoting a youthful glow. Ideal for all skin types, it revitalizes and rejuvenates, revealing brighter, smoother, and more radiant skin.
Top 5 Face Serum for Glowing Skin
1. Vitamin C Serum by SkinCeuticals: C E Ferulic
SkinCeuticals C E Ferulic is a cult favorite in the skincare community, often regarded as one of the best Vitamin C serums on the market. This serum is known for its powerful antioxidant properties, which help to protect the skin from environmental damage while promoting a bright, even complexion.
Key Ingredients
- Vitamin C (15% L-Ascorbic Acid): A potent antioxidant that helps to brighten the skin, reduce hyperpigmentation, and protect against free radicals.
- Vitamin E (1% Alpha Tocopherol): Enhances the efficacy of Vitamin C and provides additional antioxidant protection.
- Ferulic Acid (0.5%): A plant-based antioxidant that stabilizes and boosts the performance of Vitamins C and E.
Benefits
- Brightens Skin: Regular use of this serum helps to fade dark spots and even out skin tone, resulting in a more radiant complexion.
- Anti-Aging: The combination of antioxidants helps to reduce the appearance of fine lines and wrinkles, giving the skin a more youthful appearance.
- Protects Against Environmental Damage: The antioxidant blend shields the skin from harmful UV rays and pollution, preventing premature aging.
How to Use
- Apply 4-5 drops of SkinCeuticals C E Ferulic to a cleansed face, neck, and chest in the morning before applying sunscreen. This serum is particularly effective when used in conjunction with a broad-spectrum sunscreen, as it enhances the skin's natural defense against UV radiation.
2. Hyaluronic Acid Serum by The Ordinary
The Ordinary Hyaluronic Acid 2% + B5 is a budget-friendly option that delivers intense hydration to the skin. Hyaluronic acid is a superstar ingredient known for its ability to attract and retain moisture, making this serum ideal for achieving plump, glowing skin.
Key Ingredients
- Hyaluronic Acid (2%): A humectant that draws moisture into the skin, providing deep hydration and improving skin elasticity.
- Vitamin B5 (Panthenol): Helps to soothe and repair the skin barrier, enhancing the hydrating effects of hyaluronic acid.
Benefits
- Intense Hydration: The serum deeply hydrates the skin, leaving it plump and dewy, which is essential for a glowing complexion.
- Improves Skin Texture: Regular use can smooth out the skin's surface, reducing the appearance of fine lines and creating a more even skin texture.
- Affordable: This serum offers excellent value for money, making it accessible to a wide range of consumers.
How to Use
- Apply a few drops of The Ordinary Hyaluronic Acid 2% + B5 to your face in the morning and evening after cleansing. Follow with a moisturizer to lock in the hydration.
3. Niacinamide Serum by Paula’s Choice: 10% Niacinamide Booster
Paula’s Choice 10% Niacinamide Booster is a powerful serum designed to refine the skin's texture, minimize pores, and enhance overall radiance. Niacinamide, also known as Vitamin B3, is a versatile ingredient that offers a range of benefits, from brightening the skin to strengthening the skin barrier.
Key Ingredients
- Niacinamide (10%): An anti-inflammatory agent that helps to reduce redness, minimize pores, and improve skin texture.
- Vitamin C: Works synergistically with niacinamide to brighten the skin and fade dark spots.
- Antioxidants: A blend of other antioxidants provides additional protection against environmental stressors.
Benefits
- Brightens and Evens Skin Tone: Niacinamide effectively reduces hyperpigmentation and blotchiness, resulting in a more uniform complexion.
- Minimizes Pores: This serum is particularly beneficial for those with oily or combination skin, as it helps to reduce the appearance of large pores.
- Strengthens Skin Barrier: Regular use can improve the skin’s barrier function, making it more resilient to external aggressors.
How to Use
- Use the Paula’s Choice 10% Niacinamide Booster after cleansing and toning. Apply a few drops to the entire face or mix it with your favorite moisturizer. It can be used both morning and evening.
4. Retinol Serum by Sunday Riley: A+ High-Dose Retinoid Serum
Sunday Riley's A+ High-Dose Retinoid Serum is a potent anti-aging serum that helps to refine the skin's texture, reduce the appearance of wrinkles, and promote a brighter, more youthful complexion. Retinol is a well-known ingredient in skincare for its ability to accelerate cell turnover and boost collagen production.
Key Ingredients
- Retinol (5% Retinoid Blend): A potent anti-aging ingredient that helps to reduce the appearance of fine lines, wrinkles, and dark spots.
- CoQ10: An antioxidant that helps to neutralize free radicals and support skin repair.
- Honey and Bisabolol: Soothing ingredients that help to minimize the irritation often associated with retinol use.
Benefits
- Reduces Fine Lines and Wrinkles: Retinol stimulates collagen production, which helps to diminish the appearance of fine lines and wrinkles over time.
- Improves Skin Texture: Regular use of this serum can lead to smoother, more even skin texture.
- Brightens Complexion: The retinoid blend helps to fade dark spots and even out skin tone, resulting in a radiant glow.
How to Use
- Apply the Sunday Riley A+ High-Dose Retinoid Serum in the evening after cleansing and toning. Start with a small amount to allow your skin to adjust, and gradually increase usage as tolerated. Follow with a moisturizer to minimize potential dryness or irritation.
5. Brightening Serum by Drunk Elephant: C-Firma Day Serum
Drunk Elephant's C-Firma Day Serum is a potent Vitamin C serum that is formulated to brighten and firm the skin while providing antioxidant protection. This serum is packed with ingredients that work synergistically to deliver a radiant, youthful complexion.
Key Ingredients
- Vitamin C (15% L-Ascorbic Acid): A powerful antioxidant that helps to brighten the skin, fade dark spots, and protect against environmental damage.
- Ferulic Acid: Enhances the stability and efficacy of Vitamin C, providing additional antioxidant protection. Pumpkin Ferment Extract: Gently exfoliates the skin to improve texture and radiance.
Benefits
- Brightens and Firms Skin: The high concentration of Vitamin C in this serum helps to reduce the appearance of dark spots and enhance skin firmness.
- Protects Against Environmental Damage: Antioxidants in the serum protect the skin from free radical damage caused by UV rays and pollution.
- Improves Skin Texture: The gentle exfoliating action of pumpkin ferment extract helps to refine the skin's surface, resulting in a smoother, more luminous complexion.
How to Use
- Apply Drunk Elephant C-Firma Day Serum in the morning after cleansing and toning. Use a few drops on the face, neck, and chest, followed by a moisturizer and sunscreen. For best results, use consistently every morning.
FAQs
1. What is a face serum?
Answer : A face serum is a lightweight, fast-absorbing skincare product that delivers active ingredients, such as antioxidants, vitamins, and hyaluronic acid, directly into the skin. It targets specific skin concerns like dullness, uneven texture, and lack of radiance, promoting a glowing complexion.
2. How do face serums help achieve glowing skin?
Answer : Face serums are formulated with concentrated active ingredients that can deeply penetrate the skin. Ingredients like vitamin C, niacinamide, and hyaluronic acid help brighten the skin, improve texture, and increase hydration, which contributes to a healthy, radiant glow.
3. Can I use a face serum daily?
Answer : Yes, most face serums can be used daily. However, it is important to follow the product’s instructions and consider your skin type. For example, serums with exfoliating ingredients like glycolic acid may be better suited for every other day use to avoid irritation.
4. When should I apply face serum in my skincare routine?
Answer : Face serum should be applied after cleansing and toning but before moisturizing. This allows the active ingredients to penetrate the skin effectively. If you're using multiple serums, apply the one with the thinnest consistency first.
5. Can I use a face serum if I have sensitive skin?
Answer : Yes, many serums are formulated for sensitive skin. Look for products with soothing ingredients like ceramides, niacinamide, or hyaluronic acid, which provide hydration without irritation. Introduce new serums gradually to see how your skin reacts.
6. How long does it take to see results from a face serum?
Answer : Results can vary depending on the serum and your skin type. Some people notice improvements in skin radiance and texture within a few days, while others may take several weeks. Consistent use is key to achieving long-term benefits.
7. Can face serums be used with other skincare products?
Answer : Yes, face serums are designed to be layered with other skincare products. However, it's important to be mindful of combining potent ingredients, such as retinol and vitamin C, which can cause irritation. Always patch-test new combinations first.
8. Are face serums suitable for all skin types?
Answer : Most face serums are formulated for various skin types, including oily, dry, combination, and sensitive skin. Choose a serum that addresses your specific skin concerns and is suited to your skin type for the best results.
Conclusion
Achieving glowing skin is not just about using one product but finding the right combination of skincare ingredients that work for your specific skin type and concerns. The face serums highlighted in this article offer a range of benefits, from brightening and hydrating to anti-aging and texture improvement. Incorporating one or more of these serums into your daily skincare routine can help you achieve a radiant, youthful complexion.
When selecting a serum, consider your skin's needs, whether it's hydration, brightening, or anti-aging. Additionally, always perform a patch test before introducing a new product into your routine to ensure it suits your skin. Remember, consistency is key—regular use of these serums, combined with a proper skincare regimen and sun protection, will give you the glowing skin you desire.
These top 5 face serums have been chosen not only for their effectiveness but also for their reputation in the skincare community. Each of them offers unique benefits that cater to different skin concerns, making them worthy additions to any skincare routine. Whether you're new to serums or looking to upgrade your current routine, these products can help you achieve the luminous, glowing skin you’ve always wanted.
You might also like our beauty articles.
“Motivation is what gets you started. Habit is what keeps you going.” – Jim Ryun
If you would like more information about the 2024, please send us an email.
Written by Fitness Goal 4U
Smart Fitness Goals - Achieve Health with Simple Steps
Smart fitness goals focus on being Specific, Measurable, Achievable, Relevant, and Time-bound. They help you create a clear path to success, stay motivated, and track progress. Whether its weight loss, strength building, or improved endurance, smart goals guide your fitness journey, ensuring steady growth and sustainable results tailored to your needs.
“Confidence comes from discipline and training.” – Robert Kiyosaki
Moisturizer is an essential skincare product that helps to keep your skin hydrated, soft, and radiant. Designed to lock in moisture, it acts as a protective barrier, preventing dryness and improving your skin's overall texture. A good moisturizer is key to achieving glowing skin, as it nourishes and replenishes the skin, making it look healthy and youthful. Whether your skin is dry, oily, or a combination, the right moisturizer can balance your skin's hydration levels, reducing dullness and enhancing your natural glow. Regular use of a moisturizer tailored to your skin type can also minimize the appearance of fine lines, wrinkles, and blemishes, leaving you with a smooth, luminous complexion. Incorporating this step into your daily routine is a simple yet effective way to maintain a radiant, glowing look year-round.
Top 5 Moisturizer for Glowing Skin
1. CeraVe Moisturizing Cream
CeraVe Moisturizing Cream is a dermatologist-recommended product known for its ability to restore and maintain the skin’s natural barrier. This fragrance-free moisturizer is suitable for normal to dry skin and provides long-lasting hydration. Its formula, rich in essential ceramides and hyaluronic acid, ensures that the skin remains supple and smooth.
Key Ingredients
- Ceramides: These are lipid molecules that are essential in maintaining the skin barrier and retaining moisture. CeraVe contains three essential ceramides (1, 3, and 6-II) that help restore the skin’s protective barrier.
- Hyaluronic Acid: A powerful humectant that attracts and holds moisture in the skin, hyaluronic acid is a key ingredient in CeraVe’s formulation, helping to plump the skin and give it a dewy appearance.
- MVE Technology: This patented delivery system releases moisturizing ingredients over time, ensuring all-day hydration.
Benefits
- Deep Hydration: The combination of ceramides and hyaluronic acid provides intense hydration, making the skin feel soft and smooth.
- Barrier Restoration: It strengthens the skin’s natural barrier, protecting it from environmental damage and preventing moisture loss.
- Non-Greasy Formula: Despite its rich consistency, CeraVe absorbs quickly without leaving a greasy residue, making it suitable for both day and night use.
Who Should Use It?
CeraVe Moisturizing Cream is ideal for those with dry to very dry skin who are looking for a product that offers deep, long-lasting hydration and helps repair the skin barrier. It’s also a great choice for those with sensitive skin, as it’s free from fragrances and parabens.
2. Neutrogena Hydro Boost Water Gel
Neutrogena Hydro Boost Water Gel is a lightweight, oil-free moisturizer that’s perfect for those seeking hydration without the heaviness of a cream. Its water-gel formula absorbs quickly, leaving the skin feeling refreshed and hydrated. This product is particularly popular among those with oily or combination skin due to its non-greasy texture.
Key Ingredients
- Hyaluronic Acid: Like CeraVe, Neutrogena’s Hydro Boost also features hyaluronic acid, which provides intense hydration and helps the skin retain moisture throughout the day.
- Glycerin: A well-known humectant, glycerin helps draw moisture to the skin, enhancing the hydrating effects of the gel. Dimethicone: This silicone-based polymer creates a smooth, silky texture on the skin, helping to lock in moisture without clogging pores.
Benefits
- Lightweight Hydration: The water-gel formula provides intense hydration without the weight of a traditional cream, making it ideal for oily and combination skin types.
- Non-Comedogenic: The oil-free formula doesn’t clog pores, reducing the risk of breakouts and making it a great option for acne-prone skin.
- Instant Absorption: The gel absorbs quickly, making it a perfect base for makeup and ensuring that your skin feels fresh and hydrated all day.
Who Should Use It?
Neutrogena Hydro Boost Water Gel is perfect for those with oily or combination skin who need hydration without the heaviness of a cream. It’s also a great option for people who live in humid climates and want a moisturizer that won’t make their skin feel greasy.
3. La Roche-Posay Toleriane Double Repair Face Moisturizer
La Roche-Posay Toleriane Double Repair Face Moisturizer is a highly effective product designed to repair and protect the skin barrier while providing up to 48 hours of hydration. Formulated with prebiotic thermal water, this moisturizer not only hydrates but also soothes the skin, making it ideal for sensitive skin types.
Key Ingredients
- Ceramide-3: Like CeraVe, this product contains ceramides that help restore the skin’s barrier and retain moisture.
- Niacinamide: A form of Vitamin B3, niacinamide is known for its anti-inflammatory properties. It helps soothe the skin, reduce redness, and even out skin tone.
- Glycerin: This humectant draws moisture to the skin, helping to maintain hydration levels.
- Prebiotic Thermal Water: Sourced from the French town of La Roche-Posay, this thermal water is rich in minerals and antioxidants, offering soothing and anti-inflammatory benefits.
Benefits
- Skin Barrier Repair: The combination of ceramides and niacinamide helps repair the skin’s natural barrier, protecting it from environmental aggressors and preventing moisture loss.
- Soothing Properties: The prebiotic thermal water and niacinamide work together to calm and soothe irritated skin, making it ideal for sensitive skin types.
- Long-Lasting Hydration: With up to 48 hours of hydration, this moisturizer ensures that your skin stays soft and supple throughout the day and night.
Who Should Use It?
La Roche-Posay Toleriane Double Repair Face Moisturizer is perfect for those with sensitive or irritated skin who need a soothing, hydrating product that helps repair the skin barrier. It’s also a great choice for anyone looking for a moisturizer with anti-aging benefits, as niacinamide can help reduce the appearance of fine lines and wrinkles.
4. Olay Regenerist Micro-Sculpting Cream
Olay Regenerist Micro-Sculpting Cream is a powerhouse moisturizer that targets signs of aging while delivering deep hydration. This cream is renowned for its ability to firm and plump the skin, reducing the appearance of fine lines and wrinkles. It’s suitable for all skin types, but it’s particularly beneficial for those with mature skin.
Key Ingredients
- Amino-Peptides: These small protein fragments help to stimulate collagen production, leading to firmer, more youthful-looking skin.
- Hyaluronic Acid: Olay’s formula also includes hyaluronic acid, which provides intense hydration and plumps the skin, reducing the appearance of fine lines.
- Niacinamide: This form of Vitamin B3 helps to brighten the skin, even out skin tone, and reduce the appearance of enlarged pores.
- Carob Seed Extract: A natural plant extract that helps to enhance the skin’s healing and regenerative processes.
Benefits
- Anti-Aging: The combination of amino-peptides and hyaluronic acid helps to reduce the appearance of fine lines and wrinkles, while also firming and lifting the skin.
- Deep Hydration: The inclusion of hyaluronic acid ensures that the skin stays hydrated, plump, and glowing throughout the day.
- Improved Skin Texture: Niacinamide helps to even out skin tone, reduce redness, and refine the texture of the skin, giving it a smoother, more radiant appearance.
Who Should Use It?
Olay Regenerist Micro-Sculpting Cream is ideal for those with mature skin who are looking for a moisturizer that offers both hydration and anti-aging benefits. It’s also a great option for anyone who wants to improve skin texture and achieve a more youthful, radiant complexion.
5. Clinique Moisture Surge 72-Hour Auto-Replenishing Hydrator
Clinique Moisture Surge 72-Hour Auto-Replenishing Hydrator is a lightweight gel-cream that delivers an instant moisture boost and keeps skin hydrated for up to 72 hours. Its unique auto-replenishing technology helps the skin create its own internal water source, ensuring continuous hydration even after washing your face.
Key Ingredients
- Activated Aloe Water: Clinique’s formula features aloe water that has been activated to improve its moisture retention capabilities, providing intense hydration and soothing benefits.
- Hyaluronic Acid: Known for its moisture-binding properties, hyaluronic acid ensures that the skin stays plump and hydrated for extended periods.
- Caffeine: This ingredient helps to energize and revitalize the skin, improving its ability to retain moisture.
- Auto-Replenishing Technology: This innovative technology helps the skin create its own internal water source, ensuring continuous hydration throughout the day.
Benefits
- Long-Lasting Hydration: The unique formula provides up to 72 hours of hydration, ensuring that your skin remains soft, supple, and radiant even after cleansing.
- Lightweight Texture: The gel-cream consistency absorbs quickly into the skin, leaving it feeling fresh and hydrated without any greasy residue.
- Soothing and Energizing: The combination of activated aloe water and caffeine helps to soothe the skin and improve its overall vitality, giving you a healthy, glowing complexion.
Who Should Use It?
Clinique Moisture Surge 72-Hour Auto-Replenishing Hydrator is perfect for all skin types, but it’s especially beneficial for those with dehydrated or dull skin. It’s also a great option for people who want a lightweight, yet intensely hydrating product that can be used both day and night.
FAQs
1. What ingredients should I look for in a moisturizer for glowing skin?
Answer : Key ingredients to look for include hyaluronic acid, which hydrates and plumps the skin, Vitamin C for brightening, niacinamide to improve skin texture, and ceramides to restore the skin barrier.
2. Can a moisturizer really make my skin glow?
Answer : Yes, moisturizers that are formulated to hydrate and nourish your skin can enhance its natural radiance. Ingredients like hyaluronic acid and Vitamin C work to plump the skin and brighten your complexion, giving you a glowing appearance.
3. How often should I use a moisturizer for glowing skin?
Answer : For optimal results, moisturizers should be applied twice daily, in the morning and at night, after cleansing. Consistent use is key to achieving and maintaining a glowing complexion.
4. Can moisturizers help with dark spots or uneven skin tone?
Answer : Yes, some moisturizers contain brightening ingredients like Vitamin C, alpha arbutin, or niacinamide, which can help fade dark spots and even out your skin tone, contributing to a brighter, more glowing complexion.
5. Are moisturizers for glowing skin suitable for all skin types?
Answer : Most moisturizers formulated for glowing skin can be suitable for all skin types, but it's important to choose one that matches your specific needs. For instance, those with oily skin might prefer a lightweight, non-greasy formula, while those with dry skin may benefit from richer, more hydrating creams.
6. Can I use a moisturizer with SPF for glowing skin?
Answer : Absolutely! Some moisturizers, like the EltaMD UV Daily Face Sunscreen, combine SPF with hydrating ingredients like hyaluronic acid, allowing you to protect your skin from the sun while promoting a glowing appearance.
7. Can a budget-friendly moisturizer still give me glowing skin?
Answer : Yes, there are many affordable moisturizers, such as Neutrogena Hydro Boost, that provide excellent hydration and radiance without breaking the bank.
Conclusion
In conclusion, using a moisturizer tailored for glowing skin can be a transformative step in your skincare routine. These moisturizers hydrate, nourish, and brighten your skin, helping to reduce dullness and enhance your natural radiance. Key ingredients like hyaluronic acid, Vitamin C, and niacinamide work synergistically to plump the skin, even out skin tone, and restore its luminosity. Whether you opt for a luxurious formula or a budget-friendly option, consistency in application is vital for achieving long-term results. By incorporating the right moisturizer into your daily regimen, you can enjoy a healthy, glowing complexion year-round.
You might also like our beauty articles.
“Motivation is what gets you started. Habit is what keeps you going.” – Jim Ryun
If you would like more information about the 2024, please send us an email.
Written by Fitness Goal 4U
Smart Fitness Goals - Achieve Health with Simple Steps
Smart fitness goals focus on being Specific, Measurable, Achievable, Relevant, and Time-bound. They help you create a clear path to success, stay motivated, and track progress. Whether its weight loss, strength building, or improved endurance, smart goals guide your fitness journey, ensuring steady growth and sustainable results tailored to your needs.
“Confidence comes from discipline and training.” – Robert Kiyosaki
Achieving glowing skin starts with the right skincare routine, and choosing the perfect soap is a key step. With countless options available, finding a soap that enhances your skin's natural radiance while providing the necessary care can be challenging. The right soap not only cleanses but also nourishes, hydrates, and revitalizes your skin, leaving it soft, smooth, and luminous. In this guide, we explore the top 5 soaps that are renowned for their ability to promote glowing skin. From deeply moisturizing formulas to those with skin-brightening properties, each soap on this list is carefully selected to meet various skin needs. Whether you have dry, sensitive, or acne-prone skin, these soaps offer the ideal blend of ingredients to help you achieve a radiant complexion.
Top 5 Soap for Glowing Skin
1. Dove Beauty Bar
Dove Beauty Bar has been a favorite for generations and for good reason. Unlike traditional soaps, which can leave your skin feeling tight and dry, Dove is formulated with a quarter moisturizing cream. This soap not only cleanses your skin but also nourishes it deeply, making it ideal for daily use.
Key Ingredients:
- Moisturizing Cream: The ¼ moisturizing cream in Dove Beauty Bar ensures that your skin remains soft and supple. It works by replenishing the skin’s moisture barrier, which can often be disrupted by harsh soaps.
- Sodium Lauroyl Isethionate: This mild surfactant cleanses the skin without stripping away its natural oils, making it gentle enough for sensitive skin.
Benefits:
- Deep Moisturization: Dove Beauty Bar is more than just a soap; it’s a skincare product that provides intense hydration, making your skin feel smooth and glowing after every wash.
- Gentle Cleansing: It effectively removes dirt and impurities without causing irritation, making it suitable for all skin types, including sensitive and acne-prone skin.
- pH-Balanced Formula: The pH-balanced formula ensures that your skin’s natural pH is maintained, preventing any disruption to the skin’s acid mantle.
How It Works:
- The combination of moisturizing cream and mild cleansers in Dove Beauty Bar works synergistically to cleanse and hydrate your skin. The moisturizing agents penetrate deep into the skin, locking in moisture and leaving your skin looking healthy and radiant.
2. Cetaphil Gentle Cleansing Bar
Cetaphil is a brand synonymous with gentle skincare. The Cetaphil Gentle Cleansing Bar is specially designed for those with sensitive skin who need a mild yet effective cleanser. It is non-comedogenic, meaning it won’t clog your pores, making it ideal for daily use.
Key Ingredients:
- Sodium Cocoyl Isethionate: A gentle surfactant derived from coconut oil, it cleanses without stripping the skin of its natural oils.
- Glycerin: A powerful humectant that attracts moisture to the skin, helping to maintain hydration and give the skin a soft, dewy appearance.
Benefits:
- Gentle on Sensitive Skin: This soap is free from harsh detergents and is designed to be gentle on even the most sensitive skin, reducing the risk of irritation or allergic reactions.
- Non-Comedogenic: It doesn’t clog pores, making it suitable for people with acne-prone skin.
- Moisturizing: The inclusion of glycerin ensures that your skin remains hydrated, preventing dryness and promoting a healthy glow.
How It Works:
- Cetaphil Gentle Cleansing Bar cleanses the skin while preserving its natural moisture barrier. The mild surfactants effectively remove dirt and oil without stripping the skin, while glycerin works to attract moisture, keeping the skin hydrated and glowing.
3. Kojie San Skin Lightening Soap
Kojie San Skin Lightening Soap is well-known for its skin-brightening properties. It’s formulated with kojic acid, a natural ingredient derived from mushrooms that is known for its ability to lighten dark spots and even out skin tone.
Key Ingredients:
- Kojic Acid: A natural compound with melanin-inhibiting properties, kojic acid helps to lighten dark spots, hyperpigmentation, and uneven skin tone.
- Coconut Oil: Rich in fatty acids, coconut oil deeply moisturizes the skin, ensuring that it doesn’t get dry or irritated.
Benefits:
- Skin Lightening: Kojic acid effectively lightens dark spots, hyperpigmentation, and sun damage, resulting in a more even skin tone and a brighter complexion.
- Moisturizing: Coconut oil in the soap prevents the skin from drying out, which is a common issue with many lightening products.
- Exfoliating: Kojic acid also has mild exfoliating properties, helping to remove dead skin cells and promote the growth of new, healthy skin cells.
How It Works:
Kojie San Skin Lightening Soap works by inhibiting the production of melanin, the pigment responsible for dark spots and uneven skin tone. Over time, this leads to a lighter, more even complexion. The coconut oil in the formula ensures that your skin remains moisturized, preventing any dryness that could detract from your natural glow.
4. L’Occitane Shea Butter Extra Gentle Soap
L’Occitane’s Shea Butter Extra Gentle Soap is a luxurious soap made with a high concentration of shea butter. Shea butter is known for its deeply moisturizing properties and is ideal for those with dry or sensitive skin. This soap is perfect for those who want to pamper their skin while achieving a glowing complexion.
Key Ingredients:
- Shea Butter: Rich in vitamins A, E, and F, shea butter nourishes the skin, providing deep hydration and promoting a healthy glow.
- Vegetable-Based Formula: This soap is made with a 100% vegetable base, making it gentle and suitable for all skin types.
Benefits:
- Intense Hydration: The high shea butter content ensures that your skin is deeply moisturized, which is essential for maintaining a glowing complexion.
- Gentle Cleansing: The soap cleanses the skin without stripping it of its natural oils, making it ideal for dry and sensitive skin.
- Luxurious Experience: The rich, creamy lather and pleasant scent make using this soap a luxurious experience, adding a touch of indulgence to your skincare routine.
How It Works:
- L’Occitane Shea Butter Extra Gentle Soap works by providing intense hydration to the skin. The shea butter penetrates deep into the skin, nourishing it from within and leaving it soft, supple, and glowing. The gentle, vegetable-based formula ensures that your skin is cleansed without being stripped of its natural oils, which is crucial for maintaining a radiant complexion.
5. Neutrogena Transparent Facial Bar
Neutrogena Transparent Facial Bar is a dermatologist-recommended soap known for its mild, fragrance-free formula. It’s particularly suitable for those with sensitive or acne-prone skin, as it cleanses without causing irritation or dryness.
Key Ingredients:
- Glycerin: This key ingredient attracts moisture to the skin, ensuring it stays hydrated and doesn’t dry out after cleansing.
- Sodium Palmate: A gentle surfactant that effectively cleanses the skin without stripping it of its natural oils. Benefits:
- Non-Irritating: The soap is hypoallergenic and free from dyes and fragrances, making it suitable for sensitive skin. Non-Comedogenic: It won’t clog pores, which is essential for those with acne-prone skin.
- Moisturizing: Glycerin helps to retain moisture in the skin, preventing dryness and promoting a glowing complexion.
How It Works:
Neutrogena Transparent Facial Bar works by gently cleansing the skin while preserving its natural moisture balance. The inclusion of glycerin ensures that the skin remains hydrated, while the mild surfactants cleanse without causing irritation or dryness. This soap is ideal for those looking to maintain clear, healthy, and glowing skin without any harsh ingredients.
FAQs
1. What should I look for in a soap to achieve glowing skin?
Answer : When choosing a soap for glowing skin, look for ingredients that hydrate, nourish, and protect your skin. Key ingredients to consider include moisturizing agents like glycerin, shea butter, and natural oils, as well as brightening ingredients like kojic acid. Also, opt for soaps that are gentle and free from harsh chemicals.
2. Can I use these soaps on my face as well as my body?
Answer : Most of the soaps listed, such as the Dove Beauty Bar and Neutrogena Transparent Facial Bar, are suitable for both face and body. However, always check the product’s label and consider your skin type before using it on your face, as facial skin can be more sensitive.
3. Are these soaps suitable for all skin types?
Answer : Yes, the soaps included in this guide cater to various skin types, from dry and sensitive to oily and acne-prone. For example, Cetaphil Gentle Cleansing Bar is ideal for sensitive skin, while Kojie San Skin Lightening Soap is suitable for those looking to brighten their complexion.
4. How often should I use these soaps for the best results?
Answer : For optimal results, use these soaps daily as part of your skincare routine. However, if you have sensitive skin, you may want to start with every other day to ensure your skin doesn’t react negatively.
5. Will these soaps help with acne and dark spots?
Answer : Some of the soaps, like Kojie San Skin Lightening Soap, can help lighten dark spots and even out skin tone, while soaps like Neutrogena Transparent Facial Bar are formulated to cleanse without clogging pores, which can help prevent acne. For acne-prone skin, look for non-comedogenic options.
6. Are these soaps safe to use on sensitive skin?
Answer : Yes, several of the soaps, such as Cetaphil Gentle Cleansing Bar and L’Occitane Shea Butter Extra Gentle Soap, are specifically formulated for sensitive skin. These soaps are free from harsh chemicals and fragrances, making them gentle and less likely to cause irritation.
7. How long does it take to see results with these soaps?
Answer : Results can vary depending on the soap and your skin type. Generally, with consistent use, you may start noticing improvements in skin texture and radiance within a few weeks. However, for issues like dark spots, it may take longer to see significant changes.
8. Can I use other skincare products along with these soaps?
Answer : Absolutely! These soaps can be integrated into your existing skincare routine. For best results, follow up with a moisturizer and sunscreen to protect and further enhance your skin’s glow.
9. Are these soaps cruelty-free and environmentally friendly?
Answer : Many of the soaps mentioned, like L’Occitane Shea Butter Extra Gentle Soap, are made with eco-friendly practices and are cruelty-free. Always check the packaging or the brand’s website for specific information regarding cruelty-free and sustainability certifications.
10. Where can I purchase these soaps?
Answer : These soaps are widely available at drugstores, supermarkets, and online retailers. You can find them on websites like Amazon, Ulta, or directly from the brand’s official website.
Conclusion
Choosing the right soap is essential for achieving and maintaining glowing skin. The top 5 soaps highlighted in this guide each offer unique benefits tailored to various skin needs. From Dove Beauty Bar’s deep hydration and gentle cleansing to Kojie San Skin Lightening Soap’s brightening effects, these soaps cater to diverse skin types and concerns. Whether you're looking for intense moisture, gentle care, or skin-brightening properties, there's a soap on this list to help you achieve a radiant complexion. Incorporating these soaps into your daily skincare routine can significantly enhance your skin's natural glow, ensuring that you look and feel your best. Make sure to choose a soap that aligns with your skin type and needs to enjoy the full benefits of a healthy, luminous complexion.
You might also like our beauty articles.
“Motivation is what gets you started. Habit is what keeps you going.” – Jim Ryun
If you would like more information about the 2024, please send us an email.
Written by Fitness Goal 4U
Smart Fitness Goals - Achieve Health with Simple Steps
Smart fitness goals focus on being Specific, Measurable, Achievable, Relevant, and Time-bound. They help you create a clear path to success, stay motivated, and track progress. Whether its weight loss, strength building, or improved endurance, smart goals guide your fitness journey, ensuring steady growth and sustainable results tailored to your needs.
“Confidence comes from discipline and training.” – Robert Kiyosaki
Finding the right shampoo can be a game-changer for your hair's health and appearance. With so many options on the market, it’s crucial to choose a product that suits your specific needs, whether you’re dealing with damaged strands, color-treated hair, or a sensitive scalp. In this guide, we’ll explore the top 5 shampoos that cater to various hair types and concerns. From the bond-repairing power of Olaplex to the soothing qualities of Aveda, each shampoo is selected for its unique benefits and effectiveness. Whether you seek hydration, color protection, or gentle cleansing, this list will help you find the perfect shampoo to enhance your hair’s natural beauty and maintain its health. Dive in and discover the ideal product to elevate your hair care routine.
Top 5 Shampoos for Hair
1. Olaplex No. 4 Bond Maintenance Shampoo
Best for: Damaged and Color-Treated Hair
Olaplex No. 4 Bond Maintenance Shampoo is renowned for its ability to restore and strengthen hair bonds. This shampoo is particularly effective for those with damaged or color-treated hair. Its patented Bond Building Technology helps to repair broken disulfide bonds caused by chemical treatments and environmental stressors.
Key Features:
- Bond Building Technology: Rebuilds and strengthens hair structure.
- Sulfate-Free: Gentle on the hair, reducing the risk of further damage.
- pH Balanced: Maintains the hair’s natural pH, promoting health and shine.
Benefits:
- Olaplex No. 4 is excellent for reducing breakage and improving the overall texture of the hair. It also helps to retain color and enhance shine, making it a popular choice for those who frequently dye their hair.
How to Use:
- Apply a generous amount to wet hair, lather, and rinse thoroughly. Follow up with Olaplex No. 5 Conditioner for optimal results.
2. Kérastase Nutritive Bain Satin 2 Shampoo
Best for: Dry and Sensitive Hair
Kérastase Nutritive Bain Satin 2 Shampoo is designed for dry and sensitive hair types. It provides essential nourishment and hydration, making it a top choice for those struggling with dryness or frizz.
Key Features:
- Glucose-Protecting Complex: Provides essential nutrients and moisture.
- Softening Agents: Smoothens the hair fiber, reducing frizz and increasing manageability.
- Sulfate-Free Formula: Minimizes irritation and preserves the natural oils.
Benefits:
- This shampoo leaves the hair feeling soft and silky while addressing issues of dryness and sensitivity. Its nourishing formula makes it ideal for maintaining moisture balance and preventing breakage.
How to Use:
- Apply to wet hair, gently massage into the scalp, and rinse. For best results, use in conjunction with Kérastase Nutritive Lait Vital Conditioner.
3. Pureology Hydrate Shampoo
Best for: Color-Treated Hair
Pureology Hydrate Shampoo is a go-to option for those with color-treated hair. Its sulfate-free formula gently cleanses while preserving color vibrancy and enhancing moisture.
Key Features:
- Hydrating Properties: Infused with natural plant extracts to hydrate and condition.
- Anti-Fade Complex: Protects against color fading and maintains vibrancy.
- Sulfate-Free and Vegan: Safe for sensitive scalps and environmentally friendly.
Benefits:
- This shampoo effectively cleanses without stripping color, ensuring that dyed hair remains vibrant and hydrated. It also helps to reduce color fade, making it a favorite among those who frequently change their hair color.
How to Use:
- Work a small amount into wet hair, lather, and rinse thoroughly. For best results, follow with Pureology Hydrate Conditioner.
4. Living Proof Perfect Hair Day Shampoo
Best for: All Hair Types
Living Proof Perfect Hair Day Shampoo is an excellent all-around option for various hair types. It’s known for its advanced technology that tackles common hair issues such as oiliness, dullness, and frizz.
Key Features:
- Healthy Hair Molecule (OFPMA): Creates a shield against dirt and oil.
- Moisturizing Properties: Helps to hydrate and smooth the hair.
- Sulfate-Free and Silicone-Free: Ensures a gentle, non-drying cleanse.
Benefits:
- This shampoo delivers a balanced clean, making it ideal for daily use. It helps to keep hair looking fresh and healthy, reducing the need for frequent washing and minimizing buildup.
How to Use:
- Apply to wet hair, massage into the scalp, and rinse. For the best results, use in combination with Living Proof Perfect Hair Day Conditioner.
5. Aveda Shampure Nurturing Shampoo
Best for: Sensitive Scalps
Aveda Shampure Nurturing Shampoo is a top choice for those with sensitive scalps. It’s formulated with a blend of natural ingredients designed to soothe and calm irritation while providing a gentle cleanse.
Key Features:
- 100% Natural Plant and Flower Essences: Provides a calming and sensory experience.
- Gentle Cleansing Agents: Minimizes irritation and discomfort.
- Sulfate-Free: Suitable for sensitive skin and environmentally friendly.
Benefits:
- This shampoo is perfect for individuals with scalp sensitivity or allergies. It offers a soothing cleanse without causing further irritation, making it a great option for those with delicate skin.
How to Use:
- Apply to wet hair, lather, and rinse thoroughly. For optimal results, follow with Aveda Shampure Conditioner.
FAQs
1. What makes the top 5 shampoos different from regular shampoos?
Answer : The top 5 shampoos are selected based on their effectiveness for specific hair types and concerns. They offer specialized benefits such as repairing damage, preserving color, providing hydration, or soothing sensitive scalps. These shampoos are formulated with advanced technologies and high-quality ingredients that target particular hair issues more effectively than generic shampoos.
2. How do I choose the right shampoo from the top 5 options?
Answer : Consider your specific hair needs and concerns when choosing a shampoo. For example, if you have damaged or color-treated hair, Olaplex No. 4 might be ideal. For dry or sensitive hair, Kérastase Nutritive Bain Satin 2 or Aveda Shampure Nurturing Shampoo may be better choices. Assess your hair type and desired outcomes to select the most suitable product.
3. Are these top 5 shampoos suitable for daily use?
Answer : Most of the shampoos listed are gentle enough for daily use, but it's always a good idea to follow the manufacturer's recommendations. For instance, Living Proof Perfect Hair Day Shampoo is designed for regular use, while Olaplex No. 4 Bond Maintenance Shampoo is typically used 2-3 times a week depending on your hair's condition.
4. Do these shampoos work for all hair types?
Answer : Each shampoo in the top 5 is formulated for specific hair types and concerns. For example, Pureology Hydrate Shampoo is great for color-treated hair, while Living Proof Perfect Hair Day Shampoo is suitable for various hair types. Make sure to choose a product that aligns with your hair's specific needs for the best results.
5. Can I use these shampoos with other hair care products?
Answer : Yes, these shampoos can generally be used in conjunction with other hair care products, such as conditioners, leave-in treatments, and styling products. For optimal results, consider using complementary products from the same brand or product line.
6. Are the top 5 shampoos free from harmful chemicals?
Answer : Many of the top 5 shampoos are free from harsh chemicals like sulfates and parabens. For instance, Olaplex No. 4, Pureology Hydrate, and Aveda Shampure Nurturing Shampoo are sulfate-free and designed to be gentle on the hair and scalp.
7. How long will it take to see results from these shampoos?
Answer : Results can vary based on individual hair types and concerns. Typically, you may start to notice improvements in hair texture, manageability, or color vibrancy within a few weeks of regular use. For damage repair or significant changes, it might take a bit longer to see noticeable results.
8. Can these shampoos help with hair loss or thinning?
Answer : While the top 5 shampoos focus on improving hair health and appearance, they are not specifically designed to treat hair loss or thinning. For such issues, consider shampoos formulated with ingredients that promote hair growth or consult a dermatologist for personalized recommendations.
9. Are these shampoos tested on animals?
Answer : Many of the top 5 shampoos, such as those from Living Proof and Aveda, are known for their commitment to cruelty-free practices. However, it's always best to check the specific brand's policy on animal testing to ensure it aligns with your values.
10. Where can I purchase these shampoos?
Answer : The top 5 shampoos can be purchased from a variety of retailers, including high-end department stores, specialized beauty stores, and online platforms. For the most reliable and authentic products, consider buying directly from the brand's website or authorized retailers.
Conclusion
Choosing the right shampoo is essential for maintaining healthy, vibrant hair. The top 5 shampoos highlighted in this guide cater to a range of needs, from repairing damage and preserving color to soothing sensitive scalps. Each product offers unique benefits tailored to different hair concerns, ensuring you can find the perfect match for your hair type and condition. By selecting a shampoo that aligns with your specific needs, you’ll not only enhance the overall health and appearance of your hair but also streamline your hair care routine. Invest in the right shampoo, and enjoy the transformative effects of healthier, more beautiful hair every day.
You might also like our beauty articles.
“Motivation is what gets you started. Habit is what keeps you going.” – Jim Ryun
If you would like more information about the 2024, please send us an email.
Written by Fitness Goal 4U
Smart Fitness Goals - Achieve Health with Simple Steps
Smart fitness goals focus on being Specific, Measurable, Achievable, Relevant, and Time-bound. They help you create a clear path to success, stay motivated, and track progress. Whether its weight loss, strength building, or improved endurance, smart goals guide your fitness journey, ensuring steady growth and sustainable results tailored to your needs.
“Confidence comes from discipline and training.” – Robert Kiyosaki
Dry hair can be a persistent challenge, leaving your locks feeling brittle and unmanageable. The key to revitalizing and maintaining healthy hair lies in selecting the right conditioner. A high-quality conditioner for dry hair not only restores essential moisture but also improves texture, reduces frizz, and enhances shine. With countless options available, finding the perfect one can be overwhelming. To simplify your search, we’ve curated a list of the top five conditioners designed specifically to combat dryness and deliver nourishing hydration. These top picks feature a range of advanced formulas, from repairing bond-building technologies to rich natural ingredients, ensuring that you find a solution that suits your hair's unique needs. Discover which of these top conditioners will help transform your dry hair into soft, manageable, and vibrant tresses.
Top 5 Best Conditioner for Dry Hair
1. Olaplex No. 5 Bond Maintenance Conditioner
Olaplex has made a name for itself in the hair care industry with its groundbreaking approach to hair repair. The No. 5 Bond Maintenance Conditioner is particularly renowned for its ability to restore moisture and rebuild hair’s internal structure.
Key Benefits:
- Rebuilds Hair Bonds: The conditioner works on a molecular level to repair broken bonds in the hair, making it ideal for damaged and dry hair.
- Moisture Restoration: It effectively hydrates the hair without weighing it down.
- Frizz Control: Helps in reducing frizz and improving manageability.
Ingredients:
- Bis-Aminopropyl Diglycol Dimaleate: A patented ingredient that helps rebuild and strengthen hair bonds.
- Hydrolyzed Vegetable Protein: Provides moisture and improves the hair’s elasticity.
Why It’s Great for Dry Hair:
- The Olaplex No. 5 Conditioner is a go-to for those who need intensive repair and hydration. Its bond-building technology ensures that hair not only feels softer but is also stronger and less prone to breakage.
2. Living Proof Perfect Hair Day Conditioner
Living Proof’s Perfect Hair Day Conditioner is celebrated for its advanced formula that addresses dryness while promoting overall hair health.
Key Benefits:
- Silicone-Free: Free from silicones, which can often leave hair feeling greasy.
- Moisture and Softness: Delivers exceptional moisture and softens hair without adding weight.
- Frizz Reduction: Helps to manage frizz and enhance shine.
Ingredients:
- Healthy Hair Molecule (OFPMA): Helps repel dirt and oil, allowing for longer-lasting freshness.
- Conditioning Agents: Provide smoothness and manageability.
Why It’s Great for Dry Hair:
- The Perfect Hair Day Conditioner not only hydrates but also keeps hair cleaner for longer, reducing the need for frequent washes. Its lightweight formula is ideal for those who need moisture without the heaviness.
3. SheaMoisture Raw Shea Butter Restorative Conditioner
SheaMoisture is known for its use of natural ingredients and ethical practices. The Raw Shea Butter Restorative Conditioner is a popular choice for those seeking hydration with a focus on natural and organic components.
Key Benefits:
- Deep Moisture: Rich in shea butter, this conditioner provides deep and long-lasting moisture.
- Repair and Strengthen: Formulated to repair damaged hair and improve overall strength.
- Detangling: Helps in reducing breakage during detangling.
Ingredients:
- Shea Butter: Deeply hydrates and conditions hair.
- Argan Oil: Adds shine and improves manageability.
- Sea Kelp: Promotes healthy hair growth and provides nourishment.
Why It’s Great for Dry Hair:
The combination of shea butter and argan oil in this conditioner ensures that even the driest hair gets the moisture it needs while also enhancing softness and shine. It’s particularly beneficial for curly and textured hair types.
4. Briogeo Don’t Despair, Repair! Deep Conditioning Mask
Briogeo’s Don’t Despair, Repair! Deep Conditioning Mask is a treatment designed to provide intense hydration and repair to dry, damaged hair.
Key Benefits:
- Intensive Treatment: Offers a deep conditioning experience that penetrates the hair shaft for thorough hydration.
- Strengthens Hair: Helps to rebuild and strengthen hair, reducing breakage and split ends.
- Natural Ingredients: Free from sulfates, silicones, and parabens.
Ingredients:
- Rosehip Oil: Rich in essential fatty acids to help repair and restore moisture.
- Algae Extract: Provides vitamins and minerals that support healthy hair.
- B-vitamins: Enhance moisture retention and strengthen hair.
Why It’s Great for Dry Hair:
- This mask is perfect for those who need an extra boost of moisture and repair. Its deep conditioning formula is ideal for a weekly treatment to combat severe dryness and restore hair’s health.
5. Aveda Nutriplenish Conditioner
Aveda is well-regarded for its commitment to environmental sustainability and high-quality natural products. The Nutriplenish Conditioner is designed to nourish and revitalize dry hair with organic pomegranate and coconut.
Key Benefits:
- Hydration: Provides hydration with organic pomegranate and coconut oil.
- Nourishes Hair: Enriches hair with essential nutrients for improved health and appearance.
- Eco-Friendly: Made with organic ingredients and packaged in environmentally friendly materials.
Ingredients:
- Organic Pomegranate Oil: Rich in antioxidants and essential fatty acids for moisture.
- Coconut Oil: Hydrates and adds shine.
- Aloe Vera: Soothes and conditions the scalp.
Why It’s Great for Dry Hair:
- The Nutriplenish Conditioner offers a balance of hydration and nourishment while being gentle on both the hair and the environment. It’s a great choice for those who prefer natural products and are conscious about their ecological footprint.
FAQs
1. What should I look for in a conditioner for dry hair?
Answer : When selecting a conditioner for dry hair, look for ingredients that provide deep hydration, such as shea butter, argan oil, and hyaluronic acid. Additionally, conditioners that contain proteins or bond-repairing technology can help strengthen and repair damaged hair.
2. How often should I use a conditioner for dry hair?
Answer : For optimal results, use a conditioner for dry hair every time you shampoo. If you have extremely dry or damaged hair, consider using a deep conditioning treatment once a week to provide extra hydration and repair.
3. Can a conditioner alone fix dry hair?
Answer : While a conditioner is crucial for adding moisture and improving hair texture, addressing dry hair often requires a comprehensive approach. Combining a good conditioner with other practices like minimizing heat styling, using a hydrating shampoo, and maintaining a healthy diet can yield better results.
4. Are there specific conditioners for curly dry hair?
Answer : Yes, curly hair often requires more intense moisture and definition. Look for conditioners specifically formulated for curly hair that offer added hydration and frizz control. Ingredients like shea butter and coconut oil can be particularly beneficial for maintaining curl structure and moisture.
5. How can I prevent my hair from drying out between washes?
Answer : To prevent dryness between washes, consider using leave-in conditioners or hair oils. These products can provide continuous moisture and protection. Additionally, avoiding excessive heat styling and using a silk pillowcase can help maintain hair’s hydration levels.
6. Is it better to choose a conditioner with natural ingredients for dry hair?
Answer : Natural ingredients can be beneficial for dry hair, as they are often free from harsh chemicals and provide gentle, effective hydration. Ingredients like aloe vera, coconut oil, and argan oil are known for their moisturizing properties. However, effectiveness can also depend on individual hair needs and product formulation.
7. Can I use a conditioner for dry hair if I have oily roots?
Answer : Yes, you can use a conditioner for dry hair even if you have oily roots. To avoid over-conditioning, apply the conditioner primarily to the ends of your hair where it’s most needed, and avoid the roots. This helps balance moisture without making your scalp oily.
8. Are there any conditioners to avoid for dry hair?
Answer : Avoid conditioners with high levels of sulfates, silicones, or alcohol, as these can strip moisture and potentially worsen dryness. Opt for products that are sulfate-free and contain nourishing ingredients to maintain hydration and health.
9. How do I know if a conditioner is working for my dry hair?
Answer : You’ll know a conditioner is effective if your hair feels softer, more manageable, and less brittle. Additionally, look for improvements in shine and reduced frizz. Consistent use and positive changes in texture and appearance are good indicators of a conditioner’s effectiveness.
10. Can I use a conditioner for dry hair on color-treated hair?
Answer : Yes, many conditioners for dry hair are suitable for color-treated hair. Look for products that are color-safe and designed to be gentle on treated hair while providing the necessary moisture and nourishment.
Conclusion
Choosing the right conditioner for dry hair is essential for achieving healthier, more manageable locks. The conditioners listed above each offer unique benefits, from intensive hydration and bond repair to natural nourishment and eco-friendly formulations. Whether you’re looking for a deep conditioning treatment or a lightweight daily conditioner, these top picks cater to various needs and preferences. By incorporating one of these conditioners into your hair care routine, you can help restore moisture, enhance shine, and bring your dry hair back to life.
You might also like our beauty articles.
“Motivation is what gets you started. Habit is what keeps you going.” – Jim Ryun
If you would like more information about the 2024, please send us an email.
Written by Fitness Goal 4U
Smart Fitness Goals - Achieve Health with Simple Steps
Smart fitness goals focus on being Specific, Measurable, Achievable, Relevant, and Time-bound. They help you create a clear path to success, stay motivated, and track progress. Whether its weight loss, strength building, or improved endurance, smart goals guide your fitness journey, ensuring steady growth and sustainable results tailored to your needs.
“Confidence comes from discipline and training.” – Robert Kiyosaki
Dealing with pimples can be frustrating, but selecting the right cream can make a significant difference in your skincare routine. Pimples, caused by clogged pores and excess oil, require targeted treatments to effectively manage and prevent breakouts. In this guide, we highlight the top five creams designed to combat pimples, each offering unique benefits through powerful ingredients. From benzoyl peroxide to retinol and salicylic acid, these products are formulated to address various aspects of acne, including bacteria, inflammation, and clogged pores. Whether you’re looking for an overnight solution or a daily treatment, these creams provide a range of options to help achieve clearer, healthier skin. Discover how each cream works and find the one that best suits your needs for a pimple-free complexion.
Top 5 Creams for Pimples
1. Neutrogena On-the-Spot Acne Treatment
Ingredients:
- Benzoyl Peroxide (2.5%): Benzoyl peroxide is a potent ingredient known for its ability to kill acne-causing bacteria and reduce inflammation. It also helps to unclog pores and prevent future breakouts.
- Water: Acts as a solvent to deliver the active ingredients to the skin.
Benefits:
- Effective Bacterial Kill: Benzoyl peroxide is effective at killing the bacteria that contribute to acne, making it a popular choice for treating pimples.
- Reduces Inflammation: It helps to reduce the redness and swelling associated with pimples.
- Quick Absorption: The cream absorbs quickly into the skin, allowing users to apply it and go about their day without residue.
How It Works:
- Neutrogena On-the-Spot Acne Treatment uses benzoyl peroxide to target the root cause of pimples. The benzoyl peroxide penetrates the pores, killing the bacteria and reducing inflammation. Regular use can lead to clearer skin and fewer breakouts.
Usage Tips:
- Apply a thin layer to the affected area once or twice daily. Start with once a day to assess your skin's tolerance and gradually increase to twice daily if needed.
2. Olay Regenerist Retinol 24 Night Moisturizer
Ingredients:
- Retinol (0.1%): Retinol is a form of Vitamin A that promotes cell turnover, helping to clear out clogged pores and reduce the appearance of pimples.
- Niacinamide: Known for its anti-inflammatory properties, niacinamide helps to soothe the skin and reduce redness.
Benefits:
- Promotes Skin Renewal: Retinol encourages the shedding of dead skin cells, which helps to prevent clogged pores and reduces the frequency of breakouts.
- Improves Skin Texture: It enhances the overall texture of the skin, making it smoother and less prone to acne. Moisturizing: Despite containing retinol, this product also provides hydration, which is essential for maintaining healthy skin.
How It Works:
- Olay Regenerist Retinol 24 Night Moisturizer works overnight to promote skin renewal and prevent acne. The retinol stimulates cell turnover, which helps to clear clogged pores and reduce the formation of new pimples. Niacinamide helps to soothe the skin and reduce any irritation that might occur from using retinol.
Usage Tips:
- Apply in the evening after cleansing your face. Start with a small amount to see how your skin reacts, and gradually increase the amount if necessary.
3. La Roche-Posay Effaclar Duo
Ingredients:
- Salicylic Acid (0.5%): Salicylic acid is a beta hydroxy acid (BHA) that helps to exfoliate the skin and unclog pores, making it effective for treating pimples.
- Niacinamide: Reduces inflammation and helps to calm irritated skin.
- LHA (Lipo-Hydroxy Acid): A derivative of salicylic acid, LHA offers gentle exfoliation and helps to refine the skin’s texture.
Benefits:
- Unclogs Pores: Salicylic acid penetrates deep into the pores to remove dead skin cells and excess oil.
- Reduces Redness: Niacinamide helps to soothe the skin and reduce redness associated with pimples.
- Refines Skin Texture: LHA provides gentle exfoliation, improving skin texture and reducing the appearance of acne.
How It Works:
- La Roche-Posay Effaclar Duo combines salicylic acid with LHA to address both the surface and deeper layers of the skin. Salicylic acid unclogs pores and reduces inflammation, while LHA provides additional exfoliation. Niacinamide helps to soothe the skin and reduce redness.
Usage Tips:
- Apply to the affected area once or twice daily. It can be used as a spot treatment or over larger areas of the face.
4. Differin Adapalene Gel 0.1%
Ingredients:
- Adapalene (0.1%): Adapalene is a retinoid that helps to regulate skin cell turnover and prevent clogged pores. It is less irritating than other retinoids, making it suitable for sensitive skin.
Benefits:
- Regulates Cell Turnover: Adapalene helps to prevent the formation of pimples by regulating the shedding of skin cells and reducing the likelihood of clogged pores.
- Less Irritating: It is gentler than other retinoids, making it suitable for those with sensitive skin.
- Reduces Inflammation: Adapalene has anti-inflammatory properties that help to reduce redness and swelling.
How It Works:
- Differin Adapalene Gel works by normalizing the skin cell turnover process. It helps to prevent the formation of clogged pores and reduces the likelihood of new pimples developing. Its anti-inflammatory properties also help to reduce redness and swelling.
Usage Tips:
- Apply a thin layer to the affected area once daily in the evening. It may cause initial dryness or irritation, so start with every other night and gradually increase as your skin adjusts.
5. Paula’s Choice CLEAR Acne Spot Treatment
Ingredients:
- Salicylic Acid (2.5%): A higher concentration of salicylic acid helps to exfoliate the skin and unclog pores more effectively.
- Benzoyl Peroxide (5%): Combines with salicylic acid to provide a dual-action approach to treating pimples.
- Green Tea Extract: Offers antioxidant properties and helps to soothe and calm irritated skin.
Benefits:
- Dual Action: The combination of salicylic acid and benzoyl peroxide provides a comprehensive approach to treating pimples.
- Effective Exfoliation: Salicylic acid helps to exfoliate the skin and prevent clogged pores.
- Soothing: Green tea extract helps to calm the skin and reduce redness and irritation.
How It Works:
- Paula’s Choice CLEAR Acne Spot Treatment uses a combination of salicylic acid and benzoyl peroxide to target pimples from multiple angles. Salicylic acid exfoliates and unclogs pores, while benzoyl peroxide kills bacteria and reduces inflammation. Green tea extract provides additional soothing benefits.
Usage Tips:
- Apply to affected areas once or twice daily. Due to its potent ingredients, start with a small amount and gradually increase as needed to assess your skin’s tolerance.
FAQs
1. What is the best cream for treating pimples?
Answer : The best cream for treating pimples depends on your skin type and needs. Popular options include Neutrogena On-the-Spot Acne Treatment with benzoyl peroxide, Olay Regenerist Retinol 24 for its retinol, and La Roche-Posay Effaclar Duo with salicylic acid.
2. How do I choose the right cream for my pimples?
Answer : Choose a cream based on the active ingredients that target your specific concerns. Benzoyl peroxide is great for bacteria, salicylic acid helps with exfoliation, and retinol promotes cell turnover.
3. Can I use these creams if I have sensitive skin?
Answer : For sensitive skin, opt for creams with lower concentrations of active ingredients or those specifically formulated for sensitive skin, like Olay Regenerist Retinol 24.
4. How often should I apply pimple creams?
Answer : Apply pimple creams as directed, usually once or twice daily. Start with a small amount to test your skin’s tolerance and adjust based on your skin’s response.
5. How long will it take to see results?
Answer : Results vary, but you should start seeing improvements within 2 to 4 weeks with consistent use. Some creams may show quicker results, while others may take longer.
6. Can I use multiple pimple creams together?
Answer : Using multiple creams can be effective, but be cautious as combining strong ingredients may cause irritation. Consult a dermatologist for personalized advice.
7. Are these creams suitable for all skin types?
Answer : Most creams are formulated to be effective for various skin types, but it’s important to choose products that match your specific skin needs, such as oily, dry, or combination skin.
8. Can these creams be used with other skincare products?
Answer : Yes, but apply pimple creams after cleansing and before moisturizing. Avoid using other strong acne treatments simultaneously to prevent irritation.
9. Are there any side effects of using these creams?
Answer : Possible side effects include dryness, redness, or irritation. If you experience severe reactions, discontinue use and consult a dermatologist.
10. Can I use these creams if I am pregnant or breastfeeding?
Answer : Check with your healthcare provider before using acne creams during pregnancy or breastfeeding, especially those with retinoids or high concentrations of active ingredients.
Conclusion
Choosing the right cream for pimples can greatly influence the effectiveness of your acne treatment routine. Whether you opt for benzoyl peroxide, salicylic acid, retinol, or a combination of ingredients, understanding how these products work and selecting one that matches your skin type and needs can lead to clearer, healthier skin. Always remember to patch test new products and introduce them gradually to avoid irritation. With consistent use and the right product, you can take significant strides toward achieving a pimple-free complexion.
You might also like our beauty articles.
“Motivation is what gets you started. Habit is what keeps you going.” – Jim Ryun
If you would like more information about the 2024, please send us an email.
Written by Fitness Goal 4U
Smart Fitness Goals - Achieve Health with Simple Steps
Smart fitness goals focus on being Specific, Measurable, Achievable, Relevant, and Time-bound. They help you create a clear path to success, stay motivated, and track progress. Whether its weight loss, strength building, or improved endurance, smart goals guide your fitness journey, ensuring steady growth and sustainable results tailored to your needs.
“Confidence comes from discipline and training.” – Robert Kiyosaki
Dark circles are a common cosmetic concern that affects people of all ages. They can make you look tired, stressed, and older than you actually are. Whether caused by genetics, lack of sleep, dehydration, or lifestyle factors, dark circles can be a persistent problem. The good news is that several creams are formulated specifically to combat dark circles and restore a bright, youthful appearance to your eyes. In this comprehensive guide, we’ll explore the top five creams for dark circles, discussing their ingredients, benefits, and how they work. These products have been selected based on their effectiveness, customer reviews, and dermatological recommendations. Let’s dive in and find the perfect solution for your under-eye concerns.
Top 5 Creams for Dark Circles
1. Kiehl’s Creamy Eye Treatment with Avocado
Kiehl’s Creamy Eye Treatment with Avocado is a cult-favorite in the skincare community, known for its rich, hydrating formula. This cream is especially suitable for those with dry or sensitive skin who need a gentle yet effective product to reduce dark circles.
Key Ingredients:
- Avocado Oil: Rich in fatty acids and vitamins A, D, and E, avocado oil deeply nourishes and hydrates the skin, helping to improve the appearance of dark circles.
- Beta-Carotene: A natural antioxidant found in orange and red vegetables, beta-carotene is essential for skin health and helps to combat the free radicals that can contribute to dark circles.
- Shea Butter: Known for its moisturizing properties, shea butter helps to smooth and soften the delicate skin around the eyes.
How It Works:
- The creamy texture of this eye treatment ensures that the skin is thoroughly hydrated, which is crucial for reducing the appearance of dark circles. Dehydration can often make dark circles more prominent, so maintaining moisture levels is key. The antioxidants in the formula also protect the skin from environmental damage, which can exacerbate dark circles.
Pros:
- Extremely hydrating, ideal for dry skin.
- Gentle enough for sensitive skin.
- Rich in natural ingredients.
Cons:
- May be too rich for oily skin types.
- Some users find the texture a bit heavy.
Customer Reviews:
- Many users rave about the hydrating properties of this eye cream, noting that it leaves their under-eye area feeling soft and supple. Some have reported a visible reduction in dark circles after consistent use, though results can vary depending on the severity of the dark circles and individual skin type.
2. Origins GinZing Refreshing Eye Cream
Origins GinZing Refreshing Eye Cream is a popular choice for those seeking an instant pick-me-up for tired eyes. This cream is designed to brighten and depuff the under-eye area, making it a great option for morning use.
Key Ingredients:
- Caffeine: A known stimulant, caffeine helps to constrict blood vessels and reduce puffiness, which can contribute to the appearance of dark circles.
- Ginseng: An ancient herbal remedy, ginseng is known for its revitalizing properties and helps to improve circulation, further reducing dark circles.
- Magnolia Extract: This natural brightener helps to even out skin tone and reduce the appearance of dark circles.
How It Works:
- The combination of caffeine and ginseng in this formula provides an immediate boost to the under-eye area, reducing puffiness and brightening dark circles. The light-reflecting particles in the cream also help to create the illusion of a more awake and refreshed appearance.
Pros:
- Provides an instant brightening effect.
- Reduces puffiness effectively.
- Lightweight and quickly absorbed.
Cons:
- Brightening effect is temporary.
- May not provide enough hydration for very dry skin.
Customer Reviews:
- Users love the immediate results this cream provides, often describing it as a “wake-up call” for their eyes. The cooling sensation and quick absorption make it a favorite for morning routines. However, some users note that while it’s great for temporary brightening, it may not be as effective for long-term dark circle reduction.
3. La Roche-Posay Pigmentclar Eyes
La Roche-Posay Pigmentclar Eyes is a dermatologically tested cream designed specifically to address dark circles caused by hyperpigmentation. It’s an excellent choice for those dealing with stubborn, pigmentation-related dark circles.
Key Ingredients:
- PhE-Resorcinol: A potent ingredient that targets dark spots and hyperpigmentation, helping to lighten dark circles over time.
- Caffeine: As in other eye creams, caffeine helps to reduce puffiness and improve the appearance of dark circles.
- Niacinamide:> Also known as vitamin B3, niacinamide brightens the skin and improves elasticity, which can help reduce the appearance of dark circles.
How It Works:
- La Roche-Posay Pigmentclar Eyes works by targeting the pigmentation that causes dark circles. The PhE-Resorcinol in the formula helps to reduce melanin production, which in turn lightens dark circles. The addition of caffeine and niacinamide ensures that the skin around the eyes looks brighter and more even-toned.
Pros:
- Specifically targets pigmentation-related dark circles.
- Dermatologically tested and safe for sensitive skin.
- Lightweight and non-greasy.
Cons:
- May take time to see results.
- Slightly more expensive than other options.
Customer Reviews:
- Many users appreciate the targeted action of this cream, especially those with pigmentation-related dark circles. While it may take a few weeks to see noticeable results, consistent use has led to significant improvements for many. The lightweight texture is also a hit, as it absorbs quickly without leaving a greasy residue.
4. Neutrogena Hydro Boost Eye Gel-Cream
Neutrogena Hydro Boost Eye Gel-Cream is a drugstore favorite, offering a burst of hydration for the under-eye area. It’s an excellent option for those looking for an affordable yet effective solution for dark circles.
Key Ingredients:
- Hyaluronic Acid: A powerhouse hydrator, hyaluronic acid can hold up to 1,000 times its weight in water, making it ideal for plumping and hydrating the delicate under-eye skin.
- Glycerin: A common humectant, glycerin attracts moisture to the skin and helps to maintain hydration levels, reducing the appearance of dark circles caused by dehydration.
- Olive Extract: This ingredient is rich in antioxidants and helps to strengthen the skin’s moisture barrier.
How It Works:
- The Hydro Boost Eye Gel-Cream provides intense hydration to the under-eye area, which can help to plump the skin and reduce the appearance of dark circles. The lightweight gel texture is perfect for those who don’t want a heavy cream, and it absorbs quickly, leaving the skin feeling refreshed and smooth.
Pros:
- Affordable and widely available.
- Provides excellent hydration.
- Lightweight, non-greasy formula.
Cons:
- May not be effective for severe dark circles.
- Lacks targeted ingredients for pigmentation-related dark circles.
Customer Reviews:
- Users of this product often praise its hydrating properties, noting that it leaves their under-eye area feeling soft and refreshed. While it may not completely eliminate dark circles, many find that it helps to reduce their appearance by keeping the skin well-hydrated and plump.
5. Tatcha The Pearl Tinted Eye Illuminating Treatment
Tatcha The Pearl Tinted Eye Illuminating Treatment is a luxurious option for those who want to combine skincare with a hint of makeup. This cream not only targets dark circles but also provides a subtle, natural-looking tint to brighten the under-eye area instantly.
Key Ingredients:
- Akoya Pearl Extract: Rich in amino acids and minerals, this extract helps to brighten the skin and reduce the appearance of dark circles.
- Hyaluronic Acid: As in the Neutrogena cream, hyaluronic acid provides deep hydration, helping to plump and smooth the under-eye area.
- Silk Powder: A natural brightener, silk powder gives the skin a soft, radiant finish.
How It Works:
- Tatcha The Pearl works in two ways: first, it hydrates and nourishes the under-eye area, and second, it provides a subtle tint that immediately brightens dark circles. The combination of skincare and makeup makes this product a great choice for those who want an all-in-one solution.
Pros:
- Combines skincare with a subtle tint for instant brightening.
- Luxurious ingredients that nourish the skin.
- Available in different shades to suit various skin tones.
Cons:
- Pricey compared to other options.
- The tint may not be enough coverage for some users.
Customer Reviews:
- Users love the dual-action formula of this product, especially those who prefer a natural look without heavy makeup. The hydrating and brightening effects are immediate, and many users report that it helps to reduce the appearance of dark circles over time. However, the price point is a common drawback for some.
How to Choose the Right Cream for Dark Circles
Selecting the right eye cream for dark circles depends on several factors, including your skin type, the cause of your dark circles, and your specific skincare needs. Here’s a quick guide to help you choose:
1. Identify the Cause of Your Dark Circles:
- Pigmentation: If your dark circles are caused by hyperpigmentation, look for creams with ingredients like vitamin C, niacinamide, and resorcinol that target pigmentation.
- Dehydration: For dark circles caused by dry skin, opt for hydrating ingredients like hyaluronic acid, glycerin, and avocado oil.
- Poor Circulation: Caffeine and ginseng are great ingredients for boosting circulation and reducing puffiness, which can help alleviate dark circles.
2. Consider Your Skin Type:
- Dry Skin: Choose a rich, moisturizing cream with ingredients like avocado oil or shea butter.
- Oily Skin: Opt for lightweight, gel-based formulas that won’t clog pores.
- Sensitive Skin: Look for creams that are fragrance-free and dermatologist-tested to avoid irritation.
3. Think About Your Budget:
- There are effective options at all price points, from drugstore favorites like Neutrogena to luxury brands like Tatcha. Determine your budget and find a product that fits within it.
4. Look for Long-Term Benefits:
- While some creams offer immediate brightening effects, it’s important to choose a product that also provides long-term benefits, such as reducing pigmentation or improving skin elasticity.
FAQs
1. What causes dark circles under the eyes?
Answer : Dark circles can be caused by several factors, including genetics, lack of sleep, aging, dehydration, allergies, and hyperpigmentation. Poor circulation and thinning skin also contribute to the appearance of dark circles.
2. How do creams for dark circles work?
Answer : Creams for dark circles often contain ingredients that hydrate, brighten, and improve circulation in the under-eye area. Some creams target pigmentation, while others reduce puffiness and plump the skin to minimize the appearance of dark circles.
3. How long does it take to see results from a dark circle cream?
Answer : Results vary depending on the product and the severity of your dark circles. Some creams provide an instant brightening effect, while others may take 4 to 6 weeks of consistent use to show significant improvement.
4. Can I use dark circle creams if I have sensitive skin?
Answer : Yes, but it's important to choose a cream specifically formulated for sensitive skin. Look for products that are fragrance-free, hypoallergenic, and dermatologist-tested to avoid irritation.
5. Are expensive creams more effective than drugstore options?
Answer : Not necessarily. Both high-end and drugstore creams can be effective, depending on their ingredients and formulation. The key is to find a product that suits your skin type and addresses your specific concerns.M
6. Can I use a dark circle cream in combination with other skincare products?
Answer : Yes, dark circle creams can be used with other skincare products. Apply the cream after cleansing and before moisturizing. Ensure that the products you use together are compatible to avoid irritation.
7. Do these creams work for puffiness as well as dark circles?
Answer : Many creams formulated for dark circles also help reduce puffiness. Ingredients like caffeine, ginseng, and peptides are particularly effective in targeting both issues.
8. Are natural ingredients better for treating dark circles?
Answer : Natural ingredients like avocado oil, shea butter, and aloe vera can be effective in treating dark circles, especially for those with sensitive skin. However, scientifically formulated ingredients like retinol, niacinamide, and peptides can also provide powerful results.
9. Can men use these creams for dark circles?
Answer : Absolutely. Dark circle creams are suitable for all genders. The key is to choose a product that addresses your specific skin concerns and fits your skincare routine.
10. How should I apply a dark circle cream?
Answer : Apply a small amount of cream to your ring finger, then gently pat it around the under-eye area, avoiding direct contact with your eyes. Use it twice daily, in the morning and at night, for best results.
Conclusion
Dark circles can be a frustrating skincare concern, but with the right cream, you can significantly reduce their appearance and achieve a brighter, more youthful look. Whether you’re looking for intense hydration, pigmentation correction, or a quick brightening fix, there’s an eye cream on this list that can meet your needs.
Kiehl’s Creamy Eye Treatment with Avocado offers deep hydration, making it perfect for dry skin. Origins GinZing Refreshing Eye Cream is your go-to for instant brightening and depuffing. La Roche-Posay Pigmentclar Eyes targets pigmentation-related dark circles, while Neutrogena Hydro Boost Eye Gel-Cream provides affordable hydration. Finally, Tatcha The Pearl Tinted Eye Illuminating Treatment combines skincare with a hint of makeup for a natural glow.
Remember, consistency is key when it comes to treating dark circles. Use your chosen cream regularly, and be patient as you wait for results. With time, you’ll likely notice a significant improvement in the appearance of your under-eye area, helping you look and feel your best.
You might also like our beauty articles.
“Motivation is what gets you started. Habit is what keeps you going.” – Jim Ryun
If you would like more information about the 2024, please send us an email.
Written by Fitness Goal 4U
Smart Fitness Goals - Achieve Health with Simple Steps
Smart fitness goals focus on being Specific, Measurable, Achievable, Relevant, and Time-bound. They help you create a clear path to success, stay motivated, and track progress. Whether its weight loss, strength building, or improved endurance, smart goals guide your fitness journey, ensuring steady growth and sustainable results tailored to your needs.
“Confidence comes from discipline and training.” – Robert Kiyosaki
Skincare is not just a routine; it’s a ritual. And when it comes to maintaining a radiant complexion, the night cream is an essential part of that ritual. During the night, our skin goes into repair mode, making it the perfect time to nourish and rejuvenate it. A good night cream can help hydrate, repair, and enhance your skin’s natural glow. But with so many options available, choosing the right one can be overwhelming. That’s why we’ve curated a list of the top 5 night creams for glowing skin, breaking down what makes each one special.
Top 5 Night Cream for Glowing Skin
1. Olay Regenerist Retinol 24 Night Moisturizer
Why It’s a Must-Have?
Olay Regenerist Retinol 24 Night Moisturizer is a powerhouse when it comes to transforming your skin overnight. Retinol, a derivative of Vitamin A, is renowned for its anti-aging properties. It helps to smooth fine lines, even out skin tone, and boost collagen production, giving you a more youthful appearance. This night cream is also formulated with niacinamide (Vitamin B3), which helps to improve skin elasticity and strengthen the skin barrier, resulting in a radiant glow.
Key Ingredients:
- Retinol: Accelerates skin cell turnover, reducing the appearance of fine lines and wrinkles.
- Niacinamide: Enhances skin elasticity and reduces inflammation.
- Amino Peptides: Help repair and regenerate skin cells.
- Glycerin: Provides intense hydration.
How to Use:
- Apply a small amount of the cream to your face and neck after cleansing and toning. Use it consistently to see visible improvements in your skin’s texture and radiance.
Pros:
- Lightweight and non-greasy formula.
- Suitable for all skin types, including sensitive skin.
- Visibly reduces fine lines and improves skin texture.
Cons:
- Retinol can cause initial dryness or irritation for those new to it.
2. CeraVe Skin Renewing Night Cream
Why It’s a Must-Have?
CeraVe Skin Renewing Night Cream is a favorite for those with dry or sensitive skin. It’s formulated with essential ceramides, which are lipids that help restore the skin’s natural barrier and lock in moisture. The addition of hyaluronic acid ensures that your skin stays hydrated throughout the night. This cream also contains niacinamide, which soothes the skin and reduces redness, making it ideal for sensitive skin types.
Key Ingredients:
- Ceramides: Essential for maintaining the skin’s natural barrier and retaining moisture.
- Hyaluronic Acid: A powerful humectant that draws moisture into the skin.
- Niacinamide: Reduces redness and improves skin texture.
How to Use:
- After cleansing and applying any serums, gently apply the cream to your face and neck. It’s recommended for use every night as part of your nighttime skincare routine.
Pros:
- Non-comedogenic and fragrance-free, making it ideal for sensitive skin.
- Provides long-lasting hydration.
- Strengthens the skin’s barrier, reducing moisture loss.
Cons:
- May feel slightly heavy for those with oily skin.
3. Neutrogena Hydro Boost Night Pressed Serum
Why It’s a Must-Have?
Neutrogena Hydro Boost Night Pressed Serum is a unique blend of a serum and cream, designed to deliver intense hydration without the heaviness. It’s infused with hyaluronic acid and antioxidants, which help to plump the skin and protect it from environmental stressors. The lightweight, gel-like texture absorbs quickly, making it a great option for those with oily or combination skin who still want that dewy, glowing look.
Key Ingredients:
- Hyaluronic Acid: Helps retain moisture and plump the skin.
- Antioxidants: Protect the skin from free radical damage.
- Glycerin: Provides deep hydration.
How to Use:
- After cleansing, apply the serum evenly over your face and neck. For best results, use it as the last step in your nighttime skincare routine to lock in moisture.
Pros:
- Lightweight and fast-absorbing.
- Provides intense hydration without clogging pores.
- Suitable for oily and combination skin.
Cons:
- May not provide enough moisture for extremely dry skin.
4. Estée Lauder Advanced Night Repair Synchronized Multi-Recovery Complex
Why It’s a Must-Have?
Estée Lauder Advanced Night Repair is a cult favorite and for good reason. This night serum is packed with powerful ingredients that work in harmony to repair and rejuvenate the skin. It contains Chronolux™ Power Signal Technology, which supports the skin’s natural synchronization, helping it to repair more effectively during the night. Hyaluronic acid ensures that the skin remains hydrated, while antioxidants protect against environmental damage.
Key Ingredients:
- Chronolux™ Power Signal Technology: Supports the skin’s natural repair processes.
- Hyaluronic Acid: Deeply hydrates and plumps the skin.
- Antioxidants: Protect against environmental damage.
How to Use:
- Apply a few drops of the serum to your face and neck before your moisturizer. Gently massage it in, allowing the serum to fully absorb. For best results, use it every night.
Pros:
- Lightweight and non-greasy.
- Helps reduce the appearance of fine lines and wrinkles.
- Improves skin tone and texture for a radiant glow.
Cons:
- High-end price point.
5. Kiehl’s Midnight Recovery Concentrate
Why It’s a Must-Have?
Kiehl’s Midnight Recovery Concentrate is a luxurious, oil-based serum that transforms your skin while you sleep. It’s formulated with a blend of essential oils and botanical extracts, including lavender oil and evening primrose oil, which work together to restore the skin’s natural radiance. The lightweight oil absorbs quickly, leaving the skin feeling soft and smooth without a greasy residue. This concentrate is particularly beneficial for those with dull or tired-looking skin, as it helps to brighten and revitalize the complexion.
Key Ingredients:
- Lavender Essential Oil: Calms and soothes the skin, promoting relaxation.
- Evening Primrose Oil: Boosts skin hydration and improves elasticity.
- Squalane: A plant-derived lipid that helps to replenish the skin’s moisture barrier.
How to Use:
- Apply 2-3 drops of the concentrate onto your fingertips and gently press it into your skin. You can use it alone or before applying your night cream for an added boost of hydration.
Pros:
- Fast-absorbing and non-greasy.
- Revitalizes dull skin for a brighter complexion.
- Suitable for all skin types, including sensitive skin.
Cons:
- The scent may be too strong for some users.
How to Choose the Right Night Cream for Glowing Skin
When selecting a night cream, it’s essential to consider your skin type, concerns, and the ingredients that will best address your needs. Here’s a quick guide to help you choose the right night cream for glowing skin:
1. Skin Type
- Dry Skin: Look for night creams with rich, hydrating ingredients like hyaluronic acid, glycerin, and ceramides.
- Oily/Combination Skin: Opt for lightweight, non-comedogenic formulas that won’t clog pores.
- Sensitive Skin: Choose fragrance-free products with soothing ingredients like niacinamide and ceramides.
- Aging Skin: Incorporate night creams with retinol, peptides, and antioxidants to target fine lines and wrinkles.
2. Key Ingredients
- Retinol: For anti-aging benefits and skin renewal.
- Hyaluronic Acid: For deep hydration and plumping.
- Antioxidants: To protect against environmental stressors and free radicals.
- Niacinamide: To soothe inflammation and improve skin texture.
- Ceramides: To strengthen the skin barrier and retain moisture.
3. Texture and Consistency
- If you prefer a lightweight feel, opt for gels or serums.
- For those with dry or mature skin, a richer, creamier texture may provide the moisture your skin needs.
FAQs
1. Why should I use a night cream?
Answer : Night creams are specially formulated to work with your skin's natural repair processes that occur while you sleep. They provide intense hydration, repair damage, and boost skin renewal, helping you wake up with a more radiant and glowing complexion. Using a night cream can also address specific concerns like fine lines, dullness, and uneven skin tone.
2. How often should I use a night cream?
Answer : You should use a night cream every night as part of your nighttime skincare routine. Consistency is key to seeing long-term benefits like improved skin texture, hydration, and a glowing complexion.
3. Can I use a night cream during the day?
Answer : Night creams are typically richer and heavier than day creams because they are designed to work overnight when your skin is in repair mode. While you can technically use them during the day, they might feel too heavy, especially if you have oily or combination skin. Additionally, many night creams lack SPF, which is essential for daytime use.
4. What’s the difference between a night cream and a regular moisturizer?
Answer : Night creams are usually richer and contain more potent ingredients that target specific skin concerns like aging, dullness, and dehydration. They are designed to work with your skin's natural repair processes during sleep. Regular moisturizers are often lighter and formulated for daytime use, often containing SPF and ingredients that protect against environmental damage.
5. Can I use retinol-based night creams if I have sensitive skin?
Answer : Retinol is a powerful ingredient that can cause irritation, especially if you have sensitive skin. However, many night creams with retinol are formulated to be gentle and include soothing ingredients like niacinamide or ceramides to minimize irritation. If you have sensitive skin, start with a lower concentration of retinol, use it every other night, and always patch test before applying it to your face.
6. How long does it take to see results from using a night cream?
Answer : Results can vary depending on the product and your skin type. Generally, you may start noticing improvements in skin hydration and texture within a week or two. However, for more significant changes like reduced fine lines or improved skin tone, it may take 4-8 weeks of consistent use.
7. Can I layer a night cream over other skincare products?
Answer : Yes, you can layer a night cream over other skincare products. Typically, your nighttime routine should start with cleansing, followed by toner, serum, and then your night cream. If you use a facial oil, apply it after the night cream to seal in the moisture.
8. Is it necessary to use a separate night cream if I already use a serum?
Answer : While serums are highly concentrated with active ingredients, they are usually lightweight and don't provide the same level of hydration as a night cream. Using a night cream after your serum helps lock in moisture and provides additional benefits like repairing and rejuvenating the skin while you sleep.
9. What should I do if my skin feels greasy after using a night cream?
Answer : If your skin feels greasy after using a night cream, you might be using too much product or the cream might be too heavy for your skin type. Try using a smaller amount and gently pat it into your skin rather than rubbing it in. If it still feels greasy, consider switching to a lighter formula or a gel-based night cream, which may be more suitable for your skin type.
10. Are there any side effects of using night creams?
Answer : Most night creams are formulated to be safe for daily use. However, some ingredients, like retinol, can cause dryness, redness, or irritation, especially if you’re new to them. Always patch test a new product on a small area of your skin before applying it to your entire face. If you experience persistent irritation, discontinue use and consult a dermatologist.
11. Can I use different night creams on different nights?
Answer : Yes, you can alternate between different night creams based on your skin’s needs. For example, you might use a retinol-based cream a few nights a week for anti-aging benefits and a more hydrating cream on other nights to prevent dryness. This approach, often called "skin cycling," can help you reap the benefits of various active ingredients without overwhelming your skin.
12. Can night creams help with acne?
Answer : Some night creams are formulated to target acne and contain ingredients like salicylic acid, benzoyl peroxide, or retinol, which help to clear pores and reduce acne. However, if you have acne-prone skin, it's important to choose a non-comedogenic night cream that won't clog your pores. Always consult with a dermatologist if you're unsure which product is best for your acne.
13. Should I change my night cream according to the season?
Answer : Yes, your skin’s needs can change with the seasons. In colder months, your skin may require more hydration and a richer night cream, while in warmer months, a lighter formula might be more comfortable. Listen to your skin and adjust your skincare routine accordingly.
14. What should I avoid when choosing a night cream?
Answer : When choosing a night cream, avoid ingredients that your skin might be sensitive to, such as fragrances, alcohol, or harsh preservatives. Additionally, if you have acne-prone skin, steer clear of comedogenic ingredients that could clog your pores. It's also wise to avoid using multiple products with strong active ingredients simultaneously, as this can lead to irritation.
Final Thoughts
Achieving glowing skin doesn’t happen overnight, but with the right night cream, you can wake up to a more radiant complexion. Each of the night creams mentioned above has its unique benefits, catering to different skin types and concerns. Whether you’re looking to combat signs of aging, hydrate dry skin, or brighten a dull complexion, there’s a night cream on this list for you.
Remember, consistency is key in skincare. Use your chosen night cream regularly as part of your nightly routine, and give it time to work its magic. With patience and the right products, glowing skin is well within your reach. So, invest in one of these top-rated night creams and let your skin reap the benefits while you sleep.
“Motivation is what gets you started. Habit is what keeps you going.” – Jim Ryun
If you would like more information about the 2024, please send us an email.
Written by Fitness Goal 4U
Smart Fitness Goals - Achieve Health with Simple Steps
Smart fitness goals focus on being Specific, Measurable, Achievable, Relevant, and Time-bound. They help you create a clear path to success, stay motivated, and track progress. Whether its weight loss, strength building, or improved endurance, smart goals guide your fitness journey, ensuring steady growth and sustainable results tailored to your needs.
“Confidence comes from discipline and training.” – Robert Kiyosaki
Oily skin can be both a blessing and a curse. While the natural oils help keep the skin hydrated and youthful, they can also lead to issues such as acne, enlarged pores, and an unsightly shine. Finding the right skincare products, particularly moisturizers, can be a game-changer in managing oily skin. Moisturizers that are too heavy can exacerbate oiliness, while those that are too light may leave the skin feeling dry or irritated. The key is to find a cream that hydrates without clogging pores or adding excess oil. Here, we’ll delve into the top five creams specifically formulated for oily skin, each offering a unique set of benefits to help you achieve a balanced, healthy complexion.
Top 5 Creams for Oily Skin
1. Neutrogena Hydro Boost Water Gel
Neutrogena Hydro Boost Water Gel has earned its place as a favorite among those with oily skin, thanks to its lightweight, oil-free formula that delivers intense hydration without clogging pores. This gel-cream hybrid is powered by hyaluronic acid, a potent humectant that attracts and retains moisture in the skin, ensuring it stays hydrated throughout the day.
Benefits
- Non-Greasy Hydration: The water-based formula provides an instant surge of moisture, leaving the skin feeling refreshed and plump without the greasy residue that often accompanies heavier creams.
- Hyaluronic Acid: This ingredient is known for its ability to hold up to 1,000 times its weight in water, making it an excellent choice for oily skin that still needs hydration.
- Oil-Free and Non-Comedogenic: These properties are crucial for oily skin types, as they help prevent the product from clogging pores and causing breakouts.
Why It Works for Oily Skin
- Neutrogena Hydro Boost Water Gel's oil-free formula ensures that it hydrates the skin without adding excess oil. Its gel-like texture absorbs quickly, providing long-lasting moisture that doesn’t contribute to shine. The presence of hyaluronic acid ensures that the skin remains hydrated without the need for heavy, pore-clogging oils.
How to Use
- Apply Neutrogena Hydro Boost Water Gel twice daily after cleansing and toning. Use a small amount and gently massage it into the skin, focusing on areas that tend to get oily. It can be used under makeup, as it creates a smooth, hydrated base without interfering with other products.
2. La Roche-Posay Effaclar Mat
La Roche-Posay is a brand well-known for its dermatologist-recommended products, and Effaclar Mat is no exception. This mattifying moisturizer is specifically designed for oily, acne-prone skin, offering both hydration and shine control. It also helps to refine pores, making it an excellent choice for those who struggle with both oily skin and large pores.
Benefits
- Sebulyse Technology: This ingredient targets excess oil production, helping to reduce shine and control the oily appearance throughout the day.
- Pore-Refining: The cream helps to tighten and minimize the appearance of pores, giving the skin a smoother, more refined look.
- Anti-Shine: Effaclar Mat not only hydrates but also works as a primer, creating a matte finish that lasts all day, making it ideal for use under makeup.
Why It Works for Oily Skin
- La Roche-Posay Effaclar Mat is designed to tackle the common issues faced by those with oily skin: excess shine, large pores, and breakouts. Its unique formula helps to regulate sebum production while providing essential moisture, ensuring the skin remains balanced and hydrated without becoming greasy.
How to Use
- Apply Effaclar Mat in the morning after cleansing and toning. Use a small amount and focus on areas prone to shine, such as the T-zone. It can be worn alone or under makeup for a matte, shine-free finish.
3. Clinique Dramatically Different Moisturizing Gel
Clinique’s Dramatically Different Moisturizing Gel is a cult favorite, especially among those with oily or combination skin. This lightweight, oil-free gel moisturizer is part of Clinique’s famous 3-Step Skincare System and is designed to provide all-day hydration while controlling oil.
Benefits
- Oil-Free Formula: The gel is entirely oil-free, which helps prevent clogged pores and breakouts, making it ideal for oily skin types.
- Lightweight Hydration: The gel texture is refreshing and absorbs quickly, providing a moisture boost without feeling heavy or greasy on the skin.
- Allergy-Tested and Fragrance-Free: Clinique’s commitment to creating products suitable for sensitive skin is evident in this moisturizer, which is free of common irritants like fragrances.
Why It Works for Oily Skin
- The Clinique Dramatically Different Moisturizing Gel is formulated to provide hydration without contributing to oiliness. Its lightweight, fast-absorbing gel formula makes it perfect for oily skin, as it delivers the necessary moisture without sitting heavily on the skin or clogging pores.
How to Use
- Use this gel twice daily, after cleansing and toning. Apply a small amount to the entire face, avoiding the eye area. It can be used alone or as part of Clinique’s 3-Step Skincare System for a comprehensive skincare routine.
4. Kiehl’s Ultra Facial Oil-Free Gel Cream
Kiehl’s Ultra Facial Oil-Free Gel Cream is designed to provide 24-hour hydration while minimizing shine and oil production. This gel cream is particularly beneficial for those who struggle with excess oil, as it helps to balance the skin’s natural moisture levels without overloading it.
Benefits
- Oil-Free Hydration: The gel cream is specifically formulated to provide hydration without adding extra oil, making it ideal for oily skin types.
- Cooling Effect: The lightweight gel texture has a cooling effect on the skin, making it particularly soothing and refreshing, especially in warmer climates.
- Non-Comedogenic: The formula is designed to avoid clogging pores, reducing the risk of breakouts and blemishes.
Why It Works for Oily Skin
- Kiehl’s Ultra Facial Oil-Free Gel Cream works by hydrating the skin while actively controlling excess oil. Its lightweight, cooling formula makes it particularly appealing for those with oily skin, as it provides moisture without adding to the oiliness or shine.
How to Use
- Apply this gel cream to clean, dry skin twice daily. It works well as a base for makeup due to its lightweight, non-greasy finish. Focus on areas that are prone to oiliness, such as the T-zone, and gently massage the product into the skin.
5. The Ordinary Natural Moisturizing Factors + HA
The Ordinary has gained a reputation for offering effective, no-nonsense skincare products at affordable prices. Their Natural Moisturizing Factors + HA is a simple yet effective moisturizer designed to support the skin’s natural barrier while providing hydration. It’s particularly suitable for oily skin due to its lightweight, non-greasy formula.
Benefits
- Humectants and Emollients: This cream contains a blend of humectants and emollients, including hyaluronic acid, to provide hydration and support the skin’s barrier function.
- Non-Greasy Formula: Despite its moisturizing properties, the cream is lightweight and absorbs quickly, making it suitable for oily skin.
- Affordable: The Ordinary is known for offering high-quality skincare at accessible prices, making this moisturizer a budget-friendly option.
Why It Works for Oily Skin
- The Ordinary Natural Moisturizing Factors + HA is designed to provide essential hydration without overwhelming oily skin. Its lightweight formula absorbs quickly and doesn’t leave a greasy residue, making it ideal for those who want effective hydration without the heaviness of traditional creams.
How to Use
- Apply a small amount to the face after cleansing and any serums. Use twice daily, in the morning and evening. This cream can be layered under other products, including sunscreen and makeup, without causing pilling or excessive shine.
FAQs
1. Why do I need a moisturizer if I have oily skin?
Answer : Even if you have oily skin, moisturizing is essential. Your skin needs hydration to maintain its balance. When you skip moisturizer, your skin may produce even more oil to compensate for the lack of moisture, leading to increased greasiness and potential breakouts. The key is to choose a lightweight, oil-free moisturizer that hydrates without clogging pores.
2. Can these creams be used under makeup?
Answer : Yes, most of the creams mentioned are suitable for use under makeup. They provide a smooth, hydrated base without causing your makeup to slide off or look too shiny. For instance, La Roche-Posay Effaclar Mat and Neutrogena Hydro Boost Water Gel are particularly good for creating a matte, even surface for makeup application.
3. How often should I apply moisturizer if I have oily skin?
Answer : Typically, you should apply moisturizer twice daily, once in the morning and once at night, after cleansing and toning. However, if your skin feels particularly oily, you may choose to apply it only in the evening or use a lighter application during the day.
4. Will using these creams make my skin more oily?
Answer : No, using the right moisturizer should not make your skin more oily. The products listed, such as Clinique Dramatically Different Moisturizing Gel and Kiehl’s Ultra Facial Oil-Free Gel Cream, are designed to hydrate the skin without adding excess oil. These formulas are specifically crafted to balance the skin’s moisture levels and can even help reduce oil production over time.
5. Can these creams help with acne?
Answer : While these creams are primarily designed to hydrate and balance oily skin, some of them, like La Roche-Posay Effaclar Mat, contain ingredients that can help manage acne by controlling oil production and refining pores. However, for active acne, you may want to pair these moisturizers with targeted acne treatments, such as products containing salicylic acid or benzoyl peroxide.
6. Are these creams suitable for sensitive skin?
Answer : Yes, many of the creams listed, such as Clinique Dramatically Different Moisturizing Gel and The Ordinary Natural Moisturizing Factors + HA, are formulated to be gentle on the skin. They are typically free of harsh irritants like fragrances and are allergy-tested. However, if you have sensitive skin, it's always a good idea to do a patch test first to ensure the product is compatible with your skin.
7. How do I choose between a gel and a cream moisturizer?
Answer : Gel moisturizers, like Neutrogena Hydro Boost Water Gel, are usually lighter and more suitable for very oily skin, as they absorb quickly and don't leave a greasy residue. Creams, even lightweight ones, can offer more intense hydration and are better if your skin is combination or if you experience dryness in certain areas. Consider your skin’s specific needs and preferences when choosing between a gel and a cream.
8. Can I use these creams if I have combination skin?
Answer : Yes, many of these products are suitable for combination skin, where some areas of your face are oily (like the T-zone) and others are dry. For example, Clinique Dramatically Different Moisturizing Gel and Kiehl’s Ultra Facial Oil-Free Gel Cream can provide balanced hydration that works well across different skin types. Apply more product to the drier areas and a lighter layer on the oily areas.
9. What’s the best way to incorporate these creams into my skincare routine?
Answer : Start with a gentle cleanser and toner to remove excess oil and impurities. Follow up with any treatment serums you use, such as those for acne or dark spots. Then, apply your chosen moisturizer. In the morning, finish with a broad-spectrum sunscreen to protect your skin from UV damage. In the evening, you can apply the moisturizer as the final step to lock in hydration overnight.
10. Will these creams help reduce the size of my pores?
Answer : While moisturizers alone won't shrink your pores, products like La Roche-Posay Effaclar Mat can help minimize their appearance by controlling oil production and refining the skin's texture. Regular exfoliation and proper cleansing, combined with these creams, can also help keep pores clear and less noticeable.
11. How long will it take to see results from using these creams?
Answer : You may notice an immediate improvement in how your skin feels—hydrated and balanced. However, it can take several weeks of consistent use to see significant changes in oil production, texture, and the appearance of pores. Consistency is key to achieving and maintaining the best results.
12. Can I layer these moisturizers with other skincare products?
Answer : Yes, these moisturizers are designed to be layered with other skincare products. You can apply serums, spot treatments, and sunscreen over these creams without worrying about pilling or excessive shine. Just be sure to apply them in the correct order—generally from thinnest to thickest texture.
13. Is it necessary to change my moisturizer with the seasons?
Answer : It can be beneficial to adjust your moisturizer based on the season. In warmer months, you might prefer a lighter gel like Neutrogena Hydro Boost Water Gel to combat excess oil. In colder months, even oily skin can experience dryness, so you might opt for a slightly more hydrating product like Kiehl’s Ultra Facial Oil-Free Gel Cream.
14. Can men use these creams as well?
Answer : Absolutely! Skincare is universal, and these creams are suitable for all genders. Men with oily skin can benefit from these products just as much as women. The lightweight, non-greasy formulas are particularly appealing for those who prefer a minimal, no-fuss skincare routine.
Conclusion
Selecting the right moisturizer for oily skin can be a challenging task, but with the right knowledge, you can find a product that hydrates without adding to the oiliness or causing breakouts. Each of the creams listed above offers unique benefits tailored to the needs of oily skin, whether you're looking for lightweight hydration, shine control, or pore-refining properties.
When choosing a moisturizer for oily skin, consider your specific skin concerns, such as acne, large pores, or sensitivity. Look for products that are oil-free, non-comedogenic, and lightweight to ensure they won’t clog pores or contribute to excess oil production. It's also important to incorporate these creams into a comprehensive skincare routine that includes proper cleansing, toning, and sun protection to maintain a healthy, balanced complexion.
Ultimately, the key to managing oily skin is finding a product that works harmoniously with your skin's natural oils rather than against them. By choosing one of these top creams for oily skin, you can achieve a hydrated, matte complexion that feels comfortable and looks radiant throughout the day.
You might also like our beauty articles.
“Motivation is what gets you started. Habit is what keeps you going.” – Jim Ryun
If you would like more information about the 2024, please send us an email.
Written by Fitness Goal 4U
Smart Fitness Goals - Achieve Health with Simple Steps
Smart fitness goals focus on being Specific, Measurable, Achievable, Relevant, and Time-bound. They help you create a clear path to success, stay motivated, and track progress. Whether its weight loss, strength building, or improved endurance, smart goals guide your fitness journey, ensuring steady growth and sustainable results tailored to your needs.
“Confidence comes from discipline and training.” – Robert Kiyosaki
Finding the perfect moisturizer for oily skin can be a tricky endeavor. Many people with oily skin tend to shy away from moisturizers, fearing that they will make their skin even more greasy and lead to breakouts. However, skipping moisturizer can actually cause your skin to produce more oil as it tries to compensate for the lack of hydration. The key is to choose a moisturizer that provides the right balance of hydration without adding excess oil or clogging pores. In this article, we will explore the top 5 moisturizers for oily skin that help keep your complexion balanced, hydrated, and shine-free.
Top 5 Moisturizer for Oily Skin
1. Neutrogena Hydro Boost Water Gel
Neutrogena Hydro Boost Water Gel is a popular choice among dermatologists and skincare enthusiasts alike. It is a lightweight, oil-free formula that provides intense hydration without feeling heavy on the skin. The gel-based texture absorbs quickly, leaving your skin feeling refreshed and smooth.
Key Ingredients:
- Hyaluronic Acid: This powerhouse ingredient attracts moisture to the skin and locks it in, providing long-lasting hydration.
- Glycerin: A humectant that helps retain moisture and keeps the skin hydrated.
- Dimethicone: A type of silicone that creates a barrier on the skin’s surface to lock in moisture without clogging pores.
Benefits:
- Non-Comedogenic: Won’t clog pores, making it perfect for oily and acne-prone skin.
- Oil-Free: Does not add any extra oil to the skin, preventing a greasy appearance.
- Cooling Sensation: The gel formula provides a refreshing, cooling sensation, making it ideal for hot and humid climates.
How to Use:
- Apply a small amount to your face and neck after cleansing and toning. Use it morning and night for the best results. It can also be used as a makeup primer due to its smooth, matte finish.
2. La Roche-Posay Effaclar Mat Anti-Shine Oil-Free Moisturizer
La Roche-Posay Effaclar Mat is specifically formulated for oily skin, offering a mattifying effect that controls shine throughout the day. This moisturizer not only hydrates but also helps refine the skin’s texture and reduce the appearance of pores.
Key Ingredients:
- Sebulyse Technology: This innovative ingredient helps to regulate sebum production, keeping oiliness in check.
- Perlite: A natural volcanic mineral that absorbs oil and provides a matte finish.
- Salicylic Acid: A gentle exfoliant that unclogs pores and helps prevent breakouts.
Benefits:
- Mattifying: Keeps your skin looking fresh and shine-free for hours.
- Pore-Minimizing: Helps reduce the appearance of enlarged pores.
- Non-Greasy: Absorbs quickly without leaving a residue.
How to Use:
- Apply to the face and neck in the morning after cleansing. Focus on areas prone to oiliness, such as the T-zone. It works well under makeup and helps keep your foundation in place all day.
3. Cetaphil Pro Oil Absorbing Moisturizer SPF 30
Cetaphil Pro Oil Absorbing Moisturizer offers a two-in-one solution for oily skin. It provides hydration while also offering broad-spectrum sun protection with SPF 30. This moisturizer is designed to absorb excess oil, leaving your skin with a matte finish.
Key Ingredients:
- Oleosome Technology: A unique delivery system that provides long-lasting hydration while keeping the formula lightweight.
- Micropearl Technology: Absorbs excess oil and reduces shine, giving the skin a matte appearance.
- Zinc Oxide: Provides broad-spectrum sun protection without clogging pores.
Benefits:
- Sun Protection: Shields your skin from harmful UVA and UVB rays with SPF 30.
- Oil Control: Absorbs oil throughout the day, preventing a greasy complexion.
- Hypoallergenic: Suitable for sensitive skin and won’t cause irritation.
How to Use:
- Apply generously to your face and neck as the last step in your morning skincare routine. Reapply every two hours when exposed to the sun for continuous protection.
4. Kiehl’s Ultra Facial Oil-Free Gel Cream
Kiehl’s Ultra Facial Oil-Free Gel Cream is a lightweight, non-greasy formula that provides 24-hour hydration without adding any extra shine. It’s perfect for those with oily or combination skin who want to keep their skin hydrated and balanced.
Key Ingredients:
- Glacial Glycoprotein: Sourced from Antarctic glaciers, this ingredient helps protect and deeply hydrate the skin.
- Micronized Amino Acids: Help reduce excess oil production and minimize the appearance of pores.
- Imperata Cylindrica Root Extract: A plant extract that helps the skin retain moisture even in extreme conditions.
Benefits:
- Oil-Free: Hydrates without adding oil, making it ideal for oily skin.
- Long-Lasting Hydration: Keeps your skin moisturized for up to 24 hours.
- Cooling Effect: Provides a refreshing sensation upon application, which is especially soothing during hot weather.
How to Use:
- Apply a small amount to the face and neck after cleansing and toning. Use it both morning and night for optimal results. It can be layered under sunscreen during the day.
5. First Aid Beauty Skin Rescue Oil-Free Mattifying Gel Moisturizer
First Aid Beauty’s Skin Rescue Oil-Free Mattifying Gel Moisturizer is designed to provide lightweight hydration while controlling oil and shine. This gel moisturizer is packed with antioxidants and botanical extracts that help soothe the skin and reduce the appearance of blemishes.
Key Ingredients:
- Salicylic Acid: Helps unclog pores and prevent breakouts.
- Zinc PCA: Regulates sebum production and reduces shine.
- Licorice Root Extract: Soothes the skin and helps reduce redness and inflammation.
Benefits:
- Oil Control: Absorbs excess oil and leaves a matte finish.
- Non-Comedogenic: Won’t clog pores, making it suitable for acne-prone skin.
- Soothing: Calms irritated skin and helps reduce redness.
How to Use:
- Apply a small amount to clean, dry skin. Use it in the morning and evening as part of your skincare routine. It works well under makeup and helps control shine throughout the day.
FAQs
1. Why do people with oily skin need a moisturizer?
Answer : Moisturizing is essential for all skin types, including oily skin. When the skin is dehydrated, it can produce even more oil to compensate, leading to a greasier complexion and potential breakouts. A good moisturizer helps to balance the skin’s moisture levels without adding excess oil, keeping it hydrated and healthy.
2. What should I look for in a moisturizer for oily skin?
Answer : Look for moisturizers that are labeled as oil-free, non-comedogenic (won’t clog pores), and lightweight. Ingredients like hyaluronic acid, glycerin, and salicylic acid are beneficial as they hydrate the skin without making it greasy. Gel-based formulas are often better for oily skin because they absorb quickly and provide a matte finish.
3. Can I use a moisturizer with SPF if I have oily skin?
Answer : Yes, using a moisturizer with SPF is a great way to protect your skin from sun damage without adding an extra layer of sunscreen. Opt for an oil-free, non-comedogenic formula with broad-spectrum SPF protection. Products like Cetaphil Pro Oil Absorbing Moisturizer SPF 30 offer sun protection while controlling oil.
4. Will moisturizing my oily skin make it less oily?
Answer : Yes, using the right moisturizer can help regulate your skin’s oil production. When your skin is adequately hydrated, it is less likely to overproduce oil. Consistently moisturizing with a lightweight, oil-free product can lead to a more balanced complexion over time.
5. Can I skip moisturizer if my skin is very oily?
Answer : Skipping moisturizer is not recommended, even for very oily skin. Without proper hydration, your skin may produce more oil to compensate, leading to a cycle of increased oiliness. Instead, use a lightweight, oil-free moisturizer to keep your skin hydrated and balanced.
6. Are gel moisturizers better for oily skin than creams?
Answer : Gel moisturizers are often better suited for oily skin because they are lighter and absorb quickly without leaving a greasy residue. They provide hydration while giving the skin a matte finish. Creams can be too heavy for oily skin and may contribute to clogged pores and breakouts.
7. Can I use these moisturizers if I have acne-prone skin?
Answer : Yes, all of the moisturizers listed are non-comedogenic, meaning they won’t clog pores, making them suitable for acne-prone skin. Some, like La Roche-Posay Effaclar Mat and First Aid Beauty Skin Rescue Oil-Free Mattifying Gel Moisturizer, even contain ingredients like salicylic acid that help prevent and treat breakouts.
8. How often should I apply moisturizer if I have oily skin?
Answer : You should apply moisturizer twice a day—once in the morning and once at night—after cleansing and toning your skin. In the morning, consider using a moisturizer with SPF to protect your skin from sun damage. At night, a lightweight, hydrating moisturizer will keep your skin balanced.
9. Can I use these moisturizers under makeup?
Answer : Yes, all of these moisturizers work well under makeup. They absorb quickly and provide a smooth, matte base, helping to keep your makeup in place throughout the day. Neutrogena Hydro Boost Water Gel and La Roche-Posay Effaclar Mat, in particular, are excellent choices for prepping the skin before applying makeup.
10. Will using a moisturizer make my pores look larger?
Answer : No, using a moisturizer won’t make your pores look larger. In fact, some moisturizers like La Roche-Posay Effaclar Mat contain ingredients that help minimize the appearance of pores by controlling oil production and refining the skin’s texture.
11. Is it necessary to use a different moisturizer in the summer and winter?
Answer : Depending on your skin’s needs, you may want to switch to a lighter moisturizer in the summer and a slightly more hydrating one in the winter. However, if you find a moisturizer that works well year-round, like Kiehl’s Ultra Facial Oil-Free Gel Cream, you can use it regardless of the season.
12. Can these moisturizers help with reducing shine throughout the day?
Answer : Yes, many of these moisturizers, such as La Roche-Posay Effaclar Mat and Cetaphil Pro Oil Absorbing Moisturizer, are designed to control oil and reduce shine throughout the day. They absorb excess oil and leave a matte finish, helping your skin look fresh and shine-free.
13. What if my skin feels greasy after applying moisturizer?
Answer : If your skin feels greasy after applying moisturizer, you may be using too much product or your moisturizer may be too heavy for your skin type. Opt for a smaller amount or switch to a lighter, gel-based formula like Neutrogena Hydro Boost Water Gel, which is designed to hydrate without leaving a greasy residue.
14. Can I use these moisturizers if I have combination skin?
Answer : Yes, these moisturizers are suitable for combination skin, especially if you have an oily T-zone and normal to dry areas elsewhere. They provide hydration without adding excess oil, making them ideal for balancing combination skin.
15. Are these moisturizers suitable for sensitive skin?
Answer : Yes, most of these moisturizers are formulated to be gentle and are suitable for sensitive skin. For example, Cetaphil Pro Oil Absorbing Moisturizer is hypoallergenic and free from harsh ingredients that can irritate sensitive skin. Always check the ingredient list and do a patch test if you have highly sensitive skin.
Conclusion
Choosing the right moisturizer for oily skin is crucial for maintaining a healthy, balanced complexion. The best options provide essential hydration without clogging pores or adding excess oil. By incorporating one of the top five moisturizers into your skincare routine—whether it’s a lightweight gel or a mattifying formula—you can achieve clear, hydrated skin without the unwanted shine. These products are specifically designed to balance moisture levels, control oil, and leave your skin feeling fresh and smooth. With the right moisturizer, oily skin can look its best, all day long.
You might also like our beauty articles.
“Motivation is what gets you started. Habit is what keeps you going.” – Jim Ryun
If you would like more information about the 2024, please send us an email.
Written by Fitness Goal 4U
Smart Fitness Goals - Achieve Health with Simple Steps
Smart fitness goals focus on being Specific, Measurable, Achievable, Relevant, and Time-bound. They help you create a clear path to success, stay motivated, and track progress. Whether its weight loss, strength building, or improved endurance, smart goals guide your fitness journey, ensuring steady growth and sustainable results tailored to your needs.
“Confidence comes from discipline and training.” – Robert Kiyosaki
Finding the perfect skincare product can be daunting, especially for those with oily skin. Oily skin is prone to breakouts, excess shine, and enlarged pores, making it essential to choose products that help balance sebum production without clogging pores. Among these products, face serums are a game-changer, offering concentrated ingredients that target specific skin concerns.
In this article, we'll explore the top five face serums tailored for oily skin. These serums have been selected based on their ability to control oil production, reduce acne, refine pores, and promote a healthy, glowing complexion. Whether you're dealing with stubborn blackheads or looking to mattify your skin, these serums can become vital to your skincare routine.
Top 5 Face Serums for Oily Skin
1. The Ordinary Niacinamide 10% + Zinc 1%
Price Range: Affordable
Key Ingredients: Niacinamide (Vitamin B3), Zinc PCA
Benefits:
- Oil Control: Niacinamide is a powerful ingredient that helps regulate oil production, reducing excess sebum and shine.
- Pore Minimization: It helps to tighten pores, making them appear smaller. Anti-Inflammatory: Zinc PCA has anti-inflammatory properties that help soothe irritated skin and reduce redness.
Why It’s Great for Oily Skin:
- The Ordinary Niacinamide 10% + Zinc 1% serum has become a cult favorite among those with oily skin, and for good reason. Niacinamide is known for its versatility in addressing various skin concerns, including oiliness. It not only helps in reducing sebum production but also works to improve the overall texture of the skin. Zinc, on the other hand, has a calming effect and can prevent acne formation. The combination of these two ingredients makes this serum an excellent choice for anyone struggling with oily skin.
How to Use:
- Apply a few drops of this serum to your face after cleansing and before moisturizing. It can be used both in the morning and evening. However, it's essential to pair it with sunscreen during the day, as niacinamide can make your skin more sensitive to the sun.
Where to Buy:
- Available at various online retailers, including The Ordinary's official website, Sephora, and Ulta.
2. La Roche-Posay Effaclar Pore-Refining Serum
Price Range: Mid-range
Key Ingredients: Glycolic Acid, Salicylic Acid, Lipo-Hydroxy Acid
Benefits:
- Exfoliation: The combination of glycolic, salicylic, and lipo-hydroxy acids provides gentle yet effective exfoliation, helping to unclog pores and prevent acne.
- Pore Refinement: This serum visibly reduces the size of pores, giving the skin a smoother appearance.
- Anti-Acne: Salicylic acid is a well-known acne-fighting ingredient that helps to clear up blemishes and prevent future breakouts.
Why It’s Great for Oily Skin:
- La Roche-Posay's Effaclar Pore-Refining Serum is specifically formulated for oily, acne-prone skin. The trio of acids works synergistically to exfoliate the skin, remove dead skin cells, and unclog pores, which are often the culprits behind acne and blackheads. Glycolic acid, in particular, also helps to brighten the skin and improve its overall texture. If you're dealing with frequent breakouts and want to refine your pores, this serum could be the answer to your skincare woes.
How to Use:
- Apply this serum in the evening after cleansing. Because it contains exfoliating acids, it’s crucial to follow up with sunscreen in the morning to protect your skin from UV damage.
Where to Buy:
- Available at drugstores, online retailers, and La Roche-Posay’s official website.
3. Paula’s Choice Skin Perfecting 2% BHA Liquid Exfoliant
Price Range: Mid-range
- Key Ingredients: Salicylic Acid (BHA), Green Tea Extract
Benefits:
- Deep Pore Cleansing: Salicylic acid penetrates deep into the pores, dissolving excess oil and debris, preventing clogged pores.
- Anti-Inflammatory: Green tea extract soothes irritated skin and provides antioxidant protection.
- Reduces Blackheads: This exfoliant helps in reducing blackheads and whiteheads, making it ideal for oily, acne-prone skin.
Why It’s Great for Oily Skin:
- Paula’s Choice Skin Perfecting 2% BHA Liquid Exfoliant is a holy grail for those with oily skin, especially if you're struggling with blackheads or frequent breakouts. Salicylic acid is a beta hydroxy acid (BHA) that exfoliates the skin and unclogs pores from within, making it incredibly effective for oily and acne-prone skin. The inclusion of green tea extract also helps to calm the skin, reducing any redness or irritation that might accompany acne.
How to Use:
- This product can be used daily, either in the morning or evening, after cleansing. Apply with a cotton pad over your entire face, avoiding the eye area. Follow up with a moisturizer and sunscreen during the day.
Where to Buy:
- Available at Paula’s Choice website, Sephora, and other online retailers.
4. Sunday Riley U.F.O. Ultra-Clarifying Face Oil
Price Range: High-end
- Key Ingredients: Salicylic Acid, Tea Tree Oil, Black Cumin Seed Oil
Benefits:
- Acne Treatment: Salicylic acid and tea tree oil work together to fight acne-causing bacteria and clear up blemishes.
- Oil Control: Black cumin seed oil helps to regulate oil production and reduce shine.
- Skin Clarification: This face oil clarifies the skin, reduces the appearance of pores, and prevents future breakouts.
Why It’s Great for Oily Skin:
- The idea of using an oil on oily skin might seem counterintuitive, but Sunday Riley’s U.F.O. Ultra-Clarifying Face Oil is specially designed for oily, acne-prone skin. This fast-absorbing oil contains 1.5% salicylic acid to treat and prevent acne, while tea tree oil and black cumin seed oil help to control sebum production and reduce inflammation. The result is a clearer, more balanced complexion without the heavy, greasy feeling that some oils can leave behind.
How to Use:
- Apply a few drops of this oil to clean, dry skin, focusing on areas prone to breakouts. It can be used morning and night, but be sure to use sunscreen during the day.
Where to Buy:
- Available at Sephora, Sunday Riley’s official website, and other high-end retailers.
5. Vichy Normaderm Phytoaction Acne Control Daily Moisturizer
Price Range: Mid-range
Key Ingredients: Salicylic Acid, Vichy Volcanic Water, Hyaluronic Acid
Benefits:
- Acne-Fighting: Salicylic acid targets acne and prevents future breakouts.
- Hydration: Hyaluronic acid provides lightweight hydration, perfect for oily skin that still needs moisture.
- Soothing: Vichy volcanic water soothes and strengthens the skin barrier.
Why It’s Great for Oily Skin:
- Vichy Normaderm Phytoaction Acne Control Daily Moisturizer is more than just a moisturizer—it's a multi-tasking product that serves as a serum and moisturizer in one. It's perfect for those who prefer a streamlined skincare routine. Salicylic acid targets acne, while hyaluronic acid ensures the skin remains hydrated without becoming oily. Vichy’s volcanic water adds a soothing touch, making this product ideal for sensitive, oily skin that needs both treatment and hydration.
How to Use:
- Apply this moisturizer evenly across your face after cleansing, both morning and night. Because it contains salicylic acid, follow up with sunscreen during the day.
Where to Buy:
- Available at drugstores, online retailers, and Vichy’s official website.
FAQs
1. What is a face serum, and how is it different from a moisturizer?
Answer : A face serum is a concentrated skincare product that delivers a high dose of active ingredients to target specific skin concerns, such as oiliness, acne, or uneven texture. Unlike moisturizers, which primarily focus on hydrating and locking in moisture, serums are typically lighter and have smaller molecules that allow them to penetrate deeper into the skin. Serums are often used before moisturizers in a skincare routine.
2. Can oily skin benefit from using a face serum?
Answer : Absolutely! Oily skin can benefit greatly from face serums. The right serum can help regulate oil production, reduce acne, minimize pores, and improve overall skin texture. For oily skin, look for serums with ingredients that control sebum production, have anti-inflammatory properties, or offer exfoliation to prevent clogged pores.
3. How often should I use a serum for oily skin?
Answer : Generally, face serums can be used once or twice daily, depending on the product’s formulation and your skin’s tolerance. Most serums are applied in the morning and/or evening after cleansing and before moisturizing. It’s important to follow the instructions on the product label and to introduce new serums gradually to monitor how your skin responds.
4. Can I use a face serum if I have sensitive or acne-prone skin?
Answer : Yes, but you should choose a serum that is specifically formulated for sensitive or acne-prone skin. Look for products that are labeled as non-comedogenic (won’t clog pores) and contain gentle, soothing ingredients. Serums with salicylic acid, niacinamide, or green tea extract are often beneficial for sensitive, acne-prone skin.
5. Can I use multiple serums in my skincare routine?
Answer : Yes, you can use multiple serums, but it’s important to layer them correctly and ensure they complement each other. Start with the serum that has the thinnest consistency and apply it first. For example, you might use a niacinamide serum in the morning and a salicylic acid serum in the evening. Be cautious not to overload your skin with too many active ingredients, as this can cause irritation.
6. What should I do if a serum causes irritation?
Answer : If you experience irritation, discontinue use of the serum and assess your skin’s reaction. It may be helpful to introduce products one at a time and patch-test new serums on a small area of your skin before applying them to your entire face. If irritation persists, consult with a dermatologist for personalized advice.
7. Are there any side effects to using face serums for oily skin?
Answer : While most face serums are formulated to be gentle, potential side effects can include irritation, redness, or increased sensitivity. This is often due to the active ingredients in the serum. To minimize side effects, start with a lower concentration of active ingredients and gradually increase usage as your skin builds tolerance.
8. How can I choose the right serum for my specific skin concerns?
Answer : To choose the right serum, first identify your primary skin concerns, such as excess oil, acne, or enlarged pores. Then, look for serums with ingredients that address these issues. For example, if you’re struggling with acne and oiliness, a serum with salicylic acid might be beneficial. If you have enlarged pores, a serum with niacinamide or glycolic acid could help.
9. Can I use a face serum along with other acne treatments?
Answer : Yes, but be mindful of potential interactions. When using multiple acne treatments, choose serums and products that complement each other without causing excessive dryness or irritation. For instance, if you’re using a serum with salicylic acid, avoid using other products with strong exfoliating acids to prevent over-exfoliation.
10. How long does it take to see results from using a face serum?
Answer : Results can vary depending on the serum’s ingredients and your skin’s individual response. Generally, you may start to see improvements within a few weeks of consistent use. For noticeable changes, such as reduced oiliness or fewer breakouts, it may take up to 6-8 weeks. Patience and consistent application are key.
11. Are there any serums that should be avoided for oily skin?
Answer : Avoid serums with heavy, oil-based formulations or those that are overly rich, as they can exacerbate oiliness and clog pores. Additionally, steer clear of serums with alcohol or a high concentration of irritating ingredients, as these can strip the skin and trigger more oil production.
12. Can I use face serums during pregnancy?
Answer : Some face serums contain ingredients that may not be recommended during pregnancy, such as retinoids or high concentrations of certain acids. Always consult with your healthcare provider before introducing new skincare products during pregnancy to ensure they are safe for you and your baby.
13. How should I store my face serums?
Answer : Store face serums in a cool, dry place away from direct sunlight to maintain their efficacy. Some serums, especially those with active ingredients, may require refrigeration to extend their shelf life. Always check the product’s storage instructions and expiration date to ensure optimal performance.
Conclusion
Oily skin requires a delicate balance of treatment and hydration to ensure it remains healthy without becoming overly shiny or prone to breakouts. The right face serum can make all the difference in your skincare routine, helping to control oil production, minimize pores, and prevent acne.
The five serums highlighted in this article cater specifically to the needs of oily skin, offering a range of benefits from oil control to acne treatment. Whether you opt for the budget-friendly The Ordinary Niacinamide 10% + Zinc 1% or splurge on the luxurious Sunday Riley U.F.O. Ultra-Clarifying Face Oil, each of these serums is designed to enhance your skin’s health and appearance.
When selecting a serum, consider your primary skin concerns—be it acne, enlarged pores, or excess oil—and choose a product that targets those issues while complementing your overall skincare routine. And remember, consistency is key in skincare; with regular use, these serums can help you achieve a clearer, more balanced complexion.
Lastly, don't forget the importance of sunscreen, especially when using products that contain exfoliating acids or niacinamide, as they can make your skin more sensitive to the sun. With the right serum and a good skincare routine, oily skin can be managed effectively, leaving you with a radiant and healthy glow.
You might also like our beauty articles.
“Motivation is what gets you started. Habit is what keeps you going.” – Jim Ryun
If you would like more information about the 2024, please send us an email.
Written by Fitness Goal 4U
Smart Fitness Goals - Achieve Health with Simple Steps
Smart fitness goals focus on being Specific, Measurable, Achievable, Relevant, and Time-bound. They help you create a clear path to success, stay motivated, and track progress. Whether its weight loss, strength building, or improved endurance, smart goals guide your fitness journey, ensuring steady growth and sustainable results tailored to your needs.
“Confidence comes from discipline and training.” – Robert Kiyosaki
Gulab Jal, or rose water, has been cherished for centuries in various cultures for its numerous benefits. Extracted from the petals of roses, this fragrant liquid is not only a beauty staple but also offers a range of health advantages. From skincare to emotional well-being, Gulab Jal is nature’s versatile elixir. Let’s explore the top 20 benefits of this incredible potion.
Top 20 Benefits of Gulab Jal
1. Natural Skin Toner
Gulab Jal is a natural astringent, making it an excellent toner for the skin. It helps tighten pores, cleanse the skin, and maintain its pH balance. Regular use of rose water as a toner can reduce excess oil, preventing acne and promoting a clearer complexion.
2. Soothes Skin Irritation
Rose water’s anti-inflammatory properties make it effective in soothing irritated skin. Whether it’s redness, rashes, or dermatitis, applying Gulab Jal can calm the skin and reduce discomfort. It’s gentle enough for all skin types, including sensitive skin.
3. Hydrates and Refreshes the Skin
Gulab Jal is a natural hydrating agent, which helps to keep the skin moisturized and soft. Spritzing rose water on the face throughout the day can refresh tired skin, making it look plump and revitalized. It’s especially beneficial in dry climates or during the winter months.
4. Anti-Aging Properties
The antioxidants in rose water help to strengthen skin cells and regenerate skin tissues. This not only prevents signs of aging like fine lines and wrinkles but also enhances the skin’s natural glow. Regular use can result in youthful, radiant skin.
5. Heals Scars, Cuts, and Wounds
Gulab Jal has antiseptic and antibacterial properties, making it effective in healing scars, cuts, and wounds. It helps to clean the affected area, promotes faster healing, and reduces the risk of infections. Applying rose water to minor burns and wounds can soothe pain and accelerate recovery.
6. Reduces Puffiness and Dark Circles
Rose water’s cooling and anti-inflammatory properties help in reducing puffiness and dark circles around the eyes. Soak cotton pads in chilled Gulab Jal and place them over your eyes to alleviate tiredness and rejuvenate the skin around the eyes.
7. Balances the Skin’s pH Levels
Gulab Jal helps to maintain the skin’s natural pH levels, which can be disrupted by harsh skincare products, pollution, and stress. Balanced pH levels ensure that the skin is neither too oily nor too dry, preventing common skin issues like acne, blackheads, and dullness.
8. Enhances Complexion
Regular use of rose water can improve the complexion, making the skin appear brighter and more even-toned. It’s often used as a key ingredient in homemade face packs and masks to enhance skin radiance.
9. Promotes Hair Health
Gulab Jal is not just beneficial for the skin; it’s also great for the hair. It nourishes the scalp, strengthens hair roots, and adds a natural shine to the hair. Rose water can be used as a final rinse after shampooing to promote hair health and manageability.
10. Reduces Dandruff and Scalp Irritation
The moisturizing and soothing properties of rose water help in treating dandruff and dry scalp conditions. Massaging Gulab Jal into the scalp can reduce itching and flakiness, leaving the scalp hydrated and healthy.
11. Aromatherapy and Stress Relief
The fragrance of Gulab Jal is known for its calming effects on the mind. It’s widely used in aromatherapy to reduce stress, anxiety, and depression. The scent of rose water can create a serene environment, promote relaxation, and improve mood.
12. Enhances Mood and Sleep Quality
Inhaling the scent of rose water before bedtime can improve sleep quality. Its relaxing properties help calm the mind, making it easier to fall asleep and enjoy a restful night. A few spritzes on your pillow can create a tranquil atmosphere conducive to sleep.
13. Acts as a Natural Makeup Remover
Gulab Jal is a gentle and effective makeup remover. It can easily dissolve makeup, dirt, and impurities without stripping the skin of its natural oils. Mix it with a carrier oil like coconut or almond oil for a nourishing and hydrating makeup removal routine.
14. Treats Sunburns
The cooling properties of rose water make it an excellent remedy for sunburns. Applying chilled Gulab Jal to sunburned areas can soothe the skin, reduce redness, and promote faster healing. It’s a natural and gentle alternative to chemical-based after-sun products.
15. Refreshes the Breath
Rose water has been traditionally used in some cultures as a natural mouthwash. Its antibacterial properties help in eliminating bad breath and promoting oral hygiene. Gargling with diluted Gulab Jal can leave the mouth feeling fresh and clean.
16. Supports Digestive Health
In traditional medicine, rose water has been used to support digestive health. It can help in relieving bloating, indigestion, and constipation. Drinking rose water or adding it to teas can have a mild laxative effect, aiding in regular bowel movements.
17. Enhances Mood and Emotional Well-being
Gulab Jal’s pleasant aroma is not just a sensory delight but also a mood enhancer. It helps in alleviating symptoms of depression, anxiety, and stress. Incorporating rose water into your daily routine can have a positive impact on your emotional well-being.
18. Improves Circulation
Rose water is known to improve blood circulation when used in massage or as part of skincare products. Better circulation ensures that the skin and body receive ample nutrients and oxygen, promoting overall health and vitality.
19. Fights Acne and Pimples
Gulab Jal is an effective remedy for acne due to its antibacterial and anti-inflammatory properties. It helps to cleanse the skin, reduce redness, and prevent the formation of acne-causing bacteria. Regular use can prevent breakouts and promote clear skin.
20. Hydrates and Soothes Dry Lips
Rose water can be used to treat dry and chapped lips. Applying Gulab Jal to the lips hydrates them and prevents further drying. For an extra nourishing effect, mix it with honey or coconut oil and apply it as a lip balm.
FAQs
1. What is Gulab Jal?
Answer : Gulab Jal, commonly known as rose water, is a fragrant liquid made by distilling rose petals with steam. It is widely used in skincare, culinary, and medicinal practices for its soothing, hydrating, and therapeutic properties.
2. How can Gulab Jal benefit my skin?
Answer : Gulab Jal acts as a natural toner, hydrates the skin, soothes irritation, reduces puffiness, balances the skin’s pH, and has anti-aging properties. It can also help heal cuts, scars, and sunburns.
3. Can Gulab Jal help with acne?
Answer : Yes, Gulab Jal has antibacterial and anti-inflammatory properties that help cleanse the skin, reduce redness, and prevent acne-causing bacteria, making it an effective remedy for acne and pimples.
4. Is Gulab Jal suitable for all skin types?
Answer : Gulab Jal is gentle and suitable for all skin types, including sensitive, oily, dry, and combination skin. Its natural and soothing properties make it safe for daily use.
5. How do I use Gulab Jal as a toner?
Answer : To use Gulab Jal as a toner, simply soak a cotton pad with rose water and gently wipe it across your cleansed face. You can also pour it into a spray bottle and mist it over your face for a refreshing feel.
6. Can Gulab Jal be used on hair?
Answer : Yes, Gulab Jal can be used to nourish the scalp, reduce dandruff, and add shine to your hair. It can be used as a final rinse after shampooing or mixed with hair oils and masks.
7. Does Gulab Jal have any anti-aging benefits?
Answer : Gulab Jal is rich in antioxidants that help to strengthen skin cells, regenerate tissues, and prevent signs of aging like fine lines and wrinkles, promoting youthful and glowing skin.
8. How can Gulab Jal help with sunburn?
Answer : The cooling and soothing properties of Gulab Jal make it effective in treating sunburn. Applying chilled rose water to sunburned areas can reduce redness and discomfort and promote faster healing.
9. Can I use Gulab Jal to remove makeup?
Answer : Yes, Gulab Jal can be used as a natural makeup remover. It effectively dissolves makeup and impurities while hydrating the skin. For best results, mix it with a carrier oil like coconut oil.
10. What are the benefits of using Gulab Jal for the eyes?
Answer : Gulab Jal can reduce puffiness, dark circles, and tiredness around the eyes. Soaking cotton pads in chilled rose water and placing them over your eyes can refresh and rejuvenate the delicate skin in that area.
11. How does Gulab Jal support emotional well-being?
Answer : The soothing aroma of Gulab Jal is used in aromatherapy to reduce stress, anxiety, and depression. Inhaling its fragrance or using it in a bath can promote relaxation and enhance mood.
12. Is Gulab Jal safe to ingest?
Answer : Yes, food-grade Gulab Jal is safe to ingest and has been traditionally used in various culinary dishes and beverages. It also offers digestive health benefits and can be added to teas or desserts.
13. Can Gulab Jal improve sleep quality?
Answer : Inhaling the scent of rose water or spraying it on your pillow before bedtime can improve sleep quality. Its calming effects help to relax the mind and promote a restful night’s sleep.
14. How does Gulab Jal benefit hair health?
Answer : Gulab Jal nourishes the scalp, strengthens hair roots, and adds a natural shine to the hair. It also helps in reducing dandruff and scalp irritation, leaving your hair healthy and manageable.
15. Can Gulab Jal help with bad breath?
Answer : Yes, Gulab Jal has antibacterial properties that can help eliminate bad breath. Gargling with diluted rose water can leave your mouth feeling fresh and clean.
16. How do I store Gulab Jal?
Answer : Gulab Jal should be stored in a cool, dark place, away from direct sunlight. It can also be refrigerated to prolong its shelf life and enhance its cooling properties.
Conclusion
Gulab Jal is truly a versatile and natural remedy that offers a myriad of benefits for skin, hair, and overall well-being. Its gentle and soothing properties make it suitable for all skin types, and its natural origin ensures that it’s free from harmful chemicals and additives. Whether you’re looking to enhance your beauty routine or improve your health, incorporating rose water into your daily life can provide lasting benefits.
From hydrating the skin to promoting relaxation, Gulab Jal’s benefits are extensive and impressive. Embrace this ancient beauty secret, and enjoy the numerous advantages it has to offer.
You might also like our beauty articles.
“Motivation is what gets you started. Habit is what keeps you going.” – Jim Ryun
If you would like more information about the 2024, please send us an email.
Written by Fitness Goal 4U
Smart Fitness Goals - Achieve Health with Simple Steps
Smart fitness goals focus on being Specific, Measurable, Achievable, Relevant, and Time-bound. They help you create a clear path to success, stay motivated, and track progress. Whether its weight loss, strength building, or improved endurance, smart goals guide your fitness journey, ensuring steady growth and sustainable results tailored to your needs.
“Confidence comes from discipline and training.” – Robert Kiyosaki
Glycerin, also known as glycerol, is a versatile and commonly used ingredient in skincare, haircare, and other personal care products. It's a clear, odorless, and viscous liquid that has numerous benefits for the skin, hair, and overall health. Whether you're looking to improve your skincare routine, enhance your hair health, or simply understand the multifaceted uses of glycerin, this guide will explore the top 20 benefits of glycerin in detail.
Top 20 Benefits of Glycerin
1. Moisturizes the Skin
- Hydration Powerhouse: Glycerin is a humectant, which means it has the ability to draw moisture from the air into the skin. This makes it an excellent moisturizing agent, especially for dry or dehydrated skin. By maintaining the skin's moisture balance, glycerin helps keep the skin soft, smooth, and supple.
- Long-Lasting Hydration: Unlike some moisturizers that provide only temporary relief, glycerin offers long-lasting hydration. It forms a protective layer on the skin's surface, preventing moisture loss and keeping the skin hydrated for extended periods.
2. Improves Skin Barrier Function
- Strengthening the Barrier: The skin barrier is crucial for protecting against environmental aggressors like pollution, UV radiation, and bacteria. Glycerin helps to strengthen this barrier by improving the skin's natural lipid barrier, reducing the risk of irritation and damage.
- Promotes Healing: By enhancing the skin barrier, glycerin also promotes faster healing of minor cuts, wounds, and irritation. Its soothing properties make it an ideal ingredient for sensitive or compromised skin.
3. Anti-Aging Benefits
- Reduces Fine Lines and Wrinkles: Glycerin's moisturizing properties help plump the skin, which can reduce the appearance of fine lines and wrinkles. By keeping the skin hydrated and improving elasticity, glycerin contributes to a more youthful appearance.
- Prevents Premature Aging: Regular use of glycerin in your skincare routine can prevent the signs of premature aging caused by dryness, sun exposure, and environmental stressors. Its protective and nourishing qualities make it a key ingredient in anti-aging products.
4. Soothes Skin Irritation
- Calms Sensitive Skin: Glycerin is known for its gentle and soothing properties, making it an excellent choice for those with sensitive or easily irritated skin. It can calm redness, itching, and inflammation, providing relief from conditions like eczema and dermatitis.
- Ideal for Post-Treatment Care: After cosmetic treatments like chemical peels or laser therapy, the skin can be sensitive and prone to irritation. Glycerin helps soothe and hydrate the skin, speeding up the recovery process.
5. Balances Skin's pH
- Maintains Optimal pH Levels: Glycerin helps maintain the skin's natural pH balance, which is essential for healthy skin function. A balanced pH level ensures that the skin is less prone to acne, infections, and other issues.
- Protects Against Infections: By keeping the skin's pH in check, glycerin also helps protect against bacterial and fungal infections. This makes it an important ingredient in skincare products designed for acne-prone or problematic skin.
6. Enhances Skin Permeability
- Boosts Ingredient Absorption: Glycerin increases the permeability of the skin, allowing other active ingredients in skincare products to penetrate deeper and work more effectively. This enhances the overall efficacy of your skincare routine.
- Improves Treatment Results: Whether you're using anti-aging serums, acne treatments, or hydrating masks, the presence of glycerin can improve the absorption and effectiveness of these treatments, leading to better and faster results.
7. Helps Treat Acne
- Non-Comedogenic: Glycerin is non-comedogenic, meaning it doesn't clog pores. This makes it an ideal moisturizer for acne-prone skin, as it hydrates without contributing to breakouts.
- Reduces Acne Scars: Glycerin's ability to promote skin healing and regeneration can help reduce the appearance of acne scars. Over time, regular use can lead to a smoother and more even complexion.
8. Heals and Prevents Dry Lips
- Lip Hydration: Glycerin is a common ingredient in lip balms and treatments because of its powerful moisturizing properties. It helps to heal chapped lips and prevent them from becoming dry and cracked.
- Smooth Lips: Regular application of glycerin on the lips keeps them soft, smooth, and healthy-looking, especially in harsh weather conditions.
9. Nourishes Dry and Damaged Hair
- Deep Conditioning: Glycerin is not just beneficial for the skin; it's also a fantastic conditioner for the hair. It helps to lock in moisture, making the hair softer, shinier, and more manageable.
- Repairs Damage: For those with dry, brittle, or damaged hair, glycerin can help repair the hair shaft, reducing breakage and split ends. Its moisturizing properties restore the hair's natural strength and elasticity.
10. Prevents and Reduces Dandruff
- Moisturizes the Scalp: Glycerin can help treat dandruff by moisturizing a dry and flaky scalp. A well-hydrated scalp is less likely to shed flakes and cause irritation.
- Soothes Itchy Scalp: Glycerin's soothing properties also relieve itching and discomfort associated with dandruff and other scalp conditions. Regular use can prevent flare-ups and maintain scalp health.
11. Protects Hair from Environmental Damage
- Shields Against Heat and Pollution: Glycerin forms a protective barrier on the hair, shielding it from environmental stressors like pollution, UV rays, and heat styling. This helps prevent damage and keeps the hair looking healthy and vibrant.
- Maintains Moisture Balance: By keeping the hair hydrated, glycerin prevents it from becoming dry and brittle due to exposure to the elements. This is particularly beneficial for those who spend a lot of time outdoors or use heat styling tools frequently.
12. Aids in Wound Healing
- Accelerates Recovery: Glycerin's hydrating and soothing properties make it an effective treatment for minor wounds, cuts, and burns. It promotes faster healing by keeping the area moisturized and preventing the formation of scabs.
- Reduces Scarring: By keeping the skin supple and hydrated during the healing process, glycerin can help minimize the appearance of scars and ensure smoother skin recovery.
13. Improves Skin Elasticity
- Restores Firmness: Glycerin helps improve skin elasticity by hydrating and nourishing the skin. This is particularly beneficial for aging skin, where loss of elasticity leads to sagging and the formation of wrinkles.
- Supports Collagen Production: While glycerin itself doesn't increase collagen production, its ability to enhance moisture retention and skin barrier function supports the skin's natural repair processes, indirectly aiding in collagen maintenance.
14. Prevents and Treats Razor Burns
- Soothes Post-Shaving Irritation: Glycerin's soothing and hydrating properties make it ideal for treating razor burns and irritation after shaving. It calms the skin and reduces redness and discomfort.
- Prevents Future Irritation: Regular use of glycerin-based products after shaving can help prevent future razor burns by keeping the skin hydrated and supple, reducing the likelihood of nicks and irritation.
15. Enhances the Efficacy of Sunscreens
- Boosts Sun Protection: Glycerin enhances the effectiveness of sunscreens by improving their spreadability and absorption. This ensures even coverage and better protection against UV rays.
- Prevents Sun Damage: By maintaining the skin's moisture levels, glycerin helps protect against the drying effects of sun exposure, reducing the risk of sunburn and long-term damage.
16. Improves Makeup Application
- Creates a Smooth Base: Glycerin can be used as a primer to create a smooth and hydrated base for makeup application. It helps makeup glide on more easily and stay in place for longer periods.
- Prevents Cakey Makeup: Because glycerin retains moisture, it prevents makeup from looking cakey or settling into fine lines, ensuring a flawless finish.
17. Treats and Prevents Stretch Marks
- Reduces Appearance of Stretch Marks: Glycerin's moisturizing and healing properties make it effective in reducing the appearance of stretch marks. It improves skin elasticity and supports the skin's natural repair processes.
- Prevents New Stretch Marks: Regular use of glycerin on areas prone to stretching, such as the abdomen during pregnancy, can help prevent the formation of new stretch marks by keeping the skin hydrated and supple.
18. Acts as a Natural Exfoliant
- Gentle Exfoliation: Glycerin can be combined with other ingredients like sugar or oatmeal to create a gentle exfoliating scrub. This helps remove dead skin cells, revealing fresher, smoother skin underneath.
- Improves Skin Texture: Regular exfoliation with glycerin-based scrubs can improve skin texture, making it softer and more even-toned.
19. Reduces Skin Discoloration
- Fades Dark Spots: Glycerin can help lighten dark spots, hyperpigmentation, and uneven skin tone. Its ability to promote cell turnover and regeneration supports the fading of discolorations over time.
- Brightens Complexion: With consistent use, glycerin can help brighten the overall complexion, giving the skin a more radiant and youthful glow.
20. Supports Overall Skin Health
- Versatile and Safe: Glycerin is a versatile ingredient that can be used in various forms, from pure glycerin to glycerin-containing products like creams, lotions, and serums. Its safety profile makes it suitable for all skin types, including sensitive and allergy-prone skin.
- Holistic Skin Care: By addressing multiple skin concerns simultaneously—hydration, barrier protection, anti-aging, and soothing—glycerin supports overall skin health and wellness, making it an essential component of any skincare routine.
FAQs
1. What is glycerin, and where does it come from?
Answer : Glycerin, also known as glycerol, is a colorless, odorless, and viscous liquid that is widely used in skincare and personal care products. It is a natural compound derived from plant oils or animal fats, and it can also be synthesized from petroleum-based sources. Most commercial glycerin used in cosmetics is derived from vegetable oils, such as coconut or palm oil.
2. Is glycerin safe to use on all skin types?
Answer : Yes, glycerin is generally safe for all skin types, including sensitive and acne-prone skin. Its gentle, non-comedogenic nature means it won't clog pores or cause breakouts. However, those with extremely oily skin might prefer using glycerin in combination with other products to balance moisture levels.
3. Can glycerin cause any side effects?
Answer : Glycerin is typically well-tolerated, but in rare cases, it can cause mild irritation or an allergic reaction, particularly if used in high concentrations. It's always advisable to do a patch test before using a new product containing glycerin, especially if you have sensitive skin.
4. How does glycerin benefit the skin?
Answer : Glycerin is a powerful humectant, meaning it attracts and retains moisture in the skin. It helps keep the skin hydrated, improves its barrier function, soothes irritation, and can reduce the appearance of fine lines and wrinkles. Glycerin also supports skin healing and can be beneficial for conditions like eczema and dermatitis.
5. Can glycerin help with acne?
Answer : Yes, glycerin can help with acne by moisturizing the skin without clogging pores. Its soothing properties can also reduce inflammation and redness associated with acne. Additionally, glycerin's ability to promote skin healing can aid in reducing acne scars over time.
6. Is glycerin effective for anti-aging?
Answer : Glycerin's moisturizing properties can help reduce the appearance of fine lines and wrinkles, contributing to a more youthful look. By keeping the skin hydrated and improving its elasticity, glycerin helps prevent and reduce the signs of aging.
7. Can glycerin be used on the hair?
Answer : Yes, glycerin is beneficial for hair health as well. It acts as a deep conditioner, helping to lock in moisture and prevent dryness and frizz. Glycerin can also repair damage, reduce split ends, and soothe a dry or itchy scalp, making it a versatile ingredient in hair care.
8. How should glycerin be used in a skincare routine?
Answer : Glycerin can be incorporated into your skincare routine in various ways. It is often found in moisturizers, serums, and toners. You can also apply pure glycerin directly to damp skin to lock in moisture, or mix it with other ingredients like rose water or aloe vera gel for a DIY treatment.
9. Can glycerin be used to treat dry lips?
Answer : Yes, glycerin is excellent for treating dry, chapped lips. It helps hydrate and soften the lips, preventing them from becoming cracked. You can use lip balms containing glycerin or apply a small amount of pure glycerin directly to your lips.
10. Does glycerin lighten the skin?
Answer : Glycerin does not have bleaching properties, but it can help improve the overall tone and texture of the skin by keeping it well-hydrated and promoting cell turnover. Over time, this can lead to a brighter, more even complexion.
11. Is glycerin effective against stretch marks?
Answer : Glycerin can help reduce the appearance of stretch marks by keeping the skin hydrated and improving its elasticity. While it may not completely eliminate stretch marks, regular use can make them less noticeable.
12. Can glycerin be used as a makeup primer?
Answer : Yes, glycerin can be used as a makeup primer. It provides a smooth, hydrated base that helps makeup adhere better to the skin and stay in place longer. Applying a glycerin-based product before makeup can also prevent it from looking cakey or settling into fine lines.
Conclusion
Glycerin is a powerhouse ingredient with a wide range of benefits for both skin and hair. Its ability to deeply moisturize, protect, and rejuvenate makes it a must-have in any beauty routine. Whether you're dealing with dry skin, looking to improve your anti-aging regimen, or seeking to enhance the health and appearance of your hair, glycerin can provide the solution. Its versatility, safety, and effectiveness have earned it a permanent place in the world of skincare and personal care, and its benefits are likely to continue being discovered and appreciated for years to come.
You might also like our beauty articles.
“Motivation is what gets you started. Habit is what keeps you going.” – Jim Ryun
If you would like more information about the 2024, please send us an email.
Written by Fitness Goal 4U
Smart Fitness Goals - Achieve Health with Simple Steps
Smart fitness goals focus on being Specific, Measurable, Achievable, Relevant, and Time-bound. They help you create a clear path to success, stay motivated, and track progress. Whether its weight loss, strength building, or improved endurance, smart goals guide your fitness journey, ensuring steady growth and sustainable results tailored to your needs.
“Confidence comes from discipline and training.” – Robert Kiyosaki
Aloe Vera, often referred to as the "plant of immortality," has been cherished for centuries for its remarkable healing properties. Originating from the Arabian Peninsula, this succulent plant has been widely cultivated around the world for its medicinal and cosmetic benefits. Its thick, fleshy leaves contain a transparent gel that is rich in vitamins, enzymes, minerals, amino acids, and other compounds that make it a powerhouse for skin health. In this article, we will delve into the top 20 benefits of Aloe Vera for the skin, explaining how this natural wonder can transform your skincare routine.
Top 5 Benefits of Aloe Vera on Skin
1. Moisturizes the Skin
Aloe Vera is an excellent natural moisturizer. Unlike many commercial moisturizers that can clog pores, Aloe Vera gel is non-greasy and easily absorbed by the skin, making it an ideal choice for those with oily or acne-prone skin. Its hydrating properties help to lock in moisture, leaving the skin soft and supple without a heavy, greasy feel.
2. Soothes Sunburn
One of the most well-known benefits of Aloe Vera is its ability to soothe sunburned skin. The gel contains compounds called polysaccharides, which help in skin repair and reduce inflammation. Additionally, Aloe Vera has cooling properties that provide instant relief from the burning sensation associated with sunburns. Regular application can help speed up the healing process and prevent peeling.
3. Heals Wounds and Cuts
Aloe Vera’s antimicrobial properties make it effective in healing minor cuts, wounds, and scrapes. The gel acts as a protective layer over the affected area, keeping it moist while preventing infection. Aloe Vera also accelerates the regeneration of skin tissue, leading to quicker healing.
4. Reduces Acne and Blemishes
Aloe Vera is a boon for those struggling with acne. Its anti-inflammatory properties help reduce the redness and swelling associated with acne. Aloe Vera also contains salicylic acid, which unclogs pores and acts as a gentle exfoliant. Regular application can help reduce the frequency and severity of breakouts and fade acne scars and blemishes over time.
5. Anti-Aging Properties
As we age, our skin loses elasticity, leading to wrinkles and fine lines. Aloe Vera is rich in vitamins C and E, both of which are known for their anti-aging benefits. These vitamins help improve skin elasticity, reduce the appearance of wrinkles, and promote a more youthful complexion. The antioxidants in Aloe Vera combat free radicals, which are responsible for aging the skin.
6. Lightens Blemishes and Dark Spots
Hyperpigmentation and dark spots can be stubborn and difficult to treat. Aloe Vera contains aloin, a natural depigmenting compound that helps lighten dark spots and even out skin tone. Regular use can gradually fade blemishes and leave the skin with a brighter, more radiant appearance.
7. Calms Skin Irritations and Allergies
Aloe Vera’s anti-inflammatory and cooling properties make it effective in calming skin irritations caused by allergies, insect bites, or rashes. The gel can reduce redness, itching, and swelling, providing instant relief from discomfort. Its gentle nature makes it suitable for sensitive skin types as well.
8. Promotes Skin Regeneration
Aloe Vera stimulates fibroblast activity, which produces collagen and elastin fibers that are essential for skin repair and regeneration. This makes Aloe Vera particularly beneficial for healing burns, scars, and other skin damage. The gel encourages the growth of new, healthy skin cells, leading to faster recovery.
9. Tightens Skin Pores
Large pores can be a cosmetic concern, especially for those with oily skin. Aloe Vera helps tighten skin pores, giving the skin a smoother, more refined appearance. This not only improves the overall texture of the skin but also reduces the likelihood of clogged pores, which can lead to acne.
10. Balances Skin pH
Maintaining the skin’s natural pH balance is crucial for its overall health. Aloe Vera has a pH level that is close to that of the skin, making it effective in restoring and maintaining the skin’s natural acid mantle. This balance helps protect the skin from environmental stressors and bacteria, reducing the risk of skin problems.
11. Provides a Natural Glow
Aloe Vera’s hydrating and nourishing properties give the skin a natural, healthy glow. Regular use can help improve skin texture, making it smoother and more radiant. The vitamins and minerals in Aloe Vera also nourish the skin from within, promoting a vibrant complexion.
12. Prevents and Treats Stretch Marks
Stretch marks are a common concern, particularly during pregnancy or rapid weight gain. Aloe Vera can help prevent and reduce the appearance of stretch marks by improving skin elasticity. The gel’s moisturizing properties keep the skin hydrated and supple, making it more resilient to stretching and tearing.
13. Alleviates Psoriasis and Eczema
Aloe Vera’s anti-inflammatory and moisturizing properties make it beneficial for individuals suffering from skin conditions like psoriasis and eczema. It can soothe itching, reduce redness, and keep the affected areas hydrated, which is essential for managing these chronic skin conditions.
14. Fades Acne Scars
Acne scars can be a persistent reminder of past breakouts. Aloe Vera’s ability to stimulate collagen production and skin regeneration makes it effective in fading acne scars over time. Its natural healing properties help repair damaged skin tissue, leading to a more even skin tone.
15. Treats Minor Burns
Aloe Vera is a popular remedy for treating minor burns due to its soothing and healing properties. The gel forms a protective layer over the burn, keeping it moisturized and promoting faster healing. Aloe Vera also helps reduce the risk of infection and scarring.
16. Reduces Under-Eye Dark Circles
Dark circles under the eyes can make you look tired and aged. Aloe Vera’s cooling and hydrating properties can help reduce the appearance of dark circles. It also contains antioxidants and vitamin E, which nourish the delicate skin around the eyes and reduce puffiness.
17. Improves Skin Elasticity
Loss of skin elasticity is a natural part of aging, but Aloe Vera can help slow down this process. The plant’s gel stimulates the production of collagen and elastin fibers, which are essential for maintaining skin elasticity. This leads to firmer, more youthful-looking skin over time.
18. Treats Dry and Cracked Skin
Dry and cracked skin can be uncomfortable and unsightly. Aloe Vera’s deep moisturizing properties make it an effective remedy for dry skin. The gel penetrates the skin’s layers, providing long-lasting hydration and helping to heal cracks and rough patches.
19. Acts as a Natural Makeup Remover
Many makeup removers contain harsh chemicals that can irritate the skin. Aloe Vera gel can be used as a natural, gentle alternative. It effectively removes makeup without stripping the skin of its natural oils, leaving it clean, soft, and hydrated.
20. Prevents Razor Burn and Irritation
Shaving can often lead to razor burn, bumps, and irritation. Aloe Vera’s soothing properties make it an ideal post-shave treatment. The gel calms the skin, reduces redness, and prevents the formation of ingrown hairs, leaving the skin smooth and irritation-free.
FAQs
1. What are the main benefits of using Aloe Vera on the skin?
Answer : Aloe Vera offers numerous benefits for the skin, including moisturizing, soothing sunburn, reducing acne, promoting skin regeneration, lightening dark spots, and providing anti-aging effects. It also helps with conditions like psoriasis, eczema, and minor wounds or burns.
2. Can Aloe Vera be used on all skin types?
Answer : Yes, Aloe Vera is suitable for all skin types, including oily, dry, combination, and sensitive skin. Its non-greasy, lightweight nature makes it an ideal moisturizer for oily and acne-prone skin, while its soothing and hydrating properties benefit dry and sensitive skin.
3. How often should I apply Aloe Vera to my skin?
Answer : You can apply Aloe Vera gel to your skin daily. For specific concerns like sunburn, acne, or dry skin, you may use it 2-3 times a day until the condition improves.
4. Can Aloe Vera help with acne?
Answer : Yes, Aloe Vera can help reduce acne due to its anti-inflammatory and antimicrobial properties. It also contains salicylic acid, which helps unclog pores and reduces the frequency and severity of breakouts.
5. Is Aloe Vera effective in reducing wrinkles and fine lines?
Answer : Aloe Vera is rich in antioxidants, vitamins C and E, which help boost collagen production and improve skin elasticity, reducing the appearance of wrinkles and fine lines over time.
6. How does Aloe Vera help with sunburn?
Answer : Aloe Vera’s cooling and anti-inflammatory properties soothe sunburned skin and reduce redness and swelling. It also promotes healing by stimulating skin regeneration.
7. Can Aloe Vera lighten dark spots and hyperpigmentation?
Answer : Yes, Aloe Vera contains a compound called aloin, which has depigmenting properties. Regular application can help lighten dark spots, blemishes, and hyperpigmentation.
8. Can Aloe Vera be used to treat minor cuts and burns?
Answer : Aloe Vera is effective in treating minor cuts and burns due to its antimicrobial and healing properties. It forms a protective layer over the wound, keeps it moisturized, and accelerates healing.
9. Is Aloe Vera safe to use around the eyes?
Answer : Aloe Vera can be used around the eyes to reduce puffiness and dark circles. However, it’s essential to avoid getting the gel directly into the eyes, as it can cause irritation.
10. Can Aloe Vera help with stretch marks?
Answer : Aloe Vera can help prevent and reduce the appearance of stretch marks by improving skin elasticity and keeping the skin hydrated and supple.
11. How long does it take to see results from using Aloe Vera on the skin?
Answer : Results can vary depending on the skin concern being treated. For sunburn and irritation, relief can be felt within a few hours. For acne scars, dark spots, or wrinkles, it may take several weeks of consistent use to see noticeable improvements.
12. Can Aloe Vera be used as a makeup remover?
Answer : Yes, Aloe Vera gel can be used as a natural, gentle makeup remover. It effectively removes makeup without stripping the skin of its natural oils, leaving it clean and hydrated.
13. Does Aloe Vera help with psoriasis and eczema?
Answer : Aloe Vera’s anti-inflammatory and moisturizing properties can help soothe and manage symptoms of psoriasis and eczema. It reduces redness, itching, and inflammation, providing relief from these chronic conditions.
14. Can I use Aloe Vera gel directly from the plant on my skin?
Answer : Yes, you can use fresh Aloe Vera gel directly from the plant. Simply cut a leaf, extract the gel, and apply it to your skin. Make sure to patch test first to ensure you don't have an allergic reaction.
15. How does Aloe Vera help with razor burn and irritation?
Answer : Aloe Vera soothes the skin after shaving, reduces redness and irritation, and helps prevent razor bumps and ingrown hairs.
16. Can Aloe Vera help reduce under-eye dark circles?
Answer : Aloe Vera’s cooling and hydrating properties can help reduce the appearance of dark circles and puffiness under the eyes. It also nourishes the delicate skin around the eyes with antioxidants.
17. Does Aloe Vera need to be diluted before applying to the skin?
Answer : No, pure Aloe Vera gel does not need to be diluted before applying to the skin. However, if you have sensitive skin, you may mix it with other soothing ingredients like honey or cucumber juice.
18. How should Aloe Vera gel be stored?
Answer : Aloe Vera gel should be stored in an airtight container in the refrigerator to extend its shelf life and maintain its potency. Freshly extracted gel can be stored for about a week in the fridge.
19. Can Aloe Vera cause any side effects?
Answer : Aloe Vera is generally safe for most people, but some may experience allergic reactions like redness, itching, or irritation. It’s recommended to do a patch test before using it extensively on the skin.
20. Can Aloe Vera be used in combination with other skincare products?
Answer : Yes, Aloe Vera can be used in combination with other skincare products. It’s often found as an ingredient in various skincare formulations like moisturizers, serums, and masks. You can also mix it with natural ingredients like honey, turmeric, or essential oils for DIY skincare treatments.
Conclusion
Aloe Vera is truly a miracle plant when it comes to skincare. Its wide range of benefits, from moisturizing and soothing to healing and anti-aging, make it a must-have in any skincare routine. Whether used alone or as an ingredient in skincare products, Aloe Vera can help you achieve healthier, more radiant skin. With its natural, gentle properties, it’s suitable for all skin types, making it a versatile and essential part of your beauty arsenal.
Incorporating Aloe Vera into your daily skincare routine can yield noticeable improvements in your skin’s texture, tone, and overall health. From soothing sunburns to reducing acne, Aloe Vera offers a simple, natural solution to many common skin concerns. Its ability to hydrate, heal, and rejuvenate the skin makes it a timeless remedy for achieving a flawless complexion.
You might also like our beauty articles.
“Motivation is what gets you started. Habit is what keeps you going.” – Jim Ryun
If you would like more information about the 2024, please send us an email.
Written by Fitness Goal 4U
Smart Fitness Goals - Achieve Health with Simple Steps
Smart fitness goals focus on being Specific, Measurable, Achievable, Relevant, and Time-bound. They help you create a clear path to success, stay motivated, and track progress. Whether its weight loss, strength building, or improved endurance, smart goals guide your fitness journey, ensuring steady growth and sustainable results tailored to your needs.
“Confidence comes from discipline and training.” – Robert Kiyosaki
Skin allergies can be both uncomfortable and distressing, leading to redness, itching, swelling, and other bothersome symptoms. Whether caused by environmental factors, contact with allergens, or underlying conditions like eczema, treating skin allergies effectively is crucial to restoring comfort and skin health. Topical creams often play a significant role in managing these symptoms, providing relief and helping the skin heal. Here, we explore the top five creams that have been widely recognized for their efficacy in treating skin allergies.
Top 5 Creams for Skin Allergy
1. Hydrocortisone Cream
Hydrocortisone cream is a mild corticosteroid commonly used to treat inflammation and itching caused by skin allergies. It works by suppressing the immune response that triggers inflammation, providing relief from itching, redness, and swelling.
Key Benefits:
- Anti-inflammatory Action: Hydrocortisone cream is effective in reducing inflammation, a common symptom of skin allergies.
- Itch Relief: It provides quick relief from itching, which can prevent further irritation and damage from scratching.
- Accessibility: Hydrocortisone cream is widely available over-the-counter, making it an accessible option for many individuals.
Usage:
- Hydrocortisone cream should be applied to the affected area one to four times daily, depending on the severity of the symptoms and the strength of the cream. It is important to follow the instructions provided by a healthcare provider to avoid potential side effects, such as skin thinning or discoloration, which can occur with prolonged use.
Considerations:
- Hydrocortisone is generally recommended for short-term use. Prolonged use, especially on sensitive areas like the face, can lead to skin thinning.
- It is not suitable for use on broken or infected skin unless directed by a healthcare professional.
Ideal For:
- Mild to moderate skin allergies
- Temporary relief from itching and inflammation
- Individuals looking for an over-the-counter solution
2. Tacrolimus Ointment
Tacrolimus ointment is a non-steroidal topical immunomodulator used primarily to treat moderate to severe eczema, particularly when other treatments have not been effective. It works by suppressing the immune system, thereby reducing inflammation and allergic reactions in the skin.
Key Benefits:
- Steroid-Free: Unlike corticosteroids, tacrolimus does not carry the risk of skin thinning, making it a suitable option for long-term management of skin allergies.
- Targeted Action: It is particularly effective for areas of the skin that are prone to thinning, such as the face and neck.
- Efficacy in Severe Cases: Tacrolimus is often used when other treatments fail, making it a powerful option for stubborn or severe allergic reactions.
Usage:
- Tacrolimus ointment is typically applied twice daily to the affected area. It is crucial to use it as directed by a healthcare provider, as improper use can lead to side effects such as burning, itching, or increased sensitivity to sunlight.
Considerations:
- Tacrolimus may cause a burning or stinging sensation when first applied, but this usually diminishes with continued use.
- It increases the skin’s sensitivity to sunlight, so sun exposure should be minimized, and sunscreen should be used.
Ideal For:
- Moderate to severe eczema or dermatitis
- Individuals who require a steroid-free treatment option
- Long-term management of chronic skin allergies
3. Calamine Lotion
Calamine lotion is a time-tested remedy for a variety of skin conditions, including allergic reactions. It is composed of zinc oxide and ferric oxide and is known for its soothing and anti-itch properties.
Key Benefits:
- Soothing Relief: Calamine lotion provides immediate relief from itching and irritation, making it ideal for acute allergic reactions.
- Cooling Effect: It has a cooling effect on the skin, which helps alleviate discomfort caused by allergic reactions.
- Versatility: Calamine lotion is effective for treating a range of skin issues, including poison ivy, insect bites, and other contact dermatitis.
Usage:
- Calamine lotion should be shaken well before use and applied directly to the affected area using a cotton ball or pad. It can be used several times a day as needed to relieve itching and irritation.
Considerations:
- Calamine lotion may leave a pink residue on the skin, which can be washed off with water.
- It is generally considered safe for use on all skin types, but those with extremely sensitive skin should perform a patch test first.
Ideal For:
- Acute allergic reactions such as poison ivy or insect bites
- Mild to moderate itching and irritation
- Individuals looking for a soothing, natural remedy
4. Pimecrolimus Cream
Pimecrolimus cream is another non-steroidal topical immunomodulator, similar to tacrolimus. It is used to treat mild to moderate eczema and other allergic skin conditions. Pimecrolimus works by blocking the production of inflammatory cytokines, reducing inflammation and itching.
Key Benefits:
- Steroid-Free: Like tacrolimus, pimecrolimus does not cause skin thinning, making it suitable for delicate areas and long-term use.
- Rapid Onset of Action: Pimecrolimus begins working quickly to reduce inflammation and itching, often providing relief within days of starting treatment.
- Safe for Long-Term Use: It is designed for long-term management of chronic skin conditions without the side effects associated with steroids.
Usage:
- Pimecrolimus cream is typically applied twice daily to the affected area. It should be used under the guidance of a healthcare provider, especially in children, as the long-term safety of pimecrolimus in pediatric patients is still under study.
Considerations:
- Pimecrolimus may cause a mild burning sensation when first applied, particularly on inflamed skin.
- It may not be suitable for individuals with weakened immune systems or those who have a history of skin infections.
Ideal For:
- Mild to moderate eczema or dermatitis
- Individuals seeking a steroid-free treatment option
- Long-term management of skin allergies in sensitive areas
5. CeraVe Itch Relief Moisturizing Cream
CeraVe Itch Relief Moisturizing Cream is a unique blend of pramoxine hydrochloride, ceramides, and other hydrating ingredients designed to relieve itching and restore the skin’s natural barrier. It is particularly beneficial for individuals with dry, sensitive skin who experience itching due to allergies, eczema, or other skin conditions.
Key Benefits:
- Fast-Acting Relief: The pramoxine hydrochloride in CeraVe Itch Relief Cream provides fast-acting relief from itching, typically within minutes of application.
- Skin Barrier Restoration: Ceramides help restore the skin’s natural barrier, which is often compromised in individuals with skin allergies.
- Hydration: The cream is highly moisturizing, making it suitable for dry, irritated skin that needs extra care.
Usage:
- CeraVe Itch Relief Moisturizing Cream should be applied to the affected area up to three to four times daily, or as directed by a healthcare provider. It can be used on all skin types, including sensitive skin.
Considerations:
- CeraVe Itch Relief Cream is generally well-tolerated, but some individuals may experience a mild stinging sensation upon application.
- It is free of steroids and fragrances, making it a gentle option for individuals with sensitive skin.
Ideal For:
- Dry, itchy skin caused by allergies or eczema
- Individuals who need both itch relief and skin barrier restoration
- Sensitive skin prone to irritation from other treatments
Choosing the Right Cream for Your Skin Allergy
When selecting a cream for skin allergies, several factors should be considered, including the severity of the allergy, the affected area, and any underlying skin conditions. It is also important to consult with a healthcare provider, especially if you have a chronic skin condition or if over-the-counter treatments have not been effective.
Severity of Symptoms:
- Mild Allergies: For mild itching and irritation, over-the-counter options like hydrocortisone cream or calamine lotion may be sufficient.
- Moderate to Severe Allergies: For more severe symptoms, especially those that do not respond to OTC treatments, prescription options like tacrolimus or pimecrolimus may be necessary.
Location of the Allergy:
- Face and Neck: For sensitive areas like the face and neck, non-steroidal options like tacrolimus or pimecrolimus are often preferred to avoid the risk of skin thinning.
- Body: For allergies affecting larger areas of the body, hydrocortisone or CeraVe Itch Relief Cream can be effective in providing widespread relief.
Underlying Skin Conditions:
- Eczema: Individuals with eczema may benefit from creams like tacrolimus, pimecrolimus, or CeraVe, which are designed to manage chronic inflammation and restore the skin barrier.
- Contact Dermatitis: Calamine lotion is particularly effective for contact dermatitis caused by allergens like poison ivy or insect bites.
FAQs
1. What are skin allergies?
Answer : Skin allergies occur when the immune system reacts to a substance that is normally harmless, such as pollen, pet dander, certain foods, or chemicals. This reaction can cause symptoms like itching, redness, swelling, and rashes on the skin.
2. How do creams for skin allergies work?
Answer : Creams for skin allergies typically contain ingredients that reduce inflammation, soothe irritation, and relieve itching. Some creams contain corticosteroids, which help suppress the immune response, while others may include antihistamines, moisturizers, or barrier repair agents to treat and protect the skin.
3. When should I use a cream for skin allergies?
Answer : You should use a cream for skin allergies when you experience symptoms like itching, redness, or swelling due to an allergic reaction. If your symptoms persist, worsen, or if you are unsure about the cause of your allergy, it is advisable to consult a healthcare provider.
4. Are over-the-counter creams effective for skin allergies?
Answer : Over-the-counter (OTC) creams can be effective for mild to moderate skin allergies. Products like hydrocortisone cream or calamine lotion provide relief from itching and irritation. However, if OTC treatments are not effective or if your symptoms are severe, you may need a prescription cream.
5. What are the side effects of using skin allergy creams?
Answer : Side effects vary depending on the type of cream used. Common side effects may include skin thinning (with prolonged use of corticosteroids), burning or stinging sensations, increased sensitivity to sunlight, and potential allergic reactions to the cream itself. Always follow the instructions provided by your healthcare provider or the product label.
6. Can I use skin allergy creams on my face?
Answer : Some skin allergy creams are safe for use on the face, but others may not be suitable due to the delicate nature of facial skin. Non-steroidal options like tacrolimus or pimecrolimus are often recommended for facial use. It's important to consult a healthcare provider before applying any cream to your face.
7. How often should I apply a skin allergy cream?
Answer : The frequency of application depends on the specific cream and the severity of your symptoms. Generally, most creams are applied one to four times daily. Always follow the instructions provided by your healthcare provider or the product packaging.
8. Can children use skin allergy creams?
Answer : Some skin allergy creams are suitable for children, while others may not be recommended for younger patients. Mild corticosteroids and soothing lotions like calamine are often safe for children, but stronger treatments like tacrolimus or pimecrolimus should be used under medical supervision.
9. What should I do if my symptoms do not improve after using a skin allergy cream?
Answer : If your symptoms do not improve after using an over-the-counter cream or if they worsen, you should consult a healthcare provider. Persistent or severe skin allergies may require prescription treatments or further evaluation to determine the underlying cause.
10. Are there any natural alternatives to skin allergy creams?
Answer : Natural alternatives to skin allergy creams include aloe vera, oatmeal baths, and coconut oil, which can soothe irritated skin. However, these remedies may not be as effective as medicated creams, especially for more severe allergies. It’s important to discuss natural remedies with a healthcare provider before use.
11. Can I use multiple skin allergy creams at the same time?
Answer : Using multiple skin allergy creams simultaneously can increase the risk of side effects and may cause interactions between ingredients. It’s best to use one cream at a time unless advised otherwise by a healthcare provider.
12. How should I store my skin allergy cream?
Answer : Most skin allergy creams should be stored at room temperature, away from direct sunlight and moisture. Always check the product packaging for specific storage instructions and keep the cream out of reach of children.
13. Is it safe to use expired skin allergy creams?
Answer : Using expired skin allergy creams is not recommended, as the active ingredients may lose their effectiveness over time. Additionally, using expired products can increase the risk of skin irritation or infection. Always check the expiration date before use and dispose of any expired products safely.
14. What should I do if I experience an allergic reaction to a skin allergy cream?
Answer : If you experience an allergic reaction to a skin allergy cream, such as increased redness, itching, swelling, or hives, discontinue use immediately and wash the affected area with water. Seek medical attention if the reaction is severe or does not improve.
15. Can skin allergy creams be used during pregnancy?
Answer : Some skin allergy creams are safe to use during pregnancy, while others may not be recommended. It’s important to consult a healthcare provider before using any topical treatments during pregnancy to ensure they are safe for both you and your baby.
Conclusion
Skin allergies can range from mild and temporary to severe and chronic, requiring different approaches to treatment. The creams discussed in this guide offer a variety of options for managing symptoms, from over-the-counter solutions like hydrocortisone and calamine lotion to prescription medications like tacrolimus and pimecrolimus. Additionally, products like CeraVe Itch Relief Moisturizing Cream provide a blend of symptom relief and skin barrier restoration, making them ideal for individuals with dry, sensitive skin.
Ultimately, the best cream for your skin allergy will depend on the specific symptoms, the affected area, and any underlying conditions. It is always recommended to consult with a healthcare provider to determine the most appropriate treatment plan, especially for chronic or severe skin conditions. With the right approach, you can effectively manage skin allergies and restore comfort and health to your skin.
You might also like our beauty articles.
“Motivation is what gets you started. Habit is what keeps you going.” – Jim Ryun
If you would like more information about the 2024, please send us an email.
Written by Fitness Goal 4U
Smart Fitness Goals - Achieve Health with Simple Steps
Smart fitness goals focus on being Specific, Measurable, Achievable, Relevant, and Time-bound. They help you create a clear path to success, stay motivated, and track progress. Whether its weight loss, strength building, or improved endurance, smart goals guide your fitness journey, ensuring steady growth and sustainable results tailored to your needs.
“Confidence comes from discipline and training.” – Robert Kiyosaki
Maintaining a healthy brain is essential for overall well-being, cognitive function, and mental clarity. What we eat plays a crucial role in how well our brain performs, affecting everything from memory to mood. Incorporating brain-boosting foods into your diet can enhance cognitive abilities, protect against age-related decline, and support mental health. Certain nutrients, like omega-3 fatty acids, antioxidants, vitamins, and minerals, are especially beneficial for brain health. These nutrients help in maintaining brain cell structure, improving memory, enhancing focus, and even boosting mood. In this guide, we'll explore the top 10 foods known for their powerful impact on brain function. From fatty fish rich in omega-3s to antioxidant-packed blueberries, these foods are not only nutritious but also delicious, making it easy to nourish your brain every day.
Best 10 Foods to Boost Brain Function
1. Fatty Fish
Fatty fish, such as salmon, trout, mackerel, and sardines, are among the best sources of omega-3 fatty acids, essential fats that are crucial for brain health. These fish are characterized by their high fat content, which makes them rich in these beneficial oils.
Nutritional Content
- Omega-3 Fatty Acids (EPA and DHA): These essential fats are vital for maintaining the structure and function of brain cells.
- Protein: Provides the building blocks for brain tissues and neurotransmitters.
- Vitamin D: Supports overall brain health and may protect against cognitive decline.
- B Vitamins: Involved in energy production and brain function.
Benefits
- Cognitive Function: Omega-3s, particularly DHA, are critical for maintaining brain cell membranes, enhancing memory, and supporting overall cognitive performance.
- Reduced Cognitive Decline: Regular consumption of fatty fish is associated with a lower risk of age-related cognitive decline and neurodegenerative diseases like Alzheimer’s.
- Mood Regulation: Omega-3s help regulate mood by influencing the production of neurotransmitters like serotonin, potentially reducing symptoms of depression and anxiety.
- Brain Structure: Omega-3s help preserve brain volume and prevent brain shrinkage, which is associated with aging.
2. Blueberries
Blueberries are small, blue-purple berries known for their sweet flavor and high antioxidant content. They are often referred to as a "superfood" due to their numerous health benefits, particularly for the brain.
Nutritional Content
- Antioxidants: Blueberries are rich in flavonoids, particularly anthocyanins, which are powerful antioxidants.
- Vitamin C: Supports immune function and protects the brain from oxidative stress.
- Vitamin K: Plays a role in brain health and helps in the formation of sphingolipids, important for brain cells.
- Fiber: Supports digestive health and helps maintain a steady supply of glucose to the brain.
Benefits
- Improved Memory: The flavonoids in blueberries have been shown to enhance memory and delay age-related memory decline by promoting communication between brain cells and increasing blood flow to the brain.
- Protection Against Oxidative Stress: The antioxidants in blueberries combat oxidative stress, a leading cause of brain aging and neurodegenerative diseases.
- Neurogenesis: Studies suggest that blueberries may stimulate the production of new neurons, supporting brain plasticity and learning.
- Anti-inflammatory Effects: The anti-inflammatory properties of blueberries help reduce inflammation in the brain, which is linked to cognitive decline and mood disorders.
3. Turmeric
Turmeric is a bright yellow spice commonly used in Indian cuisine and traditional medicine. The active compound in turmeric, curcumin, is known for its powerful anti-inflammatory and antioxidant properties, making it highly beneficial for brain health.
Nutritional Content
- Curcumin: The primary active compound in turmeric, responsible for its health benefits. It has potent anti-inflammatory and antioxidant effects.
- Vitamins and Minerals: Contains small amounts of vitamin C, vitamin E, vitamin K, iron, and manganese.
Benefits
- Enhanced Memory and Cognitive Function: Curcumin has been shown to improve memory and attention, particularly in older adults. It may boost levels of brain-derived neurotrophic factor (BDNF), a protein linked to learning and memory.
- Mood Regulation: Curcumin can increase levels of serotonin and dopamine, neurotransmitters that play a key role in mood regulation, potentially reducing symptoms of depression and anxiety.
- Neuroprotective Effects: Curcumin’s antioxidant properties protect the brain from oxidative stress, which is a major factor in the development of neurodegenerative diseases like Alzheimer’s.
- Reduction of Brain Inflammation: Curcumin’s anti-inflammatory effects help reduce chronic inflammation in the brain, which is linked to cognitive decline and various neurological conditions.
- Improved Brain Cell Growth: By boosting BDNF, curcumin may also encourage the growth of new brain cells and support brain plasticity, which is important for learning and memory.
4. Broccoli
Broccoli is a cruciferous vegetable known for its dense nutritional content and numerous health benefits. It is particularly beneficial for brain health due to its high levels of antioxidants and essential nutrients that support cognitive function.
Nutritional Content
- Vitamin K: Broccoli is one of the richest plant sources of vitamin K, which is crucial for forming sphingolipids, a type of fat that's densely packed into brain cells.
- Vitamin C: Supports immune function and protects brain cells from oxidative stress.
- Folate: Important for brain development and function, particularly in preventing cognitive decline.
- Fiber: Helps maintain a steady supply of glucose to the brain, providing consistent energy.
- Antioxidants: Contains sulforaphane, a powerful antioxidant that has neuroprotective properties.
Benefits
- Supports Brain Structure: Vitamin K in broccoli supports the formation and maintenance of sphingolipids in brain cells, which are essential for maintaining brain structure and function.
- Protects Against Oxidative Stress: The antioxidants in broccoli, including sulforaphane, help protect the brain from oxidative stress, reducing the risk of neurodegenerative diseases.
- Reduces Brain Inflammation: Sulforaphane also has anti-inflammatory properties that help lower inflammation in the brain, which is linked to cognitive decline and brain aging.
- Enhances Cognitive Function: The combination of vitamins, minerals, and antioxidants in broccoli supports overall cognitive function, including memory and learning.
- Prevents Cognitive Decline: Folate and other nutrients in broccoli are associated with a lower risk of cognitive decline and age-related memory loss.
5. Pumpkin Seeds
Pumpkin seeds, also known as pepitas, are small, flat, green seeds that are a powerhouse of nutrients. They are not only a tasty snack but also offer numerous health benefits, particularly for brain function. These seeds are rich in essential minerals and antioxidants that support cognitive health.
Nutritional Content
- Magnesium: Vital for nerve function and memory formation.
- Zinc: Essential for proper brain signaling and immune function.
- Iron: Necessary for oxygen transport to the brain, preventing cognitive impairment.
- Copper: Helps control nerve signals and supports brain health.
- Antioxidants: Protect brain cells from damage caused by free radicals.
Benefits:
- Improved Memory and Learning: Magnesium in pumpkin seeds plays a key role in memory and learning processes. A deficiency in magnesium is linked to several neurological disorders.
- Enhanced Cognitive Function: Zinc is crucial for communication between brain cells and is essential for maintaining cognitive function. It also supports the immune system, protecting the brain from infections that could impair cognitive abilities.
- Protection Against Cognitive Decline: The antioxidant properties of pumpkin seeds help protect the brain from oxidative stress, which is a major contributor to cognitive decline and neurodegenerative diseases.
- Mood Regulation: Pumpkin seeds are rich in magnesium and tryptophan, an amino acid that converts into serotonin, the “feel-good” neurotransmitter, helping to regulate mood and reduce symptoms of depression.
- Nerve Health: Copper in pumpkin seeds supports nerve health by aiding in the communication between brain cells, ensuring that the brain functions smoothly.
6. Dark Chocolate
Dark chocolate, particularly chocolate with a high cocoa content (70% or more), is more than just a delicious treat. It is packed with brain-boosting compounds, including flavonoids, caffeine, and antioxidants, making it an excellent choice for enhancing cognitive function and supporting overall brain health.
Nutritional Content
- Flavonoids: These are plant compounds with powerful antioxidant effects that are particularly beneficial for brain health.
- Caffeine: A natural stimulant that enhances alertness, focus, and cognitive performance.
- Theobromine: A mild stimulant that, along with caffeine, contributes to the mood-boosting effects of dark chocolate.
- Magnesium: Supports brain function and helps in the regulation of neurotransmitters.
- Antioxidants: Protect the brain from oxidative stress and reduce the risk of neurodegenerative diseases.
Benefits
- Improved Cognitive Function: Flavonoids in dark chocolate improve blood flow to the brain, which enhances memory, focus, and cognitive function. These compounds may also help in forming new brain connections.
- Mood Enhancement: Dark chocolate stimulates the production of endorphins, the "feel-good" chemicals in the brain, and boosts serotonin levels, which can improve mood and reduce symptoms of depression.
- Protection Against Cognitive Decline: The antioxidants in dark chocolate protect brain cells from oxidative stress and inflammation, both of which are linked to age-related cognitive decline and neurodegenerative diseases like Alzheimer’s.
- Enhanced Brain Plasticity: Regular consumption of dark chocolate may support brain plasticity, which is the brain’s ability to adapt, grow, and form new neural connections, essential for learning and memory.
- Increased Alertness: The caffeine and theobromine in dark chocolate can boost mental alertness and energy levels, helping to enhance concentration and focus.
7. Oranges
Oranges are a widely loved citrus fruit known for their juicy, sweet taste and vibrant orange color. They are not only refreshing but also packed with essential nutrients that are particularly beneficial for brain health, making them a great addition to a brain-boosting diet.
Nutritional Content
- Vitamin C: Oranges are an excellent source of vitamin C, providing more than 100% of the daily recommended intake in just one medium-sized fruit.
- Flavonoids: Including hesperidin, which has antioxidant and anti-inflammatory properties.
- Folate: Supports brain development and cognitive function.
- Fiber: Helps regulate blood sugar levels, ensuring a steady supply of glucose to the brain.
- Potassium: Essential for nerve function and maintaining proper brain signaling.
Benefits
- Protection Against Cognitive Decline: The high vitamin C content in oranges helps protect the brain from oxidative stress, which can contribute to cognitive decline and neurodegenerative diseases such as Alzheimer’s. Vitamin C also supports the immune system, which indirectly benefits brain health.
- Enhanced Memory and Cognitive Function: Vitamin C plays a crucial role in the production of neurotransmitters, such as dopamine and serotonin, which are essential for mood regulation, memory, and overall cognitive function.
- Support for Brain Health: The flavonoids in oranges have been shown to improve blood flow to the brain, enhancing cognitive abilities like memory and learning. They also help reduce inflammation in the brain, which is associated with cognitive decline.
- Mood Regulation: Oranges, through their vitamin C and folate content, contribute to the production of neurotransmitters that help regulate mood and reduce symptoms of depression and anxiety.
8. Nuts
Nuts, including varieties such as walnuts, almonds, hazelnuts, and pecans, are nutrient-dense snacks that offer significant benefits for brain health. They are rich in healthy fats, antioxidants, and essential nutrients that support cognitive function and protect the brain from age-related decline.
Nutritional Content
- Healthy Fats: Nuts are high in monounsaturated and polyunsaturated fats, including omega-3 fatty acids, which are crucial for brain health.
- Vitamin E: A powerful antioxidant that helps protect brain cells from oxidative stress.
- Folate: Important for brain function and reducing cognitive decline.
- Magnesium: Supports nerve function and helps regulate neurotransmitters.
- Antioxidants: Help combat oxidative stress and reduce inflammation in the brain.
Benefits
- Improved Cognitive Function: The healthy fats in nuts, particularly omega-3 fatty acids in walnuts, support brain cell structure and function, enhancing cognitive abilities such as memory and learning.
- Protection Against Cognitive Decline: Vitamin E in nuts has been linked to a lower risk of cognitive decline as it protects brain cells from oxidative damage and inflammation, both of which are contributors to neurodegenerative diseases like Alzheimer’s.
- Enhanced Memory: Nuts like almonds are rich in nutrients that improve memory. Vitamin E, along with healthy fats, plays a key role in maintaining cognitive function as you age.
- Mood Stabilization: The healthy fats, magnesium, and B vitamins in nuts help regulate neurotransmitters, which can improve mood and reduce symptoms of depression and anxiety.
- Brain Plasticity: Regular consumption of nuts supports brain plasticity, which is the brain’s ability to form new neural connections, essential for learning and memory.
9. Eggs
Eggs are a versatile and nutrient-rich food that has long been celebrated for its health benefits. They are particularly beneficial for brain health due to their high content of essential nutrients like choline, which plays a crucial role in maintaining cognitive function and memory.
Nutritional Content
- Choline: Eggs are one of the best sources of choline, a nutrient essential for the production of acetylcholine, a neurotransmitter involved in memory and learning.
- B Vitamins: Including B6, B12, and folate, which are important for brain function and the production of neurotransmitters.
- Protein: Provides the building blocks for neurotransmitters and supports overall brain health.
- Lutein and Zeaxanthin: Antioxidants that protect the brain from oxidative stress.
- Vitamin D: Supports brain health and helps reduce the risk of cognitive decline.
Benefits
- Enhanced Memory and Learning: Choline in eggs is vital for the production of acetylcholine, a neurotransmitter that plays a key role in memory formation and learning. Adequate choline intake is linked to better cognitive function and a lower risk of age-related memory decline.
- Protection Against Cognitive Decline: The B vitamins in eggs, particularly B12 and folate, help reduce levels of homocysteine, an amino acid associated with cognitive decline and dementia. These vitamins support brain health by facilitating the production of neurotransmitters and maintaining the integrity of brain cells.
- Improved Mood: B vitamins in eggs are crucial for the production of serotonin and dopamine, neurotransmitters that regulate mood and reduce the risk of depression and anxiety.
- Brain Development: Choline is particularly important during pregnancy for the brain development of the fetus, making eggs a valuable food for expecting mothers.
- Antioxidant Protection: Lutein and zeaxanthin in eggs help protect brain cells from oxidative damage, which is associated with cognitive decline and neurodegenerative diseases.
10. Green Tea
Green tea is a popular beverage made from the leaves of the Camellia sinensis plant. Unlike black tea, green tea is made from unoxidized leaves and is one of the least processed types of tea, preserving a higher concentration of antioxidants and beneficial compounds. It has been consumed for centuries for its numerous health benefits, including its positive effects on brain function.
Nutritional Content
- Caffeine: A natural stimulant that enhances brain function, including improved focus, alertness, and cognitive performance.
- L-theanine: An amino acid that promotes relaxation without drowsiness and enhances the production of GABA, a neurotransmitter that has calming effects on the brain.
- Antioxidants: Rich in catechins, particularly epigallocatechin gallate (EGCG), which protect the brain from oxidative stress and reduce the risk of neurodegenerative diseases.
- Polyphenols: Plant compounds that have anti-inflammatory and neuroprotective properties.
Benefits
- Enhanced Brain Function: The combination of caffeine and L-theanine in green tea leads to improved brain function. Caffeine boosts alertness and concentration, while L-theanine promotes relaxation and focus, creating a balanced state of mind.
- Improved Memory and Learning: Studies have shown that the catechins in green tea, particularly EGCG, can enhance cognitive function, improve memory, and support the growth of new brain cells, which is essential for learning.
- Protection Against Cognitive Decline: The powerful antioxidants in green tea protect the brain from oxidative stress and inflammation, both of which are linked to cognitive decline and neurodegenerative diseases like Alzheimer’s and Parkinson’s.
- Mood Regulation: L-theanine in green tea increases the production of neurotransmitters like serotonin and dopamine, which help regulate mood and reduce symptoms of anxiety and depression.
- Increased Mental Alertness: The moderate caffeine content in green tea provides a gentle boost in mental alertness and energy without the jittery effects often associated with higher doses of caffeine found in coffee.
FAQs
1. What are the best foods for boosting brain function?
Answer : The top 10 foods that boost brain function include fatty fish, blueberries, turmeric, broccoli, pumpkin seeds, dark chocolate, oranges, nuts, eggs, and green tea. These foods are rich in essential nutrients like omega-3 fatty acids, antioxidants, vitamins, and minerals that support cognitive health.
2. How do fatty fish improve brain function?
Answer : Fatty fish like salmon and trout are rich in omega-3 fatty acids, which are essential for maintaining the structure of brain cells. These fats are linked to improved memory, reduced cognitive decline, and overall better brain function.
3. Can eating blueberries really enhance memory?
Answer : Yes, blueberries are high in antioxidants, particularly flavonoids, which improve memory by enhancing communication between brain cells and protecting them from oxidative stress.
4. What is the role of turmeric in brain health?
Answer : Turmeric contains curcumin, which has strong anti-inflammatory and antioxidant properties. Curcumin can boost memory, increase the production of brain-derived neurotrophic factor (BDNF), and protect the brain from aging and neurodegenerative diseases.
5. Why is broccoli good for the brain?
Answer : Broccoli is rich in vitamin K, which is essential for forming sphingolipids, a type of fat in brain cells. It also contains antioxidants that protect the brain from damage and improve cognitive function.
6. How do pumpkin seeds benefit brain function?
Answer : Pumpkin seeds are loaded with magnesium, zinc, iron, and copper, which are crucial for brain function. These nutrients improve memory, nerve signaling, and protect against cognitive decline.
7. Does dark chocolate really help with cognitive performance?
Answer : Yes, dark chocolate contains flavonoids, caffeine, and antioxidants that improve blood flow to the brain, enhance memory, focus, and mood, and protect the brain from oxidative damage.
8. How do oranges support brain health?
Answer : Oranges are rich in vitamin C, which helps protect the brain from oxidative stress and supports the production of neurotransmitters that are important for cognitive function and mood regulation.
9. Why are nuts recommended for brain health?
Answer : Nuts, especially walnuts and almonds, are rich in healthy fats, vitamin E, and antioxidants, which support cognitive function, improve memory, and protect against cognitive decline.
10. How does green tea affect brain function?
Answer : Green tea contains caffeine and L-theanine, which together improve alertness, focus, and relaxation. It also has antioxidants like catechins that protect the brain from oxidative stress and enhance memory.
Conclusion
Incorporating the right foods into your diet is a powerful way to support and enhance brain function. The best foods for brain health—such as fatty fish, blueberries, turmeric, broccoli, pumpkin seeds, dark chocolate, oranges, nuts, eggs, and green tea—are packed with essential nutrients that promote cognitive performance, protect against age-related decline, and support overall mental well-being. By regularly consuming these nutrient-dense foods, you can improve memory, enhance focus, boost mood, and maintain brain health throughout your life. Prioritizing these foods in your diet is a simple yet effective strategy for keeping your brain sharp and healthy.
“Motivation is what gets you started. Habit is what keeps you going.” – Jim Ryun
If you would like more information about the 2024, please send us an email.
Written by Fitness Goal 4U
Smart Fitness Goals - Achieve Health with Simple Steps
Smart fitness goals focus on being Specific, Measurable, Achievable, Relevant, and Time-bound. They help you create a clear path to success, stay motivated, and track progress. Whether its weight loss, strength building, or improved endurance, smart goals guide your fitness journey, ensuring steady growth and sustainable results tailored to your needs.