Contents Overview
- What Is the Incline Archer Push-Up?
- How to Do the Incline Archer Push-Up: Step-by-Step Guide
- Proper Form and Key Technique Tips
- Muscles Worked During This Chest Workout Exercise
- Top Archer Push Up Benefits You Can Expect
- Common Mistakes and How to Avoid Them
- Archer Push Up Progression and One Arm Push Up Progression Path
- Comparison of Advanced Push Up Variations
- How to Add the Incline Archer Push Up to Your Bodyweight Chest Workout
- Sample Calisthenics Chest Workout Routine
- Safety Tips and Who Should Try This Exercise
- Final Thoughts on Mastering the Incline Archer Push Up
- FAQs
What Is the Incline Archer Push-Up?
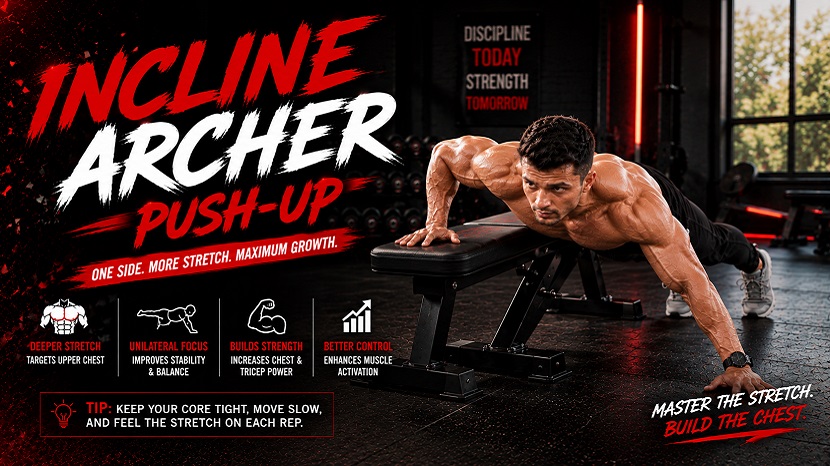
The incline archer push up is a smart bodyweight chest workout exercise that helps you build serious unilateral strength without any equipment. It is a regression of the classic archer push up, performed with your hands elevated on a bench, sturdy chair, or low wall. This angled position reduces the load on your upper body, making the movement more accessible while still delivering excellent results for the chest, shoulders, and core.
Think of it as a stepping stone. Many people want to master advanced push up variations and eventually reach a full one arm push up progression, but jumping straight to the floor version is often too difficult. The incline archer push up lets you practice the exact movement pattern with better control and less stress on the wrists and shoulders.
This exercise fits perfectly into any calisthenics chest workout or home training program. It teaches your body to handle uneven loads, which improves real-world strength and helps correct muscle imbalances that standard push-ups sometimes miss.
How to Do the Incline Archer Push-Up: Step-by-Step Guide
Learning how to do archer push ups correctly starts with the incline version. Follow these steps for safe and effective performance:
- Step 1: Place your hands on an elevated surface slightly wider than shoulder-width apart. Your fingers on the working side should point forward, while the extended arm’s fingers point slightly outward.
- Step 2: Walk your feet back until your body forms a straight line from head to heels. Engage your core and squeeze your glutes to stay rigid.
- Step 3: Shift your weight toward one side. Inhale as you bend the elbow of the loaded arm and lower your chest toward that hand. Keep the opposite arm straight and extended out to the side like an archer drawing a bow.
- Step 4: Exhale forcefully as you press through the working hand and return to the starting position. Bring the extended arm back in and reset.
- Step 5: Alternate sides with each repetition. Aim for controlled movement rather than speed.
Start with 3 sets of 5–8 repetitions per side. As you get stronger, increase to 8–12 reps per side while gradually lowering the height of the elevated surface.
Proper Form and Key Technique Tips
Good form turns the incline archer push up into a powerful tool instead of a risky movement. Keep these cues in mind every rep:
- Maintain a perfectly straight body line. Avoid sagging hips or piking at the waist.
- Keep your core braced tightly throughout the entire set. This prevents unwanted twisting and protects your lower back.
- The extended arm stays mostly straight and acts as a stabilizer, not a support that takes heavy load.
- Lower with control over 2–3 seconds. Explosive pressing on the way up builds power.
- Keep your elbows from flaring out too wide on the working arm to protect your shoulders.
- Breathe steadily: inhale on the way down, exhale on the way up.
Quality always beats quantity. If your form breaks down, stop the set or raise the incline to make it easier.
Muscles Worked During This Chest Workout Exercise
The incline archer push up is an outstanding chest workout exercise because it hits the pectoralis major hard on one side at a time. The primary muscles include the chest (especially the lower portion due to the incline angle), the front of the shoulders (anterior deltoids), and the triceps.
Secondary muscles that work hard include the serratus anterior, which helps with scapular stability, and the entire core, particularly the obliques and deep stabilizers that resist rotation. This unilateral demand makes the exercise more functional than regular push-ups.
Because one arm handles most of the load while the other provides balance, you also improve shoulder stability and overall pressing strength. Over time, this carries over to better performance in sports, daily activities, and more advanced calisthenics chest workout movements.
Top Archer Push Up Benefits You Can Expect
The archer push up benefits go far beyond just building a bigger chest. Here are the main advantages of adding the incline version to your training:
- Unilateral strength development – Each side works independently, helping fix strength imbalances between your left and right sides.
- Superior core stability – The anti-rotation demand forces your core to work harder than in bilateral push-ups.
- Progression toward advanced skills – It is one of the best exercises on the archer push up progression path that leads to a solid one arm push up progression.
- Joint-friendly chest training – The incline position reduces stress on the wrists and shoulders compared to floor variations, making it sustainable for long-term training.
- Improved functional pressing power – Real life often requires pushing with one arm more than both together. This exercise prepares your body for that reality.
- No equipment needed – Perfect for bodyweight chest workout sessions at home, in the park, or while traveling.
Many people notice better posture and reduced shoulder discomfort after consistently training unilateral movements like this.
Common Mistakes and How to Avoid Them
Even experienced trainees make errors with the incline archer push up. Watch out for these common issues:
- Rotating the hips or torso – This happens when the core is not braced. Fix it by squeezing your glutes and bracing your abs as if someone is about to punch your stomach.
- Letting the extended arm bend – The non-working arm should stay relatively straight to maintain the archer position and proper loading.
- Rushing the movement – Fast reps reduce time under tension and increase injury risk. Slow the lowering phase for better results.
- Shoulders shrugging toward the ears – Keep your shoulders down and back. Think about creating space between your shoulders and ears.
- Incomplete range of motion – Lower until your chest is close to the working hand. Partial reps limit chest development.
Film yourself from the side every few sessions. Visual feedback is one of the fastest ways to improve technique.
Archer Push Up Progression and One Arm Push Up Progression Path
The archer push up progression is logical and effective. Most people follow this path:
- Master regular incline or knee push-ups first.
- Move to the incline archer push up with a high surface.
- Gradually lower the surface until you can perform clean reps on the floor (flat archer push up).
- Add slow negatives (3–5 second lowering phase).
- Progress toward assisted or full one arm push up progression.
Once you can complete 3 sets of 8–10 clean reps per side on a low incline or flat surface, you are ready to explore more advanced push up variations such as typewriter push-ups or pseudo planche variations. Patience at each stage prevents injuries and builds lasting strength.
Comparison of Advanced Push Up Variations
| Variation | Difficulty | Primary Chest Emphasis | Core Demand | Best For |
|---|---|---|---|---|
| Standard Push-Up | Beginner-Intermediate | Overall chest | Moderate | Building base strength |
| Incline Push-Up | Beginner | Lower chest | Low | Learning form and warming up |
| Incline Archer Push Up | Intermediate | Lower to mid chest (unilateral) | High | Unilateral strength and progression |
| Floor Archer Push Up | Advanced | Mid to upper chest | Very High | Building toward one-arm push-up |
| One-Arm Push-Up | Very Advanced | Full chest (unilateral) | Extremely High | Maximum unilateral power |
How to Add the Incline Archer Push Up to Your Bodyweight Chest Workout
Place the incline archer push up early in your bodyweight chest workout when you are fresh. It pairs well with regular push-up variations and horizontal pulling movements (such as inverted rows or band pull-aparts) to keep your shoulders healthy.
A simple structure looks like this: 3–4 sets of the archer variation, followed by a bilateral pushing movement, then a core finisher. Rest 90–120 seconds between sets to maintain quality. Train this movement 2–3 times per week with at least one rest day between sessions.
Sample Calisthenics Chest Workout Routine
Here is a balanced calisthenics chest workout you can do at home:
- Warm-up: 5 minutes of arm circles, band dislocates, and light incline push-ups
- Incline Archer Push Up – 4 sets of 6–10 reps per side
- Regular Push-Ups – 3 sets of 10–15 reps
- Diamond Push-Ups – 3 sets of 8–12 reps
- Inverted Rows or Doorway Rows – 3 sets of 10–12 reps
- Plank Shoulder Taps – 3 sets of 20 total taps
- Cooldown stretch for chest, shoulders, and triceps
This routine hits all areas of the chest while building the stability needed for advanced push up variations.
Safety Tips and Who Should Try This Exercise
The incline archer push up is generally safe when performed with good form, but it is not ideal for complete beginners. You should be able to complete at least 10–15 clean regular push-ups before adding this variation.
People with existing shoulder, wrist, or elbow issues should consult a qualified coach or physical therapist first. Always warm up thoroughly and stop immediately if you feel sharp pain (muscle fatigue is normal; joint pain is not).
Progress slowly. Raising the incline or reducing reps is always better than forcing poor form.
Final Thoughts
The incline archer push up is one of the smartest additions you can make to any chest workout exercises program. It bridges the gap between basic push-ups and impressive advanced push up variations, all while delivering outstanding archer push up benefits for strength, stability, and muscle balance.
Whether your goal is a stronger chest, better posture, or eventually achieving a clean one arm push up progression, this exercise deserves a regular spot in your bodyweight chest workout and calisthenics chest workout routines.
Start today with a comfortable incline height, focus on perfect technique, and progress patiently. In a few weeks you will notice stronger, more stable shoulders and a chest that looks and performs better. Keep training consistently and enjoy the journey of mastering this powerful movement.
Frequently Asked Questions (FAQs)
1. What is an Incline Archer Push-Up?
Answer: An incline archer push-up is a challenging bodyweight chest workout exercise performed on an elevated surface. It combines the reduced load of an incline push-up with the unilateral demand of a classic archer push-up. By extending one arm out to the side, you shift most of your body weight onto the working arm and chest, creating a deep stretch and strong contraction in the pectoral muscles while improving stability and balance.
2. How Do You Perform an Incline Archer Push-Up Correctly Step by Step?
Answer: Begin in a high plank position with both hands placed on a sturdy elevated surface (such as a workout bench) slightly wider than shoulder-width apart. Step 1: Extend one arm straight out to the side while keeping it in contact with the surface for balance. Step 2: Lower your chest toward the working hand by bending only the loaded elbow, maintaining a straight line from head to heels and keeping your core braced. Step 3: Push back up to the starting position using primarily the strength of the working arm and chest. Step 4: Complete all repetitions on one side before switching arms. Move with control and avoid twisting or sagging at the hips.
3. What Muscles Does the Incline Archer Push-Up Work?
Answer: The incline archer push-up primarily targets the pectoralis major on the working side of the chest due to the increased stretch and unilateral load. It also strongly engages the anterior deltoids (front shoulders), triceps, and serratus anterior. The core muscles, including the rectus abdominis and obliques, work intensely to stabilize the body and prevent rotation, making this an effective compound movement for overall upper-body strength and chest development.
4. Is the Incline Archer Push-Up Suitable for Beginners?
Answer: Yes, the incline version is suitable for beginners who have already mastered basic incline or knee push-ups. Elevating the hands reduces the percentage of body weight lifted, allowing you to focus on proper form, shoulder stability, and core control. Beginners should start with a higher incline, perform fewer repetitions per side (3–5), and gradually progress as strength and confidence improve.
5. What Are the Benefits of the Incline Archer Push-Up for Chest Workouts?
Answer: Incline archer push-ups deliver excellent chest development through greater time under tension and an intense stretch on the pectoral muscles. They help correct left-to-right strength imbalances, improve shoulder stability and mobility, and build functional core strength. This chest workout exercise also serves as an effective bridge toward advanced calisthenics skills such as one-arm push-ups while enhancing overall pushing power for sports and daily activities.
6. What Are the Most Common Mistakes to Avoid in Incline Archer Push-Ups?
Answer: Common mistakes include letting the hips sag or rotate, failing to fully extend the non-working arm, using momentum instead of controlled strength, flaring the elbows too wide, and holding your breath. These errors reduce effectiveness and increase the risk of shoulder or lower-back strain. Always maintain a rigid plank position, move slowly through a full range of motion, keep the extended arm active, and breathe steadily—in through the nose on the way down and out through the mouth on the push.
7. How Can You Modify Incline Archer Push-Ups If You Are a Beginner?
Answer: Beginners can make the exercise easier by using a higher incline surface such as a countertop or tall bench. Other effective modifications include performing the movement on your knees, reducing the depth of the push-up, or keeping a slight bend in the extended arm initially. Focus on mastering perfect form with fewer repetitions before gradually lowering the incline height and increasing range of motion as your strength improves.
8. What Advanced Variations Can You Progress to From Incline Archer Push-Ups?
Answer: Once you can perform incline archer push-ups with good form, progress by gradually lowering the height of the surface until you reach the floor. Further advancements include adding a 2–3 second pause at the bottom position, slowing the eccentric (lowering) phase to 4–5 seconds, or elevating the feet to create a decline archer push-up. The ultimate progression is moving toward assisted or full one-arm push-up variations for exceptional unilateral strength and muscle control.
9. How Many Sets and Reps Should You Do for Incline Archer Push-Ups?
Answer: Most people benefit from 3 sets of 5 to 10 controlled repetitions per side. More advanced trainees can perform 4 sets of 8 to 12 reps per arm. Rest 60 to 120 seconds between sets to maintain quality. Because this is a demanding unilateral chest workout exercise, always prioritize perfect form over higher volume. Increase repetitions or lower the incline height over time as you become stronger.
10. What Safety Precautions Should You Take When Performing Incline Archer Push-Ups?
Answer: Always warm up your shoulders, chest, wrists, and core thoroughly before starting. Use a completely stable, non-slip elevated surface. Keep your shoulders packed down and away from your ears to protect the joints, and stop immediately if you feel sharp pain (mild muscle fatigue is normal). Individuals with existing shoulder, wrist, or elbow issues should consult a qualified trainer or physician before attempting this exercise. Prioritize long-term joint health and controlled movement at all times.